This package creates a management system to run the ASTEC algorithms for developmental biology live imaging.

Project description
This library has been created to automatize and help users to segment using ASTEC software.
On top of the ASTEC integration the tool include multiple additional features :
- Data enhancement (contour computation, smoothing, ...)
- Data Management (integration of OMERO data manager, automatic compression, automatic generation of metadata , generation of embryo identification card)
- Analyse the data generated through ASTEC pipeline (using different graphs)
- Integrated generation of properties (ASTEC properties , naming )
Table of contents
- This library has been created to automatize and help users to segment using ASTEC software.
- Table of contents
- Install
- Template files link
- Update
- Data Manager Integration
- Download any datasets from OMERO to your machine
- Upload any dataset from your machine to OMERO
- Import raw data
- Fusion
- Test default parameters and embryo rotation
- Initial movement compensation
- Verification the last iteration of movement compensation
- If the verification folder has not been generated in the "analysis" folder, you can find the png image and the movies in the Drift folder :
- Rounds of movement compensation
- Movement compensation inter angle
- Final fusion
- Fusion verification
- Computation of semantic data (optional) * Run in a terminal , line by line the following :
- Prepare the segmentation machine
- Downloading data from OMERO to the segmentation machine
- Generation of membranes intensity image from semantic
- First time point segmentation
- Apply intraregistration and properties from OMERO (optional)
Install
The first step to use this tool will be to install the Conda package manager. You can find a guide to install conda here
Now that conda is installed, open a new terminal, and type the following lines :
conda create -n AstecManager -c conda-forge python=3.10 zeroc-ice omero-py
conda activate AstecManager
conda install -c mosaic treex
pip install AstecManager
Those lines will install the creation a conda environment to use the package , and install the package and its dependencies into the environment. It includes the installation of the necessary Python version.
To be able to run the different algorithms of ASTEC pipeline, you will need to install ASTEC package and its dependencies. To do so , please follow this link.
On top of that, in order to automatically name a new embryo during the pipeline , you will need to install ASCIDIAN package , and its dependencies. To do so , please follow this link.
Template files link
The tool uses parameters files to run each of the different steps. Those files are available as templates following this link.
Please download the corresponding file for the step you are planning to run , and edit it to your needs.
Parameters file link by step :
- Import raw datas from microscope computer
- Perform fusion parameters test
- Perform downscaled fusion test
- Perform initial rotation compensation
- Perform new round of rotation compensation
- Perform inter-angle rotation
- Perform the final fusion
- Download fusions and semantics from OMERO
- After generating semantic images, compute membranes images
- Segmentation of the first time point
- Downscaling for the segmentation tests
- Segmentation test runs
- Final segmentation run
- If you need to apply intraregistration to a dataset from OMERO
Additional data generation files :
- Automatic naming
- Embryo Properties Generation
- Lineage distance properties generation
- If needed, compute intraregistration
- If needed , generate INTRAREG movie from fusion images
OMERO communication (download, upload) parameters files :
- Link to OMERO authentication file template
- Link to download a specific OMERO dataset
- Link to download a complete OMERO project(embryo)
- Link to upload a specific image folder to OMERO dataset
- Link to upload a complete embryo folder to OMERO project
Update
Often, the tool will be updated to add features, and debug the existing ones.
- To update the tool, you can simply start a terminal and run :
conda activate AstecManager
pip install AstecManager --upgrade
Data Manager Integration
To store the data for further work and archives , the team uses a data manager called OMERO. In the following pipeline, you will be able to upload or download the different data produced to OMERO , automatically or manually.
In order to upload or download, you first need to download the template file your computer, somewhere no one can access and that you should not share. The template for the configuration file can be found here
The file should contain the following lines :
host=adress.to.omero.instance
port=omero.port (usually 4064)
group=your team group
secure=True
java_arg=java
login=your omero login
password=your omero password
Save this file and store its path, so you can access it when needed.
Download any datasets from OMERO to your machine
AstecManager includes a tool made to download a complete dataset (green folder) from OMERO to your machine
Download the parameter file for download here and save it to the embryo folder where you want to download the dataset.
When downloaded, edit it :
parameters["omero_authentication_file"] = "None" # path to OMERO authentication file.
parameters["project_name"] = "" # Name of the project on OMERO
parameters["dataset_name"] = "" # Name of the dataset on OMERO
parameters["destination_folder"] = "" # Folder where to save images on the disk
If you want to download only a specific time point range, please uncomment and edit the following lines. The Default behavior is downloading the whole dataset:
#parameters["min_time"] = -1 # Change this to a specific time if you don't want to start download at first time point, don't change if you want to upload the  whole dataset
#parameters["max_time"] = -1 # Change this to a specific time if you don't want to stop download at last time point,  don't change if you want to upload the  whole dataset
When edited, open a terminal in the embryo folder:
conda activate AstecManager
python3 download_dataset_from_omero.py
Upload any dataset from your machine to OMERO
AstecManager includes a tool made to upload a folder from your disk to a complete dataset (green folder) on OMERO
Download the parameter file for upload here and save it to your disk.
When downloaded, edit it :
parameters["omero_authentication_file"] = "None" # path to OMERO authentication file.
parameters["project_name"] = "" # Name of the project on OMERO
parameters["dataset_name"] = "" # Name of the dataset on OMERO
parameters["input_folder"] = "" # Folder containing the images to upload to OMERO on the disk
If you want to download only a specific time point range, please uncomment and edit the following lines. The Default behavior is downloading the whole dataset:
#parameters["min_time"] = -1 # Change this to a specific time if you don't want to start upload at first time point, don't change if you want to upload the  whole dataset
#parameters["max_time"] = -1 # Change this to a specific time if you don't want to stop upload at last time point,  don't change if you want to upload the whole dataset
When edited, open a terminal in the embryo folder:
conda activate AstecManager
python3 upload_dataset_to_omero.py
Import raw data
After starting the acquisition of the embryo in the microscope , it is advised to setup the automatic transfert of the generated Raw Images to the processing computer. For this , create a folder in the experiment folder of the processing computer, and name it with the name of the embryo.
Download the parameters file for import here and save it to the embryo folder you created.
Edit it :
parameters["embryo_name"]="EMBRYO_NAME" # Name of the embryo after import
parameters["user"]="" # initials of user performing the import
parameters["distant_folder"]="path/to/rawdata/on/microscope/computer/embryo_folder" # Folder containing raw data stacks folders in microscope computer
parameters["copy_on_distant_storage"] = True # if set to true, copy the imported raw data to distant storage
parameters["distant_storage_folder"] = "/path/to/storage/rawdeep/"
parameters["distant_storage_address"] = "user@machine.address.fr"
parameters["delay_before_copy"]=0 #Delay in minutes before starting the copy. This allows to start the script with acquisition , and make sure copy will start after it's finished
parameters["compress_on_distant_storage"] = True
This step is able to copy the raw data to another distant storage folder, after importing it. The copy_on_distant_storage parameter should be set to True. Make sure to bind the following parameters :
distant_storage_folder folder where the embryo folder will be stored , on the distant computer distant_storage_address user and address of the distant machine, example : "user@machine.address.fr"
The data copied to distant storage can be compressed after uploading. To compress , make sure that compress_on_distant_storage parameter is set to True.
The delay_before_copy parameter is very important ! after starting the acquisition , start the file with the delay corresponding to your acquisition time (in minutes) , and the copy should be done automatically after the acquisition , and prevent loosing time with copy
To start the import, open a terminal in the embryo folder and run the following lines
conda activate AstecManager
python3 import_raw_datas.py
Fusion
The most crucial part of this process is combining the images, and it needs to be done quickly. You should begin this step right after copying the large Raw Images, and try to finish it as soon as you can.
These Raw Images are very large, roughly 3 gigabytes each. This means that if you're working with one time point, it will use up about 12 gigabytes of computer memory. Think about it this way: if you're dealing with an embryo at 300 different time points, and you have multiple channels of images, your Raw Images folder could take up as much as 2 to 3 terabytes of space on your computer's hard drive.
Additionally, the Raw Images often have a significant amount of background information, which takes up a lot of memory. This background includes unnecessary data.
The fusion step is designed to address the problems we've just talked about:
-
It keeps the most valuable information from each camera angle to create an isotropic image. An isotropic image means that it has the same characteristics, like intensity, across all regions.
-
It reduces the memory needed for a single time point from around 12 gigabytes to a more manageable 500 megabytes.
-
It also trims the image around the embryo, cutting out the excessive background and keeping only the essential information.
For more details about this step , please follow this link
It's advised to split fusion in 3 steps
-
A test step where you will test the usual working parameters in a lower resolution to compute faster, and verify if the embryo didn't rotate during the acquisition. o
- If the embryo rotated in the microscope, please follow the guide for "Drift Compensation" below
-
A production step where you will apply the best parameters to the complete dataset.
-
Your folder hierarchy should look like this, before starting the fusion
     embryo name
         └───RAWDATA
             │───stack_0_channel_0_obj_left
             │───stack_0_channel_0_obj_right
             │───stack_1_channel_0_obj_left
             │───stack_1_channel_0_obj_right
             └───... (more if you have another channel)
Test default parameters and embryo rotation
The first step of is to start a test fusion in a lower resolution in order to verify :
- that the defaults parameters are correct for this embryo images
- that the embryo didn't move during the acquisition. If so, you will have to perform a drift compensation.
As the embryo rotation may happen at any time points, this test HAS to be on the complete embryo development.
Start by downloading the parameter file that can be found here , and save it to the embryo folder.
Start by editing it :
parameters["embryo_name"] = '<name>' : replace <name> with the name of your embryo folder
parameters["begin"]=0 : for fusion, should be set to the first time point of the sequence
parameters["end"]=100 : for fusion, should be set to the last time point of the sequence
parameters["user"] = '<UI>' : for every step , will be used to store an history of the data,<UI>  should be replaced by experimentator name and surname first letters
parameters["number_of_channels"] = 1 : change this to the number of channel in the raw images acquisition. The same fusion will be applied to all channels
Finally , you will find the following lines :
parameters["fusion_strategy"]= 'hierarchical-fusion'
parameters["acquisition_orientation"]= 'right'
If it's the first time you start this step , please do not change them. If you already have tried this step and needs to change parameters , you can change them here. PLEASE DELETE THE PREVIOUS FUSION in the following folder : FUSE/FUSE_01_downscaled
And finally, if you added other parameters to the test file (for example weighing method modification) , uncomment and modify the following lines :
#parameters["fusion_weighting"] = "ramp" # Uncomment this line to change the weighting applied when creating the fusion from each angle (other values : 'guignard', 'uniform' , 'corner')
#parameters["raw_crop"] = True  # Uncomment this line and set it to False to prevent Raw image cropping
#parameters["fusion_crop"] = True  # Uncomment this line and set it to False to prevent Fusion image cropping
When all of this is ready, you can start the final fusion. Open a terminal in the embryo folder and run the following lines
conda activate AstecManager
python3 run_downscaled_fusion.py
This code will generate a downscaled fusion folder, that you don't need to look. You can load the movie image found in the INTRAREG/INTRAREG_01_TEST/MOVIES/FUSE/FUSE_01_downscaled
The final folder architecture after fusion will be this one :
experiment folder
└───embryo specie
    │──embryo name
    │   │───analysis
    │   │    └─── fusion
    │   │          └─── fusion_movie.mp4
    │   │───INTRAREG
    │   │    └─── INTRAREG_01_TEST
    │   │          └─── MOVIES
    │   │               └─── FUSE
    │   │                   └─── FUSE_01_downscaled
    │   │                       └─── embryo_name_intrareg_fuse_tbegin-tend_xy0XXX.mha
    │   │───RAWDATA
    │   │    └─── ...
    │   └───FUSE
    │       └─── FUSE_01_downscaled
    │          │─── embryo_name_fuse_t000.nii
    │          │─── embryo_name_fuse_t001.nii
    │          └─── ...
Please load this movie file into a software like Fiji, and looking at every frame, you are able to see if a specific frame (that is corresponding to a time point), seems to have moved compared to the previous one.
If you detect some movements in the embryo development, please read and go through the "Initial movement compensation", "Rounds of movement compensation" section below.
If you detect errors in the fusion that does not seem to come from movement of the embryo , refer to "Other parameters to try" section below.
If everything is correct, please skip to "Final fusion" section
Other parameters to try
If the default set of parameters is not enough to find the correct fusion parameters, you can try to change.
To do this, modify your "run_downscaled_fusion.py" file :
Change the most important parameters :
parameters["fusion_strategy"]= 'hierarchical-fusion' # Value of fusion image combination parameter, could be changed to "direct-fusion" if needed
parameters["acquisition_orientation"]= 'right' # Value of the rotation of the microscope between angles , left means +90 , right -90
and uncomment one or multiple of those lines, and modify the value if needed:
#parameters["fusion_weighting"] = "ramp" # Uncomment this line to change the weighting applied when creating the fusion from each angle (other values : 'guignard', 'uniform' , 'corner')
#parameters["raw_crop"] = True  # Uncomment this line and set it to False to prevent Raw image cropping
#parameters["fusion_crop"] = True  # Uncomment this line and set it to False to prevent Fusion image cropping
To find details on ASTEC fusion parameters , please follow this link
If you already have tried the first downscaled fusion step and changed parameters PLEASE DELETE THE PREVIOUS FUSION in the following folder : FUSE/FUSE_01_downscaled
You can finally start the downscaled fusion again :
conda activate AstecManager
python3 run_downscaled_fusion.py
Initial movement compensation
If you read this section, it means that you have seen movement in the embryo development.
Make sure to fully go through this section, before going through the next one. The "rounds of movement compensation" will not work without computing the "initial movement compensation"
The compensation of movement is done in 2 steps, but thanks to AstecManager, everything is processed automatically
- The first step is the independent fusion of each angle
- The second step is trying to find the rotation matrix between each successive time point.
If you want details on how it work, please read ASTEC documentation on this step here
To start this step automatically, download the initial drift file from here
To edit the file, you need to set the embryo name, the begin and end time points :
parameters["embryo_name"] = "EN"
parameters["begin"] = 0
parameters["end"] = 100
You can start the code by opening a terminal and running :
conda activate AstecManager
python3 run_initial_drift.py
The final folder architecture after fusion will be this one :
experiment folder
└───embryo specie
    │──embryo name
    │   │───analysis
    │   │    └─── ...
    │   │───INTRAREG
    │   │    └─── ...
    │   │───RAWDATA
    │   │    └─── ...
    │   │───FUSE
    │   │   └─── ...
    │   │
    │   └─── DRIFT
    │       └─── DRIFT_stack0
    │              │─── CORRECTED0-CO-REGISTERED/
    │              │─── CORRECTED0-CO-SCORE/
    │              │─── CORRECTED0-CO-TRSFS/
    │              │─── ITER0-CO-REGISTERED/
    │              │─── ITER0-CO-SCORE/
    │              │─── ITER0-CO-TRSFS/
    │              │─── ITER0-FUSE/
    │              │─── ITER0-MOVIES_tbegin-end/
    │              │─── ITER0-TRSFS_tbegin-end/
    .              └....
Verification the last iteration of movement compensation
After running the initial drift (or another round of movement compensation), you will need to verify if the movements of the embryos are compensated in the image.
You can find multiple files to help you analyze the iteration of movement compensation.
Those files can be found in the "analysis" folder in the embryo folder. In this folder, you will find a "drift" folder, a subfolder for each angle, and inside, all the iterations that have been analyzed.
This drift folder contains :
- a png file
- a folder named "movies", with multiple .mha images inside
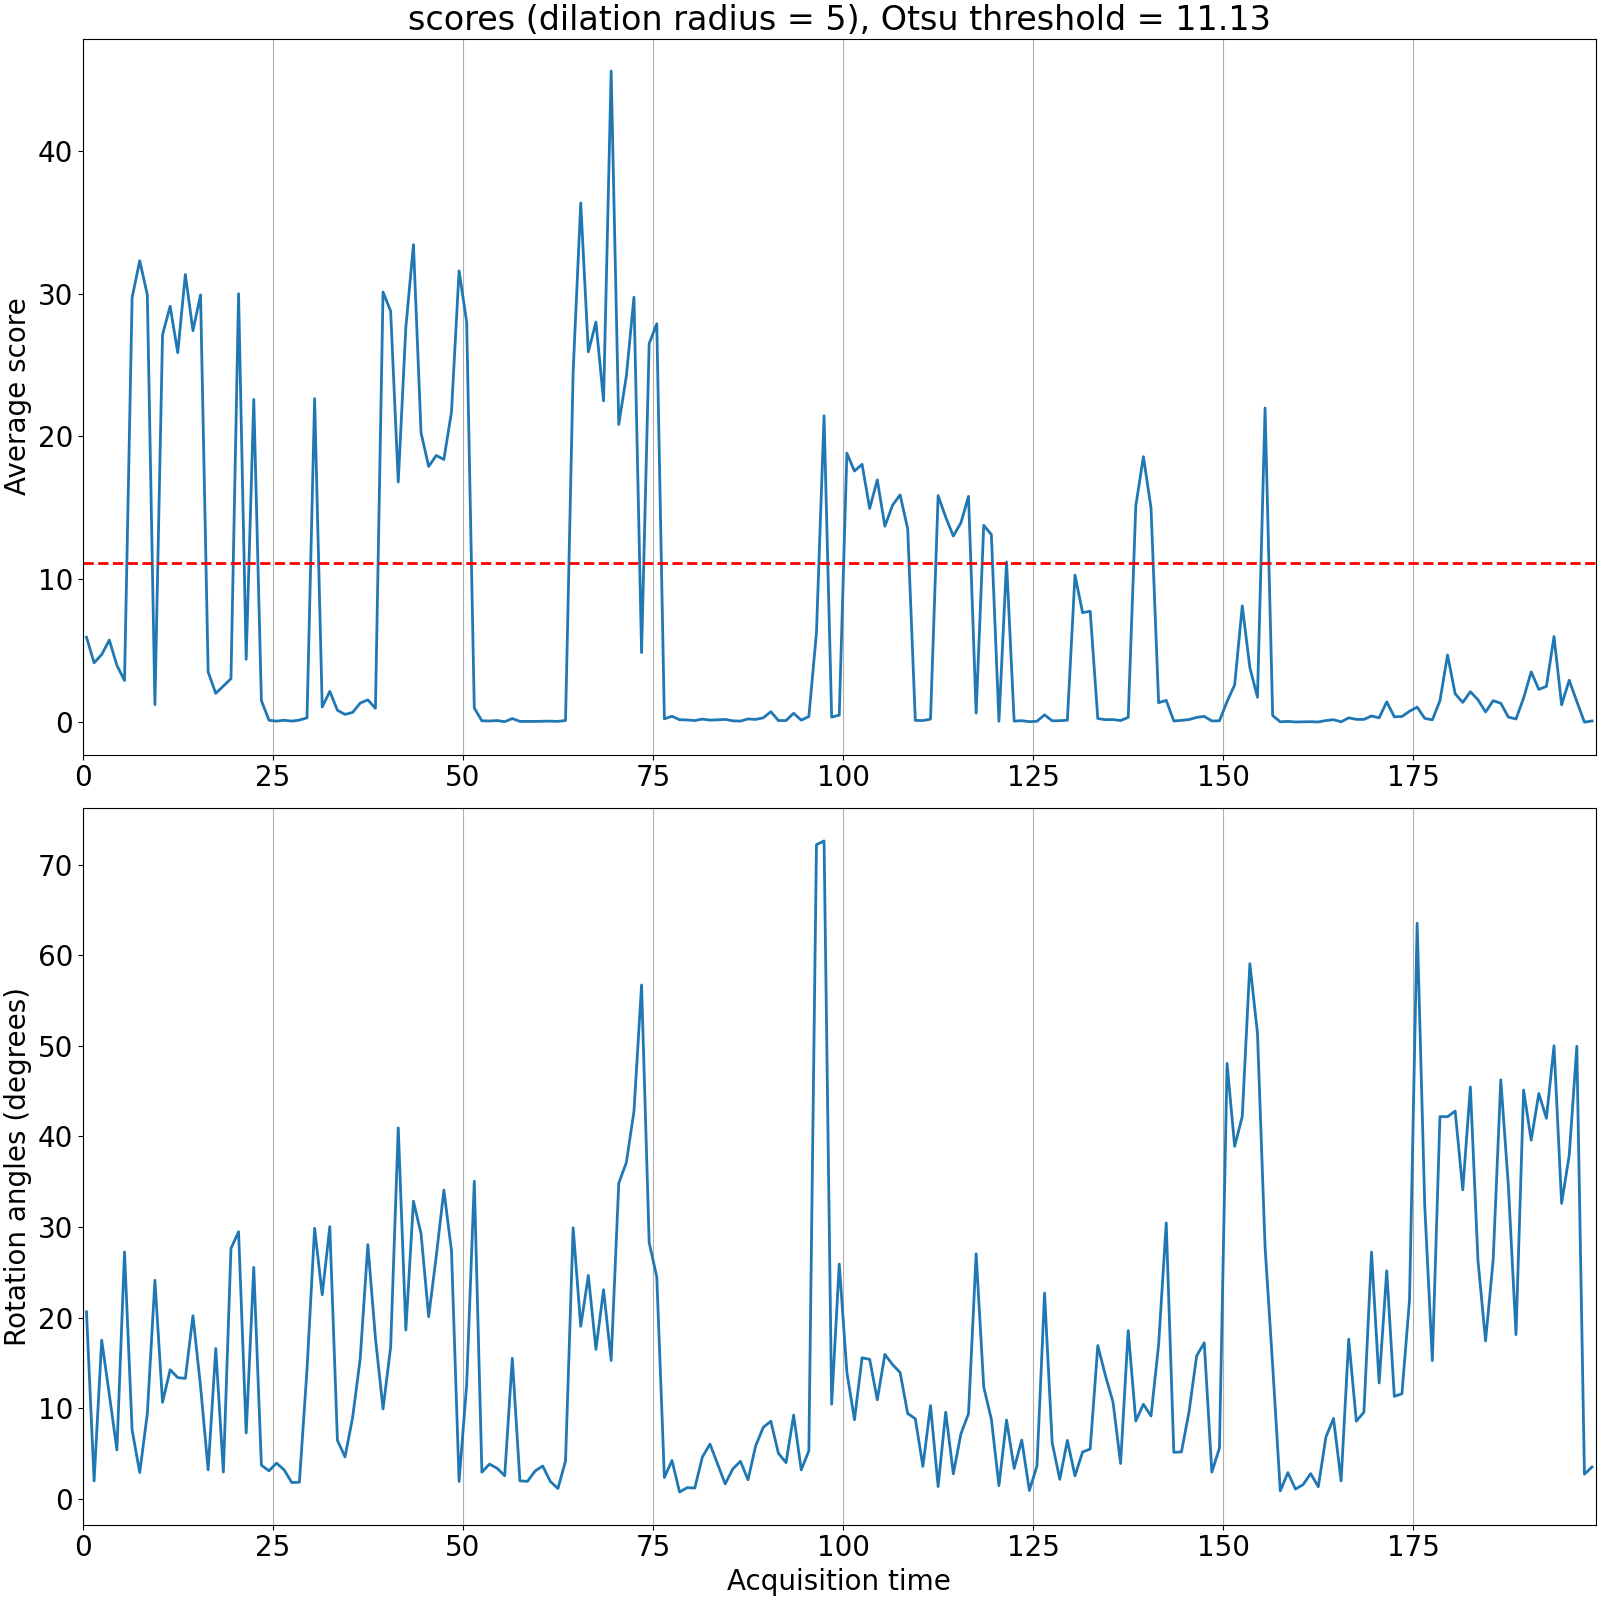
From the png image, you can consider that time points above the score may have embryo movement to compensate
To verify this, you can load in a tool like FiJi the movie images that can be found in the "movies" folder
Those movie images represents the extraction of a slice of the fusion images through time.With this, you can see if the embryo moved between two time points.
Looking at the slice, please note which time points needs to be fixed, like this.
Let's imagine that you see a difference going from slice 100 to 101 , you will have to note that the time point to fix is 99. This may look counter intuitive, but it's because FiJi slices starts at one, and the embryo images start at 0.
When you noted all time points that still need a fix, please apply a next round of movement compensation like explained below. If no time points need fix, you can skip to the final fusion.
If the verification folder has not been generated in the "analysis" folder, you can find the png image and the movies in the Drift folder :
For the following example, we consider that we are currently at iteration X of the drift compensation (you can ignore all previous interation before X )
- ITERX-CO-SCORE : contains multiple python files with the compensation scores
- ITERX-MOVIES_tbegin-end : contains an image that is a 2D plane of the development through time
experiment folder
└───embryo specie
    │──embryo name
    │   │───analysis
    │   │    └─── ...
    │   │───INTRAREG
    │   │    └─── ...
    │   │───RAWDATA
    │   │    └─── ...
    │   │───FUSE
    │   │   └─── ...
    │   │
    │   └─── DRIFT
    │       └─── DRIFT_stack0
    │              │─── ITERX-CO-REGISTERED/
    │              │─── ITERX-CO-SCORE/  <--- give us the score of the computed rotations
    │              │─── ITERX-CO-TRSFS/
    │              │─── ITERX-FUSE/
    │              │─── ITERX-MOVIES_tbegin-end/ <--- give us a 2D plane of the development through time
    │              │─── ITERX-TRSFS_tbegin-end/
    .              └....
To be able to visualize the score, you can open a terminal in the ITERX-CO-SCORE and run :
conda activate astec
python3 figure_iterX_coregistration_analyze.py
This will generate an image where you will be able to see the score, the rotation degree , and the threshold used .
Rounds of movement compensation
If after analyzing the rotation compensation computed at the initial drift, you see that some time points stil need to be compensed, you will need to compute another iteration of the drift.
To start another iteration, please download the parameter file here
Please save this file into the embryo folder, and edit it :
Please set the embryo name , begin and end time points of your embryo.
The file is here to process a new iteration on a single angle, if you want to add iteration on the 2 angles, you will need two copies of the file , one having the "stack" parameter to 0 , the other one set to 1
parameters["embryo_name"] = "EN"
parameters["begin"] = 0
parameters["end"] = 100
parameters["stack"] = 0 #  on which angle to run the code, please put 0 for first angle, 1  for second angle
The following parameters are here to refine the search of new rotations for the embryo. Here is a short explanation
- corrections_to_be_done : list of time points to compensate. If the embryo rotation is wrong from time 3 to 4 , please add 3 to the list
- score_threshold : this parameter defines the stopping score in the search of rotation. Decreasing the score will help finding the correct rotation
- rotation_sphere_radius : this is the radius in the sphere of rotation, the higher the number, more rotations are tested
If you want more explanation on the parameters , please go to ASTEC documentation here
#Example of parameters to refine drift (at least one should be used) :
parameters["corrections_to_be_done"] = [0,1] # Change 0,1 by the list of time points to refine
#parameters["score_threshold"] = 5 Target score for new drift round, change 5 by the desired score
#parameters["rotation_sphere_radius"] = 4.9 Radius in the sphere of rotation, the higher the number, more rotations are tested
The following parameters are optional. Please update them only if needed.
# Optional parameters :
#parameters["resolution"] = 0.6 #uncomment and use this only if you changed resolution
#parameters["template_threshold"] = 140 # Uncomment and use it to change threshold for movie generation, does not affect drift, only movie
#parameters["EXP_FUSE"] = "stack0" # uncomment this if you changed fuse name (defaults are either stack0 or stack1)
#parameters["EXP_DRIFT"] = "stack0" # uncomment this if you changed drift name (defaults are either stack0 or stack1)
Finally , you can start the iteration again :
conda activate AstecManager
python3 run_next_drift_round.py
When the code finished the iteration, please follow the instructions here to verify the quality of the drift iterations.
Movement compensation inter angle
The movement or rotation of the embryo can happen between the imaging of 2 time points , but can happen during the rotation of the microscope during the imaging of the 2 angles of a same time point
This step is here to compensate for this issue.
It should be done IF you need to compensate the embryo rotation, and AFTER having compensated the rotation of each angle through time :
- 1/ run_initial_drift.py
- then 2/ run_next_drift_round.py if needed
Before running this step. Please load the following fusion images in software like Fiji :
- 1 : First time point of angle 0 fusion computed during run_initial_drift
- 2 : First time point of angle 1 fusion computed during run_initial_drift
then, compare the 2 images. If they can be superimposed (roughly), you DON'T need to run this. If not, please download the following parameters here.
When downloaded, please move it inside the embryo folder, and edit it :
Please fill the following parameters
parameters["embryo_name"] = "name"
parameters["begin"] = 0 # first time point of the embryo development
parameters["end"] = 1 # last time point of the embryo development
This score is used to stop the drift between the 2 angles. It should be set to the score in the initial drift (iteration 1), of angle 0
parameters["score_threshold"] = 5
The following parameters should not be uncommented and changed, unless if you changed the names or folders of the drift process fusions and drifts.
This parameter specifies which FUSE_EXP were generated during the initial_drift step. CAUTION ! The fusion second angle (stack1 by default) should be BEFORE the fusion first angle (stack0 by default)
#parameters["EXP_FUSE"] = ['stack1', 'stack0'] # Do not change if you used default initial_drift step parameters
Please put in this parameter the EXP DRIFT folder used for angle 2 This will specify in which drift folder to store the matrix of compensation inter angle
#parameters["second_angle_drift_exp"] = ['stack1'] # this is used to store matric of inter angle compensation
When done and saved, you can start the interangle compensation :
conda activate AstecManager
python3 run_inter_angle_drift.py
When the code is finished, and if it ran successfully, a new image should have been generated in the following folder: "analysis/drift/costack/"
This folder should contain an image with the .mha extension. This image corresponds to the registration of the time point 0 of both angles, after the inter-angle compensation.
Load this image in software like Fiji, and if the image fusion seems correct, it means that the inter-angle drift worked.
If the image isn't in the analysis folder, it can be found in the following folder
embryo_folder/DRIFT/DRIFT_{EXP_DRIFT}/CO-STACK/ (by default : embryo_folder/DRIFT/DRIFT_stack1/CO-STACK/)
Final fusion
Now that you have finished the fusion test step and that you ran the embryo rotation if needed, you can start the final fusion by downloading the parameter file here :
The parameter file can be found here
Save it to the embryo folder, in the same location where you saved the test file , and start by editing it :
parameters["embryo_name"] = '<name>' : replace <name> with the name of your embryo folder
parameters["begin"]=0 : for fusion, should be set to the first time point of the sequence
parameters["end"]=100 : for fusion, should be set to the last time point of the sequence
parameters["user"] = '<UI>' : for every step , will be used to store an history of the data,<UI>  should be replaced by experimentator name and surname first letters
parameters["number_of_channels"] = 1 : change this to the number of channel in the raw images acquisition. The same fusion will be applied to all channels
parameters["omero_config_file"]= '/path/to/the/omero/config/file' : if you want to upload the result images of the fusion, you can enter the path to your omero configuration file. If you didn't create the omero
file , please read the "Data Manager Integration" section of this documentation. After fusion, a new dataset will be created in the embryo project on OMERO (created if it doesn't exist) , and will contain all of the fusion images
Finally , you will need to modify the following lines to match the parameters that worked during the downscaled fusion step :
parameters["fusion_strategy"]= 'hierarchical-fusion'
parameters["acquisition_orientation"]= 'right'
And finally , if you added other parameters to the test file (for example weighing method modification) , please provide the corresponding lines in the final fusion file too.
If you had to compensate the rotation of the embryo , we will have to add parameters so ASTEC can use this rotation compensation for the fusion step
In order to do so , please uncomment (by removing the '#') the following line from the final fusion parameter file :
#parameters["EXP_DRIFT"] = ['stack0', 'stack1']
and make sure the value of drift folders are the same in this line, than the same in the DRIFT folder of the embryo.
When all of this is ready , you can start the final fusion. Open a terminal in the embryo folder and run the following lines
conda activate AstecManager
python3 run_final_fusion.py
The final folder architecture after fusion will be this one :
experiment folder
└───embryo specie
    │──embryo name
    │   │───analysis
    │   │    └─── fusion
    │   │          └─── fusion_movie.mp4
    │   │───INTRAREG
    │   │    └─── INTRAREG_01_TEST
    │   │          └─── MOVIES
    │   │               └─── FUSE
    │   │                   └─── FUSE_01
    │   │                       └─── embryo_name_intrareg_fuse_tbegin-tend_xy0XXX.mha
    │   │───RAWDATA
    │   │    └─── ...
    │   └───FUSE
    │       └─── FUSE_01
    │          │─── embryo_name_fuse_t000.nii
    │          │─── embryo_name_fuse_t001.nii
    │          └─── ...
Fusion verification
To verify the final fusion , you can use the movie generated by the code. This movie presents the same slice of the fusion images through time. By looking at the movie , the user can make sure that all the time points were fused correctly.
You can find the movie in the following folder : "embryo_name/analysis/fusion/fusion_movie.mp4"
If, after the final fusion , the fusion_movie.mp4 file has not been generated , you can find this movie as an image in the following folder : "embryo_name/INTRAREG/INTRAREG_01_TEST/MOVIES/FUSE/FUSE_01/" .
After opening the image in Fiji , you will see that it is a slice of the fusion image , where the Z axis (the slider at the bottom of image) correspond to this slide through time. To validate the fusion through time , make sure that the image orientation , and the fusion registration remains coherent, even if the embryo is slightly different, or may have moved between the 2 times.
Computation of semantic data (optional)
The following section is a documentation about the generation of additional images for the segmentation process.
Using a deep learning tool trained by the MorphoNet team, we are able to differentiate 5 classes in the embryo geometry :
- Background
- Cytoplasm
- Cell to cell membrane contact (line)
- 3 cells membrane contacts (point)
- 3+ cells membrane contacts
From this output image it is possible to generate 2 differents segmentations , that will be computed faster than using the normal ASTEC process.
-
1 will be generated using a watershed and seed segmentation , without time propagation. The computation is really fast but the result will be average
-
2 will be generated using the propagation power of ASTEC , using the membranes extracted from semantic image. A DEVELOPMENT SHOULD BE DONE TO EXTRACT PROPAGATION FROM ASTEC AND USE IT IN A MORE EFFICIENT WAY
-
In the team , we use a computer called loki. To get access to Loki using ssh , first ask the team.
To start the computation , you first need to get the identifier of your dataset on omero. For this goes to omero , find your project and the dataset (green folder) , and look at the properties on the right. You will find a line called "Dataset id : ". Copy the number on the right
Run in a terminal , line by line the following :
ssh -i /your/user/folder/.ssh/id_deep_loki 'deep@loki.crbm.cnrs.fr'
If you can't access the loki machine, it means you have to get the public key of the account.
The computation of semantic membranes is done inside something called a screen. It's the space you can start commands inside, and that is kept even if you logout of the machine.
To start the deep learning tool after logging into the machine , you have to execute screen -dr to enter the screen.
If no screen exist , you can start one with screen
After opening the screen using Ctrl + a + " you will list all active screen windows use arrows to go the "Semantic Computation" window press "Enter" to enter the window If no code is currently running, you can start using :
conda activate morphodeep
cd /data/MorphoDeep/morphodeep/morphodeep/Process/
python3 Compute_Semantic_From_Omero.py -d id_dataset_omero
To logout from the screen while keeping the code running use : Ctrl + a + d
After the computation , you will find a new dataset inside the omero project , called JUNC_name_of_fusion_dataset
There is no troubleshooting for this section , if you have a problem , you need to find a team member.
Prepare the segmentation machine
First of all, on the machine that will process the segmentation, install the following tools if it's not done :
- AstecManager
- astec
- ascidian
Installation for those can be followed in the installation section
When all the tools are installed, create a folder that will contain the data for the embryo you are working on.
IMPORTANT 1 : all the steps explained below will happen from the embryo folder.
IMPORTANT 2 : for astec to work , the folder that will contain the data HAVE to be named like the embryo
You can now proceed to download the fusion images on this machine :
Downloading data from OMERO to the segmentation machine
Option 1 : if you generated semantic images
When the semantic is done , and all the images are available on the data manager, you will have to download them on the computer that will compute the next steps.
To be able to continue the process,the images series to be downloaded are :
- the fused image of the channel to be segmented
- the semantic images generated from this channel
In order to do so , please download the following parameters file : here, in the embryo folder.
Please edit it :
parameters["omero_authentication_file"] = None : replace None by the omero config you created before , if you didn't please refer to section "Data Manager Integration"
parameters["project_name"] = "" : write the name of the omero project of your dataset between the " " (should be the embryo name)
If the name of your datasets are not the default ones on OMERO , you will need to update the following parameters too:
parameters["dataset_name"] = "FUSE_01" # Name of the dataset on OMERO
parameters["destination_folder"] = "FUSE/FUSE_01/" # Folder where to save images on the disk
and
parameters["dataset_name"] = "JUNC_01" # Name of the dataset on OMERO
parameters["destination_folder"] = "JUNC/JUNC_01/" # Folder where to save images on the disk
Open a terminal where the download parameters file is , and start the download by running :
conda activate AstecManager
python3 download_fuse_and_semantic_from_omero.py
When the download has finished, you should fine the images in the folder corresponding to <parameters["destination_folder"]>
Option 2 : if you didn't generate semantic images
In order to perform the segmentation, you will need to download the FUSED images on the computation machine. Please download the following parameters file : here , in the embryo folder.
Please edit it :
parameters["omero_authentication_file"] = None : replace None by the omero config you created before , if you didn't please refer to section "Data Manager Integration"
parameters["project_name"] = "" : write the name of the omero project of your dataset between the " " (should be the embryo name)
parameters["dataset_name"] = "FUSE_01" # Name of the dataset on OMERO ,
parameters["destination_folder"] = "FUSE/FUSE_01/" # Folder where to save images on the disk
Open a terminal where the download parameters file is , and start the download by running :
conda activate AstecManager
python3 download_dataset_from_omero.py
When the download has finished, you should fine the images in the folder corresponding to <parameters["destination_folder"]>
Generation of membranes intensity image from semantic
When the fused images and the semantic images are downloaded, you can proceed to the computation of enhanced membranes :
We computed those semantic images to be able to create a faster, with better shaped cells , segmentation. In order to do so , we will transform the semantic images into fake intensities images.
In order to do so , please download the corresponding parameters file here , and store it in the embryo folder.
Please edit it :
Make sure to change the "EXP_JUNC" parameter, to match the suffix of your "JUNC" folder on OMERO. This will be used to name the output folder
parameters["embryo_name"] = "embryo_name" # Name of the embryo
parameters["EXP_JUNC"] = "01" # Suffix of the semantic folder used as input of contour generation
parameters["omero_authentication_file"] = "None" # path to OMERO authentication file. None means no upload to OMERO , if bound the generated intensities image will be uploaded to OMERo
parameters["user"] = "UI" # initials of user running the membrane generation
When edited, you can start it by running in a terminal :
conda activate AstecManager
python3 generate_enhanced_membranes_from_semantic.py
The fake intensities images will be generated in the following folder :
CONTOUR/CONTOUR_01
The images are generated in a CONTOUR folder, because this folder is used by ASTEC for the preprocessing of the segmentation step, explained later. Please do not move them outside of this folder. The "01" suffix is a copy of the suffix of JUNC folder used in input. You can change it if you want, but make sure to change the EXP_CONTOUR parameter during the segmentation
First time point segmentation
The segmentation process for our data is based on the propagation. Using the previous time step segmentation , the algorithm compute new segmentations , and then detect the cell divisions ( or not ) to compute the lineage. In order to start the process , it is needed to have a first time point segmentation, that SHOULD be empty of any segmentation errors. We now have 2 systems to compute the first time point segmentation :
MARS
MARS is the standard segmentation algorithm used for the first time point with our data. To start MARS algorithm , please download the parameter file here and store it in your embryo folder
Edit it the mandatory parameters :
parameters["embryo_name"] = "name": replace <name> with the name of your embryo folder
parameters["begin"]=1 : replace '1' with the first time point of the fusion sequence
parameters["end"]=1 :  replace '1' with the first time point of the fusion sequence (HAS TO BE EQUAL TO parameters["begin"])
parameters["user"]= 'UI' : for every step , will be used to store an history of the data,<UI>  should be replaced by experimentator name and surname first letters
You can change parameters that are usually not changed, if you know what you are doing. Here is the list :
parameters["resolution"] = 0.3 : Only change this if you are working in half resolution (it should be 0.6 with half resolution)
parameters["EXP_FUSE"] = '01' : Name of the fusion exp for the intensity images
parameters["use_membranes"] = True : Should be <True> to use the contour for the segmentation of the first time point, <False> otherwise
parameters["apply_normalisation"] = True : Should be <True> if you want to normalize input images intensities between [0;normalisation], <False> otherwise
parameters["normalisation"] = 1000 # if apply_normalisation is True , value of normalisation applied
This step uses the external membranes images generated from the semantic (junc) images by default. Please follow the tutorial above to generate them , or change "use_contour" parameter to False is you don't want to use them.
When you finished editing the parameters , please open a terminal in your embryo folder , and start the MARS by running :
conda activate AstecManager
python3 run_first_time_point_test_segmentation.py
The code will generate 4 segmentations of the first time point, the difference between the being how the intensities of the input images are integrated together to get an enhanced images.
The embryo folder hierarchy should look like this :
experiment folder
└───embryo specie
    │──embryo name
    │   │───SEG
    │   │    │─── SEG_mars_gace_addition
    │   │    │   │─── LOGS
    │   │    │   └─── embryo_name_mars_t000.nii
    │   │    │
    │   │    │─── SEG_mars_gace_maximum
    │   │    │   │─── LOGS
    │   │    │   └─── embryo_name_mars_t000.nii
    │   │    │─── SEG_mars_no_gace_addition
    │   │    │   │─── LOGS
    │   │    │   └─── embryo_name_mars_t000.nii
    │   │    │
    │   │    └─── SEG_mars_no_gace_maximum
    │   │        │─── LOGS
    │   │        └─── embryo_name_mars_t000.nii
    │   │───INTRAREG
    │   │    └─── ...
    │   │───RAWDATA
    │   │    └─── ...
    │   └───FUSE
    │       └─── ...
Here is a detail of what each mars folder means :
# SEG/SEG_mars_gace_addition : first time point generated using addition image combination , and GACE enhancement
# SEG/SEG_mars_gace_maximum : first time point generated using maximum image combination , and GACE enhancement
# SEG/SEG_mars_no_gace_addition first time point generated using addition image combination , and no enhancement
# SEG/SEG_mars_no_gace_maximum first time point generated using maximum image combination , and no enhancement
If you want detail on image enhancement and combination parameters, please follow this link
To compare the 4 MARS segmentations generated by this step , follow the steps detailed in the First time point verification section for each segmentation.
Import of the data in MorphoNet
This section is only needed if you used MARS algorithm to generate the segmentation. The idea is to import both segmentation (mars_add and mars_max) as MorphoNet local datasets.
To install MorphoNet Standalone, please refer to the MorphoNet documentation for application by clicking here
You can find a documentation in MorphoNet help to create a local dataset here
Verification of the first point and curation
After importing the dataset in MorphoNet application , locate the different errors in each of the segmentation generated, and find the one with the least errors.
When the segmentation is chosen , curate it using the documentation example found here
First time point storage
When the first time point is curated, please store it in a new folder inside the embryo folder. This new folder should be called MARS, and contain only the first time point segmentation image.
Here is the architecture of the embryo folder at this step :
experiment folder
└───embryo specie
    │──embryo name
    │   │───SEG
    │   │    └─── ...
    │   │───MARS
    │   │    └─── embryo_name_mars_t000.nii
    │   │───INTRAREG
    │   │    └─── ...
    │   │───RAWDATA
    │   │    └─── ...
    │   └───FUSE
    │       └─── ...
Segmentation propagation
When all the parameters and their values have been found during the test step , or you already knew them, it is time to propagate the segmentation.
Download the parameter file here, and store it in your embryo folder.
Edit it :
Parameters that should be changed :
parameters["embryo_name"] = 'name' # Embryo Name
parameters["begin"] =0 # Beggining of embryo time range
parameters["end"] =1 # End of embryo time range
parameters["automatic_naming_init_cell_count"] = 64 # This is used for automatic naming of the segmentation. If your embryo doesn't have 64 cells stages, please put the number of cells at time begin. If not, please let 64
Parameters for metadata saving :
parameters["chosen_first_time_point_segmentation"] = "mars_add_no_gace" # could be mars_add_no_gace, mars_add_gace , mars_max_no_gace , mars_max_gace , or any other segmentation tool (example : cellpose)
parameters["user"] = 'UI' # initials of user performing segmentation
Parameters for upload on OMERO :
parameters["omero_authentication_file"]= "None" # path to OMERO authentication file. None means no upload to OMERO
And finally , the usual parameters for segmentation :
parameters["reconstruction_images_combination"] = "maximum" # maximum is another image combination, please refer to ASTEC documentation for explanations
parameters["intensity_enhancement"] = "gace" # You can set to gace if you want to use ASTEC enhancement. If you are using membranes images extracted from semantic, gace adds computation time, but is not sure to give better results
If you need to add other parameters, please add them like this one :
parameters["parameter_name"] = parameter_value # value should be surrounded by " if it's a text value , not if it's a boolean (True or False) , or numeric (integer or decimal)
make sure this line is added BEFORE the following line :
manager.prod_segmentation(parameters)
When parameters are set , open a terminal in your embryo folder , and start the segmentation propagation by running :
conda activate AstecManager
python3 run_final_segmentation.py
Here is the architecture of the embryo folder at this step :
experiment folder
└───embryo specie
    │──embryo name
    │   │───SEG
    │   │    └─── SEG_01
    │   │         │─── embryo_name_seg_t000.nii
    │   │         └─── ...
    │   │───MARS
    │   │    └─── ...
    │   │───MARS06
    │   │    └─── ...
    │   │───INTRAREG
    │   │    └─── INTRAREG_01
    │   │          │─── FUSE
    │   │          │    └─── FUSE_01
    │   │          │         │─── embryoname_intrareg_fuse_t000.nii
    │   │          │         └─── ...
    │   │          │─── POST
    │   │          │    └─── POST_01
    │   │          │         │─── embryoname_intrareg_lineage.xml
    │   │          │         │─── embryoname_intrareg_post_t000.nii
    │   │          │         └─── ...
    │   │          └─── ...
    │   │───RAWDATA
    │   │    └─── ...
    │   │───REC-MEMBRANE
    │   │    └─── REC_01
    │   │         │─── embryo_name_reconstruction_t000.nii
    │   │         └─── ...
    │   │───REC-SEED
    │   │    └─── REC_01
    │   │         │─── embryo_name_reconstruction_t000.nii
    │   │         └─── ...
    │   │───POST
    │   │    └─── POST_01
    │   │         │─── embryo_name_post_t000.nii
    │   │         └─── ...
    │   │───CONTOUR (optional)
    │   │    └─── ...
    │   └───FUSE
    │       └─── ...
Segmentation propagation additional outputs
On top of the segmentation images , and the automatically corrected images (located respectively in SEG/SEG_01/ and POST/POST_01/ folders ) , others data are generated automatically after this segmentation propagation :
-
"Intrareg" segmentation images , corresponding to image where embryo rotation and movements are compensated through times. Those transformations are applied on :
- Fusion images , in INTRAREG/INTRAREG_01/FUSE/FUSE_01/ Seg , and Post images.
- Segmentation images , in INTRAREG/INTRAREG_01/SEG/SEG_01/
- Post corrected images , in INTRAREG/INTRAREG_01/POST/POST_01/
-
A complete set of embryo properties generated in the property file (xml) located in : INTRAREG/INTRAREG_01/POST/POST_01/
-
A graph of missing cells distribution in all the branches of the segmentation in : analysis/prod_segmentation/early_cell_death.png
-
A graph of cell count through time of the segmentation in : analysis/prod_segmentation/cell_count.png
Apply intraregistration and properties from the computation machine (optional)
This step is here if you have an embryo on your machine, on which you want to run intraregistration, and compute properties and naming.
Usually this would be done during the segmentation propagation, but for multiple reasons, this could not be the case.
To start this step, download the parameter file here, store it in the embryo folder (IMPORTANT), and edit it :
parameters["embryo_name"] = "" # Name of the embryo. Should be the same than OMERO project and embryo folder
parameters["begin"] = 0 # minimum time point for intraregistration
parameters["end"] = 1 # maximum time point for intraregistration
parameters["EXP_RECONSTRUCTION"] = "01" # The membranes reconstruction image folder suffix.This should match the EXP_POST of the embryo , or set to "None" if you don't want to use the rec membranes images
parameters["EXP_INTRAREG"] = "01" # name of the intraregistration folder
parameters["EXP_FUSE"] = "01" # name of the fusion folder
parameters["EXP_SEG"] = "01" # name of the segmentation folder
parameters["EXP_POST"] = "01" # name of the post correction folder
parameters["cell_count"] = 64 # number of cells for init naming property. Put 64 unless your embryo does not have 64 cells stage
parameters["result_image_suffix"] = "nii" # result format for image
When parameters are set, open a terminal in your embryo folder, and start the segmentation propagation by running :
conda activate AstecManager
python3 run_intraregistration_and_properties.py
Apply intraregistration and properties from OMERO (optional)
This step is here if you have an embryo on OMERO, on which you want to run intraregistration, and compute properties and naming.
Usually this would be done during the segmentation propagation, but for multiple reasons, this could not be the case.
After the computation, the intraregistered data will be uploaded back to OMERO .
To start this step, download the parameter file here, store it in the embryo folder (IMPORTANT), and edit it :
parameters["embryo_name"] = "" # Name of the embryo. Should be the same than OMERO project and embryo folder
parameters["begin"] = 0 # minimum time point for intraregistration
parameters["end"] = 1 # maximum time point for intraregistration
parameters["EXP_RECONSTRUCTION"] = "01" # The membranes reconstruction image folder suffix.This should match the EXP_POST of the embryo , or set to "None" if you don't want to use the rec membranes images
parameters["EXP_INTRAREG"] = "01" # name of the intraregistration folder
parameters["cell_count"] = 64 # number of cells for init naming property. Put 64 unless your embryo does not have 64 cells stage
parameters["omero_authentication_file"] = "None" # path to OMERO authentication file , for download and upload

parameters["omero_reconstruction_dataset_name"] = "" # name of the REC MEMBRANES dataset on OMERO
parameters["omero_fusion_dataset_name"] = "" # name of the fusions dataset on OMERO
parameters["omero_postcorrection_dataset_name"] = "" # name of the post correction dataset on OMERO
When parameters are set, open a terminal in your embryo folder, and start the segmentation propagation by running :
conda activate AstecManager
python3 download_from_omero_and_intrareg.py
Release history Release notifications | RSS feed


Download files
Download the file for your platform. If you're not sure which to choose, learn more about installing packages.
Source Distribution
Built Distribution
Filter files by name, interpreter, ABI, and platform.
If you're not sure about the file name format, learn more about wheel file names.
Copy a direct link to the current filters
File details
Details for the file astecmanager-1.1.0.tar.gz.
File metadata
- Download URL: astecmanager-1.1.0.tar.gz
- Upload date:
- Size: 29.9 MB
- Tags: Source
- Uploaded using Trusted Publishing? No
- Uploaded via: twine/6.2.0 CPython/3.10.20
File hashes
| Algorithm | Hash digest | |
|---|---|---|
| SHA256 |
d51d97fdc64f2c31992d34287adcf82148c1d692f97cbec1ed4886f5cd242d91
|
|
| MD5 |
00faadff21e0b237228a061fdf3fd98a
|
|
| BLAKE2b-256 |
4c4f670410c7510d84993c45fb26087b4e24ea35865d1ea655e66c35896e1a83
|
File details
Details for the file astecmanager-1.1.0-py3-none-any.whl.
File metadata
- Download URL: astecmanager-1.1.0-py3-none-any.whl
- Upload date:
- Size: 30.8 MB
- Tags: Python 3
- Uploaded using Trusted Publishing? No
- Uploaded via: twine/6.2.0 CPython/3.10.20
File hashes
| Algorithm | Hash digest | |
|---|---|---|
| SHA256 |
c3255a9fa5d5432198b3516d5960b44c29fb6d856357dfdf7f8f212abdbe78e4
|
|
| MD5 |
b72aec45536bf096277781c5335045b7
|
|
| BLAKE2b-256 |
2fd091203f4e3699f5914014ebb94e15a32cbba7f7245af47a9d6a99d82e08e7
|


