Automatically Evaluate RAG pipelines with your own data. Find optimal structure for new RAG product.

Project description
AutoRAG
RAG AutoML tool for automatically finding an optimal RAG pipeline for your data.


There are many RAG pipelines and modules out there, but you don’t know what pipeline is great for “your own data” and "your own use-case." Making and evaluating all RAG modules is very time-consuming and hard to do. But without it, you will never know which RAG pipeline is the best for your own use-case.
AutoRAG is a tool for finding the optimal RAG pipeline for “your data.” You can evaluate various RAG modules automatically with your own evaluation data and find the best RAG pipeline for your own use-case.
AutoRAG supports a simple way to evaluate many RAG module combinations. Try now and find the best RAG pipeline for your own use-case.
Explore our 📖 Document!!
YouTube Tutorial
https://github.com/Marker-Inc-Korea/AutoRAG/assets/96727832/c0d23896-40c0-479f-a17b-aa2ec3183a26
Muted by default, enable sound for voice-over
You can see on YouTube
Use AutoRAG in HuggingFace Space 🚀
Colab Tutorial
- Step 1: Basic of AutoRAG | Optimizing your RAG pipeline
- Step 2: Data Creation | Create your own Data for RAG Optimization
- Step 3: Use Custom LLM & Embedding Model | Use Custom Model
Index
Quick Install
We recommend using Python version 3.10 or higher for AutoRAG.
pip install AutoRAG
If you want to use the local models, you need to install gpu version.
pip install "AutoRAG[gpu]"
Or for parsing, you can use the parsing version.
pip install "AutoRAG[gpu,parse]"
Data Creation


RAG Optimization requires two types of data: QA dataset and Corpus dataset.
- QA dataset file (qa.parquet)
- Corpus dataset file (corpus.parquet)
QA dataset is important for accurate and reliable evaluation and optimization.
Corpus dataset is critical to the performance of RAGs. This is because RAG uses the corpus to retrieve documents and generate answers using it.
📌 Supporting Data Creation Modules
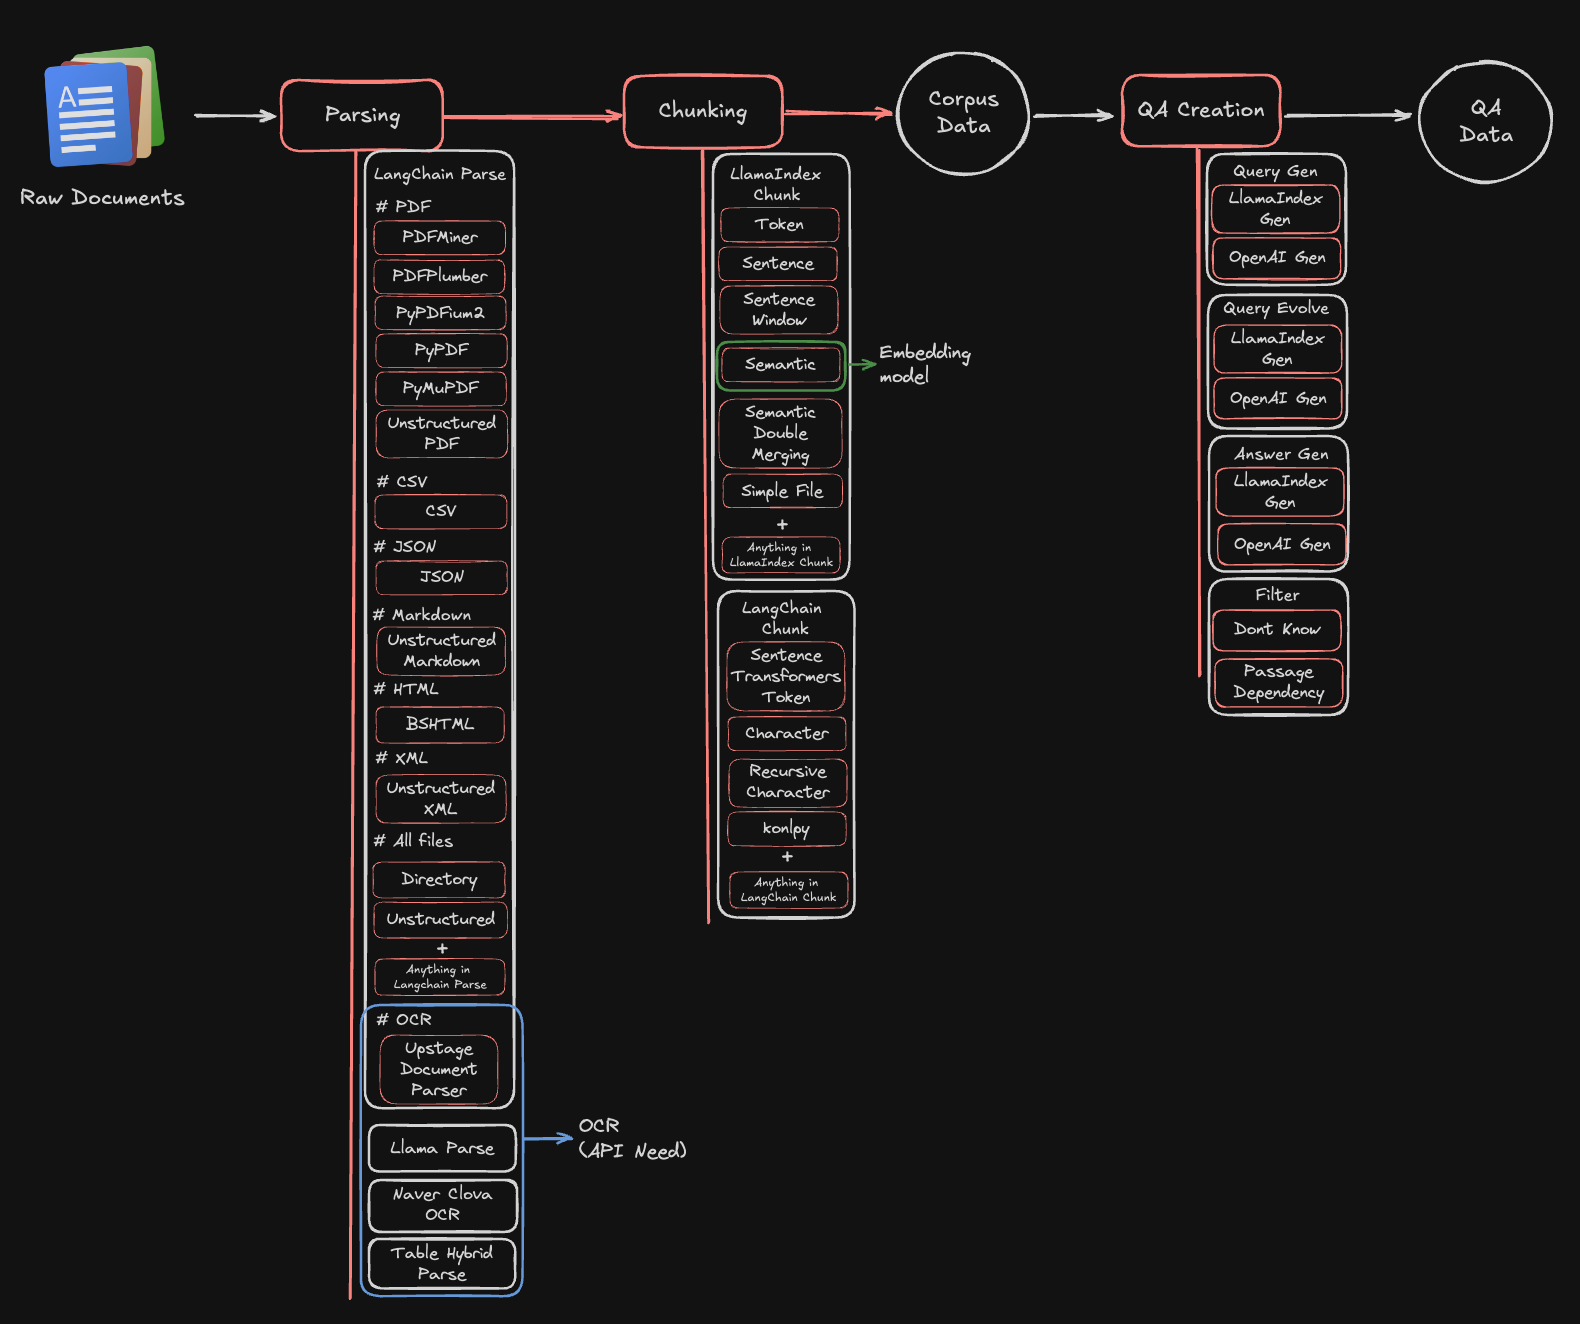
Quick Start
1. Parsing
Set YAML File
modules:
  - module_type: langchain_parse
    parse_method: pdfminer
You can also use multiple Parse modules at once. However, in this case, you'll need to return a new process for each parsed result.
Start Parsing
You can parse your raw documents with just a few lines of code.
from autorag.parser import Parser

parser = Parser(data_path_glob="your/data/path/*")
parser.start_parsing("your/path/to/parse_config.yaml")
2. Chunking
Set YAML File
modules:
  - module_type: llama_index_chunk
    chunk_method: Token
    chunk_size: 1024
    chunk_overlap: 24
    add_file_name: en
You can also use multiple Chunk modules at once. In this case, you need to use one corpus to create QA and then map the rest of the corpus to QA Data. If the chunk method is different, the retrieval_gt will be different, so we need to remap it to the QA dataset.
Start Chunking
You can chunk your parsed results with just a few lines of code.
from autorag.chunker import Chunker

chunker = Chunker.from_parquet(parsed_data_path="your/parsed/data/path")
chunker.start_chunking("your/path/to/chunk_config.yaml")
3. QA Creation
You can create QA dataset with just a few lines of code.
import pandas as pd
from llama_index.llms.openai import OpenAI

from autorag.data.qa.filter.dontknow import dontknow_filter_rule_based
from autorag.data.qa.generation_gt.llama_index_gen_gt import (
	make_basic_gen_gt,
	make_concise_gen_gt,
)
from autorag.data.qa.schema import Raw, Corpus
from autorag.data.qa.query.llama_gen_query import factoid_query_gen
from autorag.data.qa.sample import random_single_hop

llm = OpenAI()
raw_df = pd.read_parquet("your/path/to/parsed.parquet")
raw_instance = Raw(raw_df)

corpus_df = pd.read_parquet("your/path/to/corpus.parquet")
corpus_instance = Corpus(corpus_df, raw_instance)

initial_qa = (
	corpus_instance.sample(random_single_hop, n=3)
	.map(
		lambda df: df.reset_index(drop=True),
	)
	.make_retrieval_gt_contents()
	.batch_apply(
		factoid_query_gen,  # query generation
		llm=llm,
	)
	.batch_apply(
		make_basic_gen_gt,  # answer generation (basic)
		llm=llm,
	)
	.batch_apply(
		make_concise_gen_gt,  # answer generation (concise)
		llm=llm,
	)
	.filter(
		dontknow_filter_rule_based,  # filter don't know
		lang="en",
	)
)

initial_qa.to_parquet('./qa.parquet', './corpus.parquet')
RAG Optimization
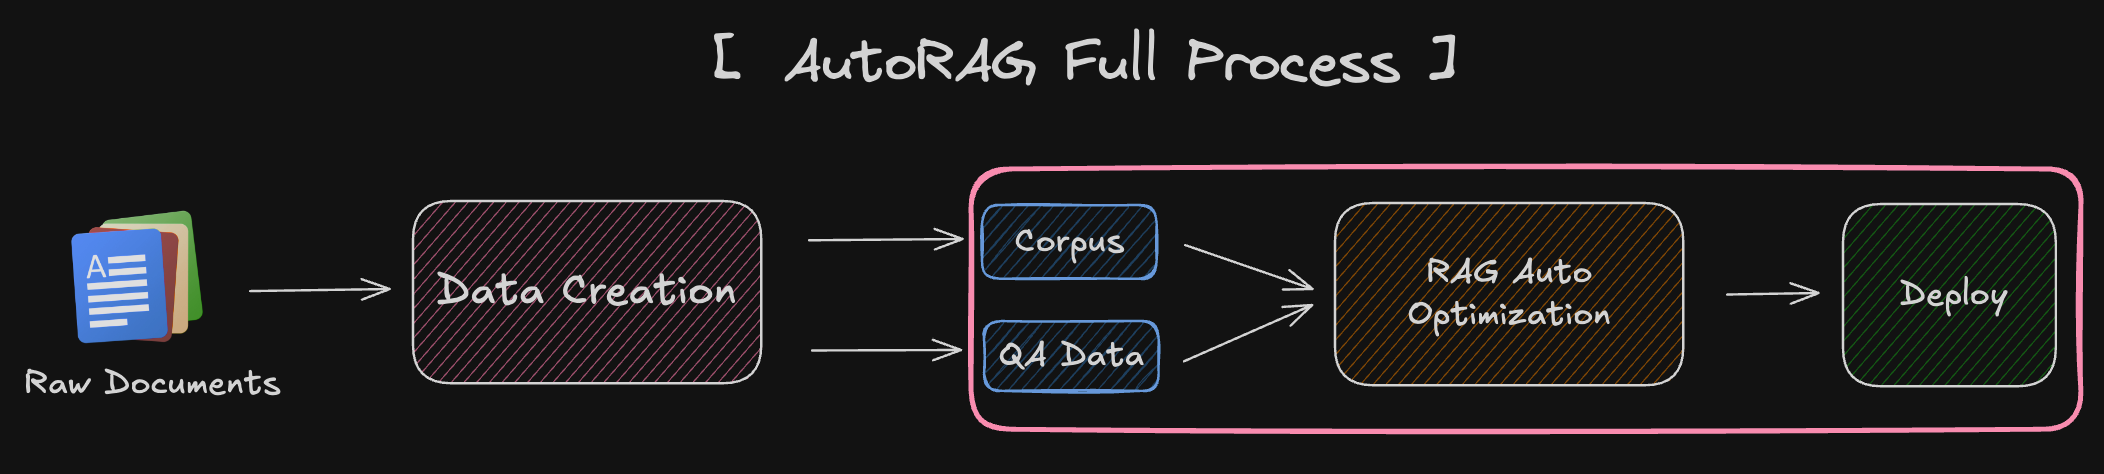

How AutoRAG optimizes RAG pipeline?
Here is the AutoRAG RAG Structure that only show Nodes.

Here is the image showing all the nodes and modules.
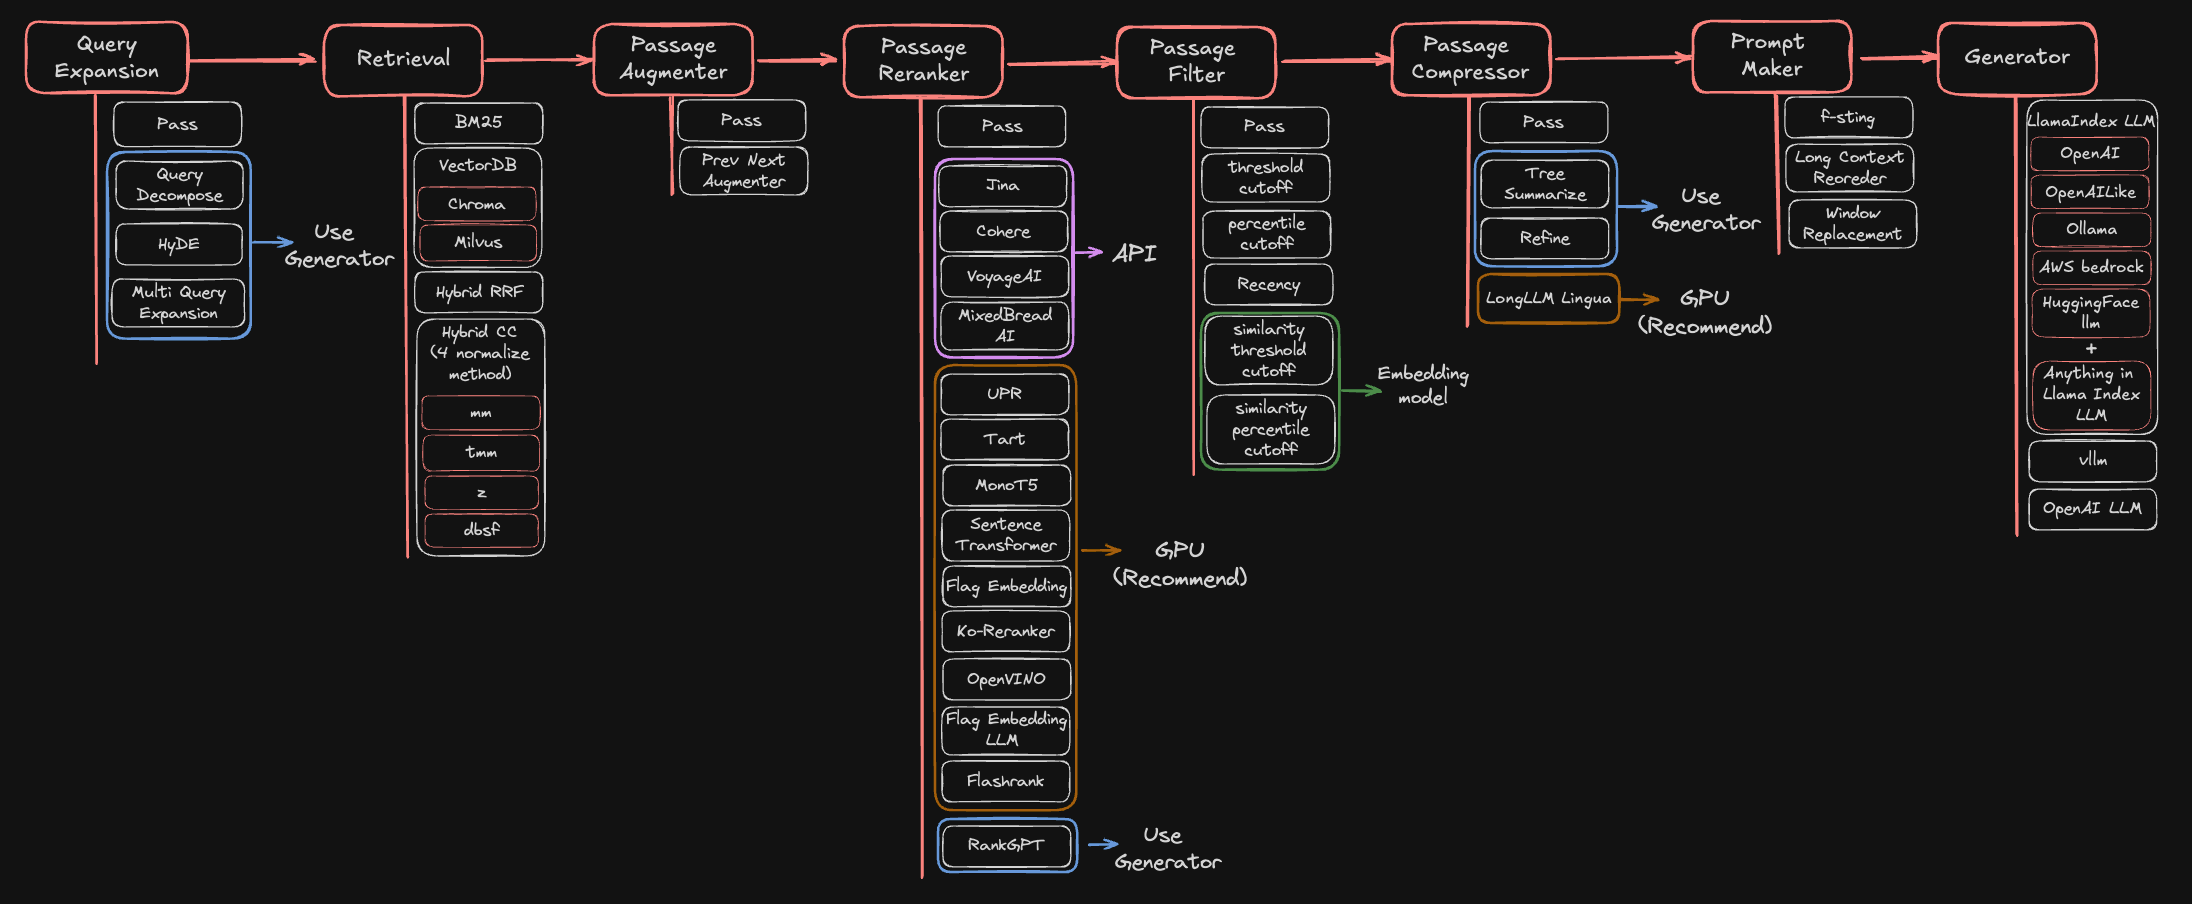
📌 Supporting RAG Optimization Nodes & modules
Metrics
The metrics used by each node in AutoRAG are shown below.

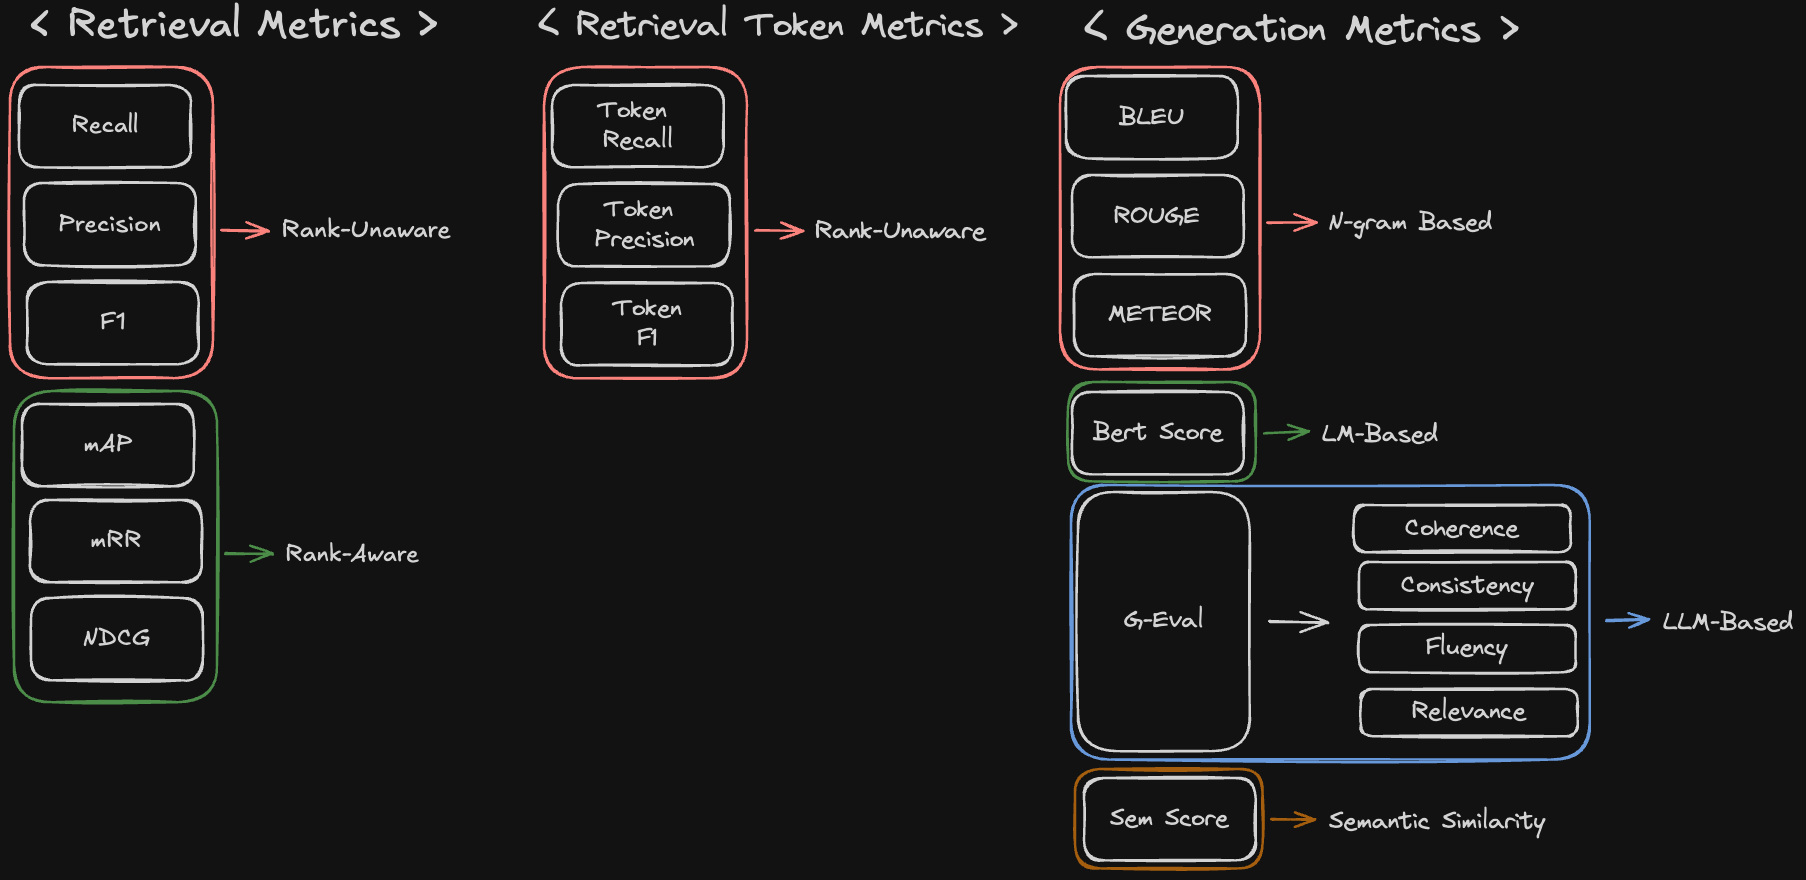
Here is the detailed information about the metrics that AutoRAG supports.
Quick Start
1. Set YAML File
First, you need to set the config YAML file for your RAG optimization.
We highly recommend using pre-made config YAML files for starter.
Here is an example of the config YAML file to use three retrieval nodes, prompt_maker, and generator nodes.
node_lines:
  - node_line_name: retrieve_node_line
    nodes:
      - node_type: lexical_retrieval
        strategy:
          metrics: [ retrieval_f1, retrieval_recall, retrieval_ndcg, retrieval_mrr ]
        top_k: 3
        modules:
          - module_type: bm25
      - node_type: semantic_retrieval
        strategy:
          metrics: [ retrieval_f1, retrieval_recall, retrieval_ndcg, retrieval_mrr ]
        top_k: 3
        modules:
          - module_type: vectordb
            vectordb: default
      - node_type: hybrid_retrieval
        strategy:
          metrics: [ retrieval_f1, retrieval_recall, retrieval_ndcg, retrieval_mrr ]
        top_k: 3
        modules:
          - module_type: hybrid_rrf
            weight_range: (4,80)
  - node_line_name: post_retrieve_node_line
    nodes:
      - node_type: prompt_maker  # Set Prompt Maker Node
        strategy:
          metrics: # Set Generation Metrics
            - metric_name: meteor
            - metric_name: rouge
            - metric_name: sem_score
              embedding_model: openai
        modules:
          - module_type: fstring
            prompt: "Read the passages and answer the given question. \n Question: {query} \n Passage: {retrieved_contents} \n Answer : "
      - node_type: generator  # Set Generator Node
        strategy:
          metrics: # Set Generation Metrics
            - metric_name: meteor
            - metric_name: rouge
            - metric_name: sem_score
              embedding_model: openai
        modules:
          - module_type: openai_llm
            llm: gpt-4o-mini
            batch: 16
2. Run AutoRAG
You can evaluate your RAG pipeline with just a few lines of code.
from autorag.evaluator import Evaluator

evaluator = Evaluator(qa_data_path='your/path/to/qa.parquet', corpus_data_path='your/path/to/corpus.parquet')
evaluator.start_trial('your/path/to/config.yaml')
or you can use the command line interface
autorag evaluate --config your/path/to/default_config.yaml --qa_data_path your/path/to/qa.parquet --corpus_data_path your/path/to/corpus.parquet
Once it is done, you can see several files and folders created in your current directory.
At the trial folder named to numbers (like 0),
you can check summary.csv file that summarizes the evaluation results and the best RAG pipeline for your data.
For more details, you can check out how the folder structure looks like at here.
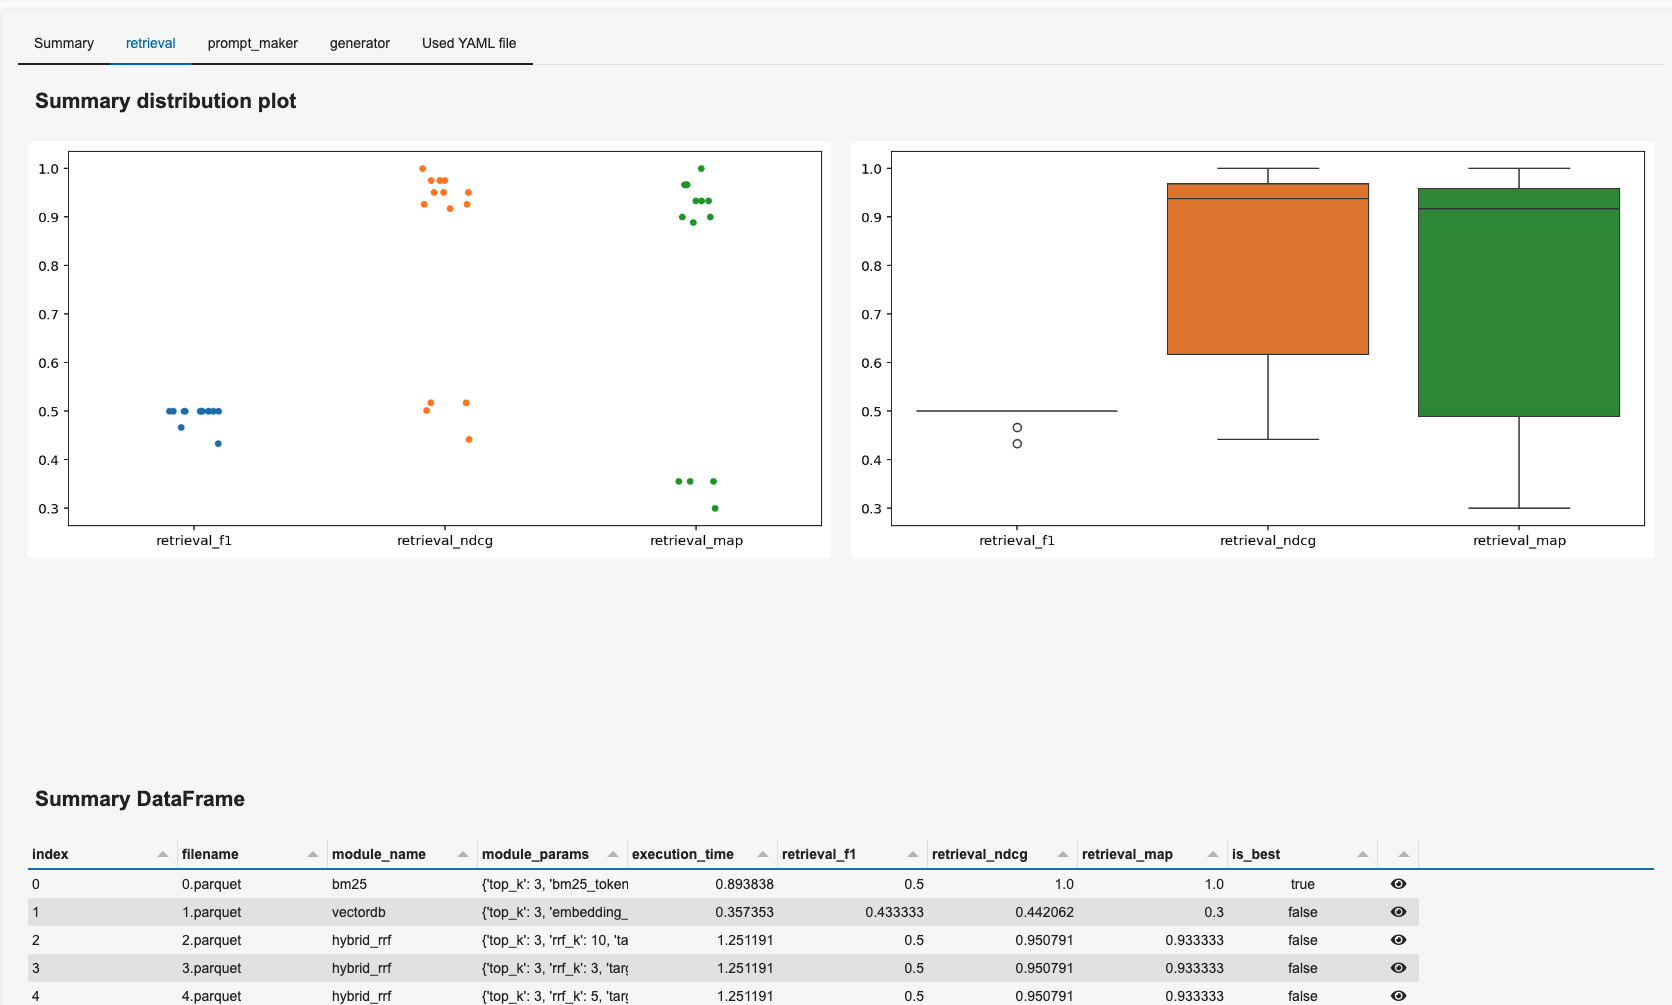
3. Run Dashboard
You can run a dashboard to easily see the result.
autorag dashboard --trial_dir /your/path/to/trial_dir
sample dashboard
4. Deploy your optimal RAG pipeline
4-1. Run as a Code
You can use an optimal RAG pipeline right away from the trial folder. The trial folder is the directory used in the running dashboard. (like 0, 1, 2, ...)
from autorag.deploy import Runner

runner = Runner.from_trial_folder('/your/path/to/trial_dir')
runner.run('your question')
4-2. Run as an API server
You can run this pipeline as an API server.
Check out the API endpoint at here.
import nest_asyncio
from autorag.deploy import ApiRunner

nest_asyncio.apply()

runner = ApiRunner.from_trial_folder('/your/path/to/trial_dir')
runner.run_api_server()
autorag run_api --trial_dir your/path/to/trial_dir --host 0.0.0.0 --port 8000
The cli command uses extracted config YAML file. If you want to know it more, check out here.
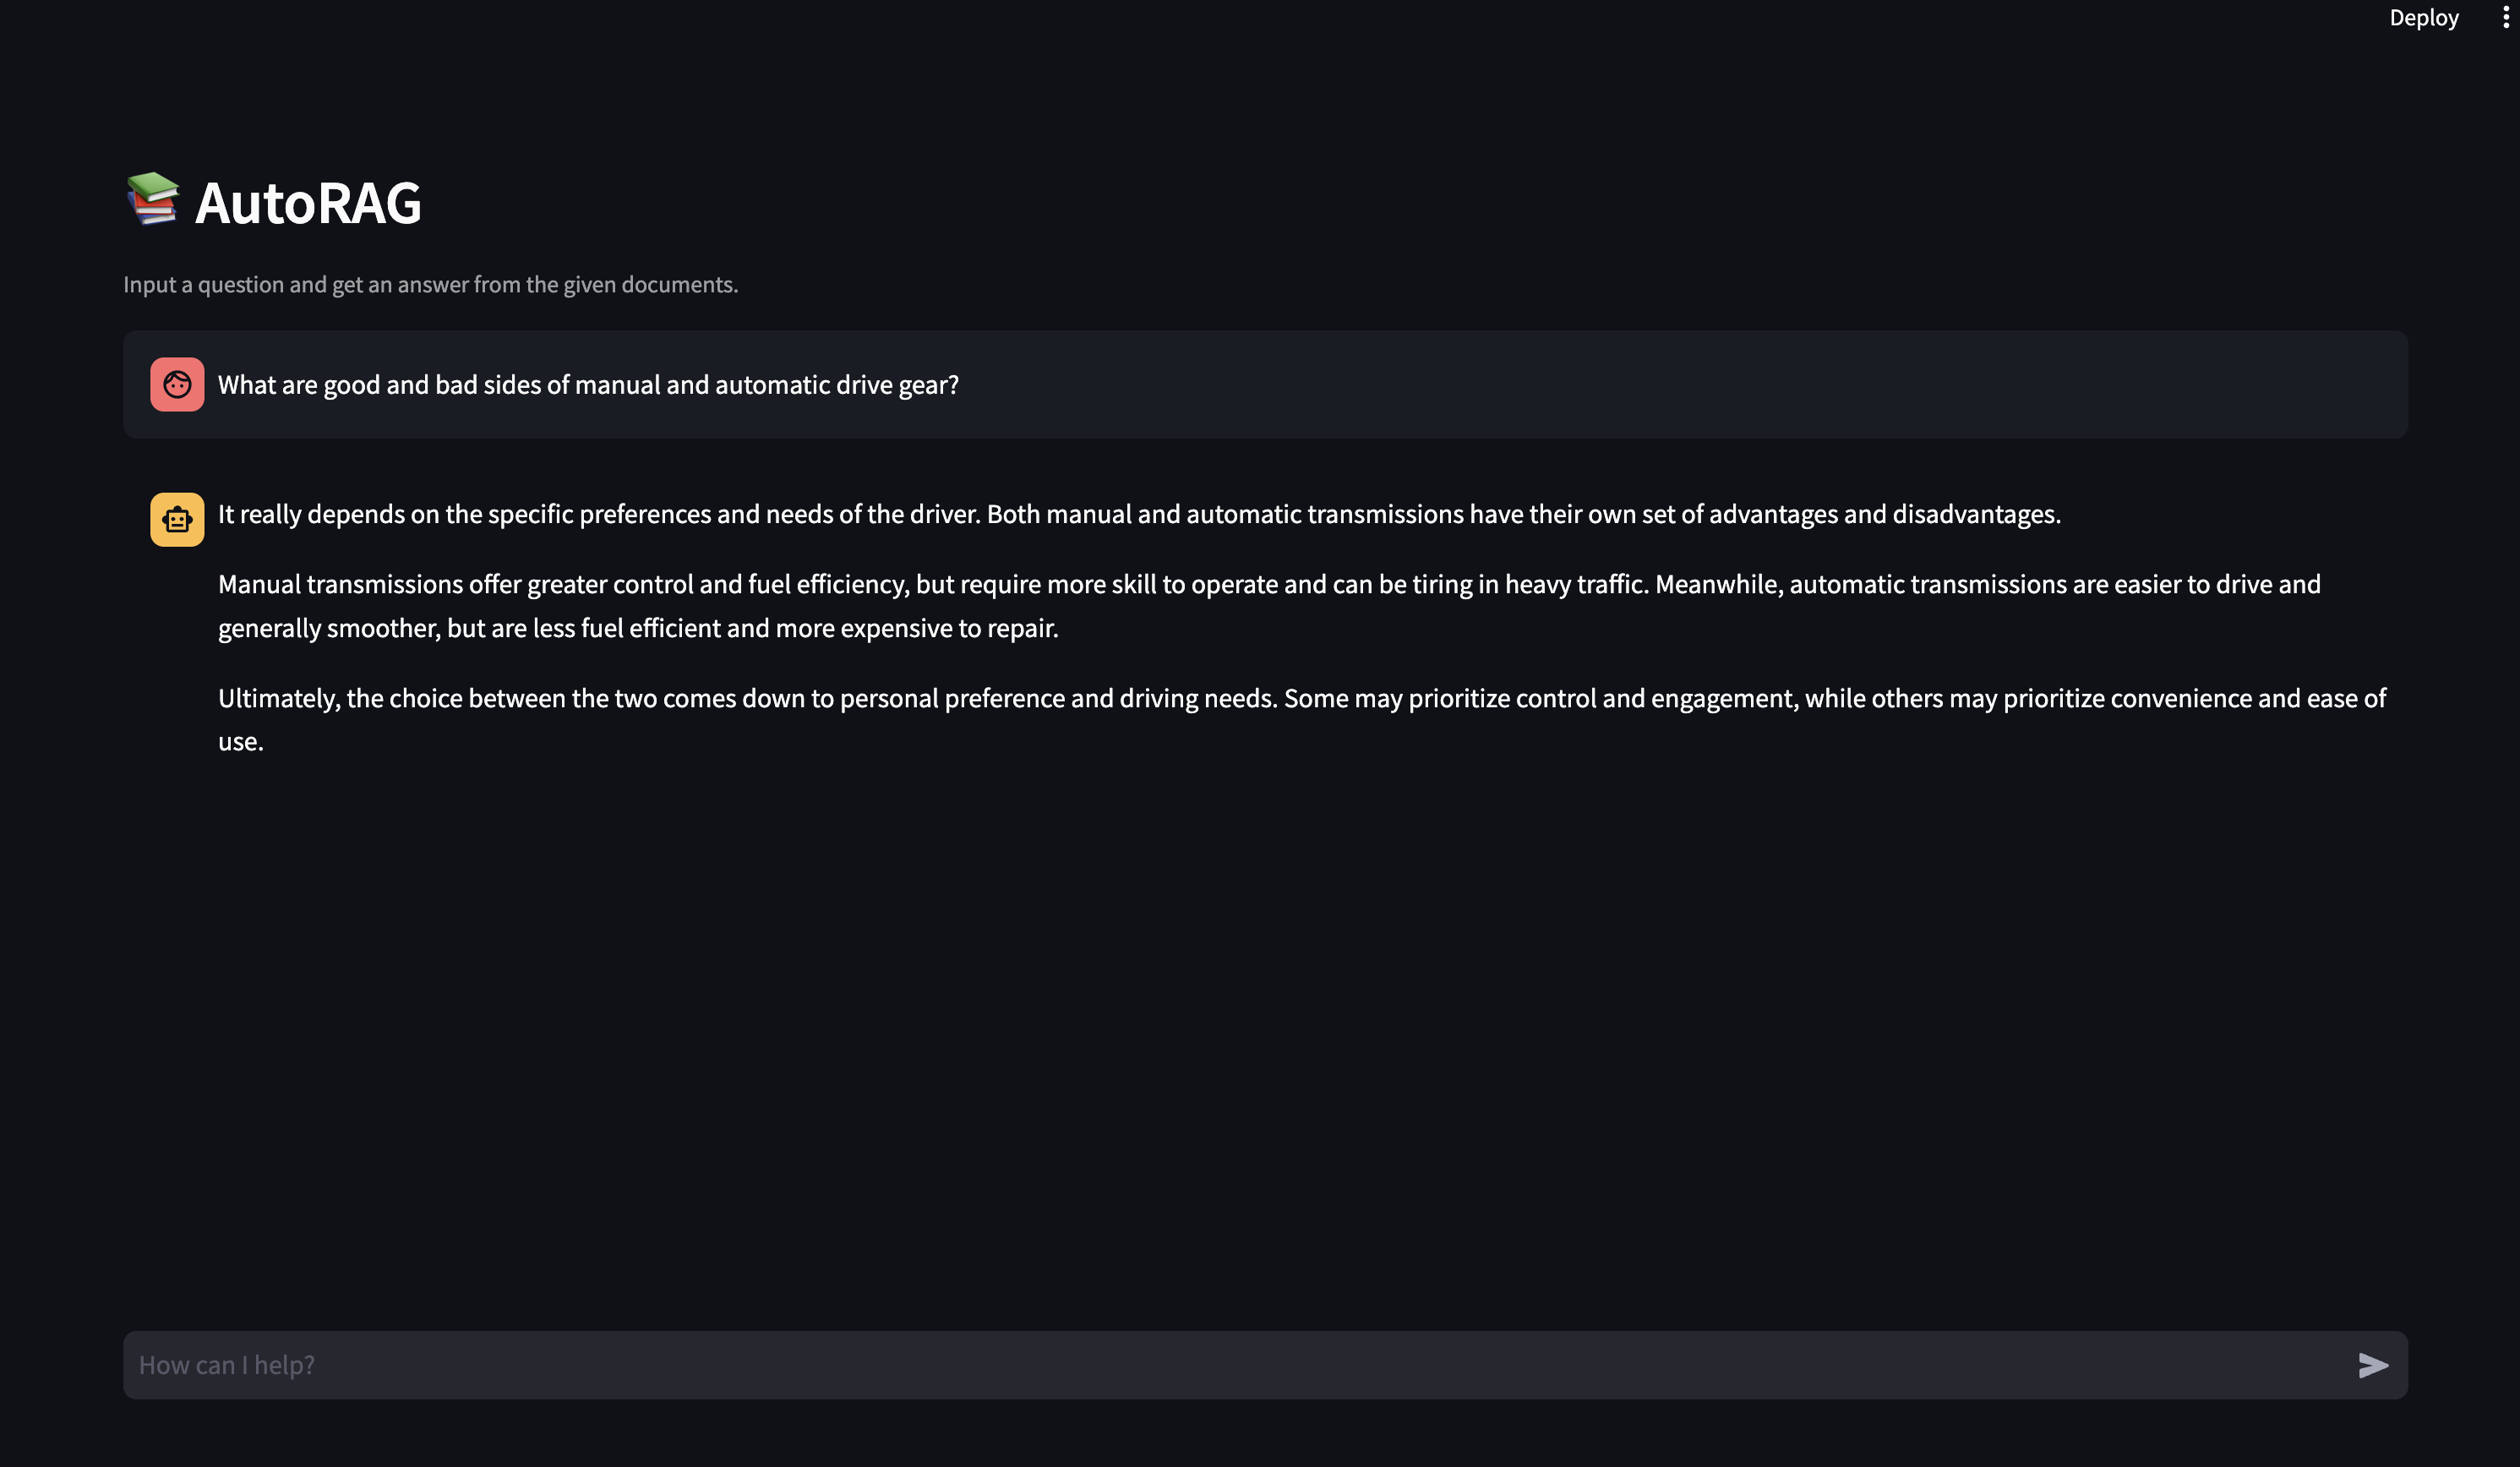
4-3. Run as a Web Interface
you can run this pipeline as a web interface.
Check out the web interface at here.
autorag run_web --trial_path your/path/to/trial_path
sample web interface
☎️ FaQ
Thanks for shoutout
Company

Individual
✨ Contributors ✨
Thanks go to these wonderful people:

Contribution
We are developing AutoRAG as open-source.
So this project welcomes contributions and suggestions. Feel free to contribute to this project.
Plus, check out our detailed documentation at here.
Citation
@misc{kim2024autoragautomatedframeworkoptimization,
      title={AutoRAG: Automated Framework for optimization of Retrieval Augmented Generation Pipeline},
      author={Dongkyu Kim and Byoungwook Kim and Donggeon Han and Matouš Eibich},
      year={2024},
      eprint={2410.20878},
      archivePrefix={arXiv},
      primaryClass={cs.CL},
      url={https://arxiv.org/abs/2410.20878},
}
Release history Release notifications | RSS feed


Download files
Download the file for your platform. If you're not sure which to choose, learn more about installing packages.
Source Distribution
Built Distribution
Filter files by name, interpreter, ABI, and platform.
If you're not sure about the file name format, learn more about wheel file names.
Copy a direct link to the current filters
File details
Details for the file autorag-0.3.22.tar.gz.
File metadata
- Download URL: autorag-0.3.22.tar.gz
- Upload date:
- Size: 10.2 MB
- Tags: Source
- Uploaded using Trusted Publishing? No
- Uploaded via: uv/0.11.3 {"installer":{"name":"uv","version":"0.11.3","subcommand":["publish"]},"python":null,"implementation":{"name":null,"version":null},"distro":{"name":"Ubuntu","version":"24.04","id":"noble","libc":null},"system":{"name":null,"release":null},"cpu":null,"openssl_version":null,"setuptools_version":null,"rustc_version":null,"ci":true}
File hashes
| Algorithm | Hash digest | |
|---|---|---|
| SHA256 |
c7dafd4ccdc55392bb4ba0275b557cf33f5a1bb85857ba6cc42312724fbca6f1
|
|
| MD5 |
769cea2ffe12192646c81a7be5d547da
|
|
| BLAKE2b-256 |
6083de0ebc6a32662cf42d0f31ed58891669da723fc6fbf9a6da58913d3af18d
|
File details
Details for the file autorag-0.3.22-py3-none-any.whl.
File metadata
- Download URL: autorag-0.3.22-py3-none-any.whl
- Upload date:
- Size: 265.5 kB
- Tags: Python 3
- Uploaded using Trusted Publishing? No
- Uploaded via: uv/0.11.3 {"installer":{"name":"uv","version":"0.11.3","subcommand":["publish"]},"python":null,"implementation":{"name":null,"version":null},"distro":{"name":"Ubuntu","version":"24.04","id":"noble","libc":null},"system":{"name":null,"release":null},"cpu":null,"openssl_version":null,"setuptools_version":null,"rustc_version":null,"ci":true}
File hashes
| Algorithm | Hash digest | |
|---|---|---|
| SHA256 |
5e63f11673ffe2c990fa8d0fcedf27d84cd76fdda68fabe35ed1b6bacbcedd3e
|
|
| MD5 |
7fb0941c67720d2872eba698bf15f799
|
|
| BLAKE2b-256 |
75cef8a52d4e0fd4e33f3df4c5fdb83d35de7ad39e57e8633ee6d136eb051495
|


