
ParticleSeg3D




ParticleSeg3D is an instance segmentation method that extracts individual particles from large micro CT images taken from mineral samples embedded in an epoxy matrix. It is built on the powerful nnU-Net framework, introduces a particle size normalization, and makes use of a border-core representation to enable instance segmentation. You can find the Arxiv version of the paper here and the journal version here.
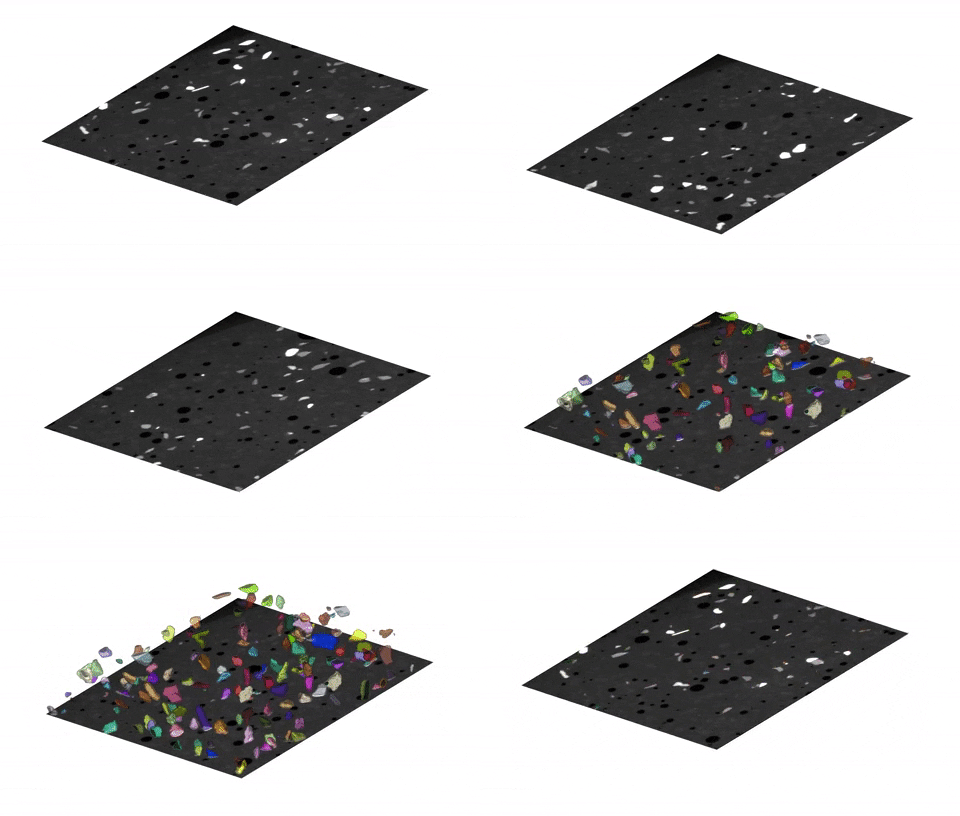
Features
- Robust instance segmentation of mineral particles in micro CT images
- Application of nnU-Net framework for reliable and scalable image processing
- Border-core representation for instance segmentation
- Particle size normalization to account for different mineral types
- Trained on a diverse set of particles from various materials and minerals
- Can be applied to a wide variety of particle types, without additional manual annotations or retraining
Installation
You can install ParticleSeg3D via pip:
pip install ParticleSeg3D
You should now have the ParticleSeg3D package installed in your Python environment, and you'll be able to use all ParticleSeg3D commands from anywhere on your system.
If you intend to train ParticleSeg3D on new data, you will need to additionally install a modified version of the nnU-Net V1:
pip install git+https://github.com/MIC-DKFZ/nnUNet.git@ParticleSeg3D
Dataset
The sample dataset consisting of the whole CT images and the patch dataset with extracted patches from these samples alongside their respective instance segmentations can be found here.
Usage - Inference
Model download
ParticleSeg3D requires a trained model in order to run inference. The trained model can be downloaded here. After downloading the weights, the weights need to be unpacked and saved at a location of your choosing.
Conversion to Zarr
To run inference on an image using ParticleSeg3D, the image must first be converted into the Zarr format. The Zarr format suits our purposes well as it is designed for very large N-dimensional images. In case of a series of TIFF image files, this conversion can be accomplished using the following command from anywhere on the system:
ps3d_tiff2zarr -i /path/to/input -o /path/to/output
Here's a breakdown of relevant arguments you should provide:
- '-i', '--input': Required. Absolute input path to the folder that contains the TIFF image slices that should be converted to a Zarr image.
- '-o', '--output': Required. Absolute output path to the folder that should be used to save the Zarr image.
Metadata preparation
ParticleSeg3D requires the image spacing and a rough mean particle diameter size in millimeter of each image that should be inferenced. This information needs to be provided in the form of a metadata.json as shown in this example:
{
    "Ore1_Zone3_Concentrate": {
        "spacing": 0.01,
        "particle_size": 0.29292
    },
    "Recycling1": {
        "spacing": 0.011,
        "particle_size": 0.5082
    },
    "Ore2_PS850_VS10": {
        "spacing": 0.01,
        "particle_size": 1.2874
    },
    "Ore5": {
        "spacing": 0.0055,
        "particle_size": 0.2296
    },
    ...
}
Inference
You can run inference on Zarr images from anywhere on the system using the ps3d_inference command. The Zarr images need to be located in a folder named 'images' and the 'metadata.json' needs to be placed next to the folder such that the folder structure looks like this:
.
├── metadata.json
└── images
    ├── Ore1_Zone3_Concentrate.zarr
    ├── Recycling1.zarr
    ├── Ore2_PS850_VS10.zarr
    ├── Ore5.zarr
    └── ...
Here's an example of how to use the command:
ps3d_inference -i /path/to/input -o /path/to/output -m /path/to/model
Here's a breakdown of relevant arguments you should provide:
- '-i', '--input': Required. Absolute input path to the base folder containing the dataset. The dataset should be structured with 'images' directory and metadata.json.
- '-o', '--output': Required. Absolute output path to the save folder.
- '-m', '--model': Required. Absolute path to the model directory.
- '-n', '--name': Optional. The name(s) without extension of the image(s) that should be used for inference. Multiple names must be separated by spaces.
Conversion from Zarr
Zarr images or Zarr predictions can be converted to TIFF using the following command from anywhere on the system:
ps3d_zarr2tiff -i /path/to/input -o /path/to/output
Here's a breakdown of relevant arguments you should provide:
- '-i', '--input': Required. Absolute input path to the folder that contains the TIFF image slices that should be converted to a Zarr image.
- '-o', '--output': Required. Absolute output path to the folder that should be used to save the Zarr image.
Usage - Training
Conversion to NIFTI
To train a new ParticleSeg3D model on new training images, the training images must first be converted into the NIFTI format. The NIFTI format is required as input format by the nnU-Net. In case of a series of TIFF image files, this conversion can be accomplished using the following command from anywhere on the system:
ps3d_tiff2nifti -i /path/to/input -o /path/to/output -s 0.1 0.1 0.1
Here's a breakdown of relevant arguments you should provide:
- '-i', '--input': Required. Absolute input path to the folder that contains the TIFF image slices that should be converted to a Zarr image.
- '-o', '--output': Required. Absolute output path to the folder that should be used to save the Zarr image.
- '-s', '--spacing': Required. The image spacing given as three numbers separate by spaces.
Metadata preparation
ParticleSeg3D requires the image spacing and a rough mean particle diameter size in millimeter of each image that should be used for training. This information needs to be provided in the form of a metadata.json as shown in this example:
{
    "Ore1_Zone3_Concentrate": {
        "spacing": 0.01,
        "particle_size": 0.29292
    },
    "Recycling1": {
        "spacing": 0.011,
        "particle_size": 0.5082
    },
    "Ore2_PS850_VS10": {
        "spacing": 0.01,
        "particle_size": 1.2874
    },
    "Ore5": {
        "spacing": 0.0055,
        "particle_size": 0.2296
    },
    ...
}
Z-Score preparation
ParticleSeg3D performs Z-score intensity normalization and thus requires the global mean and standard deviation of the entire dataset. This can either be exactly computed over all voxel of all images combined of estimated by randomly sampling a subset of voxels from all images. The second option might be more convinient on larger images.
Dataset preprocessing
The NIFTI images and reference instance segmentations need to be preprocessed into the for the nnU-Net expected dataset format. The NIFTI images need to be located in a folder named 'images', the NIFTI instance segmentations in a folder named 'instance_seg' and the 'metadata.json' needs to be placed next to both folders. Further, images and their respective instance segmentations should have the same name.The folder structure should look like this:
.
├── metadata.json
├── images
│   ├── Ore1_Zone3_Concentrate.zarr
│   ├── Recycling1.zarr
│   ├── Ore2_PS850_VS10.zarr
│   ├── Ore5.zarr
│   └── ...
└── instance_seg
    ├── Ore1_Zone3_Concentrate.zarr
    ├── Recycling1.zarr
    ├── Ore2_PS850_VS10.zarr
    ├── Ore5.zarr
    └── ...
The dataset can then be preprocessed into nnU-Net format with the following command:
ps3d_train_preprocess -i /path/to/input -o /path/to/output -z 0.12345 0.6789
Here's a breakdown of relevant arguments you should provide:
- '-i', '--input': Required. Absolute input path to the base folder that contains the dataset structured in the form of the directories 'images' and 'instance_seg' and the file metadata.json.
- '-o', '--output': Required. Absolute output path to the preprocessed dataset directory.
- '-z', '--zscore': Required. The z-score used for intensity normalization.
nnU-Net training
After the dataset has been preprocessed the training of the nnU-Net model can commence. In order to this, it is best to follow the instructions from the official nnU-Net V1 documentation. Once the training finished the trained model can be used for inference on new images.
License
Distributed under the terms of the Apache Software License 2.0 license, "ParticleSeg3D" is free and open source software
Citations
If you are using ParticleSeg3D for your article, please consider citing our paper:
@article{gotkowski2024particleseg3d,
  title={ParticleSeg3D: A scalable out-of-the-box deep learning segmentation solution for individual particle characterization from micro CT images in mineral processing and recycling},
  author={Gotkowski, Karol and Gupta, Shuvam and Godinho, Jose RA and Tochtrop, Camila GS and Maier-Hein, Klaus H and Isensee, Fabian},
  journal={Powder Technology},
  volume={434},
  pages={119286},
  year={2024},
  publisher={Elsevier}
}
Acknowledgements


ParticleSeg3D is developed and maintained by the Applied Computer Vision Lab (ACVL) of Helmholtz Imaging and the Division of Medical Image Computing at the German Cancer Research Center (DKFZ).


Release files for ParticleSeg3D 0.2.16
For a detailed explanation of source distributions (sdists) and built distributions (wheels), please see the package formats documentation.
Source distribution (sdist)
| File | Size | Uploaded | |
|---|---|---|---|
| ParticleSeg3D-0.2.16.tar.gz | 52.2 kB | Details |
Built distribution (wheel)
| File | Interpreter | ABI | Platform | Reset |
|---|---|---|---|---|
| ParticleSeg3D-0.2.16-py3-none-any.whl | Python 3 | none | any | Details |
Total release size: 110.6 kB
Release files / ParticleSeg3D-0.2.16.tar.gz
| Download URL | ParticleSeg3D-0.2.16.tar.gz |
|---|---|
| Size | 52.2 kB |
| Tags | Source |
|
SHA-256 checksum How to use checksums |
96915061b4fbabf63caacf0ef141779ee1543c551c5626263a5a5f8b87f82c15
|
|
BLAKE2b-256 checksum How to use checksums |
54c23b94b80d0743a51adcccc77a9cab4d254fd8a6dbaca9385d6d937f34da1c
|
| Upload date | |
|
Uploaded using Trusted Publishing? What is trusted publishing? |
No |
| Uploaded via |
twine/4.0.2 CPython/3.12.1
|
Release files / ParticleSeg3D-0.2.16-py3-none-any.whl
| Download URL | ParticleSeg3D-0.2.16-py3-none-any.whl |
|---|---|
| Size | 58.4 kB |
| Tags | Python 3 |
|
SHA-256 checksum How to use checksums |
5dbfc74b01ef0fd4c7849607510deaecb1353605043daa51df025226b40e05be
|
|
BLAKE2b-256 checksum How to use checksums |
3225e1257c38098d18e239c0dce54313080be4697c80c845c25cba26f100fa25
|
| Upload date | |
|
Uploaded using Trusted Publishing? What is trusted publishing? |
No |
| Uploaded via |
twine/4.0.2 CPython/3.12.1
|














