Segmentation and super resolution GAN network
Project description
SegSRGAN
This algorithm is based on the method proposed by Chi-Hieu Pham in 2019. More information about the SEGSRGAN algorithm can be found in the associated article.
Installation
User (recommended)
The library can be installed using Pypi
pip install SegSRGAN
NOTE: We recommend to use virtualenv
If the package is installed, one can find all the .py files presented hereafter using the importlib python package as follow :
importlib.util.find_spec("SegSRGAN").submodule_search_locations[0]
Developer
First, clone the repository. Use the make to run the testsuite
or yet create the pypi package.
git clone git@github.com:koopa31/SegSRGAN.git

make test
make pkg
Installation
pip install SegSRGAN
Perform a training:
Example :
python SegSRGAN_training.py
−−new_low_res 0.5 0.5 3
−−csv /home/user/data.csv
−−snapshot_ folder /home/user/training_weights
−−dice_file /home/user/dice.csv
−−mse_ file /home/user/mse_example_for_article.csv
−−folder_training_data/home/user/temporary_file_for_training
Options :
#### General options :
- csv (string): CSV file that contains the paths to the files used for the training. These files are divided into two categories: train and test. Consequently, it must contain 3 columns, called: HR_image, Label_image and Base (which is equal to either Train or Test), respectively
- dice_file (string): CSV file where to store the DICE at each epoch
- mse_file(string): CSV file where to store the MSE at each epoch
- epoch (integer) : number of training epochs
- batch_size (integer) : number of patches per mini batch
- number_of_disciminator_iteration (integer): how many times we train the discriminator before training the generator
- new_low_res (tuple): resolution of the LR image generated during the training. One value is given per dimension, for fixed resolution (e.g.“−−new_low_res 0.5 0.5 3”). Two values are given per dimension if the resolutions have to be drawn between bounds (e.g. “−−new_low_res 0.5 0.5 4 −−new_low_res 1 1 2” means that for each image at each epoch, x and y resolutions are uniformly drawn between 0.5 and 1, whereas z resolution is uniformly drawn between 2 and 4.
- snapshot_folder (string): path of the folder in which the weights will be regularly saved after a given number of epochs (this number is given by snapshot (integer) argument). But it is also possible to continue a training from its saved weight, adding the following parameters:
- folder_training_data (string): folder where temporary files are written during the training (created at the begining of each epoch and deleted at the end of it)
Network architecture options :
- kernel_gen (integer): number of output channels of the first convolutional layer of the generator.
- kernel_dis (integer): number of output channels of the first convolutional layer of the discriminator.
- is_conditional (Boolean): enables to train a conditional network with a condition on the input resolution (discriminator and generator are conditional).
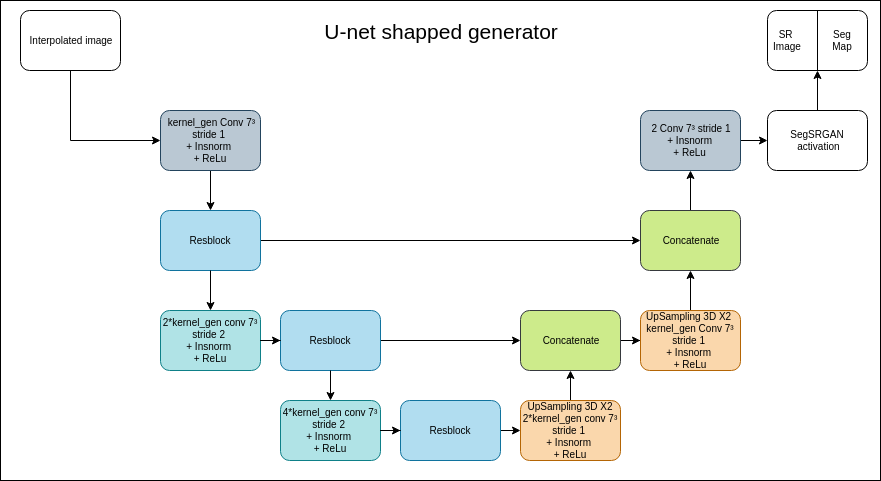
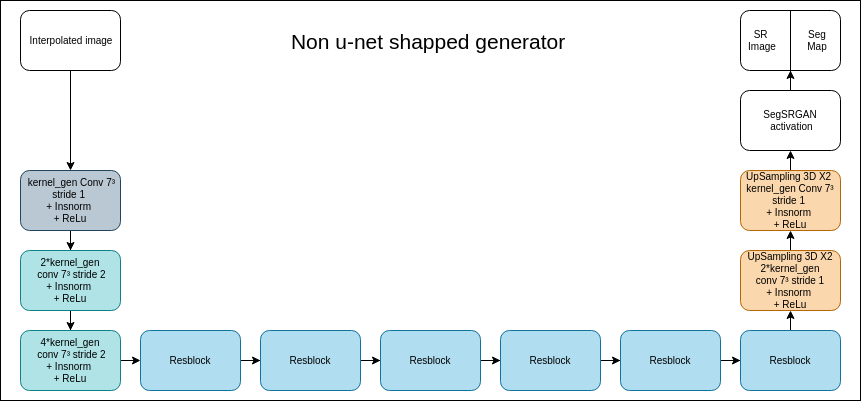
- u_net (Boolean): enables to train U-Net network (see difference between u-net and non u-net network in the images below).
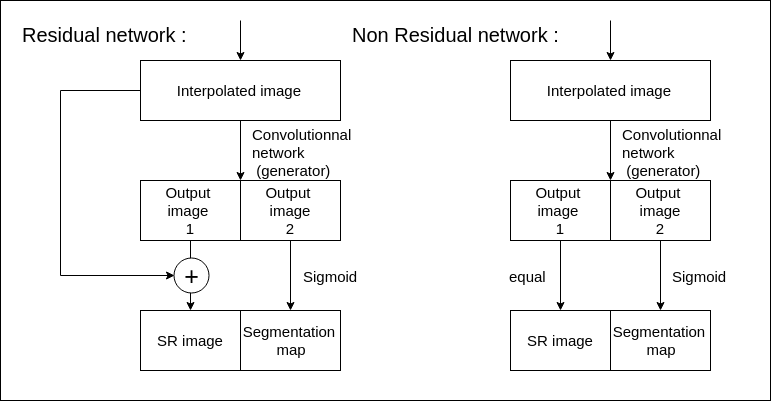
- is_residual (Boolean): determines whether the structure of the network is residual or not. This option only impacts the activation function of the generator (see image below for more details).

Residual vs non residual network
 |
|---|
 |
| U-net vs non u-net shaped network |
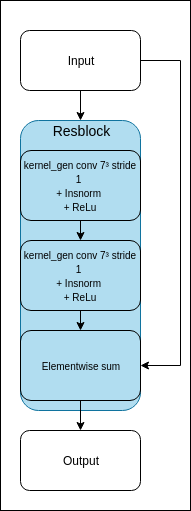
where the block denoted as "Resblock" is defined as follow :

Resblock
Options for continuing a training from set of weights :
- init_epoch (integer): number of the first epoch which will be considered during the continued training (e.g., 21 if the weights given were those obtained at the end of the 20th epoch). This is mainly useful to write the weights in the same folder as the training which is continued. Warning – The number of epochs of the remaining training is then epoch − initepoch +1.
- weights (string): path to the saved weights from which the training will be continued.
Options for data augmentation :
- percent_val_max: multiplicative value that gives the ratio of the maximal value of the image, to define the standard deviation of the additive Gaussian noise. For instance, a value of 0.03 means that sigma = 0.03 max(X) where max(X) is the maximal value of the image X.
- contrast_max: controls the modification of contrast of each image. For instance, a value of 0.4 means that at each epoch, each image will be set to a power uniformly drawn between 0.6 and 1.4.
Perform a segmentation :
Two ways are available to perform the segmentation :
- In command-lines (mainly useful to process several segmentations)
- Using a python function.
Python function :
As one can see in the testsuite/seg.py file, the python function can be used as follow :
from SegSRGAN.Function_for_application_test_python3 import segmentation

segmentation(input_file_path, step, new_resolution, patch, path_output_cortex, path_output_hr, weights_path)
Where:
- input_file_path is the path of the image to be super resolved and segmented
- step is the shifting step for the patches
- new_resolution is the new z-resolution we want for the output image
- path_output_cortex output path of the segmented cortex
- path_output_hr output path of the super resolution output image
- weights_path is the path of the file which contains the pre-trained weights for the neural network
- patch is the size of the patches
Segmentation of a set of images with several step and patch values
In order to facilitate the segmentation of several images, you can run SegSRGAN/SegSRGAN/job_model.py:
General description :
python job_model.py
--path
--patch
--step
--result_folder_name
--weights_path
The list of the paths of the images to be processed must be stored in a CSV file.
Where:
- path : Path of the CSV file
- patch : list of patch sizes
- step : list of steps
- result_folder_name : Name of the folder containing the results
#### Example :
python job_model . py −−path /home/data . csv −−patch "
64,128" −−step "32 64 ,64 128" −−
result_folder_name "
weights_without_augmentation" −−weights_path "
weights /Perso_without_data_augmentation"
CSV path parameter :
A CSV file, as the one mentioned in the above example, is used to get the paths of all the images to be processed. Only the first column of each entry will be used, and the file must only contain paths (i.e. no header).
Step and patch parameters :
In this example, we run steps 32 and 64 for patch 64 and steps 64 and 128 for patch 128. The list of the paths of the images to be processed must be stored in a CSV file. Warning – It is mandatory to respect exactly the same shape for the given step and patch. Weights parameter. The implementation of the algorithm allows one to use two different kinds of weights:
- The weights we have already trained.
- New weights one can obtain through the training.
In order to use the weights we have already trained, the easiest solution is to provide for the −−weights_path parameters some values as exemplified hereafter:
- weights/Perso_without_data_augmentation: corresponding to the weights without data augmentation.
- weights/Perso_with_constrast_0.5_and_noise_ 0.03_val_max: corresponding to the weights with data augmentation as described in Section 4.
Others weights not presented in this article are available (the help of SegSRGAN provides the list of all these available weights).
Organizing the output storage:
Each image to be processed has to be stored in its own folder. When processing a given input image (which can be either a NIfTI image or a DICOM folder), a dedicated folder is created for each output. This folder will be located in the folder of the input image which has been processed and will be named with respect to the value of the parameter −−result_folder_name (in our example the folder will be named “result_with_Weights_without_augmentation”). Finally, each initial image will contain a folder named “result_with_Weights_without_augmentation” and this folder will contain two NIfTI files, namely the SR and the segmentation.
Project details
Release history Release notifications | RSS feed
Download files
Download the file for your platform. If you're not sure which to choose, learn more about installing packages.


