Any-to-Any Terminology Mapping (AATM) is a framework for creating mappings between different terminologies or vocabularies. It uses OHDSI standard vocabularies and data models as a basis for mapping, and can be used to create mappings between any two terminologies or vocabularies. AATM is designed to be flexible and extensible, allowing users to create mappings for a wide range of use cases.

Project description
Any-to-Any Terminology Mapping
Any-to-Any Terminology Mapping is an open-source Python framework designed to facilitate terminology mapping tasks. The library organizes this process in a modular and extensible way to support multiple use cases and incorporate new techniques as they emerge.
In simple terms, mapping a new expression to a specific terminology involves considering many possible expressions, retrieving the best candidate target terms, and selecting them manually, which can be effortful and time-consuming.
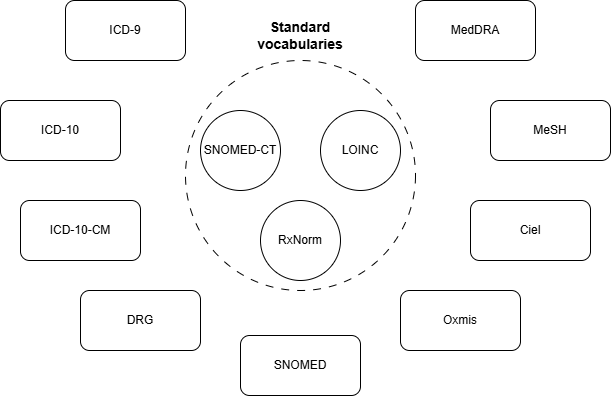
AATM leverages the OMOP vocabularies to facilitate this task. These vocabularies reflect large, community-driven mapping efforts that connect many different health-related terminologies and classifications worldwide and organize them around standard terminologies, which serve as the central connecting nodes in the system. As these mapping efforts continue, healthcare-related concepts become increasingly well represented in these vocabularies, creating a virtuous cycle and increasing the chances of finding a strong correspondence for a new unmapped expression.
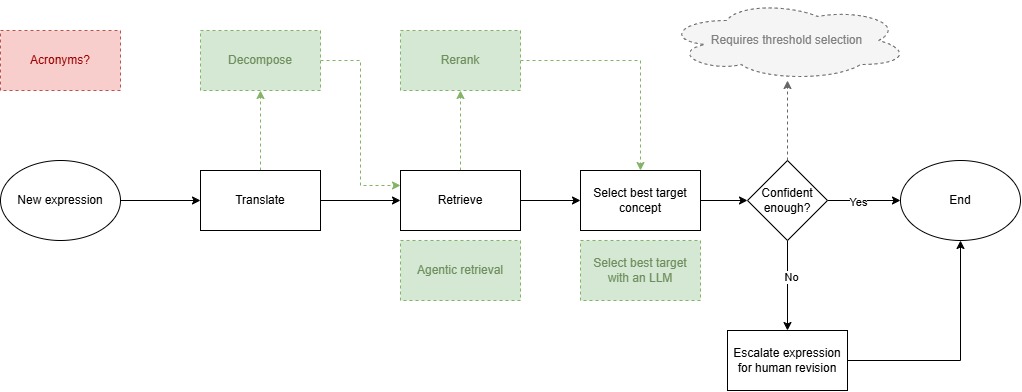
To accomplish this, AATM organizes the mapping process into very simple steps:
- translation, which can be optional;
- retrieval, which explores what is available from prior mapping efforts; and
- selection, which connects a standard concept to the new expression being mapped.
Once this connection is made, every link associated with that standard concept becomes immediately available, enabling mapping to many different terminologies and classifications that are already connected to that concept, effectively breaking down barriers to interoperability in healthcare.
Documentation
The full documentation is available at: https://precisiondata.github.io/aatm
Installation
Install the package in your environment.
pip install aatm
If you want to build from the source, clone the repository and install it locally:
git clone https://github.com/precisiondata/aatm.git
pip install -e .
git clone https://github.com/precisiondata/aatm.git
uv sync
1. Prepare your OMOP vocabularies directory
Before running aatm init, download the OMOP vocabularies you want to use and place them in a directory. You can find them at https://athena.ohdsi.org/vocabulary/list
By default, the CLI expects it at the root directory:
./vocabularies
If you do not use that location, you can point the CLI to a different directory with the option --vocab-dir or -vd. The CLI validates this path during initialization.
2. Run the initialization command
The init command is the main CLI setup workflow.
It does all of the following for you:
- creates the local
.aatmhelper directory where the local databases and aatm config files will be stored - ensures
.aatmis added to.gitignore - builds the local OMOP SQLite database
- lets you choose an embedding model
- lets you choose the standard vocabularies
- builds the mapping datasets
- builds the local vector database
That means you do not need to call Python setup functions manually for the normal setup flow. At the end, you will be ready to run terminology mapping tasks.
Simplest setup
aatm init
This uses the default vocab directory and interactively asks you to choose the embedding model, standard vocabularies and other options.
Setup with a custom vocab directory
aatm init --vocab-dir ./my_vocabularies
Setup with an explicit embedding model
aatm init --embedding-model embeddinggemma-300M
Setup with explicit standard vocabularies
aatm init --standard-vocabs LOINC --standard-vocabs SNOMED --standard-vocabs RxNorm
Fully explicit setup
aatm init \
  --vocab-dir ./vocabularies \
  --embedding-model embeddinggemma-300M \
  --standard-vocabs LOINC \
  --standard-vocabs SNOMED \
  --standard-vocabs RxNorm
3. Prepare your input CSV
After initialization, prepare the CSV you want to map.
The mapper expects an OMOP-style SOURCE_TO_CONCEPT_MAP input structure, including these columns:
source_codesource_concept_idsource_vocabulary_idsource_code_descriptionvalid_start_datevalid_end_dateinvalid_reason
Example:
source_code,source_concept_id,source_vocabulary_id,source_code_description,valid_start_date,valid_end_date,invalid_reason
A01,,LOCAL,"Dor no peito",2020-01-01,2099-12-31,
B02,,LOCAL,"Diabetes mellitus tipo 2",2020-01-01,2099-12-31,
4. Run mapping directly from the CLI
The map command runs a terminology mapping task. You can use it in two ways:
- with a task config file
- with explicit CLI options
Both paths are supported directly by the CLI implementation.
Option A: run from explicit CLI arguments
This is the most direct fully-CLI workflow.
aatm map \
  --input-file data/source_to_concept_map.csv \
  --output-dir output \
  --translator-id empty-translator \
  --retriever-id embeddinggemma-300M \
  --reranker-id bm25-reranker \
  --selector-id first-result-selector \
  --batch-size 100
Run a small test job
Use --limit-to when you want to test with only a few rows.
aatm map \
  --input-file data/source_to_concept_map.csv \
  --output-dir output \
  --translator-id empty-translator \
  --retriever-id embeddinggemma-300M \
  --reranker-id bm25-reranker \
  --selector-id first-result-selector \
  --limit-to 20
Apply rate limiting
If needed, you can also pass a rate limit:
aatm map \
  --input-file data/source_to_concept_map.csv \
  --output-dir output \
  --translator-id gemini-2.5-flash \
  --retriever-id embeddinggemma-300M \
  --reranker-id bm25-reranker \
  --selector-id first-result-selector \
  --batch-size 50 \
  --rate-limit 100
The CLI accepts all of these options directly.


Download files
Download the file for your platform. If you're not sure which to choose, learn more about installing packages.
Source Distribution
Built Distribution
Filter files by name, interpreter, ABI, and platform.
If you're not sure about the file name format, learn more about wheel file names.
Copy a direct link to the current filters
File details
Details for the file aatm-0.1.1.tar.gz.
File metadata
- Download URL: aatm-0.1.1.tar.gz
- Upload date:
- Size: 58.2 kB
- Tags: Source
- Uploaded using Trusted Publishing? No
- Uploaded via: twine/6.2.0 CPython/3.12.9
File hashes
| Algorithm | Hash digest | |
|---|---|---|
| SHA256 |
18d9e80db158bb50ae9a37f185a67170b7a8de478e38478cb5227b5f7f2b1c01
|
|
| MD5 |
f83c124b583838762069eeac5a3421c0
|
|
| BLAKE2b-256 |
82b8c0c918d331b50630f31fa1ef3cb485906b30d1769e9a290fc802f85e79d9
|
File details
Details for the file aatm-0.1.1-py3-none-any.whl.
File metadata
- Download URL: aatm-0.1.1-py3-none-any.whl
- Upload date:
- Size: 75.8 kB
- Tags: Python 3
- Uploaded using Trusted Publishing? No
- Uploaded via: twine/6.2.0 CPython/3.12.9
File hashes
| Algorithm | Hash digest | |
|---|---|---|
| SHA256 |
0baa898f3646358bfc47ddd0fca65b152c8585574e41bd6b3557a5af157e705a
|
|
| MD5 |
3af918a985076767d7d06ad8680a66a5
|
|
| BLAKE2b-256 |
e6de6d72ce1a0c411b6fd86b4ad4786431e602d6ec0778f14ade0b60653badc9
|


