De Novo Mass Spectrometry Peptide Sequencing with a Transformer Model


Project description
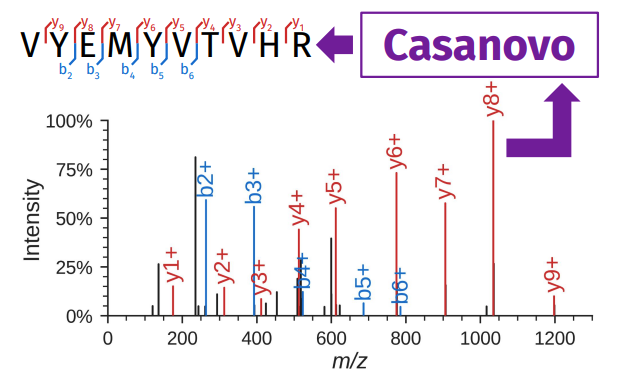
Casanovo
De Novo Mass Spectrometry Peptide Sequencing with a Transformer Model
If you use Casanovo in your work, please cite the following publication:
- Yilmaz, M., Fondrie, W. E., Bittremieux, W., Oh, S. & Noble, W. S. De novo mass spectrometry peptide sequencing with a transformer model. in Proceedings of the 39th International Conference on Machine Learning - ICML '22 vol. 162 25514–25522 (PMLR, 2022). https://proceedings.mlr.press/v162/yilmaz22a.html
Documentation
https://casanovo.readthedocs.io/en/latest/
Getting started with Casanovo
We recommend to run Casanovo in a dedicated Anaconda environment. This helps keep your environment for Casanovo and its dependencies separate from your other Python environments. This is especially helpful because Casanovo works within a specific range of Python versions (3.8 ≥ Python version ≥ 3.10).
Once you have Anaconda installed, you can use this helpful cheat sheet to see common commands and what they do.
Environment creation
Open up the anaconda prompt and run this command:
conda create --name casanovo_env python=3.8
This will create an anaconda environment called casanovo_env that has Python 3.8 installed.
(You can check if it was created by typing conda env list.)
You can activate this environment by typing:
conda activate casanovo_env
To the left of your anaconda prompt line it should now say (casanovo_env) instead of (base). If this is the case, then you have set up anaconda and the environment properly.
Be sure to retype in the activation command into your terminal when you reopen anaconda and want to use Casanovo. The base environment most likely will not work.
Installation
Install Casanovo as a Python package from this repository (requires 3.8 ≥ [Python version] ≥ 3.10 , dependencies will be installed automatically as needed):
pip install casanovo
Once installed, Casanovo can be used with a simple command line interface.
Run casanovo --help for more details.
All auxiliary data, model, and training-related parameters can be specified in a user created .yaml configuration file.
See casanovo/config.yaml for the default configuration that was used to obtain the reported results.
Model weights
When running Casanovo in denovo or eval mode, Casanovo needs compatible pretrained model weights to make predictions.
Model weights can be found on the Releases page under the "Assets" for each release (file extension: .ckpt).
The model file can then be specified using the --model command-line parameter when executing Casanovo.
To assist users, if no model file is specified Casanovo will try to download and use a compatible model file automatically.
Not all releases might have a model file included on the Releases page, in which case model weights for alternative releases with the same major version number can be used.
Example commands
- To run de novo sequencing:
casanovo --mode=denovo --peak_path=path/to/predict/spectra.mgf --output=path/to/output
Casanovo can predict peptide sequences for MS/MS data in mzML, mzXML, and MGF files. This will write peptide predictions for the given MS/MS spectra to the specified output file in mzTab format.
- To evaluate de novo sequencing performance based on known spectrum annotations:
casanovo --mode=eval --peak_path=path/to/test/annotated_spectra.mgf
To evaluate the peptide predictions, ground truth peptide labels need to be provided as an annotated MGF file.
- To train a model from scratch:
casanovo --mode=train --peak_path=path/to/train/annotated_spectra.mgf --peak_path_val=path/to/validation/annotated_spectra.mgf
Training and validation MS/MS data need to be provided as annotated MGF files.
If a training is continued for a previously trained model, specify the starting model weights using --model.
Example job
We will demonstrate how to use Casanovo using a small walkthrough example on a small MGF file (~100 MS/MS spectra).
The example MGF file is available at sample_data/sample_preprocessed_spectra.mgf.
- Install Casanovo (see above for details).
- Ensure you are in the proper anaconda environment by typing
conda activate casanovo_env. (If you named your environment differently, type in that name instead.) - Run this command:
casanovo --mode=denovo --peak_path=[PATH_TO]/sample_preprocessed_spectra.mgf
Note: If you want to store the output mzTab file in a different location than the current working directory, specify an alternative output location using the --output parameter.
This job will take very little time to run (< 1 minute).
Congratulations! You got Casanovo to work.
Common Troubleshooting / FAQ
I installed Casanovo and it worked before, but I after reopening Anaconda it says that Casanovo is not installed.
Make sure you are in the casanovo_env environment. You can ensure this by typing:
conda activate casanovo_env
Which command-line options are available?
Run the following command in your command prompt to see all possible command-line configuration options:
casanovo --help
Additionally, you can use a configuration file to fully customize Casanovo.
You can find the config.yaml configuration file that is used by default here.
I get a "CUDA out of memory" error when trying to run Casanovo. Help!
This means that there was not enough (free) memory available on your GPU to run Casanovo, which is especially likely to happen when you are using a smaller, consumer-grade GPU.
We recommend trying to decrease the train_batch_size or predict_batch_size options in the config file (depending on whether the error occurred during train or denovo mode) to reduce the number of spectra that are processed simultaneously.
Additionally, we recommend shutting down any other processes that may be running on the GPU, so that Casanovo can exclusively use the GPU.
How do I solve a "PermissionError: GitHub API rate limit exceeded" error when trying to run Casanovo?
When running Casanovo in denovo or eval mode, Casanovo needs compatible pretrained model weights to make predictions.
If no model weights file is specified using the --model command-line parameter, Casanovo will automatically try to download the latest compatible model file from GitHub and save it to its cache for subsequent use.
However, the GitHub API is limited to maximum 60 requests per hour per IP address.
Consequently, if Casanovo has been executed multiple times already, it might temporarily not be able to communicate with GitHub.
You can avoid this error by explicitly specifying the model file using the --model parameter.
I see "NotImplementedError: The operator 'aten::index.Tensor'..." when using a Mac with an Apple Silicon chip.
Casanovo can leverage Apple's Metal Performance Shaders (MPS) on newer Mac computers, which requires that the PYTORCH_ENABLE_MPS_FALLBACK is set to 1:
export PYTORCH_ENABLE_MPS_FALLBACK=1
This will need to be set with each new shell session, or you can add it to your .bashrc / .zshrc to set this environment variable by default.
Release history Release notifications | RSS feed


Download files
Download the file for your platform. If you're not sure which to choose, learn more about installing packages.
Source Distribution
Built Distribution
Filter files by name, interpreter, ABI, and platform.
If you're not sure about the file name format, learn more about wheel file names.
Copy a direct link to the current filters
File details
Details for the file casanovo-3.1.0.tar.gz.
File metadata
- Download URL: casanovo-3.1.0.tar.gz
- Upload date:
- Size: 158.1 kB
- Tags: Source
- Uploaded using Trusted Publishing? No
- Uploaded via: twine/4.0.1 CPython/3.11.0
File hashes
| Algorithm | Hash digest | |
|---|---|---|
| SHA256 |
63217f305d1f086413395a2ca14b2a747640c8e857ff8282736104e43b6ae156
|
|
| MD5 |
2f94fd27cd7d7e6770580a34d54bff21
|
|
| BLAKE2b-256 |
a2f2b8c1d21e8df38c6115042b5d13b442ac13e3bb40d20de38757a4d83df5a4
|
File details
Details for the file casanovo-3.1.0-py3-none-any.whl.
File metadata
- Download URL: casanovo-3.1.0-py3-none-any.whl
- Upload date:
- Size: 33.2 kB
- Tags: Python 3
- Uploaded using Trusted Publishing? No
- Uploaded via: twine/4.0.1 CPython/3.11.0
File hashes
| Algorithm | Hash digest | |
|---|---|---|
| SHA256 |
649b0b7a7d7225b530970017c39cf66b0df3a1e1d34ceec448f7aa7abd8ccfa0
|
|
| MD5 |
220825daf56ceaff278f2b2339fe11c1
|
|
| BLAKE2b-256 |
529a28c3e810ce507af01b20383b143e5754a583414645dac7c3f153276cb083
|


