A simple Discord chat exporter for Python Discord bots.
Verified details
These details have been verified by PyPIProject links
GitHub Statistics
Maintainers


Project description


DiscordChatExporterPy
Export Discord chats with your discord.py (or fork) bots!
Join Discord
·
Report Bug
·
Request Feature
Installation
To install the library to your virtual environment, for bot usage, run the command:
pip install chat-exporter
To clone the repository locally, run the command:
git clone https://github.com/mahtoid/DiscordChatExporterPy
Usage
There are currently 3 methods (functions) to chat-exporter which you can use to export your chat.
Expand the blocks below to learn the functions, arguments and usages.
Basic Usage
.quick_export() is the simplest way of using chat-exporter.
Using the quick_export function will gather the history of the channel you give, build the transcript then post the file and embed directly to the channel - returning a message object gathered from the message it posted.
This is mostly seen as a demo function, as opposed to a command you should actually use.
Required Argument(s):
channel: discord.TextChannel object, whether ctx.channel or any channel you gather.
Optional Argument(s):
bot: commands.Bot object to gather members who are no longer in your guild.
raise_exceptions: bool flag to raise exceptions instead of printing them to the console and surpressing the exception.
Return Argument:
discord.Message: The message quick_export will send, containing the embed and exported chat file.
Example:
import discord
import chat_exporter
from discord.ext import commands

intents = discord.Intents.default()
intents.members = True
intents.message_content = True

bot = commands.Bot(command_prefix="!", intents=intents)

...

@bot.command()
async def save(ctx: commands.Context):
    await chat_exporter.quick_export(ctx.channel)

...
Customisable Usage
.export() is the most efficient and flexible method to export a chat using chat-exporter.
Using the export function will generate a transcript using the channel you pass in, along with using any of the custom kwargs passed in to set limits, timezone, 24h formats and more (listed below).
This would be the main function to use within chat-exporter.
Required Argument(s):
channel: discord.TextChannel object, whether ctx.channel or any channel you gather.
Optional Argument(s):
limit: Integer value to set the limit (amount of messages) the chat exporter gathers when grabbing the history (default=unlimited).
tz_info: String value of a TZ Database name to set a custom timezone for the exported messages (default=UTC).
guild: discord.Guild object which can be passed in to solve bugs for certain forks.
military_time: Boolean value to set a 24h format for times within your exported chat (default=False | 12h format).
fancy_times: Boolean value which toggles the 'fancy times' (Today|Yesterday|Day).
before: datetime.datetime object which allows to gather messages from before a certain date.
after: datetime.datetime object which allows to gather messages from after a certain date.
bot: commands.Bot object to gather members who are no longer in your guild.
attachment_handler: chat_exporter.AttachmentHandler object to export assets to in order to make them available after the channel got deleted.
raise_exceptions: bool flag to raise exceptions instead of printing them to the console and surpressing the exception.
Return Argument:
transcript: The HTML build-up for you to construct the HTML File with Discord.
Example:
import io

...

@bot.command()
async def save(ctx: commands.Context, limit: int = 100, tz_info: str = "UTC", military_time: bool = True):
    transcript = await chat_exporter.export(
        ctx.channel,
        limit=limit,
        tz_info=tz_info,
        military_time=military_time,
        bot=bot,
    )

    if transcript is None:
        return

    transcript_file = discord.File(
        io.BytesIO(transcript.encode()),
        filename=f"transcript-{ctx.channel.name}.html",
    )

    await ctx.send(file=transcript_file)
Raw Usage
.raw_export() is for the crazy people who like to do their own thing when using chat-exporter.
Using the raw_export function will generate a transcript using the list of messages you pass in, along with using any of the custom kwargs passed in to set limits, timezone, 24h formats and more (listed below).
This would be for people who want to filter what content to export.
Required Argument(s):
channel: discord.TextChannel object, whether ctx.channel or any channel you gather (this is just for padding the header).
messages: A list of Message objects which you wish to export to an HTML file.
Optional Argument(s):
tz_info: String value of a TZ Database name to set a custom timezone for the exported messages (default=UTC)
military_time: Boolean value to set a 24h format for times within your exported chat (default=False | 12h format)
fancy_times: Boolean value which toggles the 'fancy times' (Today|Yesterday|Day)
bot: commands.Bot object to gather members who are no longer in your guild.
attachment_handler: chat_exporter.AttachmentHandler object to export assets to in order to make them available after the channel got deleted.
raise_exceptions: bool flag to raise exceptions instead of printing them to the console and surpressing the exception.
Return Argument:
transcript: The HTML build-up for you to construct the HTML File with Discord.
Example:
import io

...

@bot.command()
async def purge(ctx: commands.Context, tz_info: str, military_time: bool):
    deleted_messages = await ctx.channel.purge()

    transcript = await chat_exporter.raw_export(
        ctx.channel,
        messages=deleted_messages,
        tz_info=tz_info,
        military_time=military_time,
        bot=bot,
    )

    if transcript is None:
        return

    transcript_file = discord.File(
        io.BytesIO(transcript.encode()),
        filename=f"transcript-{ctx.channel.name}.html",
    )

    await ctx.send(file=transcript_file)
Attachment Handler
Due to Discords newly introduced restrictions on to their CDN, we have introduced an Attachment Handler. This handler will assist you with circumventing the 'broken' and 'dead-assets' which arise when former attachments hosted by Discord reach their expiration date.
The AttachmentHandler serves as a template for you to implement your own asset handler. Below are two basic examples on
how to use the AttachmentHandler. One using the example of storing files on a local webserver, with the other being
an example of storing them on Discord (the latter merely just being an example, this will still obviously run in to
the expiration issue).
If you do not specify an attachment handler, chat-exporter will continue to use the URLs for the assets.
Concept
The concept of implementing such an AttachmentHandler is very easy. In the following a short general procedure is described to write your own AttachmentHandler fitting your storage solution. Here we will assume, that we store the attachments in a cloud storage.
- Subclassing
Start by subclassing
chat_exporter.AttachmentHandlerand implement the__init__method if needed. This should look something like this:
from chat_exporter import AttachmentHandler
from cloud_wrapper import CloudClient


class MyAttachmentHandler(AttachmentHandler):
    def __init__(self, *args, **kwargs):
        # Your initialization code here
        # in your case we just create the cloud client
        self.cloud_client = CloudClient()
- Overwrite process_asset
The
process_assetmethod is the method that is called for each asset in the chat. Here we have to implement the upload logic and the generation of the asset url from the uploaded asset.
import io
import aiohttp
from chat_exporter import AttachmentHandler
from cloud_wrapper import CloudClient
from discord import Attachment


class MyAttachmentHandler(AttachmentHandler):
    def __init__(self, *args, **kwargs):
        # Your initialization code here
        # in your case we just create the cloud client
        self.cloud_client = CloudClient()

    async def process_asset(self, attachment: Attachment):
        # Your upload logic here, in our example we just upload the asset to the cloud

        # first we need to authorize the client
        await self.cloud_client.authorize()

        # then we fetch the content of the attachment
        async with aiohttp.ClientSession() as session:
            async with session.get(attachment.url) as res:
                if res.status != 200:
                    res.raise_for_status()
                data = io.BytesIO(await res.read())
        data.seek(0)

        # and upload it to the cloud, back we get some sort of identifier for the uploaded file
        asset_id = await self.cloud_client.upload(data)

        # now we can generate the asset url from the identifier
        asset_url = await self.cloud_client.get_share_url(asset_id, shared_with="everyone")

        # and set the url attribute of the attachment to the generated url
        attachment.url = asset_url
        return attachment
Note
- The
process_assetmethod should return the attachment object with the url attribute set to the generated url. - The
process_assetmethod should be an async method, as it is likely that you have to do some async operations like fetching the content of the attachment or uploading it to the cloud. - You are free to add other methods in your class, and call them from
process_assetif you need to do some operations before or after the upload of the asset. But theprocess_assetmethod is the only method that is called from chat-exporter.
Examples:
AttachmentToLocalFileHostHandler
Assuming you have a file server running, which serves the content of the folder /usr/share/assets/
under https://example.com/assets/, you can easily use the AttachmentToLocalFileHostHandler like this:
import io
import discord
from discord.ext import commands
import chat_exporter
from chat_exporter import AttachmentToLocalFileHostHandler

...

# Establish the file handler
file_handler = AttachmentToLocalFileHostHandler(
    base_path="/usr/share/assets",
    url_base="https://example.com/assets/",
)

@bot.command()
async def save(ctx: commands.Context):
    transcript = await chat_exporter.export(
        ctx.channel,
        attachment_handler=file_handler,
    )

    if transcript is None:
        return

    transcript_file = discord.File(
        io.BytesIO(transcript.encode()),
        filename=f"transcript-{ctx.channel.name}.html",
    )

    await ctx.send(file=transcript_file)
AttachmentToDiscordChannel
Assuming you want to store your attachments in a discord channel, you can use the AttachmentToDiscordChannel.
Please note that discord recent changes regarding content links will result in the attachments links being broken
after 24 hours. While this is therefor not a recommended way to store your attachments, it should give you a good
idea how to perform asynchronous storing of the attachments.
import io
import discord
from discord.ext import commands
import chat_exporter
from chat_exporter import AttachmentToDiscordChannel

...

# Establish the file handler
channel_handler = AttachmentToDiscordChannel(
    channel=bot.get_channel(CHANNEL_ID),
)

@bot.command()
async def save(ctx: commands.Context):
    transcript = await chat_exporter.export(
        ctx.channel,
        attachment_handler=channel_handler,
    )

    if transcript is None:
        return

    transcript_file = discord.File(
        io.BytesIO(transcript.encode()),
        filename=f"transcript-{ctx.channel.name}.html",
    )

    await ctx.send(file=transcript_file)
AttachmentToWebhookHandler
Assuming you want to store your attachments in a discord channel using webhook, you can use the AttachmentToWebhookHandler.
Please note that discord recent changes regarding content links will result in the attachments links being broken
after 24 hours. While this is therefor not a recommended way to store your attachments, it should give you a good
idea how to perform asynchronous storing of the attachments.
import io
import discord
from discord.ext import commands
import chat_exporter
from chat_exporter import AttachmentToWebhookHandler

...

# Establish the webhook handler
webhook_handler = AttachmentToWebhookHandler(
    webhook_link="https://discord.com/api/webhooks/....",
)

@bot.command()
async def save(ctx: commands.Context):
    transcript = await chat_exporter.export(
        ctx.channel,
        attachment_handler=webhook_handler,
    )

    if transcript is None:
        return

    # Due to Discord webhook file size limits (8MB),
    # Attachments larger than 8MB are not attached directly.
    # Instead, it stores a placeholder image saying "Attachment size is too high".
    transcript_file = discord.File(
        io.BytesIO(transcript.encode()),
        filename=f"transcript-{ctx.channel.name}.html",
    )

    await ctx.send(file=transcript_file)
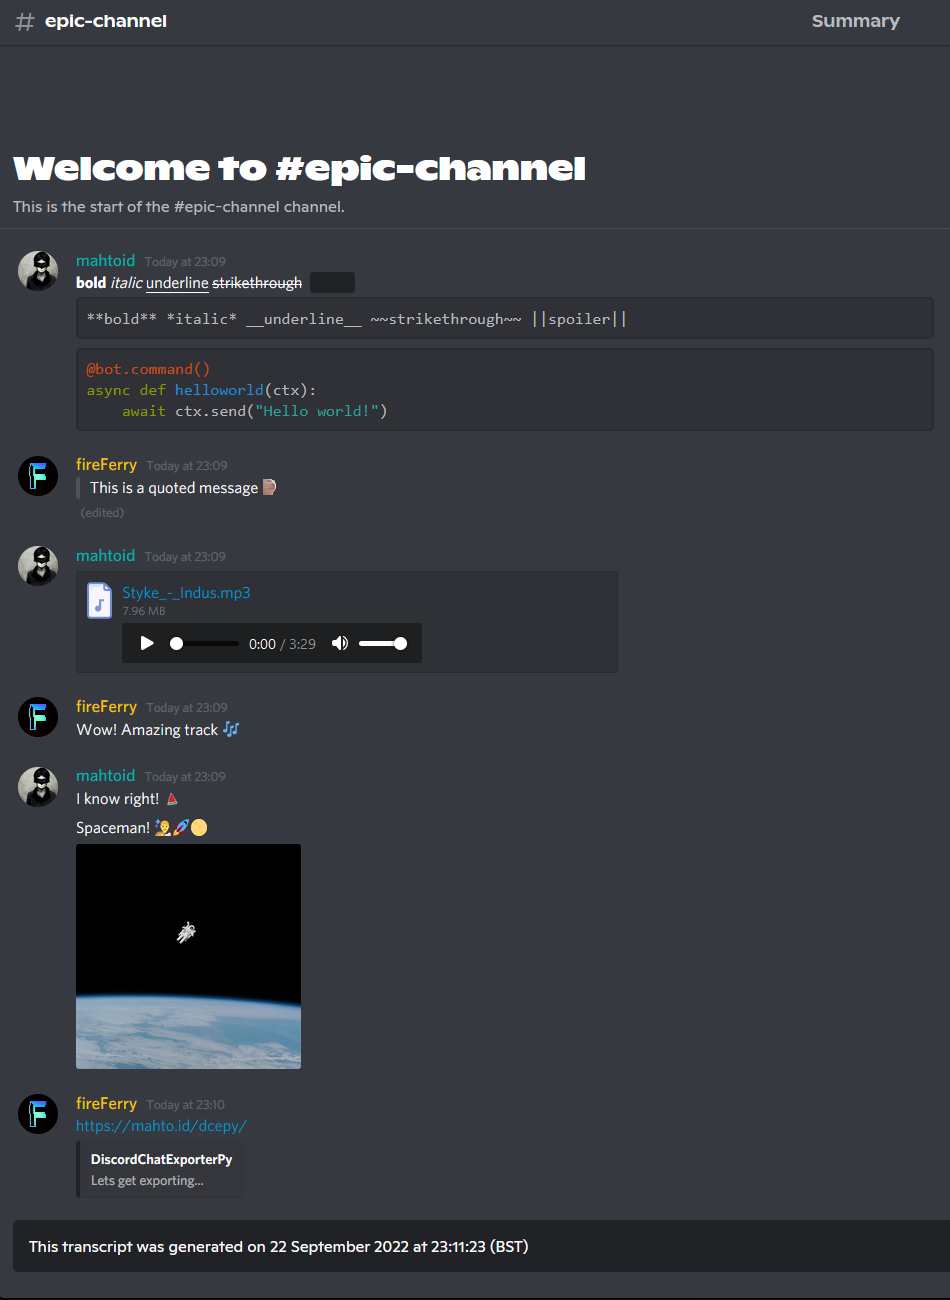
Screenshots
General
Discord
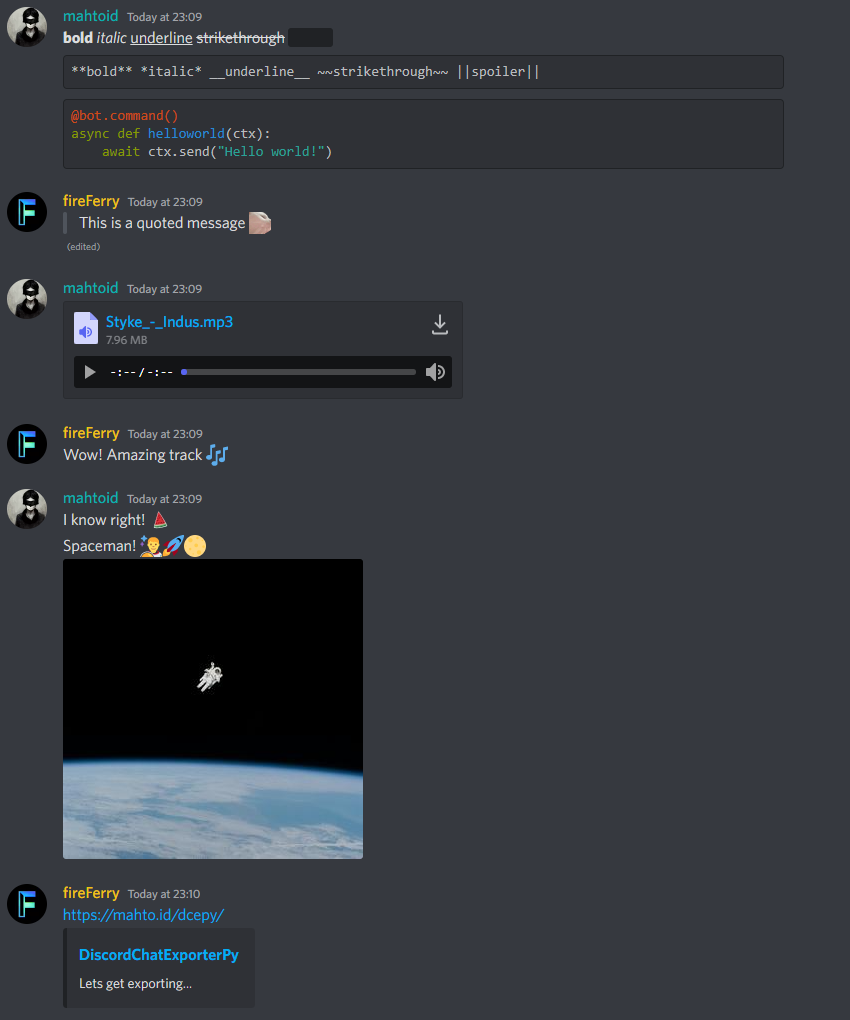
Chat-Exporter
Attributions
This project borrows CSS and HTML code from Tyrrrz's C# DiscordChatExporter repository.
Project details
Verified details
These details have been verified by PyPIProject links
GitHub Statistics
Maintainers
Release history Release notifications | RSS feed


Download files
Download the file for your platform. If you're not sure which to choose, learn more about installing packages.
Source Distribution
Built Distribution
Filter files by name, interpreter, ABI, and platform.
If you're not sure about the file name format, learn more about wheel file names.
Copy a direct link to the current filters
File details
Details for the file chat_exporter-3.1.0.tar.gz.
File metadata
- Download URL: chat_exporter-3.1.0.tar.gz
- Upload date:
- Size: 72.4 kB
- Tags: Source
- Uploaded using Trusted Publishing? Yes
- Uploaded via: twine/6.1.0 CPython/3.13.12
File hashes
| Algorithm | Hash digest | |
|---|---|---|
| SHA256 |
651cd64ad9739d78a3e20d8f8fb4735750074ed01bf5d2477a7e02bc7d0285e0
|
|
| MD5 |
14e167d2ddd7d3a64c652544e869d407
|
|
| BLAKE2b-256 |
b2c5002c2964b1d7742a72f5c560b9935fd45af388816a892634cc19e1ccb673
|
Provenance
The following attestation bundles were made for chat_exporter-3.1.0.tar.gz:
Publisher:
python-publish.yml on mahtoid/DiscordChatExporterPy
-
Statement:
-
Statement type:
https://in-toto.io/Statement/v1 -
Predicate type:
https://docs.pypi.org/attestations/publish/v1 -
Subject name:
chat_exporter-3.1.0.tar.gz -
Subject digest:
651cd64ad9739d78a3e20d8f8fb4735750074ed01bf5d2477a7e02bc7d0285e0 - Sigstore transparency entry: 1429598300
- Sigstore integration time:
-
Permalink:
mahtoid/DiscordChatExporterPy@b221a7f289a58011866eb91dcb3b2e7dc749aca7 -
Branch / Tag:
refs/tags/3.1.0 - Owner: https://github.com/mahtoid
-
Access:
public
-
Token Issuer:
https://token.actions.githubusercontent.com -
Runner Environment:
github-hosted -
Publication workflow:
python-publish.yml@b221a7f289a58011866eb91dcb3b2e7dc749aca7 -
Trigger Event:
release
-
Statement type:
File details
Details for the file chat_exporter-3.1.0-py3-none-any.whl.
File metadata
- Download URL: chat_exporter-3.1.0-py3-none-any.whl
- Upload date:
- Size: 80.6 kB
- Tags: Python 3
- Uploaded using Trusted Publishing? Yes
- Uploaded via: twine/6.1.0 CPython/3.13.12
File hashes
| Algorithm | Hash digest | |
|---|---|---|
| SHA256 |
9a37828d2e03eff87f953767bde5d1d80487cee926cfe78bb822de8341e67af1
|
|
| MD5 |
80bf8293baa82ca2802a331503b967fd
|
|
| BLAKE2b-256 |
98b94ca2f440c6ad4b06b9eb1050af135afce5b81221c6a2d140546c1a8144c0
|
Provenance
The following attestation bundles were made for chat_exporter-3.1.0-py3-none-any.whl:
Publisher:
python-publish.yml on mahtoid/DiscordChatExporterPy
-
Statement:
-
Statement type:
https://in-toto.io/Statement/v1 -
Predicate type:
https://docs.pypi.org/attestations/publish/v1 -
Subject name:
chat_exporter-3.1.0-py3-none-any.whl -
Subject digest:
9a37828d2e03eff87f953767bde5d1d80487cee926cfe78bb822de8341e67af1 - Sigstore transparency entry: 1429598307
- Sigstore integration time:
-
Permalink:
mahtoid/DiscordChatExporterPy@b221a7f289a58011866eb91dcb3b2e7dc749aca7 -
Branch / Tag:
refs/tags/3.1.0 - Owner: https://github.com/mahtoid
-
Access:
public
-
Token Issuer:
https://token.actions.githubusercontent.com -
Runner Environment:
github-hosted -
Publication workflow:
python-publish.yml@b221a7f289a58011866eb91dcb3b2e7dc749aca7 -
Trigger Event:
release
-
Statement type:


