Generate STL files from numpy arrays and text (based on thearn/stl_tools)

Project description
csdt_stl_tools
This is a fork of this repository.
Needed in order to have our stl converter properly working with the site.
Additional documentation and setup for PyPi can be found here.
Note: You need to be added to our PyPi repository to make your have your changes reflected on the site. Also, make sure to remember to update requirements.txt in csdt_website to latest version of csdt_stl_tools.
Python 3.7.3
================================================================
Python code to generate STL geometry files from plain text, LaTeX code, and 2D numpy arrays (matrices). (Based on thearn/csdt_stl_tools)
This allows for rapid 3D printing of text, rendered equations, or simple digital images. Use them for product prototyping, art, cookie cutters, ice cube trays, chocolate molds, (see this to learn how to make a printed object food-safe) or whatever else you can think of.
Some modification may be needed to the STL or printer settings to get certain shapes to print cleanly (i.e. thicker base, support structures, etc).
Besides printing, these can also be merged into other 3D meshes for many other possible uses, using programs such as Blender.
Also included is a function that can convert raw LaTeX expressions to high quality .png images, which allows for simple inclusion of LaTeX equations into non-LaTeX document editors.
A command-line script for converting images to STL (no text yet) is included in the installation for those who do not want to write Python code directly.
Requirements:
- Python 2.7+ or 3.2+
- Numpy 1.7 or higher (for array manipulation)
- Scipy 0.12 or higher (for resizing and filtering functions)
- Matplotlib 1.2.1 or higher (for rendering text and LaTeX to image data)
Installation:
There are two ways to install csdt_stl_tools.
It's recommended that you install Numpy, Scipy, and Matplotlib first, either
using binary installers (windows) or using a package manager (apt-get,
homebrew), etc.
Installing straight from PyPI:
Run pip install csdt_stl_tools.
Installing from Source:
Run python setup.py build install to install.
Either method will also install the
command line script image2stl into the Python/Scripts directory.
Automatic tests can be performed by running csdt_stl_tools/test/test_stl.py.
If a path to a C compiler is found by setuptools, a C-extension will be built to handle most of the computational heavy lifting needed by the library at runtime. The library can default to using plain python code as well, though this is much slower.
Quickstart Examples:
Run the file examples.py to produce a few sample STL files from images included in examples/example_data.
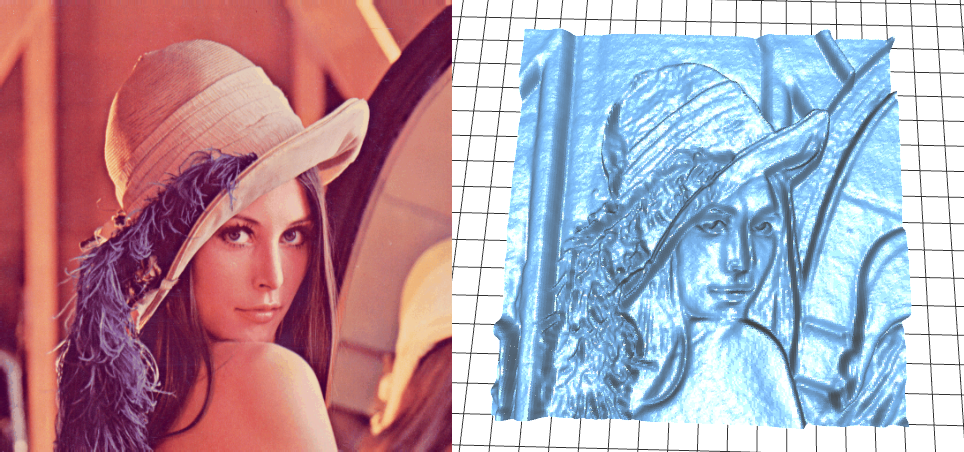
The first example converts the commonly-used Lena test image to an STL file The "solid" keyword argument sets whether to create a solid geometry (with sides and a bottom) or not. The algorithm used to generate the sides and bottom have not yet been optimized, so may double the file size at the moment. We'll generate this example without a bottom.
from csdt_stl_tools import numpy2stl

from scipy.misc import lena, imresize
from scipy.ndimage import gaussian_filter


A = imresize(lena(), (256, 256))  # load Lena image, shrink in half
A = gaussian_filter(A, 1)  # smoothing

numpy2stl(A, "examples/Lena.stl", scale=0.1, solid=False)
Source image vs. output geometry:
The next two examples convert logos to STL, using color information to achieve appropriate 3D layering. For this example, we'll generate a solid geometry (solid=True), for comparison to the first example.
Python code:
from pylab import imread

A = 256 * imread("examples/example_data/NASA.png")
A = A[:, :, 2] + 1.0*A[:,:, 0] # Compose RGBA channels to give depth
A = gaussian_filter(A, 1)  # smoothing
numpy2stl(A, "examples/NASA.stl", scale=0.05, mask_val=5., solid=True)
Equivalent command-line syntax:
> image2stl NASA.png -scale 0.05 -mask_val 5. -RGBA_weights 1. 0. 1. 0. -gaussian_filter 1

Python code:
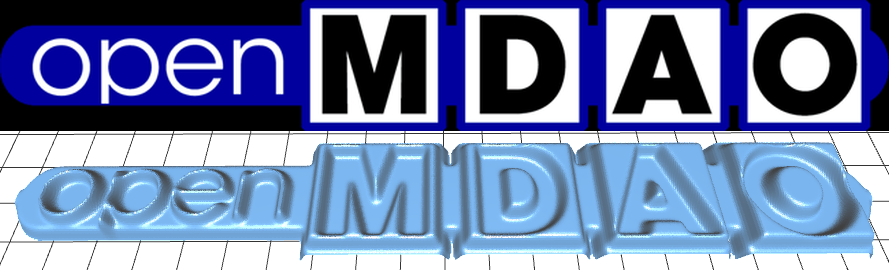
A = 256 * imread("examples/example_data/openmdao.png")
A =  A[:, :, 0] + 1.*A[:,:, 3] # Compose some elements from RGBA to give depth
A = gaussian_filter(A, 2)  # smoothing
numpy2stl(A, "examples/OpenMDAO-logo.stl", scale=0.05, mask_val=1., solid=False)
Equivalent command-line syntax:
> image2stl openmdao.png -scale 0.05 -mask_val 1. -RGBA_weights 1. 0. 0. 1. -gaussian_filter 2
Source image vs. output geometry:
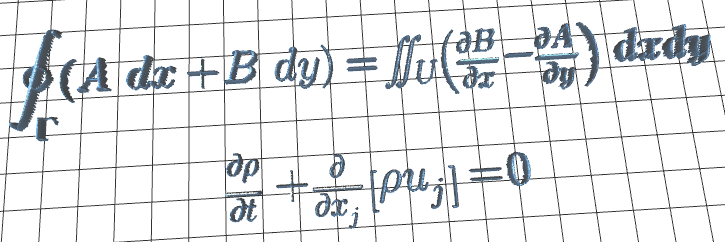
Finally, this example renders a LaTeX expression into a png image, then converts this image to an STL.
Note that LaTeX expressions which coincidentally contain special ASCII markers (such as \n and \r)
have to be escaped with an additional slash in those positions in order to be properly rendered, unless these
markers are intended.
Python code:
from csdt_stl_tools import numpy2stl, text2png, text2array

text = ("$\oint_{\Gamma} (A\, dx + B\, dy) = \iint_{U} \left(\\frac{\partial "
        "B}{\partial x} - \\frac{\partial A}{\partial y}\\right)\ dxdy$ \n\n "
        "$\\frac{\partial \\rho}{\partial t} + \\frac{\partial}{\partial x_j}"
        "\left[ \\rho u_j \\right] = 0$")
text2png(text, "examples/Greens-Theorem_Navier-Stokes", fontsize=50) #save png

A = imread("examples/Greens-Theorem_Navier-Stokes.png") # read from rendered png
A = A.mean(axis=2) #grayscale projection
A = gaussian_filter(A.max() - A, 1.)

numpy2stl(A, "examples/Greens-Theorem_Navier-Stokes.stl", scale=0.2,
                                                         mask_val = 5.)
Source image vs. output geometry:

Library usage:
There are 3 principal functions (no classes) to import and use from csdt_stl_tools:
csdt_stl_tools.numpy2stl
numpy2stl(A, fn, scale=0.1, mask_val = -np.inf, ascii=False, calc_normals=False)
Reads a numpy array, and outputs an STL file

Inputs:
 A (ndarray) -  an 'm' by 'n' 2D numpy array
 fn (string) -  filename to use for STL file

Optional input:
 scale (float)  -  scales the height (surface) of the
                   resulting STL mesh. Tune to match needs

 mask_val (float) - any element of the inputted array that is less
                    than this value will not be included in the mesh.
                    default renders all vertices (x > -inf for all float x)

 ascii (bool)  -  sets the STL format to ascii or binary (default)

 calc_normals (bool) - sets whether surface normals are calculated or not

 max_width, max_depth, max_height (floats) - maximum size of the stl
                                            object (in mm). Match this to
                                            the dimensions of a 3D printer platform

Returns: (None)
numpy2stl() is the main function of this repository.
It takes a 2D numpy array and output filename as input, and writes an STL file.
Each element of the array is tessellated to its neighbors to produce 2 triangular faces for every 4 contiguous elements. The depth axis of any vertex is taken to be the value of the array corresponding to that point.
The scale argument scales the height of the resulting geometry. It's a similar effect to extruding or shrinking.
The mask_val argument allows you to set a threshold value for elements in the input array for exclusion in the STL file.
Array elements which are less than this value will not be included as vertices.
It takes a bit of trial-and-error to get these just right. Plotting the intermediate arrays
with a colorbar (to show scaling) helps in finding decent values.
The max_width, max_height, and max_depth values are measurements (in mm) used to scale the final output to
the largest size that can fit onto your 3D printer platform. Default values are for the MakerBot Replicator.
csdt_stl_tools.text2png
text2png(text, fn = None)
Renders inputted text to a png image using matplotlib.

Inputs:
 text (string) -  text to render

Optional input:
 fn (string)  -  filename of png to be outputted.
                 defaults to the entered text

Returns: (None)
text2png() was written as an intermediate helper function to render text to pngs, to then be imported, filtered, and meshed.
However, it may be useful in it's own right. For example, it can be used alone to render LaTeX expressions into images, to be imported into WYSIWYG document editors like MS Word or LibreOffice Writer.
csdt_stl_tools.text2array
text2array(text)
Renders inputted text, and returns array representation.

Inputs:
 text (string) -  text to render

Returns: A (ndarray) - 2D numpy array of rendered text
text2array() renders inputted text using text2png(), but imports the resulting png as an ndarray and deletes the intermediate file.
There may be a direct way to render the matplotlib figure as an array without using an intermediate file, but I could not seem to find a simple
way in the matplotlib docs.
Command-line scripts
image2stl
image2stl is a command-line script that is installed via entry points when setup.py is run.
This provides a simple command-line interface to the functions of this library, with the same
arguments. See the examples above for usage.
Tips:
-
Consider scaling down a digital image before generating an STL from its pixels. For images of standard sizes for modern cameras, the resulting STL file size can be pretty large.
-
Just like was shown in the examples, applying a simple filtering function to smooth sharp edges results in an STL geometry that is likely to be more easily printable. Fine tuning in a program like Photoshop or Gimp can also help prevent spikes/jagged edges in the geometry.
-
To make a proper mold, scale up the edges of the source image to match the maximum pixel value of the image (or higher), to form a lip. For example:
m, n = A.shape
border_val = 1.1 * A.max()
A[0::m-1, :] = border_val # make top and bottom lip
A[:, 0::n-1] = border_val # make left and right lip
In practice, the border may need to be thicker than 1 pixel.
Known bugs:
scipy.misc.imreadhas some odd behavior for me on my Linux box (64-bit Mint 15). When an image is read, an empty 0-dim array is returned. This is supposedly due to a versioning issue with PIL, which I can't seem to work around successfully.pylab.imreadworks fine, and seems consistent across platforms.
Todo/future features:
-
Photos of actual printed models.
-
I'm looking into writing a utility function to refine STL meshes by removing redundant vertices (so that wide flat spaces aren't packed with dense tessellations)
-
It's possible to apply various warping functions to the resulting meshes. So you could load an image, warp the result into a cylinder, and have a textured column (or something like that).


Download files
Download the file for your platform. If you're not sure which to choose, learn more about installing packages.
Source Distribution
Built Distribution
Filter files by name, interpreter, ABI, and platform.
If you're not sure about the file name format, learn more about wheel file names.
Copy a direct link to the current filters
File details
Details for the file csdt_stl_tools-0.5.4.tar.gz.
File metadata
- Download URL: csdt_stl_tools-0.5.4.tar.gz
- Upload date:
- Size: 15.6 kB
- Tags: Source
- Uploaded using Trusted Publishing? No
- Uploaded via: twine/3.2.0 pkginfo/1.6.1 requests/2.22.0 setuptools/41.4.0 requests-toolbelt/0.9.1 tqdm/4.51.0 CPython/3.7.3
File hashes
| Algorithm | Hash digest | |
|---|---|---|
| SHA256 |
3e2947463fb4589860042e30ea178b10e3f28dfa3d1517f1feadb493adee8169
|
|
| MD5 |
5be478ecff6bbbea9af26c93886b3995
|
|
| BLAKE2b-256 |
e8272d9c89696db9f77b1fa87a98dab73b9620b197884278e891a447126495ac
|
File details
Details for the file csdt_stl_tools-0.5.4-cp37-cp37m-macosx_10_9_x86_64.whl.
File metadata
- Download URL: csdt_stl_tools-0.5.4-cp37-cp37m-macosx_10_9_x86_64.whl
- Upload date:
- Size: 190.7 kB
- Tags: CPython 3.7m, macOS 10.9+ x86-64
- Uploaded using Trusted Publishing? No
- Uploaded via: twine/3.2.0 pkginfo/1.6.1 requests/2.22.0 setuptools/41.4.0 requests-toolbelt/0.9.1 tqdm/4.51.0 CPython/3.7.3
File hashes
| Algorithm | Hash digest | |
|---|---|---|
| SHA256 |
ef52d6c7c1535db5ada508aaac26de34170a01baaae348c1bc83e901bc0972cc
|
|
| MD5 |
a2e9b9daff05ad7f9830c9d4dcf37892
|
|
| BLAKE2b-256 |
e939a3fe5057764930eed0f651f54e7d353635a1439d41c02795241d9d5f5a4d
|


