Library to help the drawing process with OpenCV. Thought to add labels to the images. Classification of images, etc.
Project description
cv2_tools
Library to help the drawing process with OpenCV. Thought to add labels to the images. Classification of images, etc.
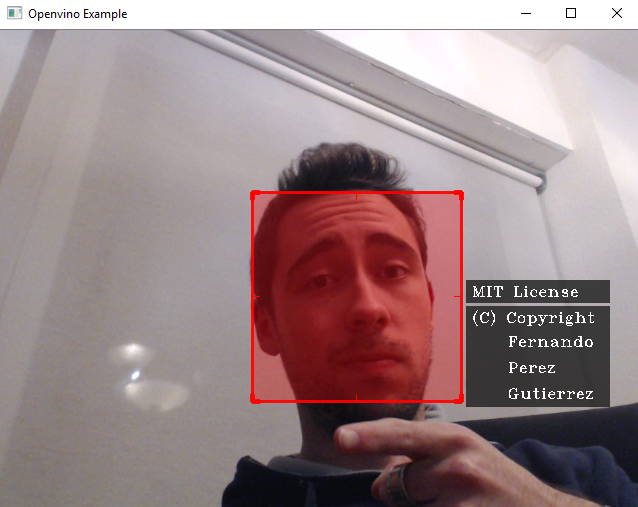
Image generated with Intel Openvino Toolkit and drawed with opencv-draw-tools v0.1.9
Installation
Pre-requisites
You will need to install:
- opencv >= 3.6.2
- numpy >= 1.13.3
- python-constraint >= 1.4.0
You can simply execute:
pip install -r requirements.txt
Finally you can install the library with:
pip install opencv-draw-tools-fernaperg
When you install opencv-draw-tools, it will automatically download numpy but not opencv becouse in some cases you will need another version.
Usage
Test
import cv2_tools

print('Name: {}\nVersion:{}\nHelp:{}'.format(cv2_tools.name,cv2_tools.__version__,cv2_tools.help))
webcam_test()
Oriented Object Programming method
Firstly create a SelectorCV2 object. You can pass it optional parameters to configure the output.
from cv2_tools.Selection import SelectorCV2
selector = SelectorCV2(color=(200,90,0), filled=True)
Also you can configure it later using the method (all optional parameters):
selector.set_properties()
Now, each time you want to add a selected zone call the method:
"""
Coordinates:

(x1,y1)____(x2,y1)
   |          |
   |          |
(x1,y2)____(x2,y2)

Tags (optional parameter):
* It could be a normal string
* A string with '\n'
* A list of strings
* None / '' / [] / False
"""
selector.add_zone((x1,y1,x2,y2),tags=tag)
Finally, when you want to draw all the rectangles execute:
edited_frame = selector.draw(frame)
If you want to use the same object multiple times you can easily change the content inside it:
# This method could help change rectangles to
selector.set_range_valid_rectangles( origin, destination)

# This method could help if you know exactly the indexes that you want to keep
# Default = [], so if you just want to clean the buffer call this method without parameters
set_valid_rectangles(indexes)
If you want, you can see the example detect_faces.py, it also use an open source library called face_recognition.
Manual method
import opencv_draw_tools as cv2_tools


"""
  Draw better rectangles to select zones.
  Keyword arguments:
  frame -- opencv frame object where you want to draw
  position -- touple with 4 elements (x1, y1, x2, y2)
              This elements must be between 0 and 1 in case it is normalized
              or between 0 and frame height/width.
  tags -- list of strings/tags you want to associate to the selected zone (default [])
  tag_position -- position where you want to add the tags, relatively to the selected zone (default None)
                  If None provided it will auto select the zone where it fits better:
                      - First try to put the text on the Bottom Rigth corner
                      - If it doesn't fit, try to put the text on the Bottom Left corner
                      - If it doesn't fit, try to put the text Inside the rectangle
                      - Finally if it doesn't fit, try to put the text On top of the rectangle
  alpha -- transparency of the selected zone on the image (default 0.9)
           1 means totally visible and 0 totally invisible
  color -- color of the selected zone, touple with 3 elements BGR (default (110,70,45) -> dark blue)
           BGR = Blue - Green - Red
  normalized -- boolean parameter, if True, position provided normalized (between 0 and 1) else you should provide concrete values (default False)
  thickness -- thickness of the drawing in pixels (default 2)
  filled -- boolean parameter, if True, will draw a filled rectangle with one-third opacity compared to the rectangle (default False)
  peephole -- boolean parameter, if True, also draw additional effect, so it looks like a peephole
"""
frame = cv2_tools.select_zone(frame, position, tags=[])
Example with Webcam
import opencv_draw_tools as cv2_tools
cv2_tools.webcam_test()
See webcam_test() code:
def webcam_test():
    """Reproduce Webcam in real time with a selected zone."""
    print('Launching webcam test')
    cap = cv2.VideoCapture(0)
    f_width = cap.get(3)
    f_height = cap.get(4)
    window_name = 'opencv_draw_tools'
    while True:
        ret, frame = cap.read()
        frame = cv2.flip(frame, 1)
        if ret:
            keystroke = cv2.waitKey(1)
            position = (0.33,0.2,0.66,0.8)
            tags = ['MIT License', '(C) Copyright\n    Fernando\n    Perez\n    Gutierrez']
            frame = select_zone(frame, position, tags=tags, color=(130,58,14), thickness=2, filled=True, normalized=True)
            cv2.imshow(window_name, frame)
            # True if escape 'esc' is pressed
            if keystroke == 27:
                break
    cv2.destroyAllWindows()
    cv2.VideoCapture(0).release()
Project details
Release history Release notifications | RSS feed
Download files
Download the file for your platform. If you're not sure which to choose, learn more about installing packages.
Source Distribution
Built Distribution
Hashes for cv2_tools-1.0.0-py3-none-any.whl
| Algorithm | Hash digest | |
|---|---|---|
| SHA256 | dd343ea522e9893ca61afa266e4adb37a3a96b5b585b6a254fa7cc236f42c45e |
|
| MD5 | f5cfaed747a62e08a49ebeccabdc690f |
|
| BLAKE2b-256 | f0304d24a27031e38408aeea6e3f52f535dbe05a2cf23499d6af7acfb1f5501f |


