Continuous Delivery tool for PySpark Notebooks based jobs on Databricks.

Project description
DBloy
A Databricks deployment CLI tool to enable Continuous Delivery of PySpark Notebooks based jobs.
Installation
$ pip install dbloy
Usage
Authenticate with Databricks using authentication token:
$ dbloy configure
Update Databricks Job
$ dbloy apply --deploy-yml deploy.yml --configmap-yml configmap.yml --version <my_version_number>
where deploy.yml and configmap.yml contain the Job specification. The Job version is specified in <my_version_number>
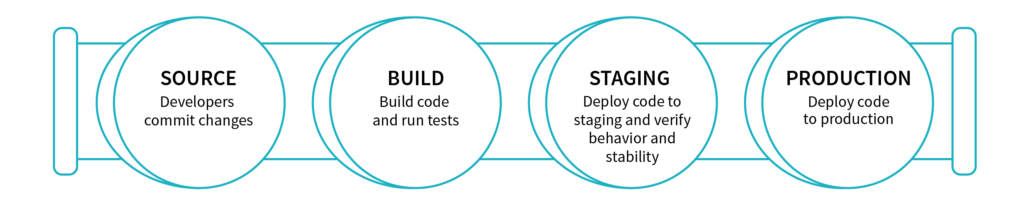
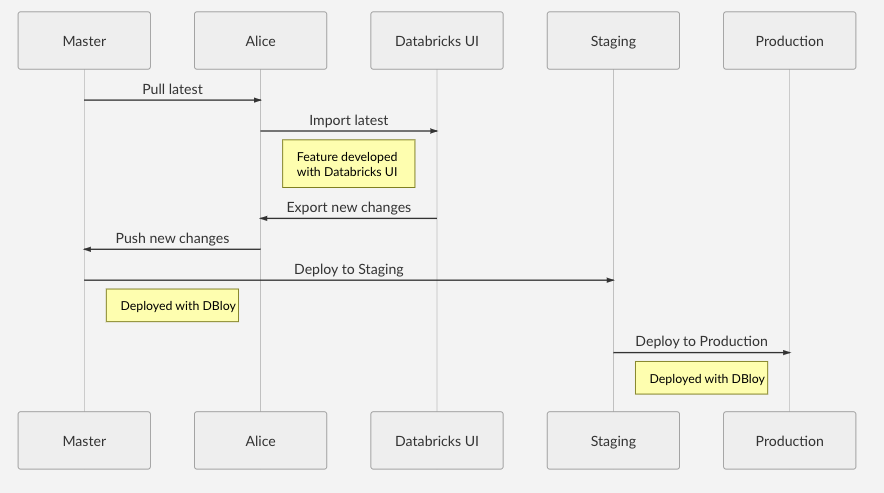
Workflow
Example Usage
See example/gitlab_my-etl-job for a example ETL repository using Gitlab's CI/CD.
A Deployment requires the following:
- Deployment manifest
- Configuration manifest
- A main Databricks Notebook source file available locally.
- (Optional) Attached python library containing the core logic. This allows easier unit testing of
Creating a Deployment
deploy.yml
kind: Deployment
metadata:
  name: my-etl-job
  workspace: Shared
template:
  job:
    name: My ETL Job
  notifications:
    email:
      no_alert_for_skipped_runs: true
      on_failure :
        - my_email@my_org.com
  base_notebook: main
  notebooks:
    - EPHEMERAL_NOTEBOOK_1: notebook_name1
    - EPHEMERAL_NOTEBOOK_2: notebook_name2
  libraries:
    - egg_main: dbfs:/python35/my_python_lib/my_python_lib-VERSION-py3.5.egg
    - egg: dbfs:/python35/static_python_lib.egg
    - pypi:
        package: scikit-learn==0.20.3
    - pypi:
        package: statsmodels==0.10.1
    - pypi:
        package: prometheus-client==0.7.1
    - jar: dbfs:/FileStore/jars/e9b87e4c_c754_4707_a62a_44ef47535b39-azure_cosmosdb_spark_2_4_0_2_11_1_3_4_uber-38021.jar
  run:
    max_concurrent_runs: 1
    max_retries: 1
    min_retry_interval_millis: 600000
    retry_on_timeout: true
    timeout_seconds: 10800
configmap.yml
kind: ConfigMap
metadata:
  namespace: production
params:
  DB_URL: production_db_url_1
  DB_PASSWORD: production_password123
job:
  id: 289
  schedule:
    quartz_cron_expression: "0 0 0 * * ?"
    timezone_id: "Europe/Berlin"
  max_retries: "1"
cluster:
  spark_version: "5.3.x-scala2.11"
  node_type_id: "Standard_DS3_v2"
  driver_node_type_id: "Standard_DS3_v2"
  autoscale:
    min_workers: 1
    max_workers: 2
  spark_env_vars:
    PYSPARK_PYTHON: "/databricks/python3/bin/python3"
In this example:
- Job id
289on Databricks, indicated by the.job.idfield inconfigmap.yml, will be updated with the nameMy ETL Job, indicated by the.template.job.namefield indeploy.yml. - A cluster will be created on demand which is specified by the field
.clusterinconfigmap.yml. See https://docs.databricks.com/api/latest/clusters.html#request-structure for a complete list of cluster settings. Note: Setting.cluster.existing_cluster_idwill use an existing cluster. - Libraries specified by the field
.template.librariesin.deploy.ymlwill be installed on the cluster. See https://docs.databricks.com/api/latest/libraries.html#library. Note: The field.template.libraries.egg_mainis reserved for python.eggfile that is versioned with the ETL job. For example when the main logic of the ETL job is put into a library. The.eggversion number is expected to be the same as the ETL version number. - The main task notebook that will be executed by the job is defined by the field
.template.base_notebookindeploy.yml. Task parameters are specified by the field.paramsinconfigmap.ymlwhich will be accessible in the Notebooks viadbutils. - The notebook
main, indicated by the field.template.base_notebookis the Task notebook. This notebook should be found in the workspace/Shared/my-etl-job/<my_version_number>/mainspecified by the fields.metadataand.template.base_notebookindeploy.yml. The version number<my_version_number>will be specified in the CLI command. - Two ephemeral notebooks are available under
/Shared/my-etl-job/<my_version_number>/notebook_name1and/Shared/my-etl-job/<my_version_number>/notebook_name2. This allows the main task to execute nested Notebooks, e.g.
notebook_path_1 = dbutils.widgets.get("EPHEMERAL_NOTEBOOK_1")
dbutils.notebook.run(notebook_path_1)
Create the Deployment by running the following command:
$ dbloy apply --deploy-yml deploy.yml --configmap-yml configmap.yml --version <my_version_number>
Release history Release notifications | RSS feed

Download files
Download the file for your platform. If you're not sure which to choose, learn more about installing packages.
Source Distribution
File details
Details for the file dbloy-0.3.0.tar.gz.
File metadata
- Download URL: dbloy-0.3.0.tar.gz
- Upload date:
- Size: 5.5 kB
- Tags: Source
- Uploaded using Trusted Publishing? No
- Uploaded via: twine/1.13.0 pkginfo/1.5.0.1 requests/2.22.0 setuptools/39.1.0 requests-toolbelt/0.9.1 tqdm/4.35.0 CPython/3.6.5
File hashes
| Algorithm | Hash digest | |
|---|---|---|
| SHA256 |
b757ce138ab254fbeab17c83f4fee3d58bf974dfbb08173b11a3cfac769aafd9
|
|
| MD5 |
f6694e02bd5d6dec3eff08fc7c3577b6
|
|
| BLAKE2b-256 |
365d852215b182841bb3e96d9e62859a94ccc18ba54f91a4ff7546d6fc15da18
|


