Discover augmentation strategies tailored for your data

Project description
DeepAugment


DeepAugment discovers augmentation strategies tailored for your images. It uses Bayesian Optimization for optimizing data augmentation hyperparameters. The tool:
- reduces error rate of CNN models (shown 60% decrease in error for CIFAR-10 on WRN-28-10 compared to no augmentation)
- saves time by automating the process
Resources: slides
Installation/Usage
Tutorial: google-colab
$ pip install deepaugment
Simple usage (with any dataset)
from deepaugment.deepaugment import DeepAugment

deepaug = DeepAugment(my_images, my_labels)

best_policies = deepaug.optimize(300)
Simple usage (with CIFAR-10 on keras)
deepaug = DeepAugment("cifar10")

best_policies = deepaug.optimize(300)
Advanced usage
from keras.datasets import fashion_mnist

# my configuration
my_config = {
    "model": "basiccnn",
    "method": "bayesian_optimization",
    "train_set_size": 2000,
    "opt_samples": 3,
    "opt_last_n_epochs": 3,
    "opt_initial_points": 10,
    "child_epochs": 50,
    "child_first_train_epochs": 0,
    "child_batch_size": 64
}

(x_train, y_train), (x_test, y_test) = fashion_mnist.load_data()
# X_train.shape -> (N, M, M, 3)
# y_train.shape -> (N)
deepaug = DeepAugment(iamges=x_train, labels=y_train, config=my_config)

best_policies = deepaug.optimize(300)
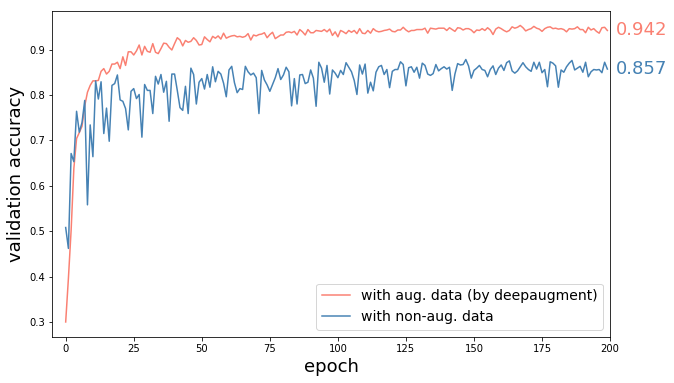
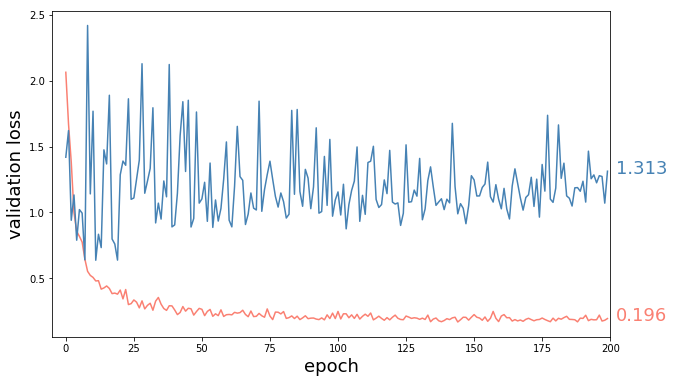
Results
CIFAR-10 best policies tested on WRN-28-10
- Method: Wide-ResNet-28-10 trained with CIFAR-10 augmented images by best found policies, and with unaugmented images (everything else same).
- Result: 60% reduction in error (8.5% accuracy increase) by DeepAugment
Design goals
DeepAugment is designed as a scalable and modular partner to AutoAugment (Cubuk et al., 2018). AutoAugment was one of the most exciting publications in 2018. It was the first method using Reinforcement Learning for this problem. AutoAugmentation, however, has no complete open-sourced implementation (controller module not available) preventing users to run it for their own datasets, and takes 15,000 iterations to learn (according to paper) augmentation policies, which requires massive computational resources. Thus most people could not benefit from it even if its source code would be fully available.
DeepAugment addresses these two problems. Its main design goals are:
- minimize the computational complexity of optimization while maintaining quality of results
- be modular and user-friendly
First goal is achieved by following changes compared to AutoAugment:
- Bayesian Optimization instead of Reinforcement Learning
- which requires much less number of iterations (~100 times)
- Minimized Child Model
- decreasing computational complexity of each training (~20 times)
- Less stochastic augmentation search space design
- decreasing number of iterations needed
For achieving the second goal, user interface is designed in a way that it gives user broad configuration possibilities and model selections (e.g. selecting the child model or inputting a self-designed child model).
Importance
Practical importance
DeepAugment makes optimization of data augmentation scalable, and thus enables users to optimize augmentation policies without needing massive computational resources. As an estimate of its computational cost, it takes 4.2 hours (500 iterations) on CIFAR-10 dataset which costs around $13 using AWS p3.x2large instance.
Academic importance
To our knowlege, DeepAugment is the first method which utilizes Bayesian Optimization for the problem of data augmentation hyperparameter optimization.
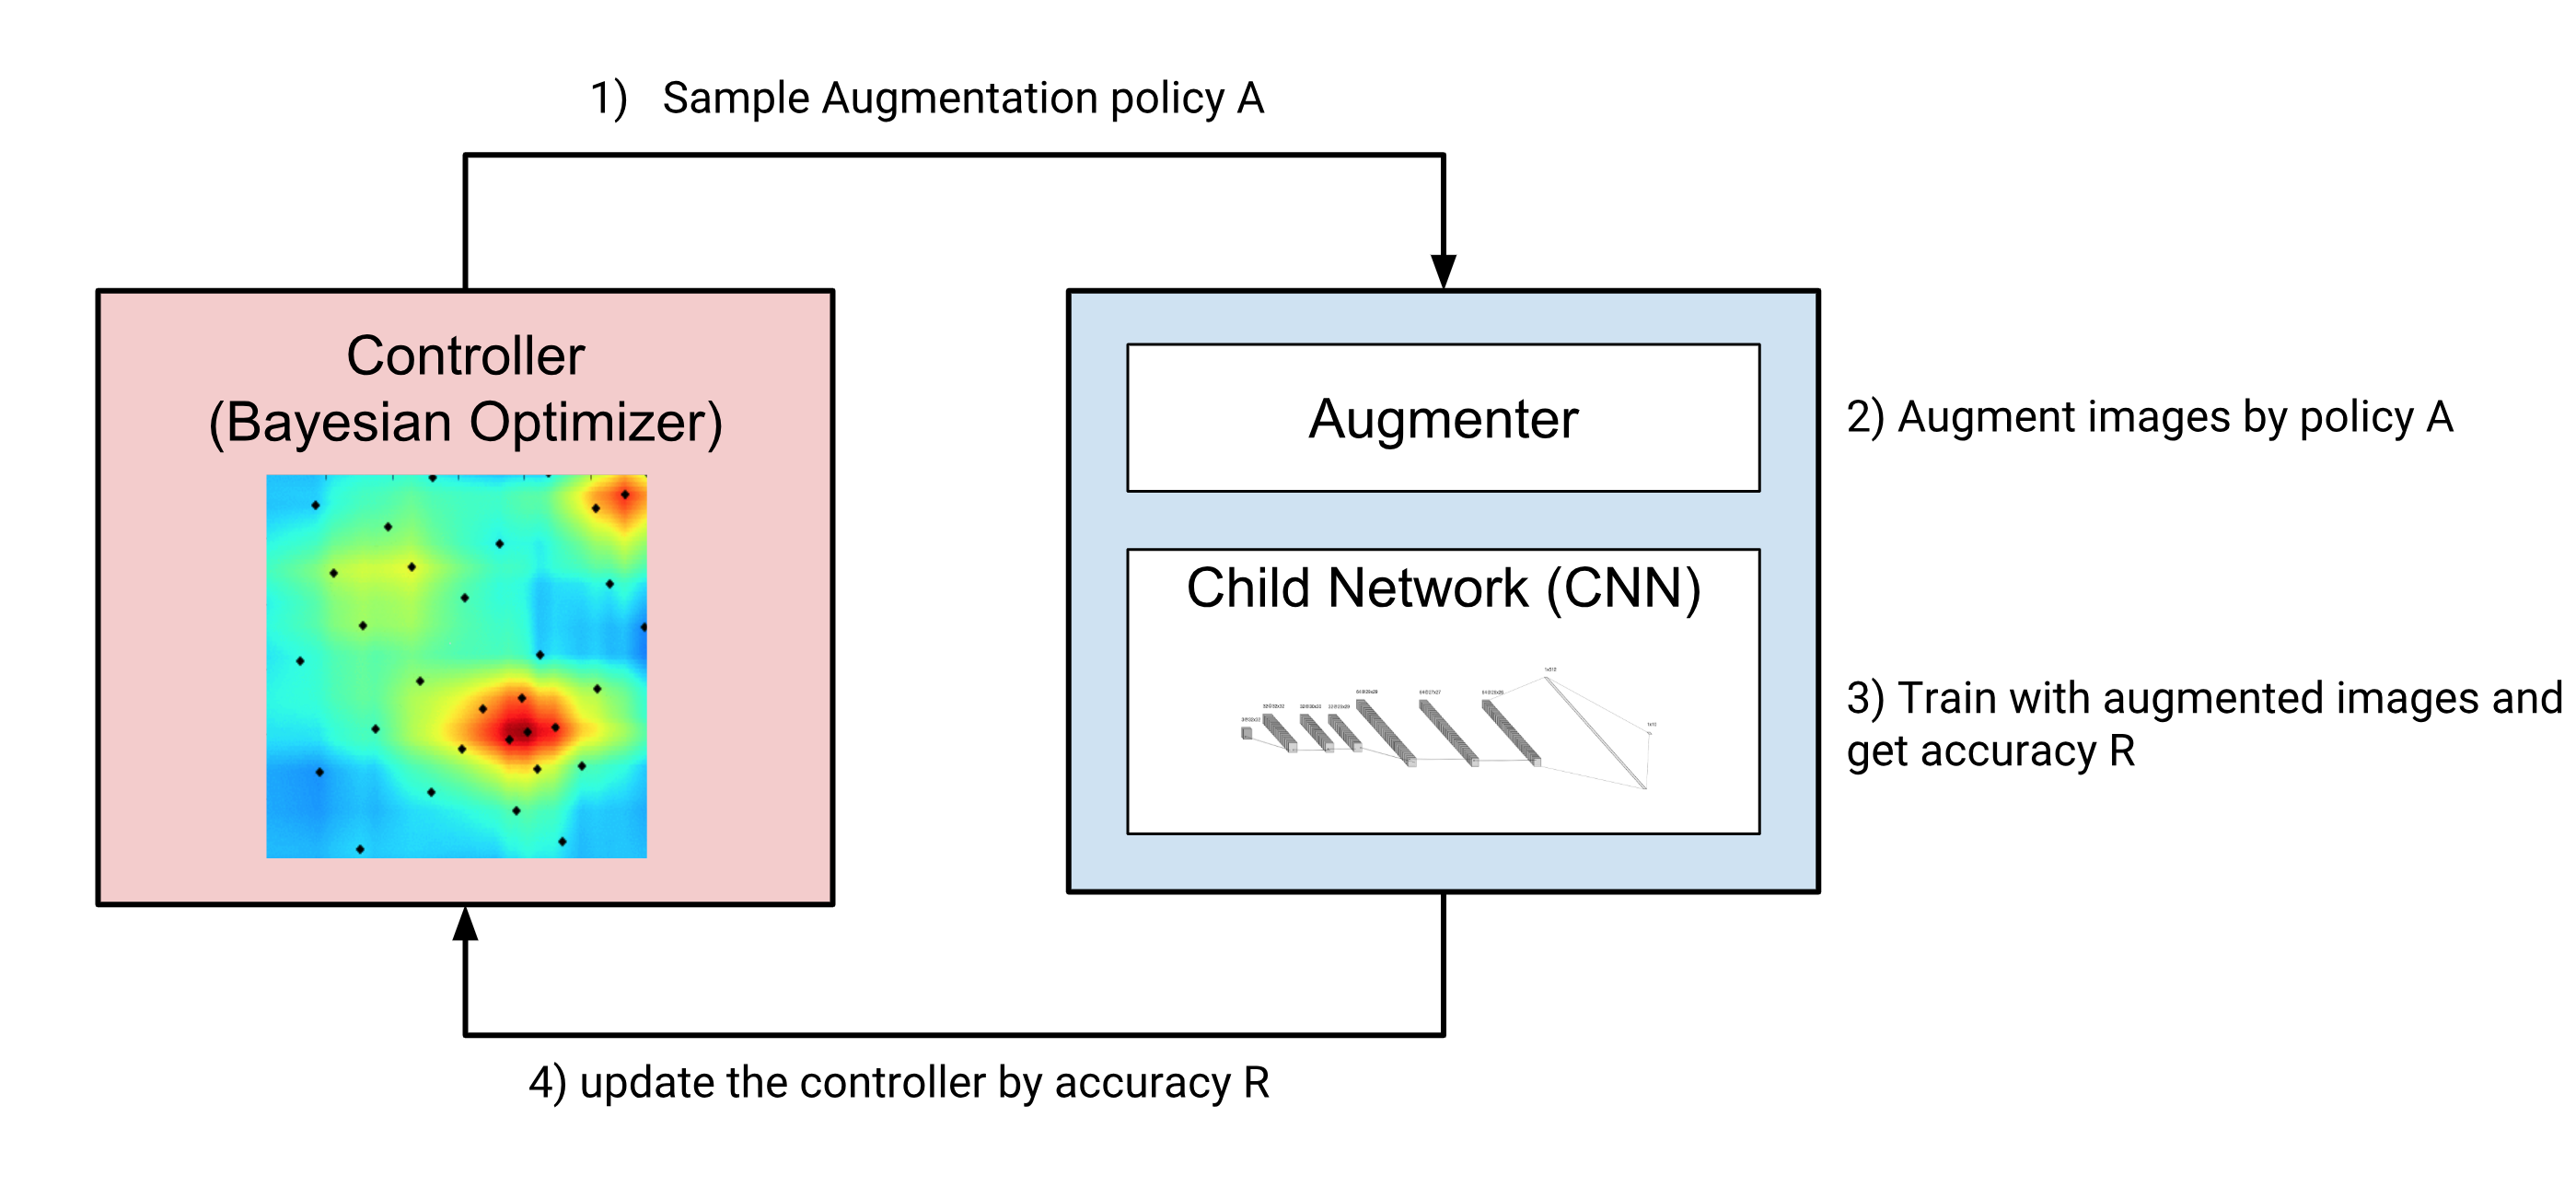
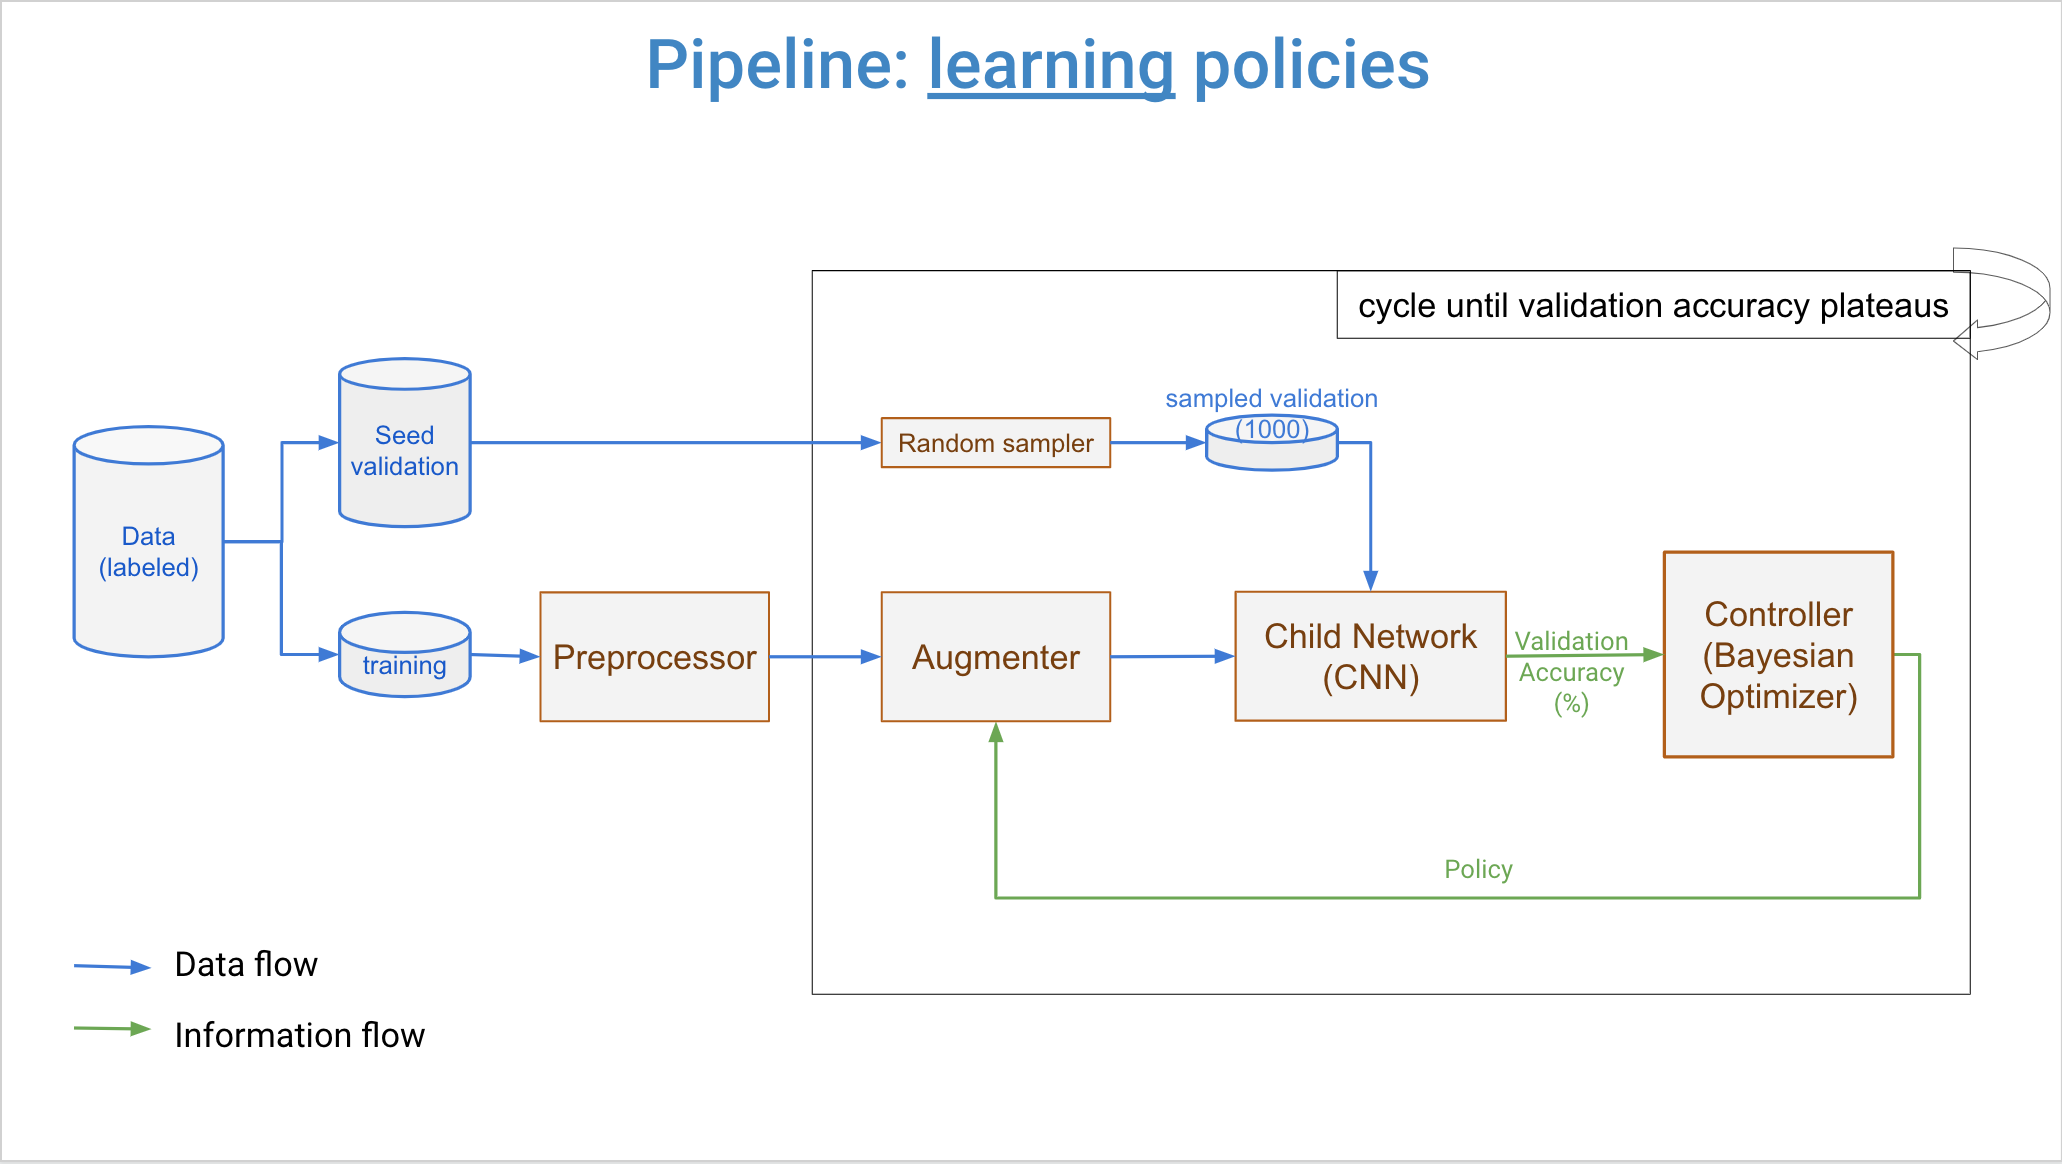
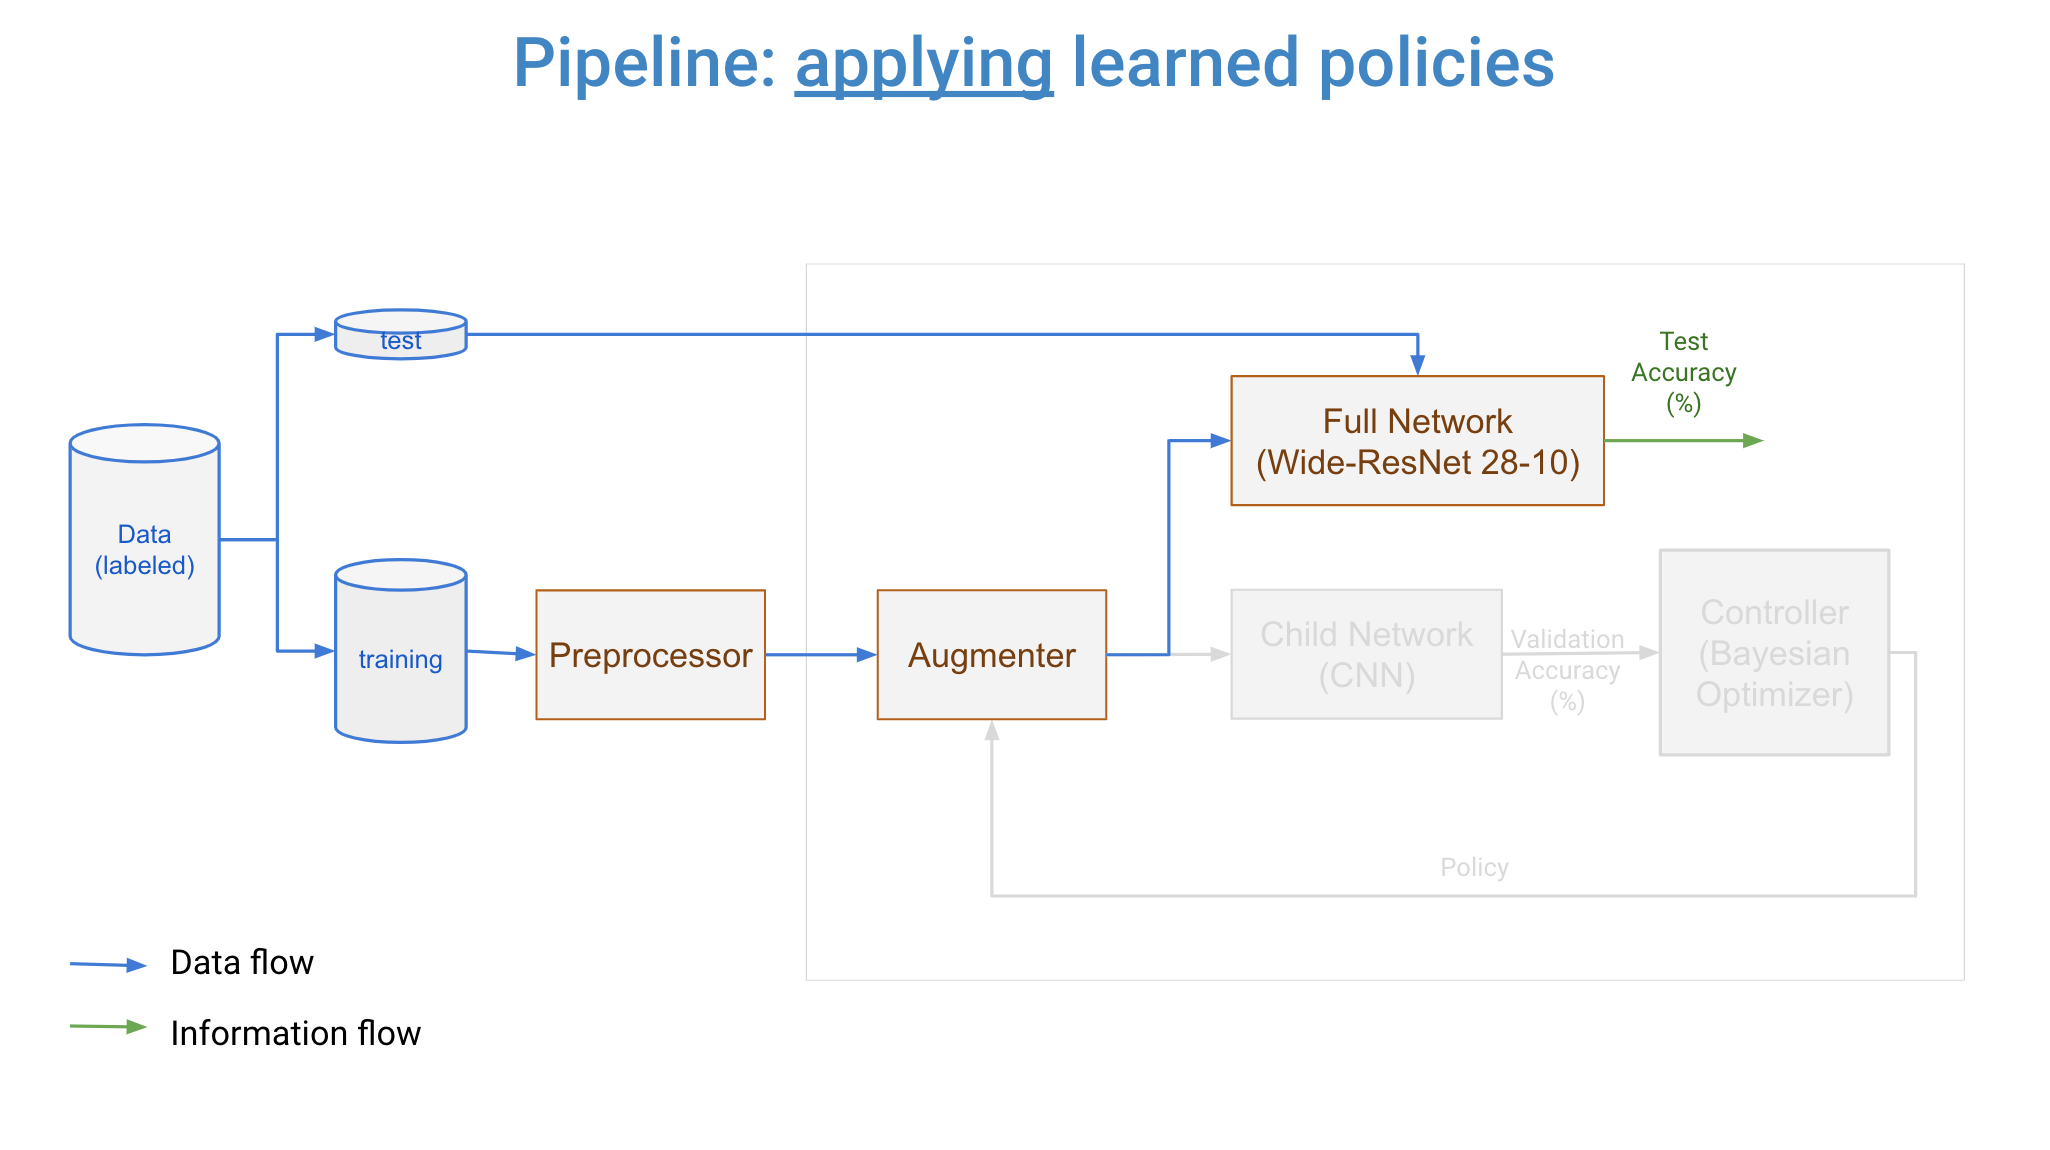
How it works
Three major components of DeepAugment are controller, augmenter, and child model. Overal workflow is that controller samples new augmentation policies, augmenter transforms images by the new policy, and child model is trained from scratch by augmented images. Then, a reward is calculated from child model's training history. This reward is returned back to the controller, and it updates its surrogate model with this reward and associated augmentation policy. Then, controller samples new policies again and same steps repeats. This process cycles until user-determined maximum number of iterations reached.
Controller can be set for using either Bayesian Optimization (default) or Random Search. If set to Bayesian Optimization, samples new policies by a Random Forest Estimator and Expected Improvement acquistion function.
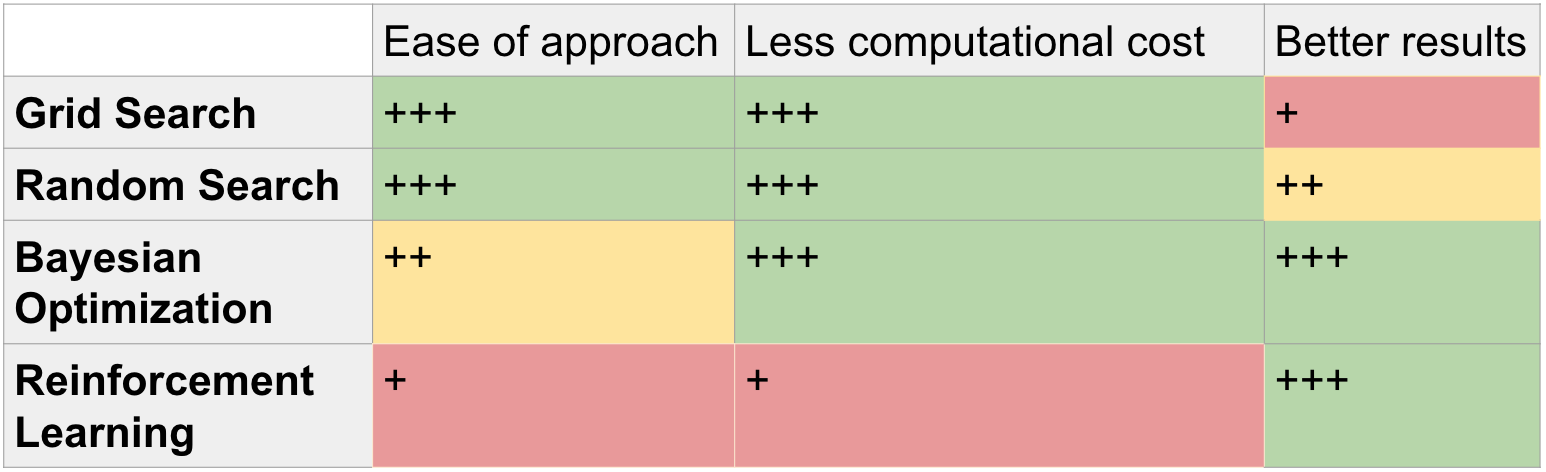
Why Bayesian Optimization?
In hyperparameter optimization, main choices are random search, grid search, bayesian optimization (BO), and reinforcement learning (RL) (in the order of method complexity). Google's AutoAugment uses RL for data augmentation hyperparameter tuning, but it takes 15,000 iterations to learn policies (which means training the child CNN model 15,000 times). Thus, it requires massive computational resources. Bayesian Optimization on the other hand learns good polices in 100-300 iterations, making it +40X faster. Additionally, it is better than grid search and random search in terms of accuracy, cost, and computation time in hyperparameter tuning(ref) (we can think optimization of augmentation policies as a hyperparameter tuning problem where hyperparameters are concerning with augmentations instead of the deep learning architecture). This result is not surprising since despite Grid Search or Random Search BO selects new hyperparameter as informed with previous results for tried hyperparameters.
How does Bayesian Optimization work?
Aim of Bayesian Optimization (BO) is finding set of parameters which maximize the value of an objective function. It builds a surrogate model for predicting value of objective function for unexplored parameters. Working cycle of BO can be summarized as:
- Build a surrogate model of the objective function
- Find parameters that perform best on the surrogate (or pick random hyperparameters)
- Execute objective function with these parameters
- Update the surrogate model with these parameters and result (value) of objective function
- Repeat steps 2-4 until maximimum number of iterations reached
For more detailed explanation, read this blogpost explaining BO in high-level, or take a glance at this review paper
Augmentation policy
A policy describes the augmentation will be applied on a dataset. Each policy consists variables for two augmentation types, their magnitude and the portion of the data to be augmented. An example policy is as following:
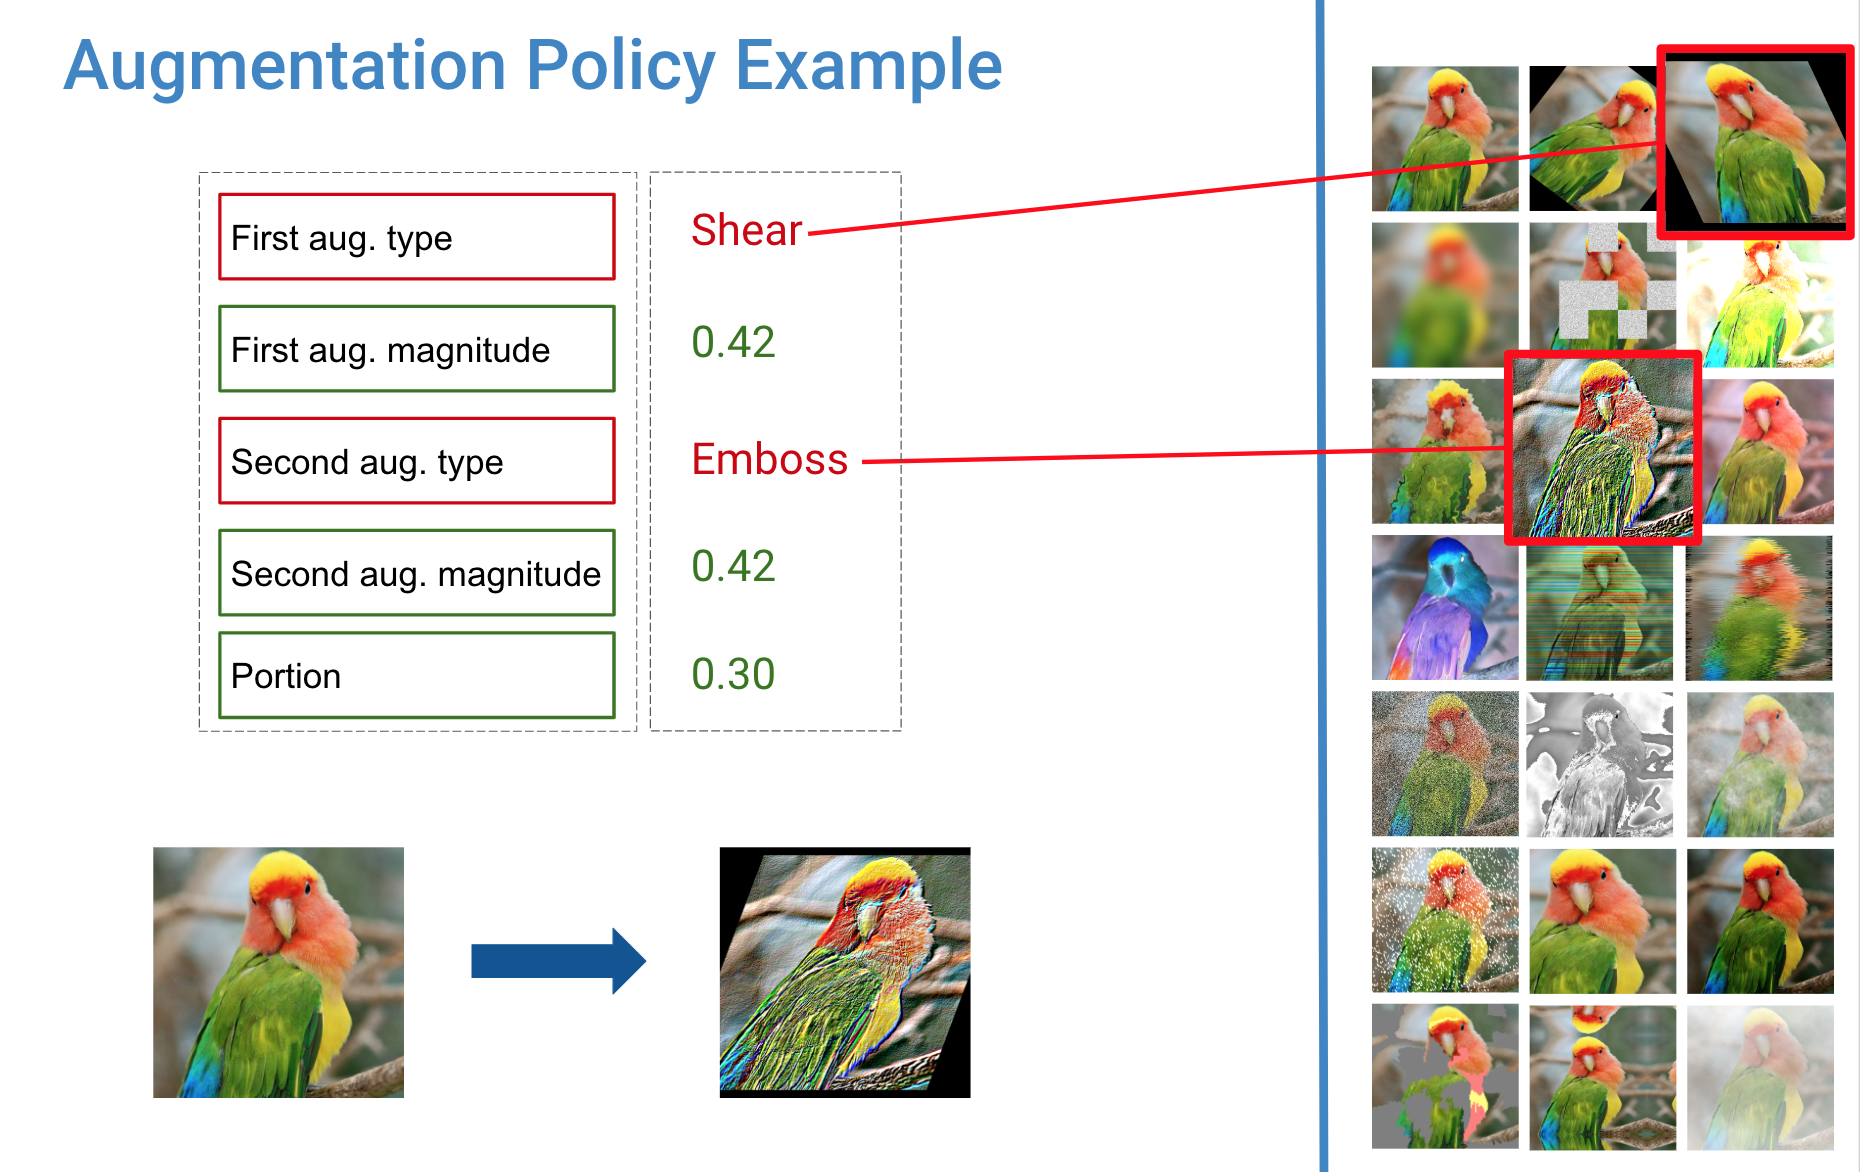
There are currently 20 types of augmentation techniques (above, right) that each aug. type variable can take. All techniques are (this list might grow in later versions):
AUG_TYPES = [ "crop", "gaussian-blur", "rotate", "shear", "translate-x", "translate-y", "sharpen", "emboss", "additive-gaussian-noise", "dropout", "coarse-dropout", "gamma-contrast", "brighten", "invert", "fog", "clouds", "add-to-hue-and-saturation", "coarse-salt-pepper", "horizontal-flip", "vertical-flip"]
Child model
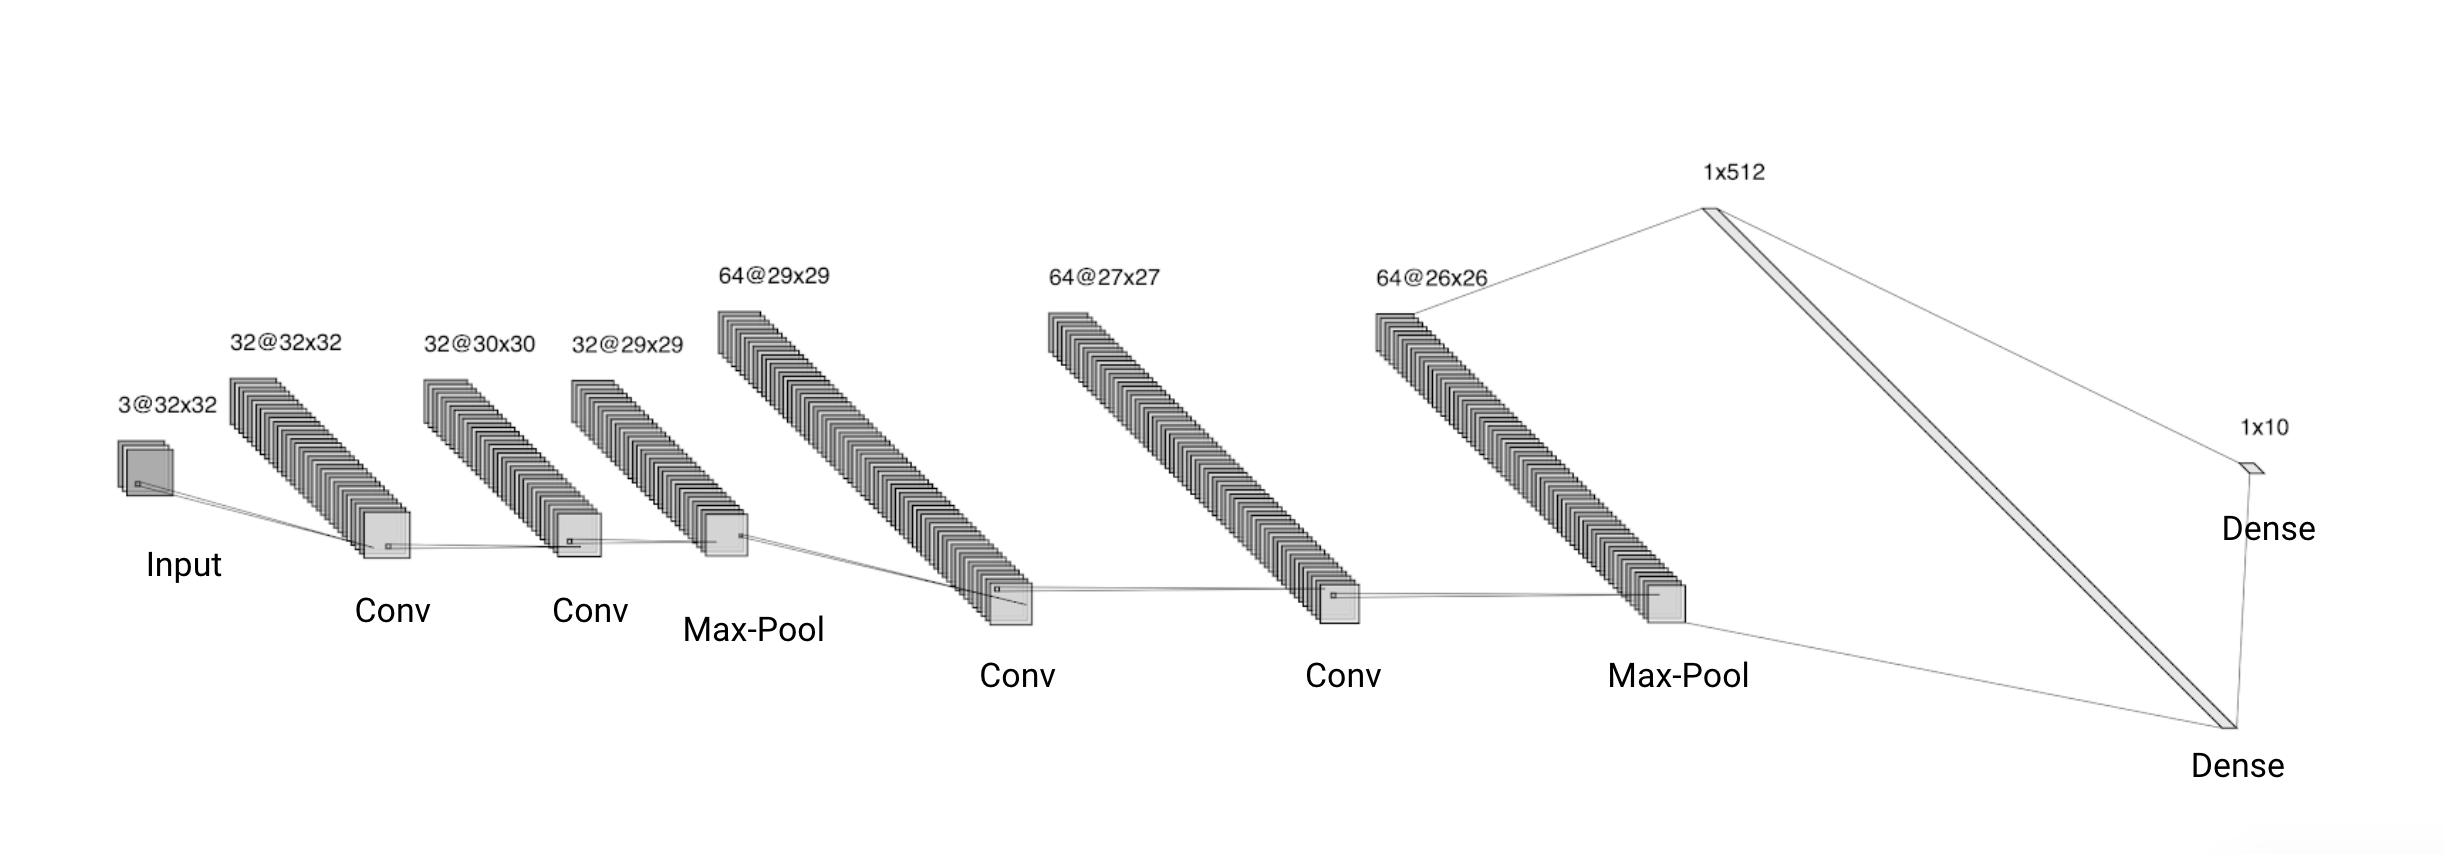
Child model is trained over and over from scratch during the optimization process. Its number of training depends on the number of iterations chosen by the user, which is expected to be around 100-300 for obtaining good results. Child model is therefore the computational bottleneck of the algorithm. With the current design, training time is ~30 seconds for 32x32 images on AWS instance p3.x2large using V100 GPU (112 TensorFLOPS). It has 1,250,858 trainable parameters for 32x32 images. Below is the diagram of child model:
Other choices for child CNN model
Standard Child model is a basic CNN where its diagram and details given above. However, you are not limited with that model. You can use your own keras model by assigning it into config dictionary as:
my_config = {"model": my_keras_model_object}
deepaug = DeepAugment(my_images, my_labels, my_config)
Or use an implemented small model, such as WideResNet-40-2 (while it is bigger than Basic CNN):
my_config = {"model": "wrn_40_2"} # depth(40) and wideness-factor(2) can be changed. e.g. wrn_20_4
Or use a big model (not recommended unless you have massive computational resources):
my_config = {"model": "InceptionV3"}
my_config = {"model": "MobileNetV2"}
Reward function
Reward function is calculated as mean of K highest validation accuracies of the child model which is not smaller than corresponding training accuracy by 0.05. K can be determined by the user by updating opt_last_n_epochs key in config as argument to DeepAugment() class (K is 3 by default).
Configuration options
DeepAugment can be given a config dictionary during initialization. It is expected to have following keys:
- model: child model type. Options: "basiccnn", "inceptionv3", "mobilenetv2", "wrn__", or keras.models.Model object
- method: "bayesian_optimization" or "random" (for random search)
- train_set_size: size of the training set during optimization. It should be small enough that computation will not take too long.
- opt_samples: number of samples optimizer will run for each augmentation-policy. Training of the child model is stochastic and validation accuracy results might be slightly different from run to run. The tool trains child model three times by default and takes average, in order to have more robust accuracy results.
- opt_last_n_epochs: number of non-overfitting epochs whose validation accuracy average will be used as reward. For each training,
opt_last_n_epochshighest validation accuracies (where its difference to training accuracy is not more than 10%) are averaged and taken as reward. - opt_initial_points: number of random initial policies will be tried by Bayesian Optimizer. It will be the
n_initial_pointsargument for skopt Optimizer (see its documentation) - child_epochs: number of epochs for the child model
- child_first_train_epochs: if not 0, child model is pre-trained without any augmentation and its resulting weights are load for each training with augmentation. The purpose is training child model 10-20 epochs once and thereby saving 10-20 epochs for each training of optimizer iterations which is +100 times.
- child_batch_size: batch size for the child model
- per_aug_weights_path: path for pre-augmented training weights. Unneccessary if
child_first_train_epochs=0 - logging: logging object for getting news about the optimization.
- notebook_path: path for recording all trainings in all iterations. For each iteration, training history, trial-no, sample-no, calculated reward and mean recent validation accuracy is recorded. Records is updated at each trial for ensuring records are not lost in case optimization interrupted unintentionally. Records can be found at "/reports/experiments//notebook.csv"
Default configurations are as following:
DEFAULT_CONFIG = {
    "model": "basiccnn", #
    "method": "bayesian_optimization",
    "train_set_size": 2000,
    "opt_samples": 3,
    "opt_last_n_epochs": 3,
    "opt_initial_points": 10,
    "child_epochs": 50,
    "child_first_train_epochs": 0,
    "child_batch_size": 64,
    "pre_aug_weights_path": "pre_aug_weights.h5",
    "logging": logging,
    "notebook_path": f"{EXPERIMENT_FOLDER_PATH}/notebook.csv",
}
Versioning rules
A three-number system is used, like 1.2.3. Each increment of version is one of the following types:
- minor: if bugs are fixed, or documentation changed significantly. 1.2.3 -> 1.2.4
- major: if a feature implemented differently, or a new feature added. 1.2.3 -> 1.3.0
- disruptive: if a feature is removed or renamed. 1.2.3 -> 2.0.0 (Backward compatibility is not guaranteed)
Note: Versions from 0.0.0 to 1.0.0 are considered as alpha phase and do not follow this strategy.
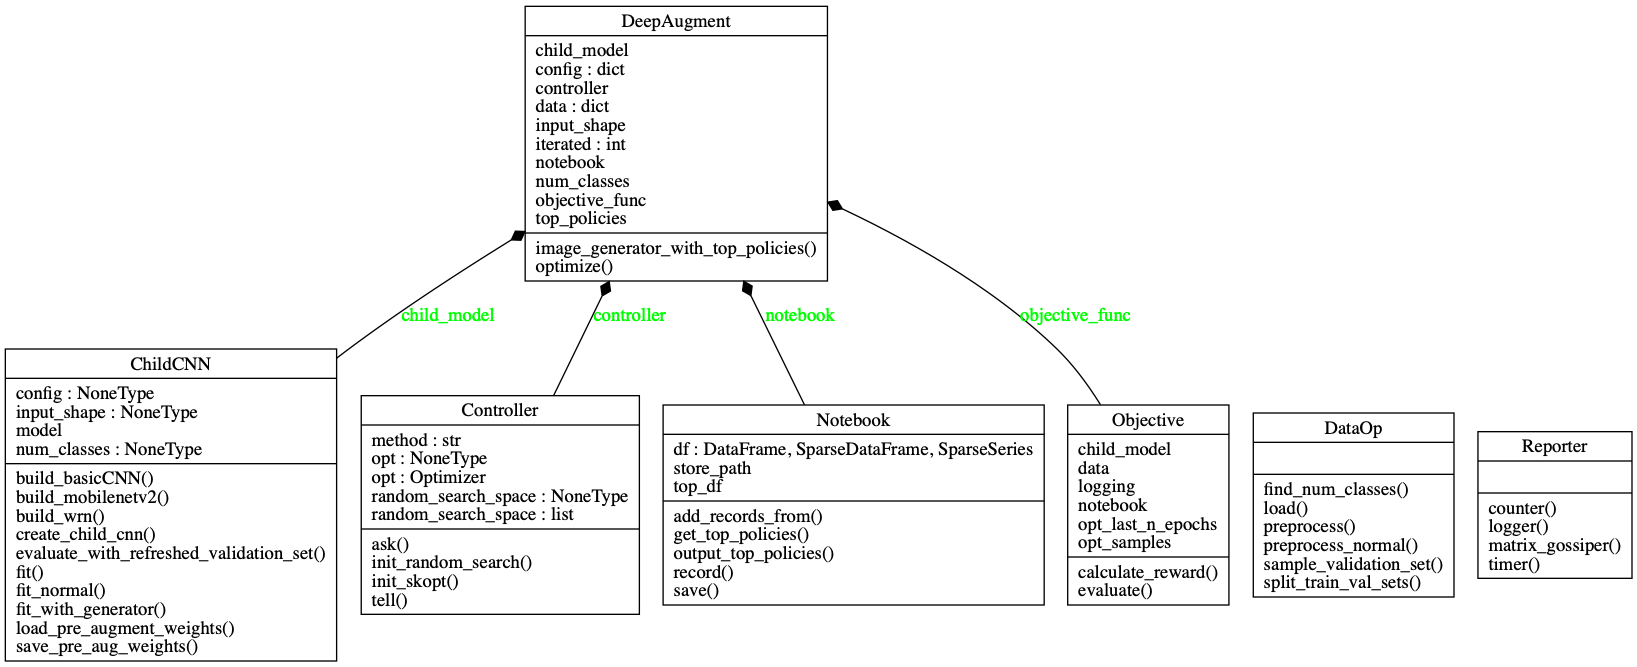
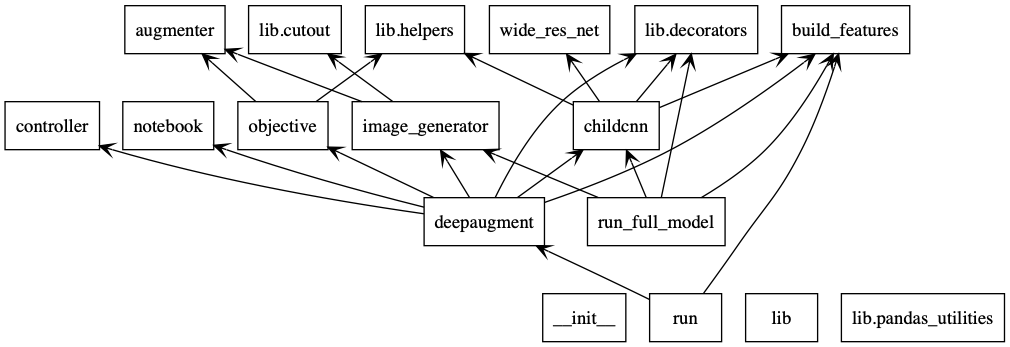
Data pipeline
Class diagram
Created by pyreverse
Package diagram
Created by pyreverse
References
[1] Cubuk et al., 2018. AutoAugment: Learning Augmentation Policies from Data (arxiv)
[2] Zoph et al., 2016. Neural Architecture Search with Reinforcement Learning (arxiv)
[3] Shahriari et al., 2016. A review of Bayesian Optimization (ieee)
[4] Dewancker et al. Bayesian Optimization Primer (white-paper)
[5] DeVries, Taylor 2017. Improved Regularization of CNN's with Cutout (arxiv)
Blogs:
- A conceptual explanation of Bayesian Optimization (towardsdatascience)
- Comparison experiment: Bayesian Opt. vs Grid Search vs Random Search (mlconf)
Libraries:
- scikit-optimize
- mgaug
- AutoAugment-unofficial
- Automold (Self-driving car image-augmentation library)
Contact
Baris Ozmen, hbaristr@gmail.com
Release history Release notifications | RSS feed


Download files
Download the file for your platform. If you're not sure which to choose, learn more about installing packages.
Source Distribution
Built Distribution
Filter files by name, interpreter, ABI, and platform.
If you're not sure about the file name format, learn more about wheel file names.
Copy a direct link to the current filters
File details
Details for the file deepaugment-1.1.2.tar.gz.
File metadata
- Download URL: deepaugment-1.1.2.tar.gz
- Upload date:
- Size: 33.5 kB
- Tags: Source
- Uploaded using Trusted Publishing? No
- Uploaded via: twine/1.12.1 pkginfo/1.4.2 requests/2.21.0 setuptools/40.6.3 requests-toolbelt/0.8.0 tqdm/4.28.1 CPython/3.6.5
File hashes
| Algorithm | Hash digest | |
|---|---|---|
| SHA256 |
7b9eeb7d063c4f04594ca25a4457c1944c10cdca7376b1c12e024be299650603
|
|
| MD5 |
a716e4f10643c78c7d9339d8faa5210e
|
|
| BLAKE2b-256 |
09ac991b27a857152fc0a3dfa7bec6ae4af7a54cf27769bd13e9b995ea0f62d2
|
File details
Details for the file deepaugment-1.1.2-py2.py3-none-any.whl.
File metadata
- Download URL: deepaugment-1.1.2-py2.py3-none-any.whl
- Upload date:
- Size: 33.8 kB
- Tags: Python 2, Python 3
- Uploaded using Trusted Publishing? No
- Uploaded via: twine/1.12.1 pkginfo/1.4.2 requests/2.21.0 setuptools/40.6.3 requests-toolbelt/0.8.0 tqdm/4.28.1 CPython/3.6.5
File hashes
| Algorithm | Hash digest | |
|---|---|---|
| SHA256 |
5453ce2e4f6b559acd2d932c22a87313674c968e6eba6a497030b66bd6ff9805
|
|
| MD5 |
e930e56f97dc60c31e7ac18448cdded9
|
|
| BLAKE2b-256 |
99f940211d827039df475091639c6aded9a1786849f898b9c619e24c15efc82a
|


