

Divide Et Impera And Scan (and also merge the scan results)


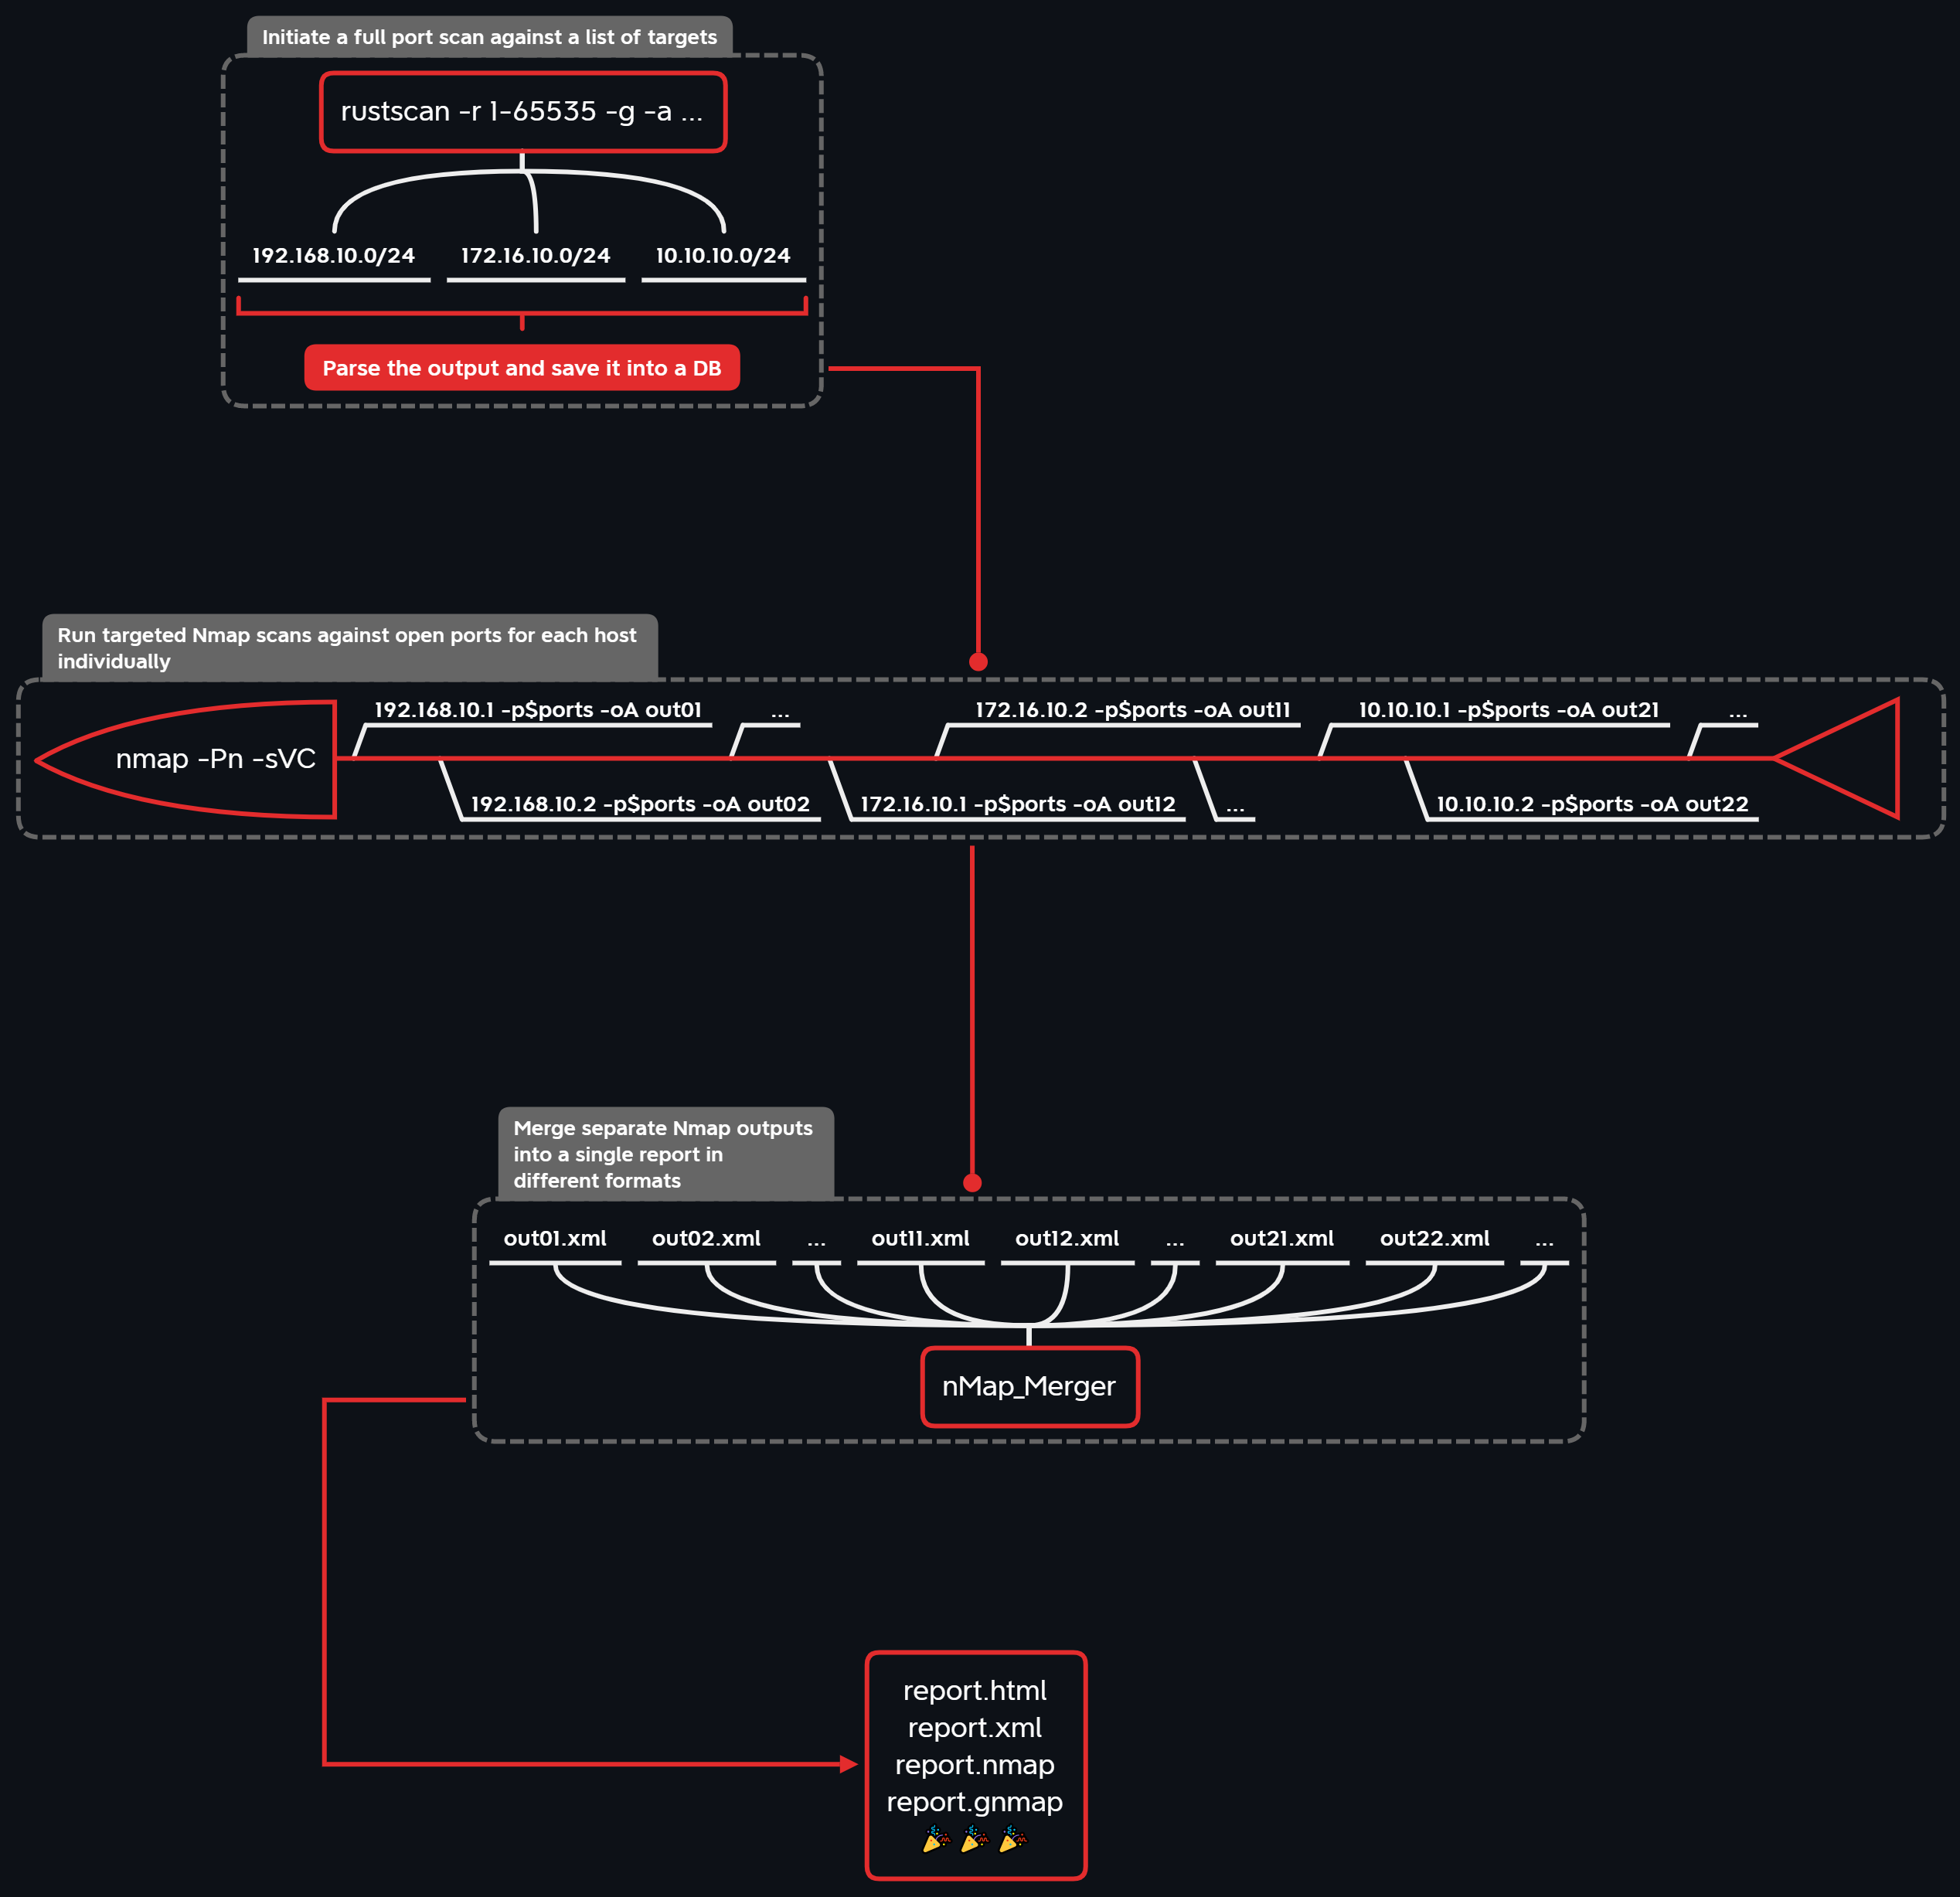
DivideAndScan is used to efficiently automate port scanning routine by splitting it into 3 phases:
- Discover open ports for a bunch of targets.
- Run Nmap individually for each target with version grabbing and NSE actions.
- Merge the results into a single Nmap report (different formats available).
For the 1st phase a fast port scanner* is intended to be used, whose output is parsed and stored in a single file database (TinyDB). Next, during the 2nd phase individual Nmap scans are launched for each target with its set of open ports (multiprocessing is supported) according to the database data. Finally, in the 3rd phase separate Nmap outputs are merged into a single report in different formats (XML / HTML / simple text / grepable) with nMap_Merger. The visualization portion is provided by DrawNmap.
Potential use cases:
- Pentest engagements / red teaming with a large scope to enumerate.
- Cybersecurity wargames / training CTF labs.
- OSCP certification exam.
* Available port scanners:
DISCLAIMER. All information contained in this repository is provided for educational and research purposes only. The author is not responsible for any illegal use of this tool.
How It Works
How to Install
Prerequisites
To successfully divide and scan we need to get some good port scanning tools (in the examples below GitHub releases are grabbed via eget).
📑 Note: if you don't feel like messing with dependecies on your host OS, skip to the Docker part.
Nmap
sudo apt install nmap xsltproc -y
sudo nmap --script-updatedb
Masscan
pushd /tmp
wget https://github.com/robertdavidgraham/masscan/archive/refs/heads/master.zip -O masscan-master.zip
unzip masscan-master.zip
cd masscan-master
make
sudo make install
popd && rm -rf /tmp/masscan-master*
RustScan
eget -t 2.0.1 -a amd64 RustScan/RustScan --to /tmp/rustscan.deb
sudo dpkg -i /tmp/rustscan.deb && rm /tmp/rustscan.deb
sudo wget https://gist.github.com/snovvcrash/8b85b900bd928493cd1ae33b2df318d8/raw/fe8628396616c4bf7a3e25f2c9d1acc2f36af0c0/rustscan-ports-top1000.toml -O /root/.rustscan.toml
Naabu
sudo mkdir /opt/naabu
sudo eget -s linux/amd64 projectdiscovery/naabu --to /opt/naabu
sudo ln -sv /opt/naabu/naabu /usr/local/bin/naabu
NimScan
sudo mkdir /opt/nimscan
sudo eget -a NimScan elddy/NimScan --to /opt/nimscan
sudo ln -sv /opt/nimscan/nimscan /usr/local/bin/nimscan
sx
sudo mkdir /opt/sx
sudo eget -s linux/amd64 v-byte-cpu/sx --to /opt/sx
sudo ln -sv /opt/sx/sx /usr/local/bin/sx
Installation
DivideAndScan is available on PyPI as divideandscan, though I recommend installing it from GitHub with pipx in order to always have the bleeding-edge version:
~$ pipx install -f "git+https://github.com/snovvcrash/DivideAndScan.git"
~$ das
For debbugging purposes you can set up a dev environment with poetry:
~$ git clone --recurse-submodules https://github.com/snovvcrash/DivideAndScan
~$ cd DivideAndScan
~$ poetry install
~$ poetry run das
📑 Note: DivideAndScan uses sudo to run all the port scanners, so it will ask for the password when scanning commands are invoked.
Using from Docker

You can run DivideAndScan in a Docker container as follows:
~$ docker run --rm -it --name das -v ~/.das:/root/.das -v `pwd`:/app -p 8050:8050 snovvcrash/divideandscan
Since the tool requires some input data and produces some output data, you should specify your current working directory as the mount point at /app within the container. Also publishing port 8050 on host allows to access the Dash app used for Nmap reports visualization.
You may want to set an alias to make the base command shorter:
~$ alias das='docker run --rm -it --name das -v ~/.das:/root/.das -v `pwd`:/app -p 8050:8050 snovvcrash/divideandscan'
~$ das
How to Use
1. Filling the DB
|
Provide the ⚠️ Warning: please, make sure that you understand what you're doing, because nearly all port scanning tools can damage the system being tested if used improperly. # Nmap, -v flag is always required for correct parsing!
~$ das add nmap '-v -n -Pn -e eth0 --min-rate 1000 -T4 -iL hosts.txt -p1-65535 --open'
# Masscan
~$ das add masscan '--rate 1000 -iL hosts.txt -p1-65535 --open'
# RustScan
~$ das add rustscan '-b 1000 -t 2000 -u 5000 -a hosts.txt -r 1-65535 -g --no-config'
# Naabu
~$ das add naabu '-rate 1000 -iL hosts.txt -p - -silent -s s'
# NimScan
~$ das add nimscan '192.168.1.0/24 -vi -p:1-65535 -f:500'
# sx
~$ sudo sx arp -i eth0 192.168.1.0/24 --json | tee arp.cache
~$ das add sx 'tcp syn -a arp.cache -i eth0 --rate 1000/s 192.168.1.0/24 -p 445,3389'
When the module starts its work, a directory |
2. Targeted Scanning
|
Launch targeted Nmap scans with the # Scan by hosts
~$ das scan -hosts all -oA report1
~$ das scan -hosts 192.168.1.0/24,10.10.13.37 -oA report1
~$ das scan -hosts hosts.txt -oA report1
# Scan by ports
~$ das scan -ports all -oA report2
~$ das scan -ports 22,80,443,445 -oA report2
~$ das scan -ports ports.txt -oA report2
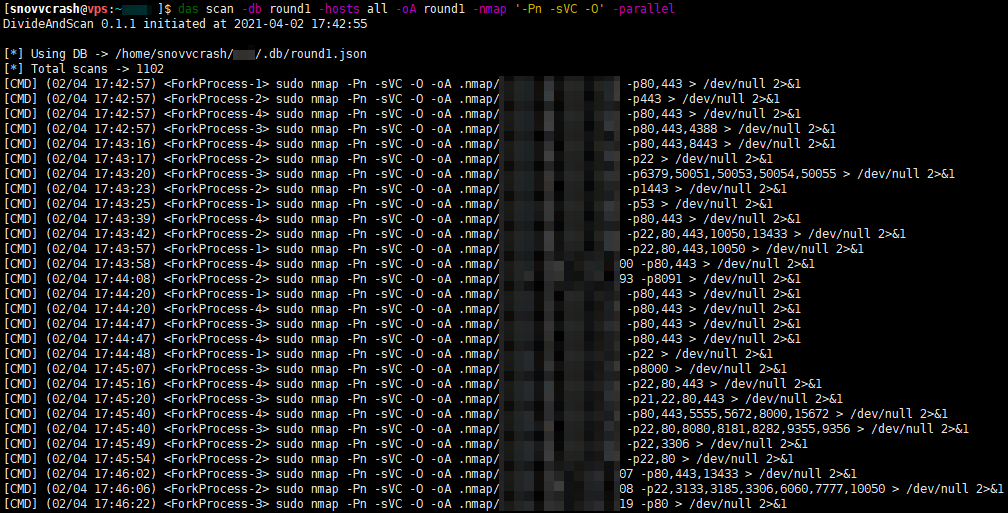
To start Nmap simultaneously in multiple processes, specify the ~$ das scan -hosts all -oA report -parallel [-proc 4]
The output format is selected with Also, you can inspect the contents of the database with ~$ das scan -hosts all -show
|
3 (Optional). Merging the Reports
|
In order to generate a report independently of the # Merge outputs by hosts
~$ das report -hosts all -oA report1
~$ das report -hosts 192.168.1.0/24,10.10.13.37 -oA report1
~$ das report -hosts hosts.txt -oA report1
# Merge outputs by ports
~$ das report -ports all -oA report2
~$ das report -ports 22,80,443,445 -oA report2
~$ das report -ports ports.txt -oA report2
📑 Note: keep in mind that the |
🔥 Example 🔥
Let's enumerate open ports for all live machines on Hack The Box.
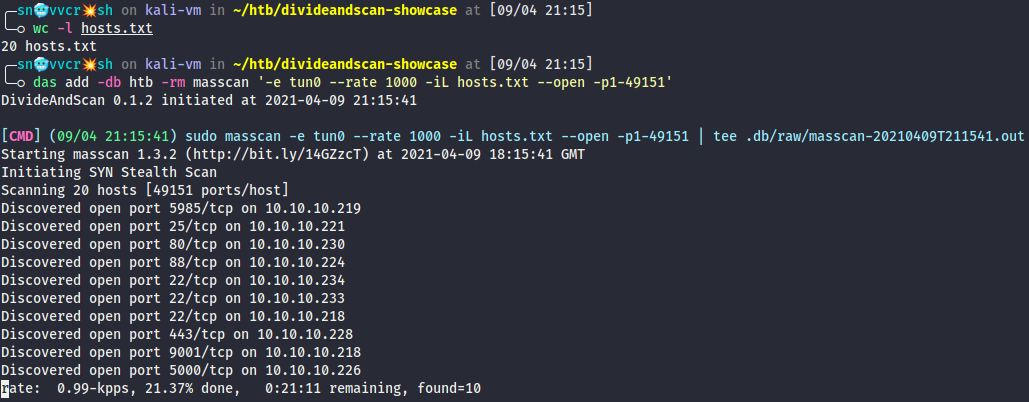
- Add mappings "host ⇄ open ports" to the database with Masscan. For demonstration purposes I will exclude dynamic port range to avoid unnecessary stuff by using
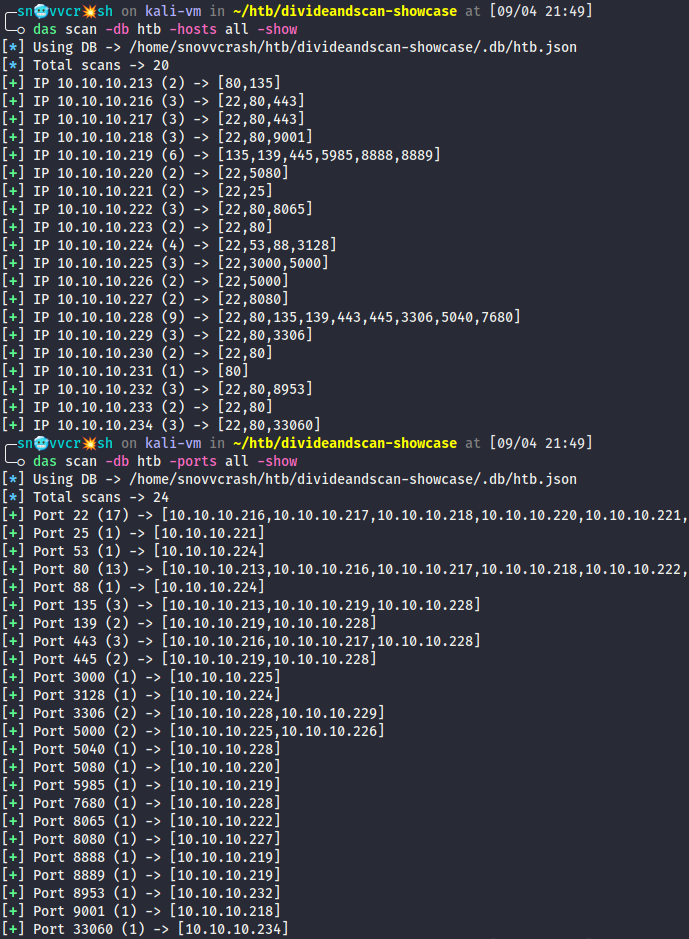
-p1-49151. On the second screenshot I'm reviewing scan results by hosts and by ports:
~$ das -db htb add -rm masscan '-e tun0 --rate 1000 -iL hosts.txt -p1-49151 --open'
~$ das -db htb scan -hosts all -show
~$ das -db htb scan -ports all -show
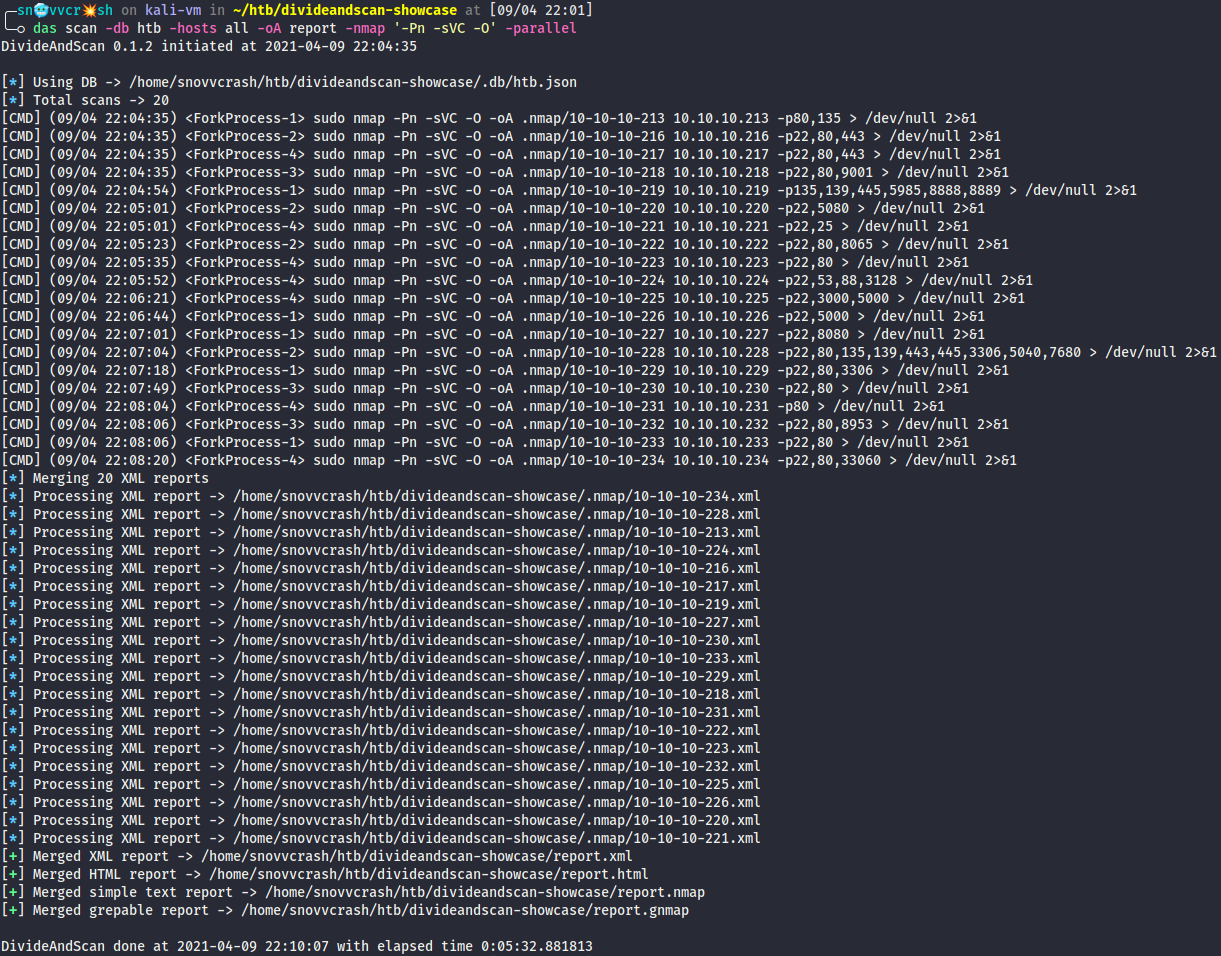
- Launch Nmap processes for each target to enumerate only ports that we're interested in (the open ports). On the second screenshot I'm doing the same but starting Nmap processes simultaneously:
~$ das -db htb scan -hosts all -oA report
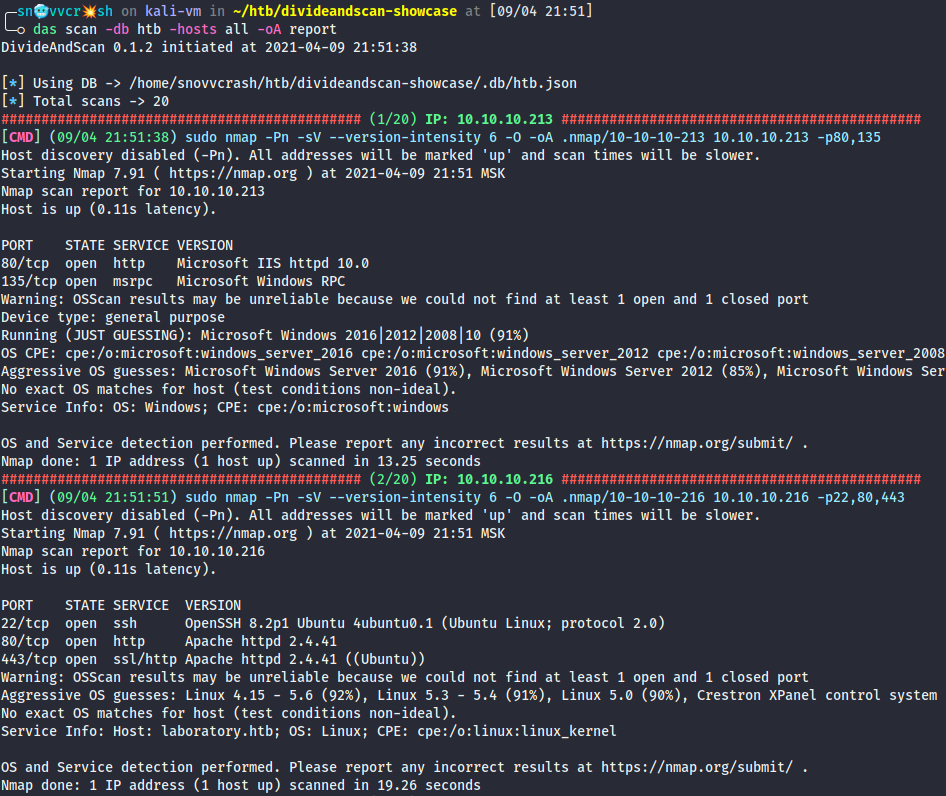
~$ das -db htb scan -hosts all -oA report -nmap '-Pn -sVC -O' -parallel
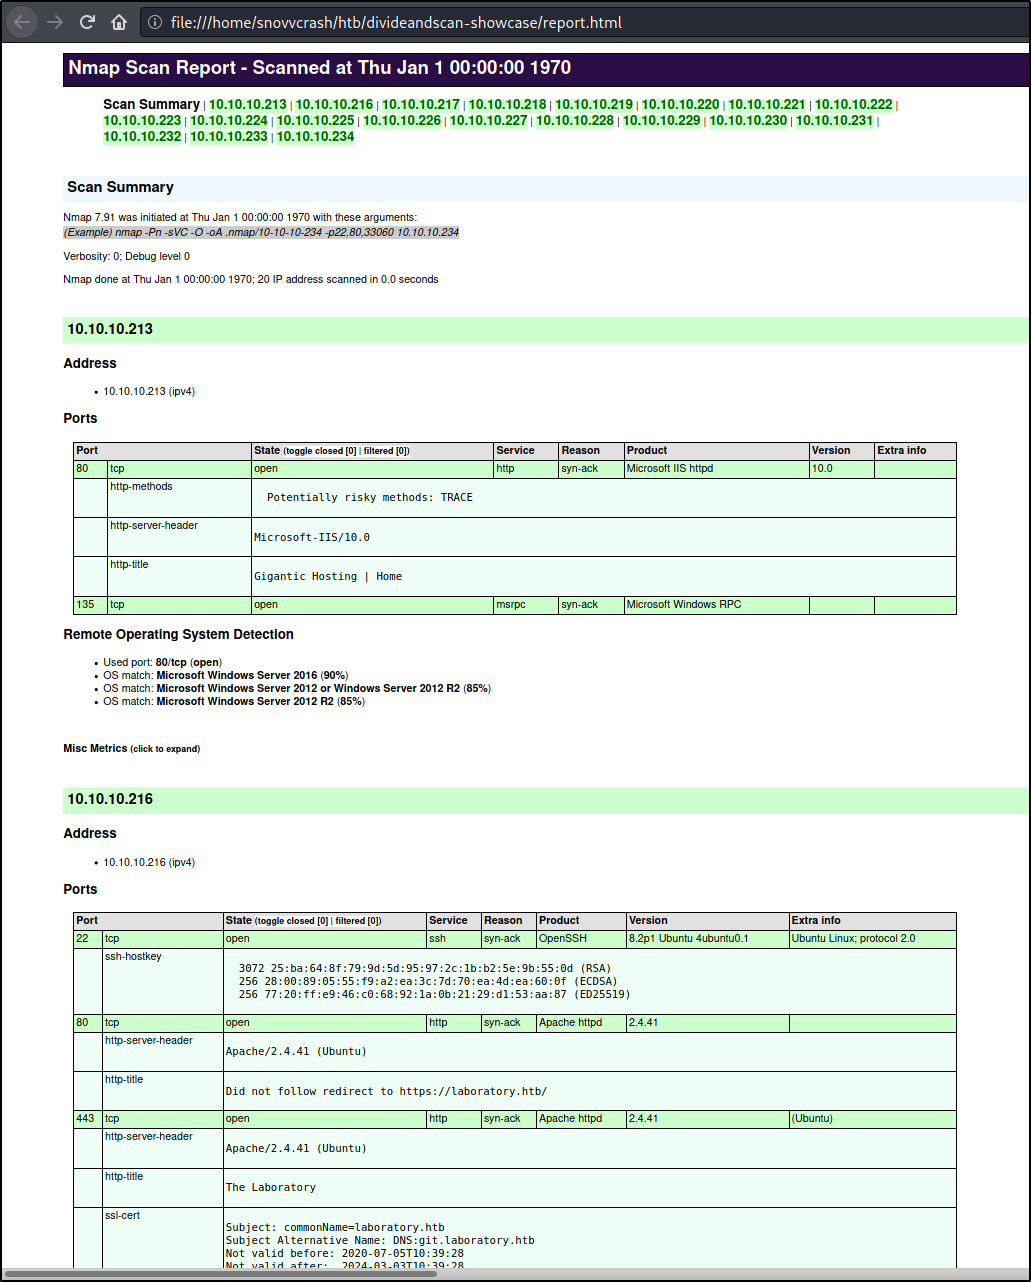
- As a result we now have a single report in all familiar Nmap formats (simple text, grepable, XML) as well as a pretty HTML report.
Bring Your Own Scanner!
You can pair your favourite port scanner with DivideAndScan by implementing a single parse method for its output in das/parsers/DUMMY_SCANNER.py (see example for masscan):
from das.parsers import IAddPortscanOutput


class AddPortscanOutput(IAddPortscanOutput):
    """Child class for processing DUMMY_SCANNER output."""

    def parse(self):
        """
        DUMMY_SCANNER raw output parser.

        :return: a pair of values (portscan raw output filename, number of hosts added to DB)
        :rtype: tuple
        """
        hosts = set()
        for line in self.portscan_raw:
            # DUMMY_SCANNER parser implementation
            pass

        return (self.portscan_out, len(hosts))
Help
usage: das [-h] [-db DB] {add,scan,dns,report,parse,draw,tree,help} ...

 -----------------------------------------------------------------------------------------------
|  ________  .__      .__    .___        _____              .____________                       |
|  \______ \ |__|__  _|__| __| _/____   /  _  \   ____    __| _/   _____/ ____ _____    ____    |
|   |    |  \|  \  \/ /  |/ __ |/ __ \ /  /_\  \ /    \  / __ |\_____  \_/ ___\\__  \  /    \   |
|   |    `   \  |\   /|  / /_/ \  ___//    |    \   |  \/ /_/ |/        \  \___ / __ \|   |  \  |
|  /_______  /__| \_/ |__\____ |\___  >____|__  /___|  /\____ /_______  /\___  >____  /___|  /  |
|          \/                 \/    \/        \/     \/      \/       \/     \/     \/     \/   |
|  {@snovvcrash}            {https://github.com/snovvcrash/DivideAndScan}             {vX.Y.Z}  |
 -----------------------------------------------------------------------------------------------

positional arguments:
  {add,scan,dns,report,parse,draw,tree,help}
    add                 run a full port scan and add the output to DB
    scan                run targeted Nmap scans against hosts and ports from DB
    dns                 resolve "A" domain names into IP addresses and update DB items with them
    report              merge separate Nmap outputs into a single report (https://github.com/CBHue/nMap_Merger)
    parse               parse raw Nmap XML reports by service names and print entries in format {service}://{host}:{port}}
    draw                visualize Nmap XML reports (https://github.com/jor6PS/DrawNmap)
    tree                show contents of the ~/.das/ directory using tree
    help                show builtin --help dialog of a selected port scanner

options:
  -h, --help            show this help message and exit
  -db DB                DB name to work with

Psst, hey buddy... Wanna do some organized p0r7 5c4nn1n6?
ToDo
- Add projectdiscovery/naabu parser
- Add elddy/NimScan parser
- Add sx parser
- Add ZMap parser
- Store hostnames (if there're any) next to their IP values
- Add
fuffswitch to automate web directory fuzzing (addedparsemodule)
1 maintainer

Metadata
1 maintainer
Release files for divideandscan 0.3.7
For a detailed explanation of source distributions (sdists) and built distributions (wheels), please see the package formats documentation.
Source distribution (sdist)
| File | Size | Uploaded | Provenance | Actions |
|---|---|---|---|---|
| divideandscan-0.3.7.tar.gz | 25.7 kB | Without provenance | Details for divideandscan-0.3.7.tar.gz |
Built distribution (wheel)
| File | Interpreter | ABI | Platform | Actions Reset |
|---|---|---|---|---|
| divideandscan-0.3.7-py3-none-any.whl | Python 3 | none | any | Details for divideandscan-0.3.7-py3-none-any.whl |
Total release size: 53.2 kB
Release files / divideandscan-0.3.7.tar.gz
| Download URL | divideandscan-0.3.7.tar.gz |
|---|---|
| Size | 25.7 kB |
| Tags | Source |
|
SHA-256 checksum How to use checksums |
119a03b40ed030728fb004301c58f77b8a89ac72d35f075db0ca40e42cb9c123
|
|
BLAKE2b-256 checksum How to use checksums |
85b98b514ab7adb15ea51a7b250c4190b31baa40213cfee7bf02c875b7c36df1
|
| Upload date | |
|
Uploaded using Trusted Publishing? What is trusted publishing? |
No |
| Uploaded via |
poetry/1.5.1 CPython/3.9.16 Linux/5.15.0-1041-azure
|
Release files / divideandscan-0.3.7-py3-none-any.whl
| Download URL | divideandscan-0.3.7-py3-none-any.whl |
|---|---|
| Size | 27.5 kB |
| Tags | Python 3 |
|
SHA-256 checksum How to use checksums |
cfb8750e54a94847dbae5072525cc3734537798581200396dc24eda4d755aa6b
|
|
BLAKE2b-256 checksum How to use checksums |
fdb6a5f917f694115606ba81005c8083b94fae0c5717952a530cf450926f9d9f
|
| Upload date | |
|
Uploaded using Trusted Publishing? What is trusted publishing? |
No |
| Uploaded via |
poetry/1.5.1 CPython/3.9.16 Linux/5.15.0-1041-azure
|
Security for divideandscan 0.3.7
Provenance
Provenance describes where a file came from. On PyPI, provenance is shared via attestations, which provide a verifiable record of the build or publishing details. View details, limitations and caveats.
No provenance found
None of the files in this release were uploaded with provenance metadata.
A note on package security
PyPI is a repository for distributing packages, not a service for auditing them. While third-party security researchers and our staff do their best to detect and remove malicious packages, PyPI cannot guarantee the quality, security or suitability of any given package.
To learn more about protecting yourself from malicious actors, visit our package security documentation.














