
Django Magicauth
Django Magicauth brings password-less authentication to your project.
How it works
- The user inputs their email address (and optionnally an OTP).
- An email is sent to the user with a link that contains a one-time token.
- Once they click on this link, they are logged in to the service.
For a detailed step-by-step with screenshots of the default templates, see Step-by-step in pictures.
Fonctionnement (FR)
Authentifiez vos utilisateurs sans mot de passe avec Django Magicauth.
Comment ça marche
- Les utilisateurs renseignent leur adresse email (et en option un OTP).
- Ils reçoivent alors un email avec un lien de connexion.
- Lorsqu'ils cliquent sur le lien, ils sont authentifiés et redirigés sur le service.
Pour un détail du fonctionnement en image, voir le déroulé en images.
Installations and testing instructions
Quick start
- Install Magicauth
pip install git+https://github.com/betagouv/django-magicauth.git
- Add "magicauth" to your INSTALLED_APPS in
settings.py
INSTALLED_APPS = [
    # all your apps
    "magicauth",
]
- Include the magicauth URLconf in your app's
url.py
# After your previous imports
from magicauth import views as magicauth_views
from magicauth.urls import urlpatterns as magicauth_urls

urlpatterns = [
    # here are your URL patterns
]

urlpatterns.extend(magicauth_urls)
- Add the following items in your project's settings.py`
MAGICAUTH_FROM_EMAIL = 'contact@mysite.com'
MAGICAUTH_LOGGED_IN_REDIRECT_URL_NAME = 'home'
-
Run
python manage.py migrateto create the polls models. -
Setup your mailer in
settings.pyIn dev mode, you can use a console mailer -
Make sure you have the following middlewares
MIDDLEWARE = [
    # [...] other middleware you may have
    "django.contrib.sessions.middleware.SessionMiddleware",
    "django.contrib.messages.middleware.MessageMiddleware",
    "django.contrib.auth.middleware.AuthenticationMiddleware",
    "django.contrib.sites.middleware.CurrentSiteMiddleware",
]
Two-Factor Authentication (2FA) using One Time Passwords (OTP)
Two-Factor Authentication means you ask for two different passwords from your user : their normal password and an OTP. (See https://en.wikipedia.org/wiki/Multi-factor_authentication) They will get the magic link only if the two are valid, else they get an error and the link is not sent.
What is a OTP ? It is a short code (6 to 8 digits), usually generated by a dedicated app on a user's device (smartphone, hardware). See https://en.wikipedia.org/wiki/Time-based_One-time_Password_algorithm
How to enable OTPs
We use the django-otp package. You must have it installed and configured in your project.
- install django_otp :
pip install django_otp(or whatever package manager you use) - add the required apps in INSTALLED_APPS :
'django_otp','django_otp.plugins.otp_totp' - run the migrations in your project :
python manage.py migrate - Set
MAGICAUTH_ENABLE_2FA = Truein your settings.py
If you use the default login template, an OTP input will show up in the login page, below the Email. (To check your install has worked, you can revert to the default template and see if the field appears : remove your MAGICAUTH_LOGIN_VIEW_TEMPLATE var.)
If you have a custom login template, you will have to add the field for entering OTPs, in an OTP_form. See the default login template for an example : templates/magicauth/login.html`
For testing purposes, you can generate OTPs for a given user from the command line :
- Add 'django_otp.plugins.otp_static' to INSTALLED_APPS.
- Then you can use addstatictoken from command line. E.g :
python manage.py addstatictoken -t 123456 "thierry@coucou.fr"
Contribute to Magicauth
To contribute to Magicauth, you can install the package in the "editable" mode
pip uninstall django-magicauth  # just in case...
pip install -e git+https://github.com/betagouv/django-magicauth.git#egg=django-magicauth
You can also install a specific branch, for instance for testing a PR. To install branch my-branch:
pip install -e git+https://github.com/betagouv/django-magicauth.git@my-branch#egg=django-magicauth
Django-magicauth is now a dependency of your project, and you can edit the code located here:
cd src/django-magicauth
run tests
Create a virtual env for the project or reuse one and source it.
Install dependencies and run tox
cd src/django-magicauth
pip install -r requirements.txt
tox
Release process
The follwing dependencies need to be installed: pip setuptools wheel twine:
python -m pip install --upgrade pip setuptools wheel twine
- Create a new MD file under
docs/releasesnamed after the new version and fill the file with the changes - Change the version in
setup.py - Create a commit named Release version
- Open and merge the PR for that release
- Create a new release at https://github.com/betagouv/django-magicauth/releases/new
- Publish the new version on PyPI:
 python setup.py sdist bdist_wheel
 twine upload dist/*
Projects using Magicauth
https://github.com/betagouv/e-controle/ https://github.com/betagouv/Aidants_Connect https://github.com/betagouv/peps https://github.com/betagouv/urbanvitaliz-django
Join us !
Step-by-step in pictures
Note : the screenshots below use the default templates, which don't look very nice. It is expected that you replace them with your own better-looking ones.
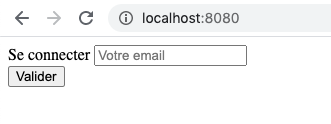
Step 1 : the user goes to the login page. (see LoginView in magicauth/views.py)
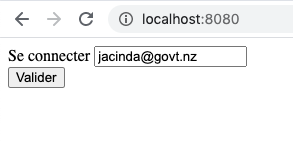
Step 2 : The user inputs their email address in the login page.
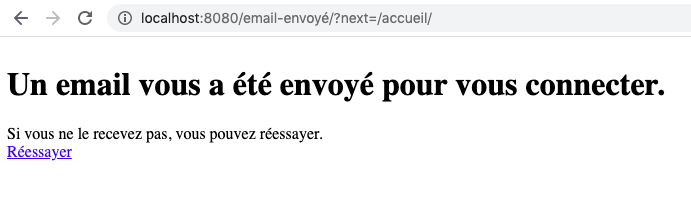
Step 3 : The user sees a confirmation page (EmailSentView), explaining that an email has been sent.
An email is sent to the user with a link that contains a one-time token.
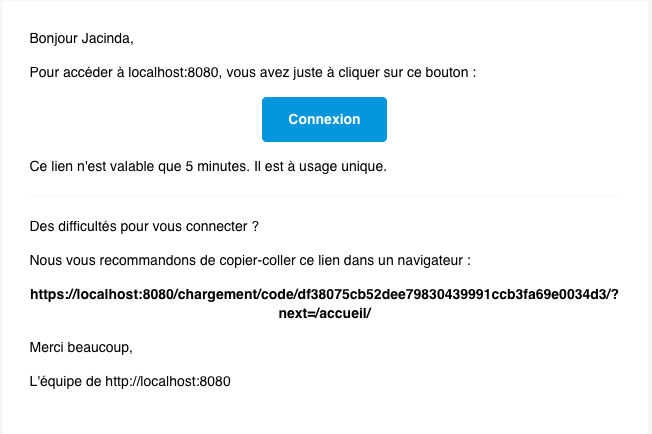
The link looks something like this :

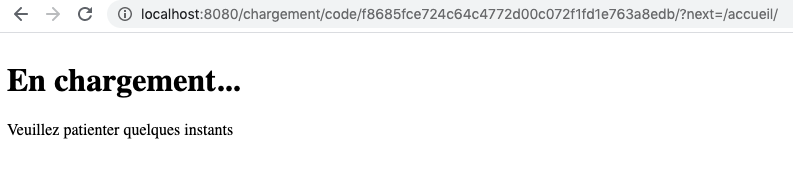
Step 4 : once they click on the button and follow the link, the user is directed to a wait page (this is optional) (WaitView)
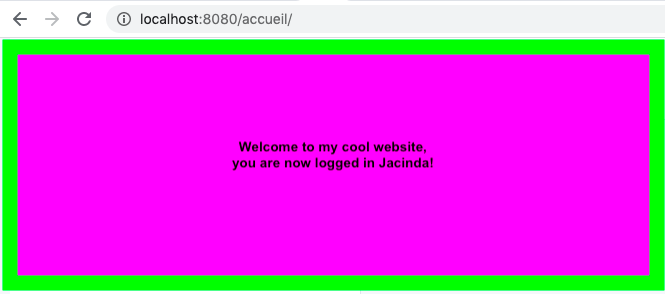
Step 5 : the user is logged in to the service (ValidateTokenView) and redirected to the landing page.
4 maintainers


Metadata
4 maintainers
Release files for django-magicauth 1.0.2
For a detailed explanation of source distributions (sdists) and built distributions (wheels), please see the package formats documentation.
Source distribution (sdist)
| File | Size | Uploaded | |
|---|---|---|---|
| django-magicauth-1.0.2.tar.gz | 20.7 kB | Details |
Built distribution (wheel)
| File | Interpreter | ABI | Platform | Reset |
|---|---|---|---|---|
| django_magicauth-1.0.2-py3-none-any.whl | Python 3 | none | any | Details |
Total release size: 48.4 kB
Release files / django-magicauth-1.0.2.tar.gz
| Download URL | django-magicauth-1.0.2.tar.gz |
|---|---|
| Size | 20.7 kB |
| Tags | Source |
|
SHA-256 checksum How to use checksums |
7c3b19bebe46d170842864b70c1605bb1e4da352aa293e5ad14d701cd935c893
|
|
BLAKE2b-256 checksum How to use checksums |
dcf1a2a89ba5fa536bf93b30017e36be32d642124e946ae6310da4ad89388852
|
| Upload date | |
|
Uploaded using Trusted Publishing? What is trusted publishing? |
No |
| Uploaded via |
twine/4.0.2 CPython/3.11.9
|
Release files / django_magicauth-1.0.2-py3-none-any.whl
| Download URL | django_magicauth-1.0.2-py3-none-any.whl |
|---|---|
| Size | 27.6 kB |
| Tags | Python 3 |
|
SHA-256 checksum How to use checksums |
3c05a7fa11864b4e15a4c567f799a09e210b1e5bf9e0fbb11106c7d44c1397b0
|
|
BLAKE2b-256 checksum How to use checksums |
a37d3d1ba6fa7bc917bf6a549c48a1b12ca3867188fd5a47a58c924309d0204d
|
| Upload date | |
|
Uploaded using Trusted Publishing? What is trusted publishing? |
No |
| Uploaded via |
twine/4.0.2 CPython/3.11.9
|














