No project description provided

Project description


Interface for the Creality Ender 3 V3 SE display running Klipper
This project allows you to use the original Creality E3V3SE (Ender 3 V3 SE) display with Klipper when connected directly to the host (at the moment a Raspberry pi only) via UART and GPIOs. It fetches the information from Klipper via the moonraker API and is able to send basic commands back, so that you can re-use the printer original display for some basic functionality.
Considering that the communication protocol between E3V3SE and the display is presently undisclosed, the repository includes a comprehensive guide on reverse engineering the communication protocol of such printers. This resource is invaluable for extending this capability to other 3D printers. Users are encouraged to customize the project to suit their specific printer models.
Installation
Via pip
pip install e3v3se-display-klipper
e3v3se_display_klipper
By cloning the project
git clone https://github.com/jpcurti/E3V3SE_display_klipper.git
cd E3V3SE_display_klipper
Configuration and Running
Parameters can be set as arguments or in a config.ini file in the project root. Run python3 run.py --help (for project cloning) or e3v3se_display --help for a complete list of parameters.
- Example of configuration file: Check the file
config-example.ini - Example when running as arguments:
python run.py --com_port '/dev/ttyAMA0' --baud 115200 --gpio_wheel_button_left 26 --gpio_wheel_button_right 19 --gpio_wheel_button_click 13 --klipper_api_key 'yourapikey' --klipper_socket '/home/youruser/printer_data/comms/klippy.sock'

or

e3v3se_display_klipper --com_port '/dev/ttyAMA0' --baud 115200 --gpio_wheel_button_left 26 --gpio_wheel_button_right 19 --gpio_wheel_button_click 13 --klipper_api_key 'yourapikey' --klipper_socket '/home/youruser/printer_data/comms/klippy.sock'
Wiring
Using a Rpi as a host
If you want to follow the same wiring as the default configuration, make sure to configure the primary UART on the raspberry!.
Then, wire the raspberry pi and display according to the image below:
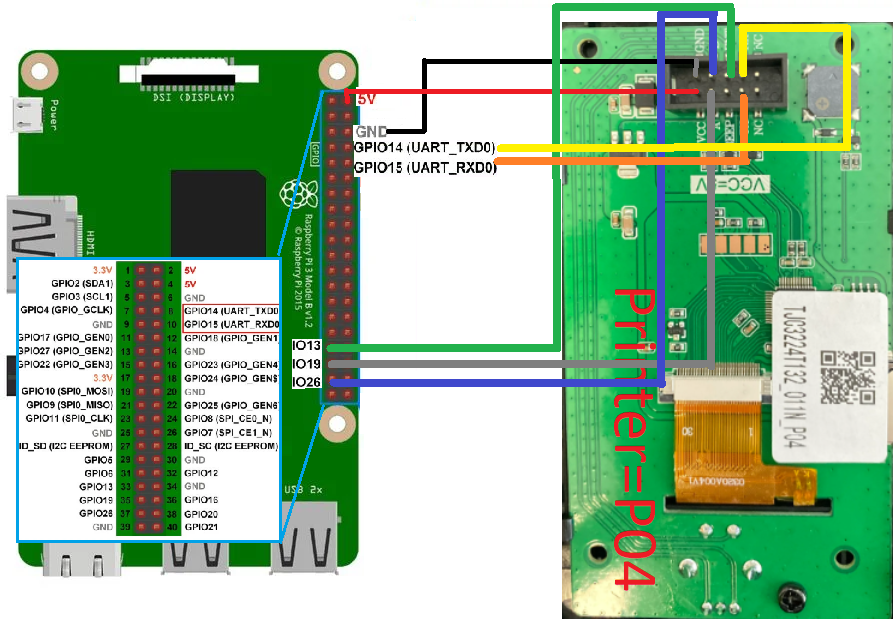
| Display | RPi |
|---|---|
| VCC (5V) | 2 |
| GND | 6 |
| TX | 10 (RX) |
| RX | 8 (TX) |
| A | 19 |
| B | 26 |
| ENTER | 13 |
Important - Credits:
-
This repository is heavily based on the DWIN_T5UIC1_LCD repository for the E3V2 display and makes use of most of the available classes and methods implemented there, with the necessary modifications for the E3V3SE display. All credits goes to the author of the DWIN_T5UIC1_LCD project for making the version which this repository is based on.
-
This project is based on the E3V3SE display firmware 1.0.6. Any changes in the firmware version, such as a new version from Creality, can change the assets locations within the display memory and a new mapping would be necessary. A list of available firmware can be found on Creality website and a detailed instruction on how to update your display is available on youtube.
Useful links
Release history Release notifications | RSS feed


Download files
Download the file for your platform. If you're not sure which to choose, learn more about installing packages.
Source Distribution
Built Distribution
Filter files by name, interpreter, ABI, and platform.
If you're not sure about the file name format, learn more about wheel file names.
Copy a direct link to the current filters
File details
Details for the file e3v3se_display_klipper-1.0.tar.gz.
File metadata
- Download URL: e3v3se_display_klipper-1.0.tar.gz
- Upload date:
- Size: 32.3 kB
- Tags: Source
- Uploaded using Trusted Publishing? No
- Uploaded via: twine/4.0.2 CPython/3.9.2
File hashes
| Algorithm | Hash digest | |
|---|---|---|
| SHA256 |
d14752a12bf71bc4b78bca3f20f0ad4325303e1c42e98f53b10a37c573e30283
|
|
| MD5 |
9c9e0038e41d9e7de25ace22b89c7100
|
|
| BLAKE2b-256 |
4b7eaa7d2aadd468cd98bc90496bd2a4f95a94c9f29ca4a1ba50dfccf0596616
|
File details
Details for the file e3v3se_display_klipper-1.0-py3-none-any.whl.
File metadata
- Download URL: e3v3se_display_klipper-1.0-py3-none-any.whl
- Upload date:
- Size: 64.7 kB
- Tags: Python 3
- Uploaded using Trusted Publishing? No
- Uploaded via: twine/4.0.2 CPython/3.9.2
File hashes
| Algorithm | Hash digest | |
|---|---|---|
| SHA256 |
7f1bff1a9edb40fb3c8fc630649178c796f107b9eb900b1bd883caae5e8ac0ac
|
|
| MD5 |
ab06290fe52e34338c7dfa8a3364e140
|
|
| BLAKE2b-256 |
76e345c40ca738c42cef2e09a5705015a3cad2f6e84ba6d85291d743010fef5b
|


