> Easy and micro fsm could used in python3.x and micropython.

Project description
fsm
1.介绍
2.功能介绍
2.1.最简单的例子
2.2.缓冲机制
2.3.添加说明文档
2.4.自动数据区域
2.5.转移函数优先级
2.6.手动声明起点和终点
1. 介绍
纯python编写的有限状态机,或许我也不清楚是否可以称作有限状态机。它以一种十分简化的方式实现了有限状态机的功能。或许称它为easyfsm更合适。
由于使用了代理和加壳以及自动简化等功能,导致其速度较慢。从循环951600次所花费的时间来看,这要比纯普通python代码慢30倍(这个倍率随着状态逻辑复杂度上升而下降)
@Test
from ezfsm import *
import time
tfs = [
    ["a", "b", lambda: True, lambda: ...]
]

sm = StateMachine(tfs)  # You can also use SM instead of Statemachine

# sm.EnableLogPrint(False)
sm.EnableLogRecord(False)  # 关闭日志记录
sm.Build()  # compile
a = time.time()
for i in range(921600):
    if (lambda : True)():
        (lambda : ...)()

time1 = time.time() - a
a += time1

for i in range(921600):
    while not sm.IsFinish(): sm.Execute()  # You can also use sm() instead of sm.Execute()
    sm.Reset()
time2 = time.time() - a

print("传统耗时: %s, sm耗时: %s"%(time1, time2))
@run
传统耗时: 0.34980034828186035, sm耗时: 10.96321439743042
平均每次运算额外花费10us,对运算速度敏感的需要慎重考虑
目前没有为micropython编写简化版本.
可以直接将代码拷贝到micropython上运行,但性能可能会受到影响.
2. 功能介绍
将介绍最简单的使用方法.
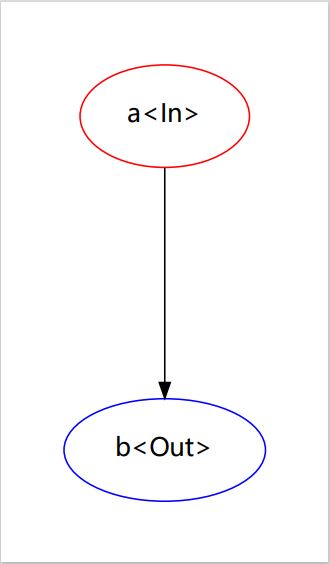
2.1 最简单的例子
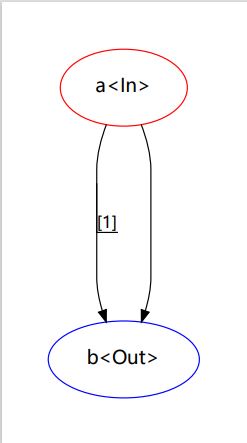
考虑实现一个只有(a, b)两个状态的状态机(如图):
@example:
from ezfsm import *    # This step is best to import all

tfs = [
    ["a", "b", lambda: True, lambda: print("a -> b")]
]

sm = StateMachine(tfs)    # You can also use SM instead of Statemachine

sm.Build()    # compile


#  Ususally, other general FSM does not need to be compiled
#  But this step is set to standardize the data format and improve efficiency. It can make writing more convenient
#  Statemachine without compilation cannot execute most operations.


while not sm.IsFinish(): sm.Execute()    # You can also use sm() instead of sm.Execute()

# if you want to view the graph, you must pip install graphviz and download the graphviz software.

graph = sm.StateGraph()    # get the graphviz.Digraph object
graph.view()
@run
No set <start> <end>, Auto Set : {start <- a, end <- b}
[Auto] Add srt<a> to state table.
[Auto] Add dst<b> to state table.
a -> b
FSM Touch End<b>.
*在上面的例子中,你只需要定义转移函数列表(TransFunc list (tfs))即可完整地描述状态机(其余的代码不会随状态机的复杂度而变化)
*这种状态机的基本运行原理只包含状态集(StateSets)和转移函数(TransFun
*状态机从一个start点开始运行,按一定优先级检查执行该状态的每个转移函数是否可用(通过调用一个条件函数(cond_func),返回True即会被认为可用)。一旦某个转移函数被认为是可用的,那么程序会尝试'转移'到该转移函数指向的状态并放弃检查剩下的转移函数, 而进行'转移'等价于调用操作函数(exec_func). 因此,一个转移函数至少包括srt, dst, cond_func, exec_func这4项信息, 也就是我们构造转移函数所必要的参数.
*如果一个状态机只有转移函数(TransFunc)作为它的参数,那么它会试图自动提取出StateSets、start、end.
*上述描述可以写为如下:
tfs = [
    TF("a", "b", lambda: True, lambda: print("a -> b")),  # TransFunc - TF
]
2.2 缓冲机制
你可以设置缓冲次数,这可以简单暴力的抑制由于过度敏感的条件导致的错误触发.缓冲n次可以理解为:n次通过(cond_func)而不能执行'转移'操作,直到缓冲够n次后才执行转移.
tfs = [
    ["a", "b", lambda: True, lambda: print("a -> b"), BufTs(3), BufDo(lambda: print("缓冲中."))]  # BufTs = BufTimes
]
@run
No set <start> <end>, Auto Set : {start <- a, end <- b}
[Auto] Add srt<a> to state table.
[Auto] Add dst<b> to state table.
缓冲中.
缓冲中.
缓冲中.
a -> b
FSM Touch End<b>.
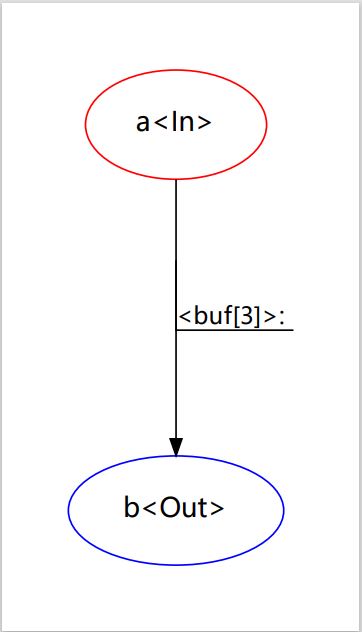
关于缓冲有几点需要说明:
缓冲:
当IF的条件检查通过时,状态机会试图执行转移操作
但是若是存在n次缓冲,则状态机在使n减少1。且在n <= 0前都不执行转移操作
以下操作会使n被重置:
1.n次缓冲完毕、执行转移操作后
2.该state的另一个分支的转移操作被执行
3.被StateMachine.ResetBuffer重置.
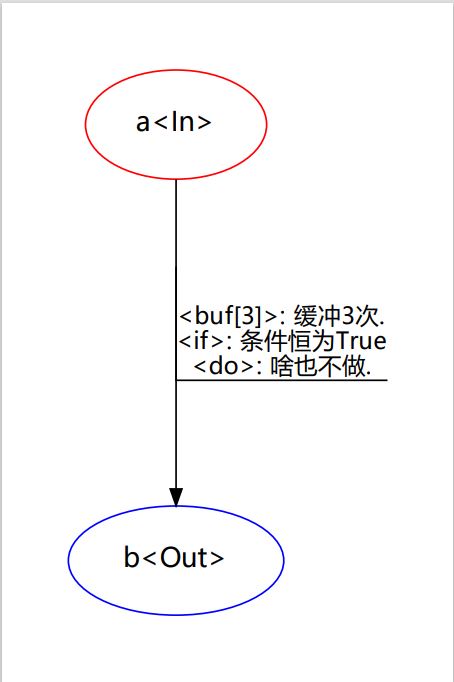
2.3 添加说明文档
你可以对转移函数的if do buf这三个部分添加文档说明。这不会对程序运行产生任何影响,但有助于你分析状态图.
可以通过TFKwargs类或是键值对传入TF构造函数这两种方式添加:
tfs = [
    ["a", "b", lambda: True, lambda: print("a -> b"),
     IfDoc("条件恒为True"), DoDoc("啥也不做."),
     BufTs(3), BufDo(lambda: print("缓冲中.")), BufDoc("缓冲3次.")]
]

OR

tfs = [
    TF("a", "b", lambda: True, lambda: print("a -> b"),
     cond_doc="条件恒为True", exec_doc="啥也不做.",
     buffer_times=3, buffer_exec=lambda: print("缓冲中."), buffer_doc="缓冲3次.")
]
2.4 自动数据区域
fsm提供了一种数据区域(DataArea)类,其中除了[set, iadd, isub]这3个名称不可用外,用户可以在其中任意添加自己的属性,便于在需要的地方使用到它们。
class DataArea(object):
    def iadd(self, attr, value):
        new = getattr(self, attr) + value
        setattr(self, attr, new)
        return new

    def isub(self, attr, value):
        new = getattr(self, attr) - value
        setattr(self, attr, new)
        return new

    def set(self, attr, value):
        setattr(self, attr, value)
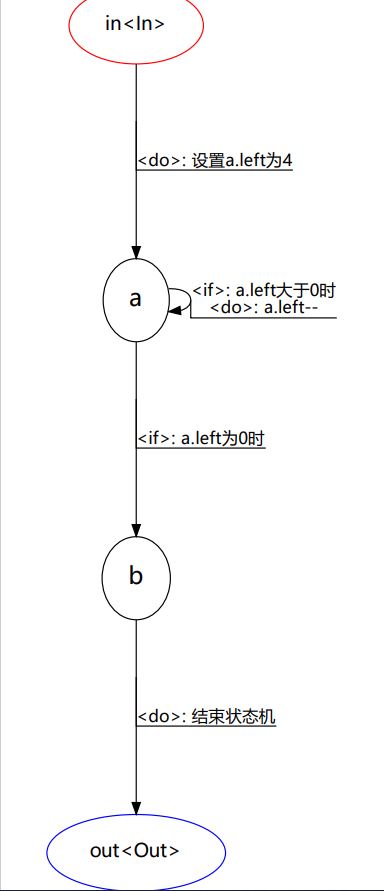
*另一个重要的特性便是mach、inst、dest、this这四个全局数据区域变量。fsm内建了4个DataArea代理变量,用于让程序员更方便的在cond_func、exec_func、buffer_func这三个函数中使用这4个数据区域。
之所以称之为自动数据区域,是因为fsm会在执行具体转移函数时,自动确定这几个数据区域的值。具体值如下:mach: 当前正在运行的状态机 的运行环境
inst: 当前状态节点 的运行环境
dest: 目标状态节点 的运行环境
this: 转移函数自身 的运行环境@Example
tfs = [
    # in -> a
    ['in', 'a', lambda :True,
        lambda :[print("进入状态机."), dest.set("left", 4)],  # in -> a, 所以dest为a的数据域
        DoDoc("设置a.left为4")],
    # a -> b
    ['a', 'b', lambda : inst.left <= 0,  # a -> b, 所以inst为a的数据域
        lambda :print("进入状态b."),
        IfDoc("a.left为0时")],
    # a -> a
    ['a', 'a', lambda : inst.left > 0,  # a -> b, 所以inst为a的数据域
        lambda :[print("进入状态a. left:", inst.left)  , inst.set('left', inst.left - 1)],  # a -> b, 所以inst为a的数据域
        IfDoc("a.left大于0时"),
        DoDoc("a.left--")],
    # b -> out
    ['b', 'out',
        lambda :True,
        lambda :print("进入状态out."),
        DoDoc("结束状态机")],
]
No set <start> <end>, Auto Set : {start <- in, end <- out}
[Auto] Add srt<in> to state table.
[Auto] Add dst<a> to state table.
[Auto] Add dst<b> to state table.
[Auto] Add dst<out> to state table.
进入状态机.
进入状态a. left: 4
进入状态a. left: 3
进入状态a. left: 2
进入状态a. left: 1
进入状态b.
进入状态out.
FSM Touch End<out>.
2.5 转移函数优先级<\h3>
当若干个状态函数都起源于同一个状态节点,状态机执行状态函数的先后顺序就需要考究了.
默认的优先级都为0,fsm对同一优先级下所有转移函数按照先入先执行的原则进行检查和执行
tfs = [
    ["a", "b", lambda: True, lambda: print("a -> b, 1 channel")],  # 先入先执行
    ["a", "b", lambda: True, lambda: print("a -> b, 2 channel")],  # 上一条被优先检查,若其cond_func返回True,就执行不到这里了
]
@run
No set <start> <end>, Auto Set : {start <- a, end <- b}
[Auto] Add srt<a> to state table.
[Auto] Add dst<b> to state table.
a -> b, 1 channel
FSM Touch End<b>.
修改优先级的方法是在第五项数据处设置:
tfs = [
    ["a", "b", lambda: True, lambda: print("a -> b, 1 channel")],  # 优先级默认为0
    ["a", "b", lambda: True, lambda: print("a -> b, 2 channel"), 1],  # 优先级1优先于0检查
]
@run
No set <start> <end>, Auto Set : {start <- a, end <- b}
[Auto] Add srt<a> to state table.
[Auto] Add dst<b> to state table.
a -> b, 2 channel
FSM Touch End<b>.
2.6 手动声明起点和终点
简单的状态图可以很容易自动辨识出起点和终点,而一旦出现嵌套、循环这种逻辑时,系统就不能正确识别出起点和终点了。这时就需要我们手动指定. 第一种指定方式是在实例化时直接指定
sm = SM(tfs, start='a', end='b')
另一种方式是使用StateMachine.Config()方法修改起点和终点
sm.Config(start='a', end='b')
如果你传入了StateSets,那么sm在找不到start和end时会优先选取state sets的首尾作为start和end
states = ['a', 'b', 'c']
tfs = [
    TF("a", "b", lambda: True, lambda: print("a -> b")),  # TransFunc - TF
    TF("b", "c", lambda: True, lambda: print("b -> c")),
    TF("b", "b", lambda: True, lambda: print("b -> b")),
]
sm = SM(states, tfs)  # 如果只传tfs,那么会出现逻辑错误(不会报错)
需要注意的是,修改的这些值在编译前都是没有任何效果的,因此在编译前你可以重新修改它们.
软件架构
安装教程
- pip install ezfsm
使用说明
from ezfsm import *
2.[OR]:
import ezfsm as fsm
mach, inst, dest, this = fsm.mach, fsm.inst, fsm.dest, fsm.this
Release history Release notifications | RSS feed


Download files
Download the file for your platform. If you're not sure which to choose, learn more about installing packages.
Source Distribution
Built Distribution
Filter files by name, interpreter, ABI, and platform.
If you're not sure about the file name format, learn more about wheel file names.
Copy a direct link to the current filters
File details
Details for the file ezfsm-0.2.1.2.tar.gz.
File metadata
- Download URL: ezfsm-0.2.1.2.tar.gz
- Upload date:
- Size: 19.8 kB
- Tags: Source
- Uploaded using Trusted Publishing? No
- Uploaded via: twine/4.0.2 CPython/3.11.4
File hashes
| Algorithm | Hash digest | |
|---|---|---|
| SHA256 |
f04c94324a7c3e72cf84ef788eaeb6eb42e960f53b5efa462c02a375c818b7cb
|
|
| MD5 |
d6bd3af1855a4e0a041e7303273e2ca6
|
|
| BLAKE2b-256 |
f1b4939f87c5d805e2e2a187addf1ba2d006dd27028cef7fdc893394f724992c
|
File details
Details for the file ezfsm-0.2.1.2-py3-none-any.whl.
File metadata
- Download URL: ezfsm-0.2.1.2-py3-none-any.whl
- Upload date:
- Size: 18.6 kB
- Tags: Python 3
- Uploaded using Trusted Publishing? No
- Uploaded via: twine/4.0.2 CPython/3.11.4
File hashes
| Algorithm | Hash digest | |
|---|---|---|
| SHA256 |
130e0c52c90e12aefee411dc189974cdb3e62aaf773d044e3457bb4c823ed893
|
|
| MD5 |
a4e49b155751dcd9db904d358e6792ed
|
|
| BLAKE2b-256 |
14b88a3993ae31f7f8e6391ace87ef7a0e12127b18b1734992c99e31a4571dc7
|


