🔥 Fast-Flet is a package built as a complement to Flet, designed for newbies which facilitates the handling of flet events, designed to work with numerous pages and be customizable.

Project description
🔥Fast-Flet
Fast-Flet is a package built as a complement to Flet, designed for newbies which facilitates the handling of flet events, designed to work with numerous pages of your created application. It also provides a better MVC construction of your code, which can be scalable and easy to read. But it not only limits the MVC model but you can adapt it according to your preferences.
📌Flet events it handles
on_route_change: Dynamic routing (automatic and manual)on_view_popon_keyboard_eventon_resizeon_error
📌It also contains extra options:
- Responsive of the page in terms of its height. view
- Login control of assigned pages. view
- Async compatible. view
- Automatic dynamic routing. view
- Manual dynamic routing. view
- Compatible with
Flet_Fastapi. view - How to use
Fast-Flet? view
class of Fast-Flet
- Using
ViewPageclass. view - Using
MyControllerclass. view - Using of
on_resize. view - Using of
on_keyboard_event. view
💻Installation:
It is installed automatically:
- flet
- flet_fastapi
- uvicorn
pip install fast-flet
💻Update:
pip install fast-flet --upgrade
⌨️Fast-Flet Cli
Contains new quickstart commands that you can use in the terminal. They will allow you to start developing immediately and without any effort.
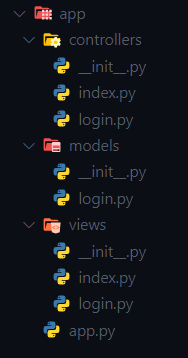
- Create the MVC based project
fast-flet init mvc
- Create the MVC based project (async)
fast-flet init mvc --async
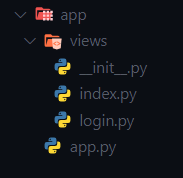
- Create a custom project, only the
viewsfolder and theapp.pyfile will be created.
fast-flet init app
- Create a custom project, only the
viewsfolder and theapp.pyfile will be created. (async)
fast-flet init app --async
- Check the version
fast-flet version
🚀 HOW TO USE FAST-FLET?
Fast-Flet presents a main structure based on MVC and the other is according to how the user wants to adapt it.
Suggested MVC
Adaptive according to the user.
In this case it only requires the app.py file and the views folder, the rest is already customizable in terms of more folders or files.
Fast-Flet app example:
We create the main file app.py in the root path of the project, which is where Flet will be initialized.
import flet as ft
from fast_flet import RoutePage, ConfView

def main(page: ft.Page):
    # CONFIGURACION GENERAL
    theme = ft.Theme()
    platforms = ["android", "ios", "macos", "linux", "windows"]
    for platform in platforms:  # Removing animation on route change.
        setattr(theme.page_transitions, platform, ft.PageTransitionTheme.NONE)

    page.theme = theme

    # View flet configuration in all views
    view = ConfView(
        appbar=lambda: ft.AppBar(
            title=ft.Text("fast-flet"),
            center_title=False,
            bgcolor=ft.colors.SURFACE_VARIANT,
            actions=[
                ft.IconButton(ft.icons.WB_SUNNY_OUTLINED),
                ft.IconButton(ft.icons.FILTER_3),
                ft.PopupMenuButton(
                    items=[
                        ft.PopupMenuItem(text="Item 1"),
                        ft.PopupMenuItem(
                            text="Checked item", checked=False
                        ),
                    ]
                ),
            ],
        )
    )

    # ROUTING AND HANDLING VIEWS IN AUTOMATICO
    fast_flet = RoutePage(
        page=page,
        route="/index",
        route_login='/login',
        route_404="/404-fast-flet",
        view=view,
    )
    # WE RUN THE ROUTING OF THE VIEWS
    fast_flet.run()


ft.app(main,
       port=8000,
       view=ft.AppView.WEB_BROWSER,
       web_renderer=ft.WebRenderer.AUTO,
       route_url_strategy='hash'
       )
Class usage RoutePage:
By default this Fast-Flet class performs automatic routing. It has the following attributes.
-
page:'page' parameter of the main function of the app or website (mandatory). -
route:Path where the app or website will be initialized (mandatory). -
route_login:Login route, where it will be redirected. -
route_404:Custom page path not found. -
view:General configuration of all the'View'of the page'(page.views)' -
manual_routing:Use manual routing of'views'
Class usage ConfView:
Contains all View Flet properties to assign to all pages.
-
Note: if the parameter receives a flet class,
lambdais used. (Not in async)Example:
    controls: list = None
    appbar: AppBar = None # use lambda
    floating_action_button: FloatingActionButton = None # use lambda
    navigation_bar: NavigationBar = None # use lambda
    vertical_alignment: MainAxisAlignment = None # use lambda
    horizontal_alignment: CrossAxisAlignment = None # use lambda
    spacing: int = None
    padding: int = None # use lambda
    bgcolor: str = None # use lambda

    # ScrollableControl specific
    scroll: ScrollMode = None # use lambda
    auto_scroll: bool = None
    fullscreen_dialog: bool = None
    on_scroll_interval: OptionalNumber = None # use lambda
    on_scroll = None
Manual dynamic routing.
To perform manual routing, it is required to use the add_routes() method from RoutePage and import add_view() from Fast-Flet.
🔎 Note: To use it you must first activate it in the RoutePage class with its attribute manual_routing= True (by default it is False).
Example:
import flet as ft
from fast_flet import RoutePage,add_view

# Import the View classes from the views folder to use in add_routes
from views.index import View
from views.task import View as Taskview
from views.contador import View as ContadorView
from views.login import View as LoginView
from views.resize import View as ResizeView
from views.page_404 import View as Page_404View

def main(page: ft.Page):
    # CONFIGURACION GENERAL
    theme = ft.Theme()
    platforms = ["android", "ios", "macos", "linux", "windows"]
    for platform in platforms:  # Removing animation on route change.
        setattr(theme.page_transitions, platform, ft.PageTransitionTheme.NONE)

    page.theme = theme

    fast_flet = RoutePage(
        page=page,
        route="/index",
        route_login='/login',
        route_404="/404-fast-flet",
        manual_routing= True
    )

    # ROUTING AND MANAGEMENT VIEWS IN MANUAL'
    fast_flet.add_routes(
        [
            add_view(url='/index',view=View()),
            add_view(url='/task',view=Taskview(),clear=False),
            add_view(url='/counter/:id/:name',view=ContadorView(), clear=False),
            add_view(url='/login',view=LoginView()),
            add_view(url='/resize',view=ResizeView(), clear=False),
            add_view(url='/404-fast-flet',view=Page_404View(), clear=False),
        ]
    )

    # WE RUN THE ROUTING OF THE VIEWS
    fast_flet.run()


ft.app(main,
       port=8000,
       view=ft.AppView.WEB_BROWSER,
       web_renderer=ft.WebRenderer.AUTO,
       route_url_strategy='hash'
       )
Using the add_view() function
The parameters that this function has are:
urlWe set the url.viewWe use the class imported from the views folder.clearAll views stored inpage.viewsare removed (default is true).
⚡RoutePage run() method
run() Initialize Fast-Flet
🔀Async apps with Fast-Flet
To use Flet in async mode, it is initialized with the run_async() method of the RoutePage class
🗂️In the views folder a file is created for example index.py
🔎Note: When using automatic routing the class must be called View and inherit ViewPage from Fast-Flet.
import flet as ft
from fast_flet import ViewPage


class View(ViewPage):
    def __init__(self) -> None:
        super().__init__()
        self.call.route = '/index'
        # remove icon return to previous view of 'appbar', if it is activated
        self.call.page_clear = True # clean the list of views added to the page (default is false)

    # View general configuration
    def build(self):
        # we assign a url
        self.route = '/index'
        page = self.call.page
        page.title = 'Index'

        # modify View properties : https://flet.dev/docs/controls/view
        self.appbar.title = ft.Text('Home')
        self.controls = [
            ft.Column(
                [
                    ft.Container(
                        content=ft.Column(
                            [
                                ft.FilledButton(
                                    'go Counter',
                                    on_click=lambda e: e.page.go(
                                        '/counter/100/fast-flet')
                                ),
                                ft.FilledButton(
                                    'go Task',
                                    on_click=lambda e:e.page.go('/task')
                                ),
                                ft.FilledButton(
                                    'go Resize',
                                    on_click=lambda e:e.page.go('/resize')
                                ),
                            ],
                            alignment=ft.MainAxisAlignment.CENTER,
                            horizontal_alignment=ft.CrossAxisAlignment.CENTER
                        ),
                        width=450,
                        height=450,
                        bgcolor='blue800',
                        alignment=ft.alignment.center,
                        border_radius=20

                    ),

                ]
            )
        ]

        self.horizontal_alignment = ft.CrossAxisAlignment.CENTER
        self.vertical_alignment = ft.MainAxisAlignment.CENTER
        self.bgcolor = ft.colors.BLACK
The View class inherits:
self.call
-
self.call.page: PageReceives the page from the main function. -
self.call.route: str = '/'Establish a route (Automatic Routing). -
self.call.page_clear:bool = FalseSet removal of listpage.viewsstored by flet (Automatic Routing). -
self.call.url_params: list = NoneReceives the parameters sent through the url. -
self.call.is_login: bool = FalseEstablish if the page requires login. -
self.call.on_keyboard_event: MykeyboardReceive information about the event:'on_keyboard_event'. -
self.call.on_resize: MyPageResizeReceive information about the event:on_resize.
Configure flet View properties flet.View, It is used in the build() method.
In the build() method that inherits from the ViewPage class, you can add new controllers and assign value of the page properties.
self.controls: list = Noneself.appbar: AppBar = Noneself.floating_action_button: FloatingActionButton = Noneself.navigation_bar: NavigationBar = Noneself.vertical_alignment: MainAxisAlignment = Noneself.horizontal_alignment: CrossAxisAlignment = Noneself.spacing: int = Noneself.padding: int = Noneself.bgcolor: str = None
ScrollableControl specific
self.scroll: ScrollMode = Noneself.auto_scroll: bool = Noneself.fullscreen_dialog: bool = Noneself.on_scroll_interval: int = Noneself.on_scroll = None
🔐How to configure page access protection? (login)
- To do this we use the
login_required()method that inherits from the ViewPage class, the configuration will only be done once. - We use
self.call.is_login = TrueRequires login to access the page (previously configured)
class View(ViewPage):
    def __init__(self) -> None:
        super().__init__()
        self.call.route = '/login' # we assign a url
        self.call.is_login = True # requires login to access the page (previously configured)

    # required login configuration
    def login_required(self) -> bool:
        super().login_required()
        class_login = Login() # import the login controller class
        add_login_required = lambda:class_login.login() #We use the method of the class where the login configuration has been made
        return add_login_required() # Returns login validation.

    # View general configuration
    def build(self):
        self.call.page.title = 'Login'
        .......
        ........
⚙️Use self.call.on_keyboard_event
Once the ViewPage attributes are inherited we can use them.
🔎self.call.on_keyboard_event It has the following methods:
-
add_control('<controller method>')Adds a controller configuration (controller method), which is executed with theon_keyboard_eventevent. -
def key()Returns the value entered by keyboard. -
def shift()Returns the value entered by keyboard. -
def ctrl()Returns the value entered by keyboard. -
def alt()Returns the value entered by keyboard. -
def meta()Returns the value entered by keyboard. -
def test()Returns a message of all the values entered by keyboard. (key, Shift, Control, Alt, Meta)
⚙️ Use self.call.on_resize
🔎 self.call.on_resize It has the following methods:
-
controlsStores the checklist to be responseve. -
add_control('<control>', '<height>', '<max_height>')Add a control that will be a response when executing the 'on_resize' event. -
add_controls = '<lambda>'Stores an anonymous function. -
response('<'controls>')Configure the response of all controls. -
add_def_control = <lambda>Add a function that will be executed with theon_resizeevent, the function must be from thecontrollersfolder.
Example:
🗂️ In the views folder of the task.py file
def build(self):
# ------
# We configure all the values of the page.
page = self.call.page # we get all the values of the page.
page.title = 'test'
# --------
on_resize = self.call.on_resize # on_resize values are obtained
on_keyboard = self.call.on_keyboard_event # the values of on_keyboard_event are obtained
task = ContentTask(on_resize, on_keyboard) # flet custom control
# modify View properties : https://flet.dev/docs/controls/view
self.appbar.title = ft.Text('Task')
self.controls = [
task
]
Flet custom control
class ContentTask(ft.UserControl):
def __init__(self, on_resize: MyPageResize, on_keyboard: Mykeyboard):
super().__init__()
# We create an object of the controller class of this class, to be able to use its methods.
self.new_control = ContentTaskC(self, on_resize, on_keyboard)
self.on_keyboard = on_keyboard # the values of on_keyboard_event are obtained
# add a function to on_keyboard, which will be executed according to what is established in the function, it will be executed with keyboard input.
self.on_keyboard.add_control(self.new_control.add_on_keyboard)
self.on_resize = on_resize # on_resize values are obtained
self.new_control.user_control = Task # # We send the class that we are going to use in the controller of this class
self.input = ft.TextField(
col=8,
label='Enter the task',
multiline=True,
autocorrect=True,
helper_text="'Alt'+'L' -> to add task",
on_focus=self.new_control.update_input,
)
self.colum_task = ft.Column(scroll=ft.ScrollMode.ADAPTIVE)
self.response_page = ft.Container(
col={'sm': 5},
bgcolor=ft.colors.BLACK26,
height=self.on_resize.height - 80,
padding=10,
border_radius=10
)
self.response_task = ft.Container(
col={'sm': 11},
bgcolor=ft.colors.BLACK12,
height=self.on_resize.height-244,
padding=10,
border_radius=10,
)
# We add the controllers that are height responsive, if it is not displayed the page has to be reloaded (possible flet error)
self.on_resize.add_control(self.response_page, 80, 420)
self.on_resize.add_control(self.response_task, 244, 383)
self.on_resize.add_controls = lambda: self.new_control.response(
self.on_resize.controls) # we add all the controls
def build(self):
self.response_task.content = self.colum_task
self.response_page.content = ft.ResponsiveRow(
controls=[
ft.Text('Task', size=25,
text_align=ft.TextAlign.CENTER),
ft.ResponsiveRow(
controls=[
self.input,
ft.FilledButton(
'ADD',
col=4,
on_click=self.new_control.add_task
)
],
vertical_alignment=ft.CrossAxisAlignment.CENTER
),
self.response_task
],
alignment=ft.MainAxisAlignment.CENTER
)
return ft.ResponsiveRow(
controls=[
self.response_page
],
alignment=ft.MainAxisAlignment.CENTER,
)
🗂️In the controllers folder of the task.py file
The Fast-Flet MyController class contains the following inheriting attributes.
self.call.model = NoneIt is assigned the class of the file.py in the models folder.self.call.on_resize = on_resizeIt is assigned the self.call.on_resize of the View class from the file.py in the views folder.self.call.on_keyboard_event = on_keyboardIt is assigned the self.call.on_keyboard_event of the View class in the .py file in the views folder.self.x = _selfThe custom control object is stored.self._user_control = NoneThe class that will be used in the custom control is stored.
# view's ContentTask class handler
class ContentTaskC(MyController):
    def __init__(self, _self: object, on_resize: MyPageResize = None, on_keyboard=None) -> None:
        super().__init__(_self, on_resize, on_keyboard)

    def _add_task(self):
        if self.x.input.value != '':
            input_task = self.x.input.value
            task = self.user_control(self.delete, input_task, self.call.on_keyboard_event)
            self.x.colum_task.controls.append(task)
            self.x.input.value = ''
            self.x.input.label = 'Enter a task'
        else:
            self.x.input.label = 'Enter a task please'
            self.x.input.border_color=ft.colors.RED
            self.x.update()
            sleep(2)
            self.x.input.border_color=None
        self.x.update()

    def add_task(self,e):
        self._add_task()

    def delete(self, task):
        self.x.colum_task.controls.remove(task)
        self.x.update()

    def update_input(self,e):
        self.x.input.border_color=None
        self.x.update()

    # used with keyboard input
    def add_on_keyboard(self):
        keyboard = self.call.on_keyboard_event
        if keyboard.key() == 'L' and keyboard.alt():
            self._add_task()
🔗Responsive of the page in terms of its height.
In the previous example you can see the responsible use of the page height.
self.response_page = ft.Container(
            col={'sm': 5},
            bgcolor=ft.colors.BLACK26,
            height=self.on_resize.height - 80,
            padding=10,
            border_radius=10
        )

        self.response_task = ft.Container(
            col={'sm': 11},
            bgcolor=ft.colors.BLACK12,
            height=self.on_resize.height-244,
            padding=10,
            border_radius=10,

        )

        # We add the controllers that are height responsive, if it is not displayed the page has to be reloaded (possible flet error)
        self.on_resize.add_control(self.response_page, 80, 420)
        self.on_resize.add_control(self.response_task, 244, 383)
        self.on_resize.add_controls = lambda: self.new_control.response(
            self.on_resize.controls)  # we add all the controls
🔗 Links


🔋Sample applications with Fast-Flet
threading(defectFlet)Async(withflet_fastapi) watch online
License
Release history Release notifications | RSS feed

Download files
Download the file for your platform. If you're not sure which to choose, learn more about installing packages.
Source Distribution
Built Distribution
Filter files by name, interpreter, ABI, and platform.
If you're not sure about the file name format, learn more about wheel file names.
Copy a direct link to the current filters
File details
Details for the file fast-flet-0.1.1.tar.gz.
File metadata
- Download URL: fast-flet-0.1.1.tar.gz
- Upload date:
- Size: 3.0 MB
- Tags: Source
- Uploaded using Trusted Publishing? No
- Uploaded via: twine/4.0.2 CPython/3.11.5
File hashes
| Algorithm | Hash digest | |
|---|---|---|
| SHA256 |
c55d19253c97f71a8e5a9a11ec01300b7321d1d9053cc784968a695285f517b9
|
|
| MD5 |
76a4eb38dde1b859bbf618bc6fc298fb
|
|
| BLAKE2b-256 |
386f8ee58c905d690d5c8ca2aa4c71c592e3a27a0f11741a2e65bdce7c0648c4
|
File details
Details for the file fast_flet-0.1.1-py3-none-any.whl.
File metadata
- Download URL: fast_flet-0.1.1-py3-none-any.whl
- Upload date:
- Size: 3.0 MB
- Tags: Python 3
- Uploaded using Trusted Publishing? No
- Uploaded via: twine/4.0.2 CPython/3.11.5
File hashes
| Algorithm | Hash digest | |
|---|---|---|
| SHA256 |
9586f94add06d3e4316e899f2cf7f8d9354e4c1316d652dadc2cf7f1765b7c32
|
|
| MD5 |
c120a18d03fe4a120870c48ad4beea2e
|
|
| BLAKE2b-256 |
f78346d0f90e9a35a5361795420cbd309de2905890359e39149671a214647d8d
|


