IPSO Phen an image processing toolbox for mass phenotyping

Project description
IPSO Phen
Remember, a few hours of trial and error can save you several minutes of looking at the README.
— I Am Devloper (@iamdevloper) November 7, 2018
Full documentation is available at our read the docs site
What is IPSO Phen
The rise in popularity of high throughput plant phenotyping facilities leads to a large volume of images. To address the increasing demand and diversity of image analysis needs, we developed IPSO Phen, an all-in-one program to build, test and execute image-processing pipelines by chaining easily customizable tools.
Introduction
Toulouse Plant Microbe Phenotyping (TPMP) is a high throughput platform located on the INRA Occitanie-Toulouse campus in France. It has five camera groups in two robots taking pictures from the top or the side of the plant. Species studied to date are Marchantia, Arabidopsis, Medicago, Tomato, Tobacco, Sunflower, Eucalyptus, Wheat and Brachypodium. This large amount of possible combinations generated the need for a tool to create, test and run analysis pipelines. After evaluating the software tools freely available, we created IPSO Phen, an all-in-one image processing toolbox.
IPSO Phen, groups in a single interface around fifty different image-processing tools that can be combined into pipelines. The settings of both tools and pipelines can be thoroughly tested on fixed or random sets of images from the experiments. IPSO Phen can access images either from a file system or through a database.
Image processing tools
Among the available tools, there is an image pre-processor based on Otsu’s automatic clustering-based threshold method, various classic threshold methods and an advanced contour cleaning tool able to remove noise while keeping split contours.
Each tool can be used directly in a Python script by copying and pasting the code generated in the "code" tab next to the "Help" tab.
Adding tools
Even if IPSO Phen comes with a large (and expanding) set of image processing tools, some users may want to add additional tools that they have created or from an existing toolkit like PlantCV [1]. To that end, we offer an easy way to create or add tools to the user interface (UI) where widgets are added in a descriptive way and all callbacks and notifications are handled by the program.
Pipelines
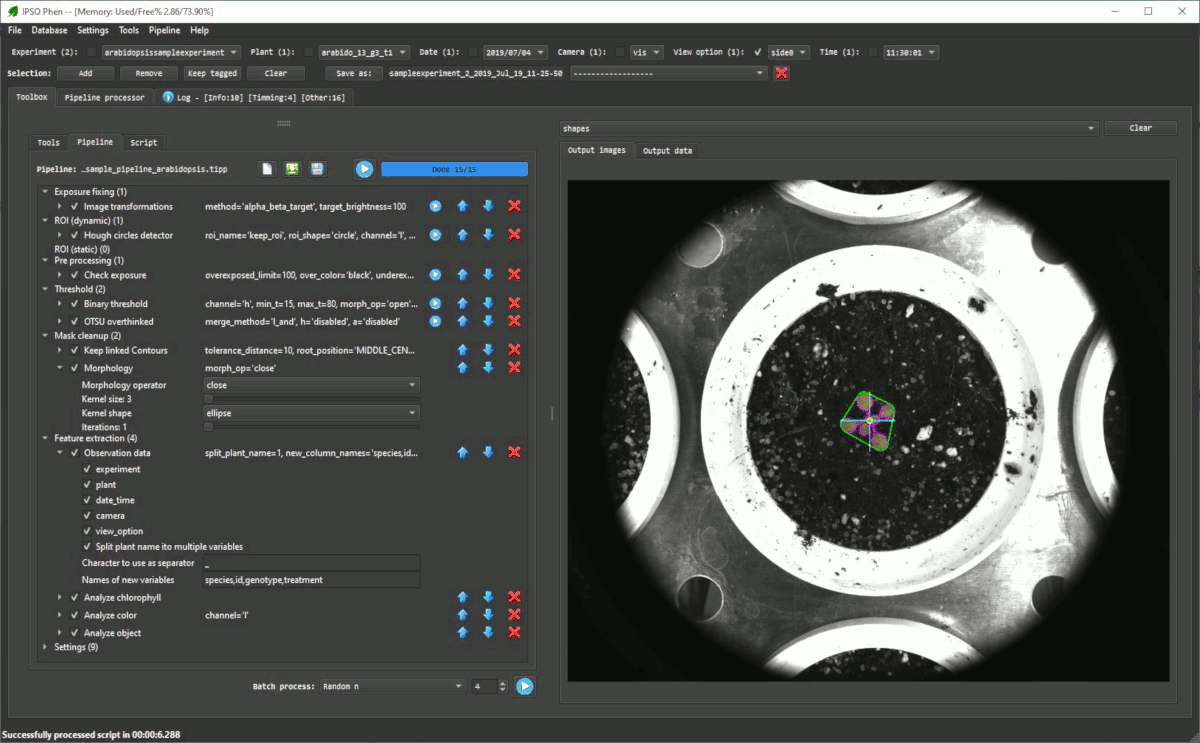
The user can arrange any number of image processing tools into a customizable pipeline (Image below) that can be fully edited, saved and restored for later usage. Before executing the pipeline (IPSO Phen supports parallel execution) the user may select which features to extract from images. Once the process ends, IPSO Phen generates a CSV file.
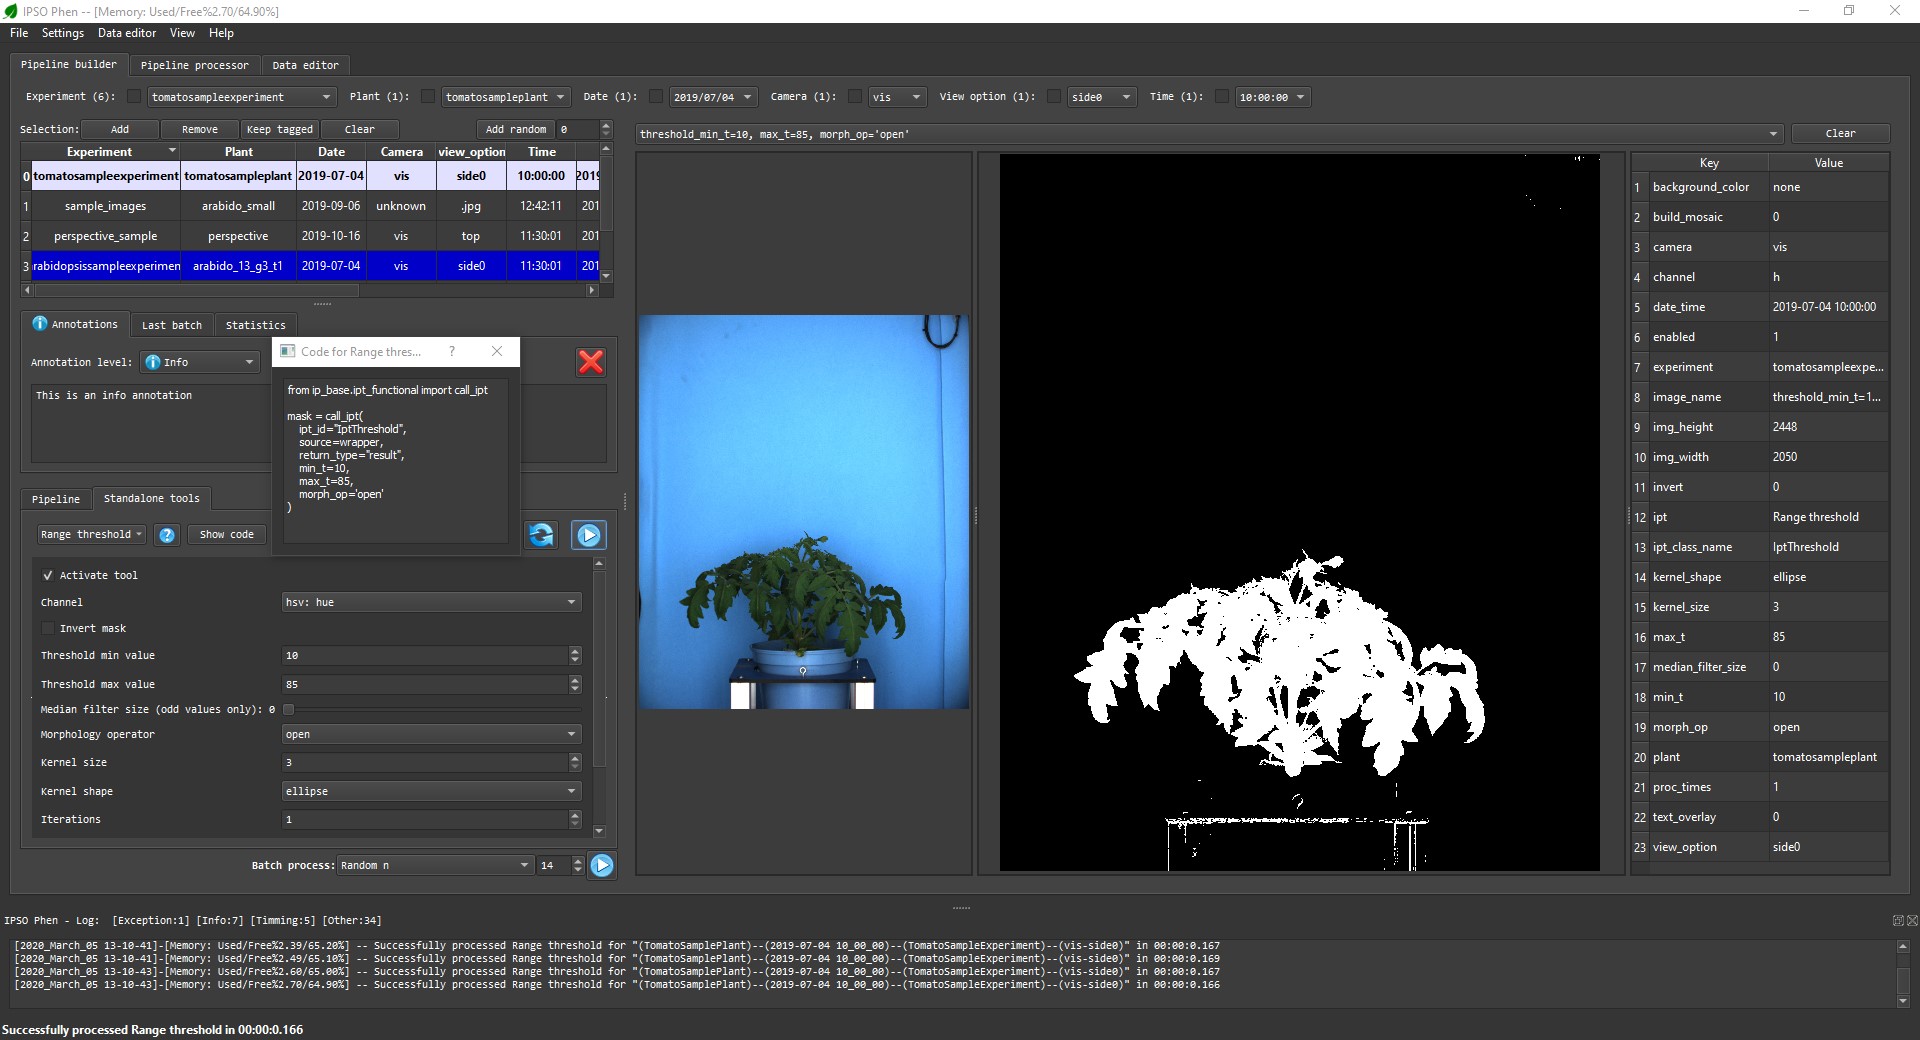
For advanced Python users there is also the possibility to generate fully functional Python script reproducing the behavior of the pipeline, this allows customization in any way needed. See Arabidopsis top view for an example. To be used, the script must be placed in the "script_pipelines" folder within IPSO Phen.
Testing
At any point, the user may choose to test the current tool or pipeline configuration on any number of images with a single click. Test images can be selected manually, taken from a saved selection or random sample, or, any combination of these three methods. The results of the test can be accessed with a combo box or saved as a video to be reviewed later. This feature facilitates a large number of tests, which in turn will improve the quality of the analysis.
Installing
In order to use PlantCV or to create new image processing tools, the program must be installed from the source code.
System requirements
IPSO Phen has been tested on:
- Linux: Ubuntu 18.04+
- Windows 10
Dependencies
Python, tested with versions 3.6, 3.7 and 3.8. Python 3.5 will not work.
Python packages:
- numpy
- opencv-contrib-python
- pandas
- paramiko
- psutil
- psycopg2-binary
- PySide2
- scikit-image
- scikit-learn
- seaborn
- SQLAlchemy
- SQLAlchemy-Utils
- tqdm
- Unidecode
PlantCV requirements
If you want to use IPSO Phen with PlantCV, you must install it from the source code and modify requirements.txt so it installs OpenCV v3 instead of v4.
Install via pacakage manager
Install on an existing python environment with command line:
pip install ipso_phen
Install from source
Source code is available from: https://github.com/tpmp-inra/ipso_phen
Install on an existing python environment with command line:
pip install -r requirements.txt
First steps
Launching IPSO Phen
To run IPSO Phen just type
If installing from PyPi, after activating, run the following command from the shell.
ipso_phen
If installing from git, after activating, run the following command from the shell.
python -m ipso_phen
From the root IPSO Phen folder once the python environment has been activated.
Loading images
- IPSO Phen can only parse folders, to do so go to File/Parse Folder.
- Once the images are loaded, they can all be accessed via the comboboxes on the first row of th UI (User Interface).
- To add images to the quick access list, click icon the "Add" button on the third row of the UI, this will execute a query to the loaded images that will take into account the checkboxes on the top row.
About the tools
- All tools can be accessed through the "Tools" menu
- They're classified by their type
- One tool can have multiple types
- Existing types:
- Ancillary: Tools mostly used inside other tools
- Clustering: Clustering tools
- Demo: Demo tools, start here if you want to understand how to create/edit tools
- Execute default class pipeline: Execute a class pipeline linked to the selected image experiment, if no class pipeline is available an error will be reported
- Exposure fixing: Fix image exposure, the resulting image will be used for color analysis
- Feature extraction: Tools to extract features from a segmented image
- Image checking: Check different aspects of an image
- Image info: Gives info about current image
- Image generator: Creates one or more images from a selected image
- Mask cleanup: Cleans a coarse mask generated by threshold tools
- Pre-processing: Transform the image to help segmentation, the image may not retain it's properties. Changes here will be ignored when extracting features
- ROI (dynamic): Create a ROI after analyzing the image
- ROI (static): Create a ROI from coordinates
- Threshold: Threshold tools
- Visualization: Visualization tools
- White balance: Tools to help change white balance, depending on where those tools are set in the pipeline they or may not be ignored when extracting features
- Upon selecting a tool the help tab and the tool interface is updated
- If the tool reacts in real time the result will be displayed on the "Output image" tab, if not you need to click on the play button next to "Use pipeline as preprocessor"
Creating & using pipelines
- The following types of tools can be added to pipelines through the "Pipeline" menu:
- Exposure fixing
- Feature extraction
- Mask cleanup
- Pre-processing
- ROI (dynamic)
- ROI (static)
- Threshold
- Once a pipeline is loaded its components appear on the "Pipeline" tab in the bottom left part of the UI
- Pipelines can be saved/loaded through the "Pipeline" menu
- Pipeline options can be configured on the pipeline tab
- To Execute a pipeline click the "play" button on the "Pipeline" tab
- Pipelines can be executed on all the images present on the quick access list in the "Pipeline processor" tab
Testing while building
- At any time a test run can be executed on all or part of the images present in the quick access list by clicking on the "Play" button next to "Batch process" at the bottom left of the UI
- Three test modes are available:
- "All": Will test all images in the quick access list, this will ignore the spin box
- "First n": Test the first n images, n refers to the number displayed in the spin box
- "Random n": Test n random images, n refers to the number displayed in the spin box
Building image data file
Launching the analysis
Once a pipeline is ready it can be executed on any number of images in the "Pipeline processor" tab. Options can be set before launching the maas process, only thread count can be modified afterwards.
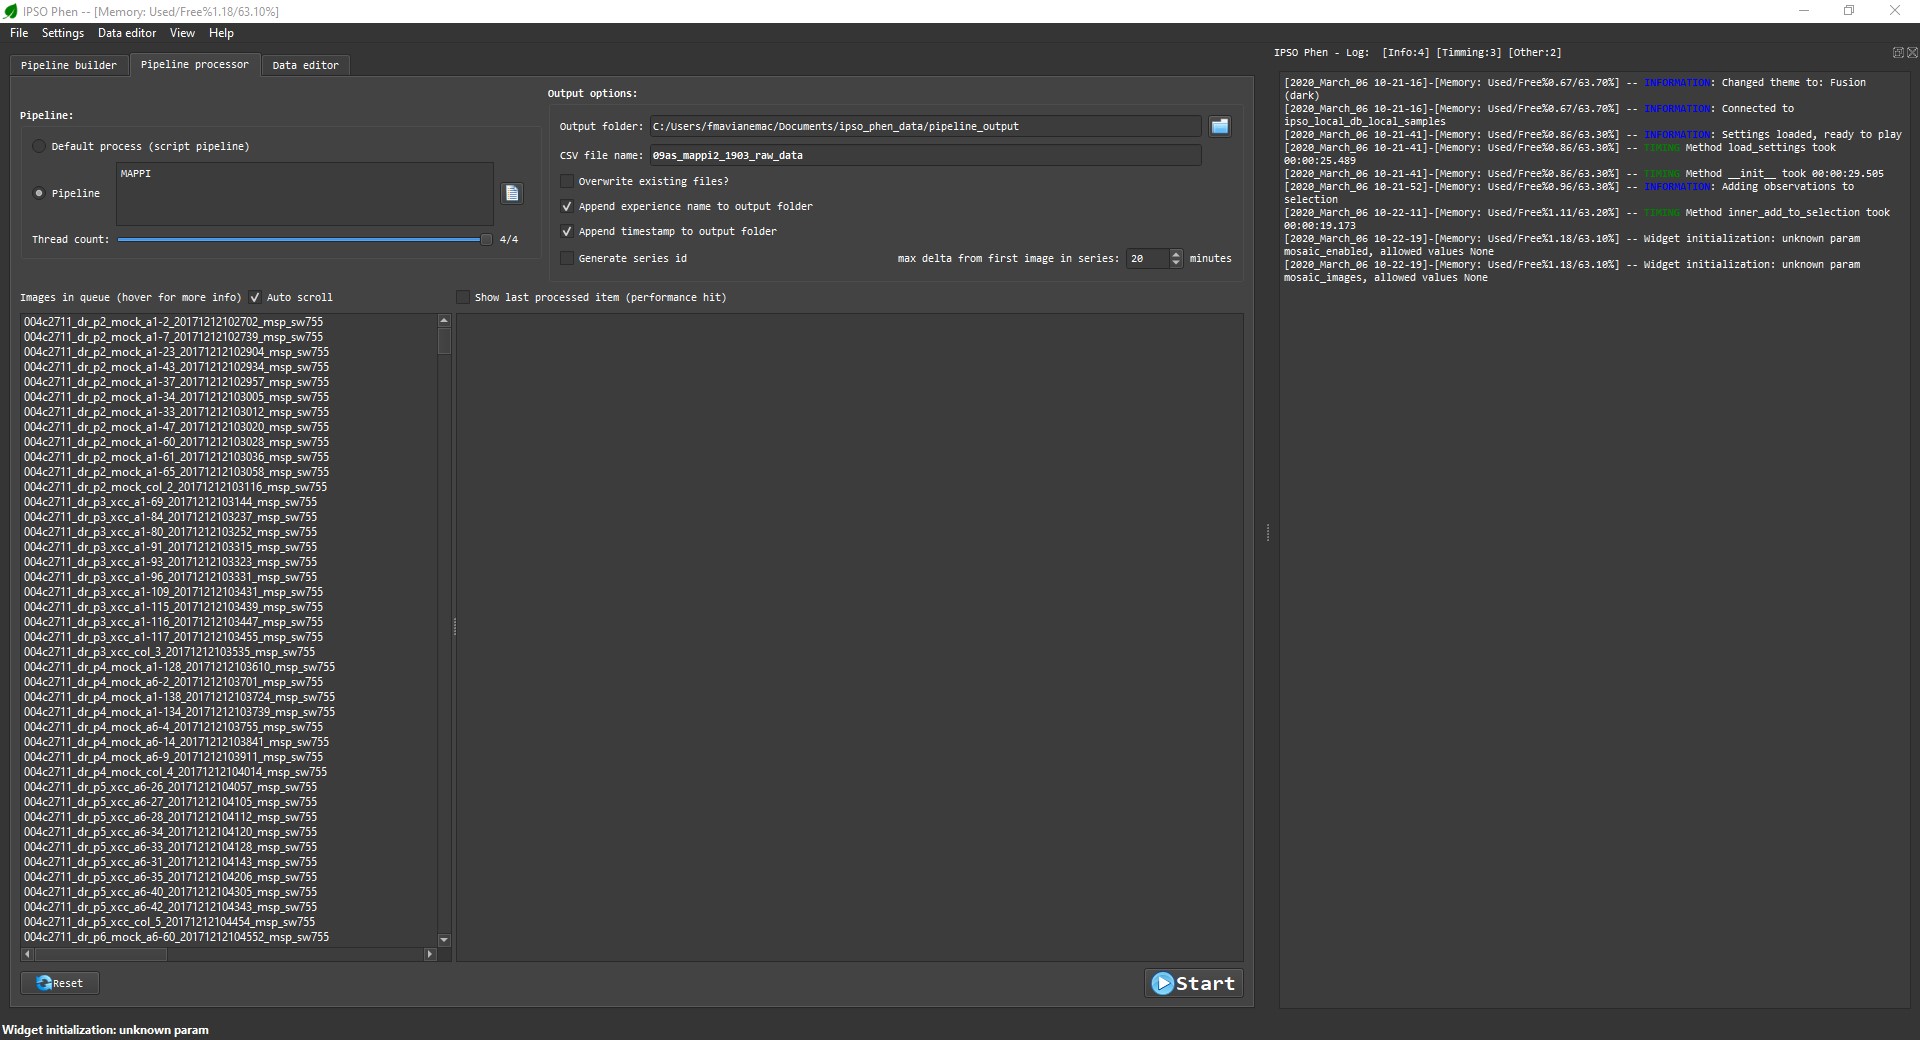
Progress feedback
Once the process starts, the progress can be viewed on the "Log" tab. At any time the process can be stopped, afterwards, if the process is restarted the already analysed images will be skipped (partial results are stored) unless the setting to overwrite is checked.

CSV file
After the all the images are analysed, a CSV file will be generated in the selected output folder.
Samples
Two sample images (locate in the sample_images folder) are available. To load this files into IPSO Phen go to File/Parse folder and select the sample_images folder
Arabidopsis top view
This example illustrates how a standard pipeline and generated scripts work. To use this sample:
- Select the arabidopsis image from the sample images
- Load the sample pipeline from the sample_pipelines folder from "Pipeline/Load..."
- Select the "Pipeline" tab next to the "Tools" tab
- Run the pipeline
- Sample pipeline and output image
- Generated script (excerpt) and output data
The generated script can be called as a stand alone python script, it can also be edited to achieve results others than the ones available with the default pipeline structure
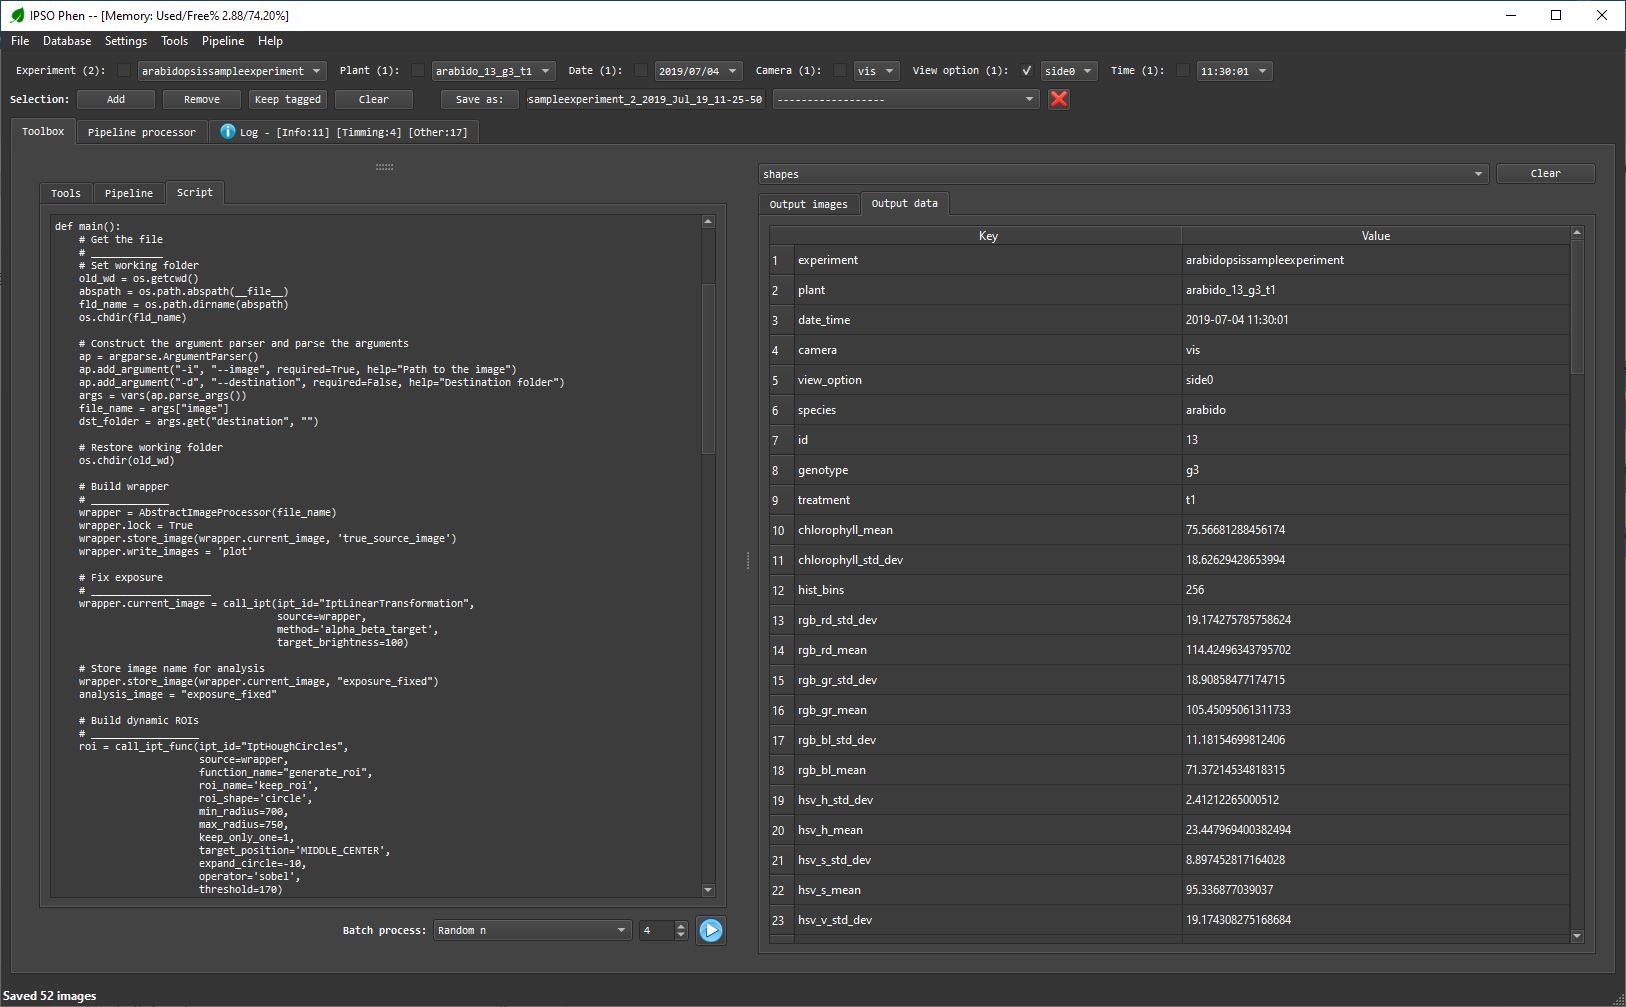
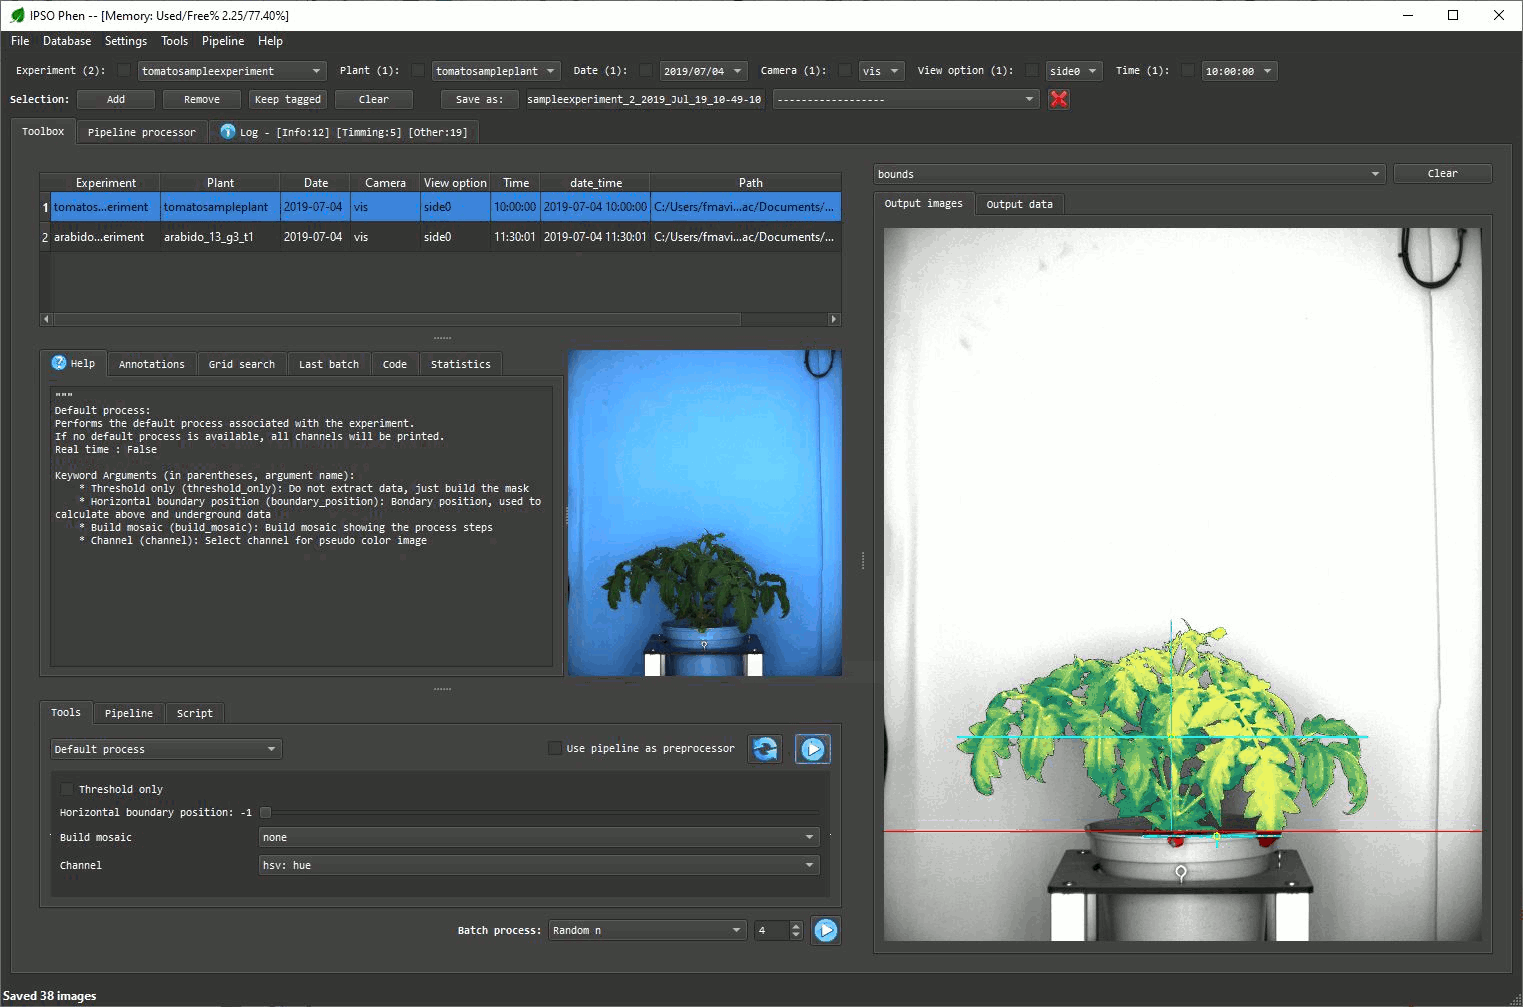
Tomato side plant
This example shows how a class pipeline works, to execute it just select the "Default process" tool from the "Tools/Execute default process" menu after selection the tomato plant sample. Once done, the step by step images will appear on the "output images" panel and the features extracted will appear on the "output data" panel. If you want to build a class pipeline check this script
- Output images:
Authors
- Felicià Antoni Maviane Macia
Release history Release notifications | RSS feed


Download files
Download the file for your platform. If you're not sure which to choose, learn more about installing packages.
Source Distribution
Built Distribution
Filter files by name, interpreter, ABI, and platform.
If you're not sure about the file name format, learn more about wheel file names.
Copy a direct link to the current filters
File details
Details for the file ipso_phen-0.7.112.546.tar.gz.
File metadata
- Download URL: ipso_phen-0.7.112.546.tar.gz
- Upload date:
- Size: 415.5 kB
- Tags: Source
- Uploaded using Trusted Publishing? No
- Uploaded via: twine/3.4.1 importlib_metadata/4.5.0 pkginfo/1.7.0 requests/2.25.1 requests-toolbelt/0.9.1 tqdm/4.61.1 CPython/3.8.4
File hashes
| Algorithm | Hash digest | |
|---|---|---|
| SHA256 |
b81d976dfc3fc09939fb600c8585073d85f401286a8292dbeea3c715ef1d46c8
|
|
| MD5 |
e038c14b999260b99fce40ffaff6ea71
|
|
| BLAKE2b-256 |
844843c2601df8cb358d54e5d7f64314e260e2eadd465b485289dc0d36f247dd
|
File details
Details for the file ipso_phen-0.7.112.546-py3-none-any.whl.
File metadata
- Download URL: ipso_phen-0.7.112.546-py3-none-any.whl
- Upload date:
- Size: 987.6 kB
- Tags: Python 3
- Uploaded using Trusted Publishing? No
- Uploaded via: twine/3.4.1 importlib_metadata/4.5.0 pkginfo/1.7.0 requests/2.25.1 requests-toolbelt/0.9.1 tqdm/4.61.1 CPython/3.8.4
File hashes
| Algorithm | Hash digest | |
|---|---|---|
| SHA256 |
d52863507f26f8d7a2bf452878d884f0e8d922cdb6d005c8a2e9a5354ae9c630
|
|
| MD5 |
e19acaa74ac721c65fcf31317642eae8
|
|
| BLAKE2b-256 |
2c200993833d79643ca6ffa8156e23929e98a896711280bdc7680c5dfd68e8ef
|


