Spectroscopy lock application using RedPitaya


Project description
Linien

User-friendly locking of lasers using RedPitaya (STEMlab 125-14) that just works. Linien aims to follow the UNIX philosophy of doing a single thing (locking using intelligent algorithms) very well. It was mainly developed for locking spectroscopy signals but may also be used for Pound-Drever-Hall or other lock-in techniques as well as simple PID operation. Linien is built with Python and Migen and is based on red pid. Development takes place at Optical Metrology Group of Humboldt University Berlin.
Features
- All included: Sinusoidal modulation (up to 50 MHz), demodulation (1f to 5f), filtering and servo implemented on the FPGA.
- Client-server architecture: Autonomous operation on RedPitaya. One or multiple GUI clients or python clients can connect to the server.
- Autolock: Click and drag over a line, and Linien will automatically lock to it.
- IQ demodulation: Optimize demodulation phase in an instant
- Noise analysis: Record power spectral density (PSD) of the error signal for analyzing noise of the locked laser and for optimizing PID parameters
- Lock detection: Linien is capable of detecting loss of lock.
- Automatic relocking: in that case, it relocks autonomously.
- Machine learning is used to tune the spectroscopy parameters in order to optimize the signal
- Remote-controllable: the client libraries can be used to control or monitor the spectroscopy lock with python.
- Combined FMS+MTS: Linien supports dual-channel spectroscopy that can be used to implement combined FMS+MTS
- Logging: Use linien-influxdb to log the lock status to influxdb.
- Second integrator on (slow) analog output 0
- Additional analog outputs may be used using the GUI or python client (ANALOG_OUT 1, 2 and 3)
- 16 GPIO outputs may be programmed (e.g. for controlling other devices)
Getting started: install Linien
Linien runs on Windows and Linux. For most users the standalone binaries containing the graphical user interface are recommended. These binaries run on your lab PC and contain everything to get Linien running on your RedPitaya.
If you want to use the python interface you should install it using pip.
Standalone binary
You can download standalone binaries for windows and linux on the releases page (download the corresponding binary in the assets section of the latest version). On linux mark it as executable before executing:
chmod +x linien-linux*
./linien-linux*
As the linux world is highly heterogeneous, the standalone binary may not work on some systems (Ubuntu 18.04 or newer should work, other distributions may not). In this case flatpak install (see below) is recommended.
Installation with Flatpak (linux only)
- Install flatpak
- Run
flatpak install flathub io.github.hermitdemschoenenleben.linien - Linien should now have been installed to your applications menu. You can launch it from there.
- If this doesn't work, run
flatpak run io.github.hermitdemschoenenleben.linien
Installation with pip
Linien is written for python 3 and can be installed using python's package manager pip:
pip3 install linien
On Linux, you may run the application by calling
linien
in a terminal.
If this doesn't work, your local bin directory (e.g. ~/.local/bin) is probably missing in your PATH. In this case you can open Linien with python:
from linien.gui.app import run_application
run_application()
In case you're only interested in the python client and don't want to install the graphical application, you may use the linien-python-client, a subset of the linien package:
pip3 install linien-python-client
Physical setup
The default setup looks like this:
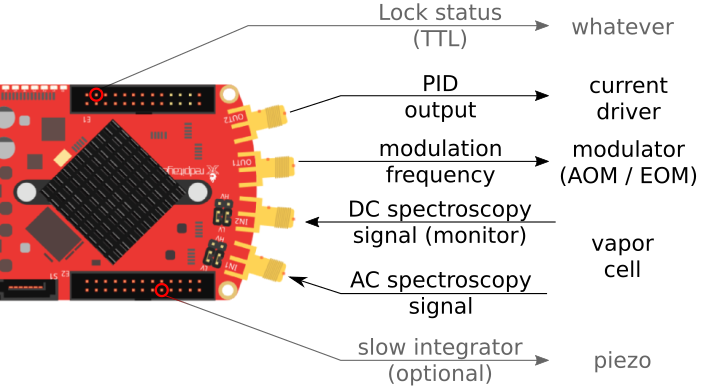
You can also configure Linien for different setups, e.g. if you want to have the modulation frequency and the control on the same output. Additionally, it is possible to set up a slow integrator on ANALOG OUT 0 (0 V to 1.8 V).
Using the application
First run: connecting to the RedPitaya
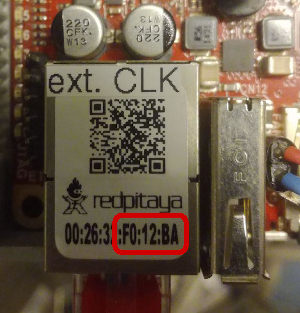
After launching Linien you should supply details of your RedPitaya. Its host address is usually given by
rp-XXXXXX.local, where XXXXXX are the last 6 digits of the device's MAC address. You will find them on a sticker on the ethernet port:
| :exclamation: If connecting using host name fails, try using RP's IP address instead |
|---|
Default value for user name and password is root (but you should probably change the password...).
When connecting to a RedPitaya for the first time, the Linien offers you to install the server component. Please note that this requires internet access on the RedPitaya (LAN access is not sufficient).
Once server libraries are installed, Linien will automatically run the server and connect to it. There's no need ever to start or stop anything on the server manually as the client takes care of this.
The server now operates autonomously: closing the client application doesn't have any influence on the lock status. You may also start multiple clients connecting to the same server.
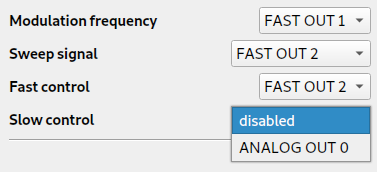
Setting things up
The first thing to set up is the configuration of input and output signals:
Connect your AC spectroscopy signal to FAST IN 1. If you also want to monitor the DC spectroscopy signal, connect it to FAST IN 2.
Then, adapt the output signals to your needs:
When you're done, head over to Modulation, Ramp & Spectroscopy to configure modulation frequency and amplitude. Once your setup is working, you should see something like this:
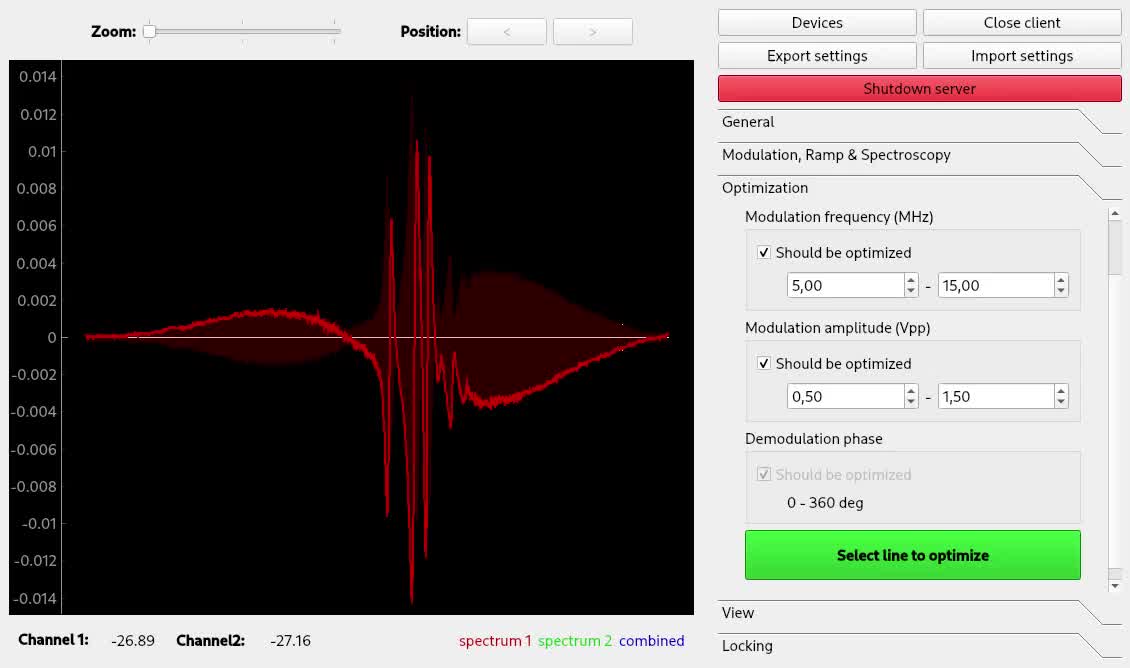
The bright red line is the demodulated spectroscopy signal. The dark red area is the signal strength obtained by iq demodulation, i.e. the demodulation signal obtained when demodulating in phase at this point.
Optimization of spectroscopy parameters using machine learning (optional)
Linien may use machine learning to maximize the slope of a line. As for the autolock, click and drag over the line you want to optimize. Then, the line is centered and the optimization starts. Please note that this only works if initially a distinguished zero-crossing is visible.
Using the autolock
In order to use the autolock, enter some PID parameters first. Note that the sign of the parameters is determined automatically. After clicking the green button, you can select the line you want to lock to by clicking and dragging over it. The autolock will then center this line, decrease the scan range and try to lock to the middle between minimum and maximum contained in your selection.
The following options are available:
- Determine signal offset: If this checkbox is ticked, the autolock will adapt the y-offset of the signal such that the middle between minimum and maximum is at the zero crossing. This is especially useful if you have a large background signal (e.g. the Doppler background in FMS spectroscopy).
- Check lock: Directly after turning on the lock, the control signal is investigated. If it shifts too much, the lock is assumed to have failed.
- Watch lock: This option tells the Linien to continuously watch the control signal when the laser is locked. If steep changes are detected, a relock is initiated.
If you experience trouble with the autolock, this is most likely due to a bad signal to noise ratio or strong laser jitter.
Using the manual lock
If you have problems with the autolock, you may also lock manually. Activate the Manual tab and use the controls in the top (Zoom and Position) to center the line you want to lock to. Choose whether the target slope is rising or falling and click the green button.
Transfer function
Transfer function of the PID is given by
L(f) = kp + ki / f + kd * f
with kp=P/4096, ki=I/0.1s and kd=D / (2**6 * 125e6).
Note that this equation does not account for filtering before the PID (cf. Modulation, Ramp & Spectroscopy tab).

Scripting interface
In addition to the GUI, Linien can also be controlled using python. For that purpose, installation via pip is required (see above).
Then, you should start the Linien server on your RedPitaya. This can be done by running the GUI client and connecting to the device (see above). Alternatively, LinienClient has the option autostart_server.
Once the server is up and running, you can connect using python:
from linien.client.connection import LinienClient, MHz, Vpp
c = LinienClient(
    {'host': 'rp-XXXXXX.local', 'username': 'root', 'password': 'change-it-to-something-else!'},
    # starts the server if it is not running
    autostart_server=True
)

# read out the modulation frequency
print(c.parameters.modulation_frequency.value / MHz)

# have a look at https://github.com/hermitdemschoenenleben/linien/blob/master/linien/server/parameters.py
# for a documentation of all parameters that can be accessed and modified

# set modulation amplitude
c.parameters.modulation_amplitude.value = 1 * Vpp
# in the line above, we set a parameter. This is not written directly to the
# FPGA, though. In order to do this, we have to call write_data():
c.connection.root.write_data()

# additionally set ANALOG_OUT_1 to 1.2 volts DC (you can use this to control other devices of your experiment)
c.parameters.analog_out_1.value = 1.2 * ANALOG_OUT_V

# GPIO outputs can also be set
# each bit corresponds to a pin
# Example: enable all N pins and disable all P pins
c.parameters.gpio_n_out.value = 0b11111111
c.parameters.gpio_p_out.value = 0b00000000
# Example: enable the N pins 1-4 and disable N pins 5-8
c.parameters.gpio_n_out.value = 0b11110000 # 4 on, 4 off
# Example: enable every second P pin
c.parameters.gpio_p_out.value = 0b01010101 # 4 on, 4 off

# again, we have to call write_data in order to write the data to the FPGA
c.connection.root.write_data()

# it is also possible to set up a callback function that is called whenever a
# parameter changes (remember to call `call_listeners()` periodically)
def on_change(value):
    # this function is called whenever `my_param` changes on the server.
    # note that this only works if `call_listeners` is called from
    # time to time as this function is responsible for checking for
    # changed parameters.
    print('parameter arrived!', value)

c.parameters.modulation_amplitude.on_change(on_change)

from time import sleep
for i in range(10):
    c.parameters.call_listeners()
    if i == 2:
        c.parameters.modulation_amplitude.value = 0.1 * Vpp
    sleep(.1)

# plot control and error signal
import pickle
from matplotlib import pyplot as plt
plot_data = pickle.loads(c.parameters.to_plot.value)

# depending on the status (locked / unlocked), different signals are available
print(plot_data.keys())

# if unlocked, signal1 and signal2 contain the error signal of channel 1 and 2
# if the laser is locked, they contain error signal and control signal.
if c.parameters.lock.value:
    plt.title('laser is locked!')
    plt.plot(plot_data['control_signal'], label='control signal')
    plt.plot(plot_data['error_signal'], label='error signal')
else:
    plt.title('laser is ramping!')
    plt.plot(plot_data['error_signal_1'], label='error signal channel 1')
    plt.plot(plot_data['error_signal_2'], label='error signal channel 2')

plt.legend()
plt.show()
For a full list of parameters that can be controlled or accessed have a
look at
parameters.py. Remember that changed parameters are not written to the FPGA unless c.connection.root.write_data() is called.
Updating Linien
Before installing a new version of Linien, open the previously installed client and click the "Shutdown server" button. Don't worry, your settings and parameters will be saved. Then you may install the latest client on your local PC as described in the getting started section above. The next time you connect to RedPitaya, Linien will install the matching server version.
Development
git clone https://github.com/hermitdemschoenenleben/linien.git
Then, create a file named checked_out_repo/linien/VERSION which contains
dev
(no newlines).
This ensures that local changes of the server's code are automatically uploaded to RedPitaya when you launch the client. Please note that this only h
Architecture
Linien contains three components:
- The client: Connects to the server, runs the GUI, etc.
- The server: Handles connections from the client, runs long-running tasks like the autolock or the optimization algorithm. Connects to the acquisition process for communication with the FPGA.
- The acquisition process: Handles the low-level communication with the FPGA (reading / writing registers)
The communication between the components takes place using rpyc.
For development purposes, you can run the first two components on your local machine to simplify debugging. Only the acquisition process has to run on the RedPitaya. In a production version of linien, server and acquisition process run on RedPitaya.
Running the code
Before running the development version check that no production version of the server is running on the RedPitaya by executing linien_stop_server on the RedPitaya. Now you need to have an FPGA bitstream at linien/server/linien.bin. You have two choices:
- Build the gateware: this makes sense if you want to change the FPGA programming.
- Use the gateware of the latest release: if you just want to work on the python client or server code without touching the FPGA gateware, this approach is right for you as it is way easier:
- Install linien-server using pip:
pip3 install linien-server - Find out where it was installed to:
python3 -c "import linien; print(linien.__path__)" - In that folder go to linien/server and copy this file to your development server folder.
- Install linien-server using pip:
Now you can launch the client
python3 linien/client/client.py
and you can connect to your RedPitaya.
If you have set checked_out_repo/linien/VERSION to dev (see above), this automatically uploads your local code to the RedPitaya and starts the server.
The FPGA bitstream will also be transferred to the RedPitaya and loaded on the FPGA.
Run server locally
For debugging it may be helpful to execute the server component on
your machine (e.g. if you want to work on the autolock and want to plot the spectra). In order to make this work, you have to start /linien/server/acquisition_process.py on your RedPitaya using SSH. This process provides remote access to the FPGA registers. Then, you can run the server locally and connect to the FPGA registers:
python3 server/server.py --remote-rp=root:password@rp-f0xxxx.local
Now, you can start the client. Important: Be sure not to connect your client to the RedPitaya, but to "localhost" instead.
Fake server
If you just want to test the GUI, there is also a fake server that you can run locally on your machine:
python3 server/server.py --fake
This fake server just outputs random data. Then you can connect to "localhost" using the client.
Building the FPGA image
For building the FPGA image, you need to install Xilinx Vivado first. Then, call scripts/build_gateware.sh. In the end, the bitstream is located at linien/server/linien.bin. Note: So far, this was tested only with Linux. It should work on Windows 10, though, when calling the script inside Windows Powershell.
Releasing a new version
First, update the version number in the checked_out_repo/linien/VERSION file. Then you can build and upload the package to pypi using scripts/upload_pypi.sh. Finally, build the standalone client using build_standalone_client.sh (you have
to do this on the platform you want to build the standalone client for). When on Windows 10, both scripts have to be started in Windows Powershell.
Upload the standalone to a github release. Release the new version to flathub.
Troubleshooting
Connection problems
If the client fails to connect to a RedPitaya, first check whether you can ping it by executing
ping rp-f0xxxx.local
in a command line. If this works, check whether you can connect via SSH. On Windows, you have to install a SSH client, on linux you can execute
ssh rp-f0xxxx.local
on the command line.
FAQs
How to update to a new version?
There's no need to install anything on RedPitaya manually. Run the new version of Linien on your computer and connect to RedPitaya. You will see a dialog that allows you to install the corresponding server component.
Can I run Linien and the RedPitaya web application / scpi interface at the same time?
No, this is not possible as Linien relies on a customized FPGA bitstream.
What control bandwidth is achievable with Linien?
The propagation delay is roughly 300 ns, thus approximately 3 MHz bandwidth are possible.
Why do ethernet LEDs of RedPitaya stop blinking when Linien is running?
Ethernet LED blinking was found to impact analog outputs of RedPitaya. As this may impact lock stability, Linien disables ethernet LED blinking when starting.
If you want to re-enable the LEDs, just stop the Linien server or restart your RedPitaya.
Troubleshooting
Updating or installing fails
- make sure that your RedPitaya is connected to the internet
- if the orange LED stops blinking and RedPitaya becomes unresponsive, your SD card is probably faulty
Citation
@misc{linien,
  author = {Benjamin Wiegand},
  title = {Linien - User-friendly spectroscopy locking},
  year = {2020},
  publisher = {GitHub},
  journal = {GitHub repository},
  howpublished = {\url{https://hermitdemschoenenleben.github.io/linien/}}
}
See Also
- RedPID: the basis of Linien
Release history Release notifications | RSS feed


Download files
Download the file for your platform. If you're not sure which to choose, learn more about installing packages.
Source Distribution
Built Distribution
Filter files by name, interpreter, ABI, and platform.
If you're not sure about the file name format, learn more about wheel file names.
Copy a direct link to the current filters
File details
Details for the file linien-0.4.3.dev2.tar.gz.
File metadata
- Download URL: linien-0.4.3.dev2.tar.gz
- Upload date:
- Size: 100.2 kB
- Tags: Source
- Uploaded using Trusted Publishing? No
- Uploaded via: twine/3.2.0 pkginfo/1.6.1 requests/2.24.0 setuptools/49.1.3 requests-toolbelt/0.9.1 tqdm/4.59.0 CPython/3.9.2
File hashes
| Algorithm | Hash digest | |
|---|---|---|
| SHA256 |
e3a808987f13653bb6214502ac8ab204819658571142d576459aa89d80a8f201
|
|
| MD5 |
d0c5248356b1c563dc973830c8630c3b
|
|
| BLAKE2b-256 |
8d3639e05482c3f41cb368ba1d6d6b295be5050c7d0c677324a7f71b65890c07
|
File details
Details for the file linien-0.4.3.dev2-py3-none-any.whl.
File metadata
- Download URL: linien-0.4.3.dev2-py3-none-any.whl
- Upload date:
- Size: 117.7 kB
- Tags: Python 3
- Uploaded using Trusted Publishing? No
- Uploaded via: twine/3.2.0 pkginfo/1.6.1 requests/2.24.0 setuptools/49.1.3 requests-toolbelt/0.9.1 tqdm/4.59.0 CPython/3.9.2
File hashes
| Algorithm | Hash digest | |
|---|---|---|
| SHA256 |
e23238f719a643ba7ed8a79d011b1c06e864be2eae6ae6ddf6b5892f3b522947
|
|
| MD5 |
82c148baf879bbe5185887db78f1be24
|
|
| BLAKE2b-256 |
869e5ae60e6a6c7c0e1a37735cb13d3beab7539d62bf7cd5160b21a545857f41
|


