Transient rendering extensions for Mitsuba 3


Project description

mitransient
Transient light transport in Mitsuba 3


Overview
mitransient is a library adds support to Mitsuba 3 for doing transient simulations, with amazing support for non-line-of-sight (NLOS) data capture simulations, polarization tracking and differentiable transient rendering.
[!TIP] Check out our online documentation (mitransient.readthedocs.io) and our code examples:
Main features
- Foundation ready to use: easy interface to convert your algorithms to the transient domain.
- Python-only library for doing transient rendering in both CPU and GPU.
- Several integrators already implemented: transient pathtracing (also adapted for NLOS scenes) and transient volumetric pathtracing.
- Cross-platform: Mitsuba 3 has been tested on Linux (x86_64), macOS (aarch64, x86_64), and Windows (x86_64).
- Polarization tracking
- Differentiable transient rendering
License and citation
This project was started by Diego Royo, Miguel Crespo and Jorge Garcia-Pueyo. See below for the full list of mitransient contributors. Also see the original Mitsuba 3 license and contributors.
If you use our code in your project, please consider citing us using the following:
@misc{royo2025mitransient,
      title={mitransient: Transient light transport in Mitsuba 3},
      author={Diego Royo and Jorge Garcia-Pueyo and Miguel Crespo and Óscar Pueyo-Ciutad and Guillermo Enguita and Diego Bielsa},
      year={2025},
      eprint={2510.25660},
      archivePrefix={arXiv},
      primaryClass={cs.GR},
      url={https://arxiv.org/abs/2510.25660},
}
Additionally, the NLOS features were implemented from our publication Non-line-of-sight transient rendering. Please also consider citing us if you use them:
@article{royo2022non,
	title        = {Non-line-of-sight transient rendering},
	author       = {Diego Royo and Jorge García and Adolfo Muñoz and Adrian Jarabo},
	year         = 2022,
	journal      = {Computers & Graphics},
	doi          = {https://doi.org/10.1016/j.cag.2022.07.003},
	issn         = {0097-8493},
	url          = {https://www.sciencedirect.com/science/article/pii/S0097849322001200}
}
What is transient rendering?
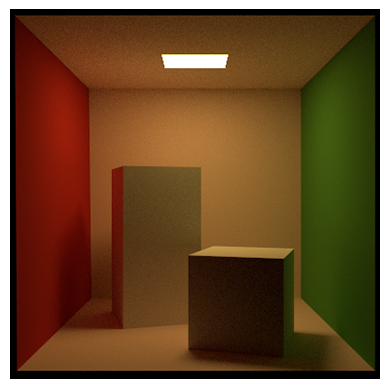
Conventional rendering is referred to as steady state, where the light propagation speed is assumed to be infinite. In contrast, transient rendering breaks this assumption allowing us to simulate light in motion (see the teaser image for a visual example).
For example, path tracing algorithms integrate over multiple paths that connect a light source with the camera. For a known path, transient path tracing uses the very complex formula of time = distance / speed (see [Two New Sciences by Galileo]) to compute the time when each photon arrives at the camera from the path's distance and light's speed. This adds a new time dimension to the captured images (i.e. it's a video now). The simulations now take new parameters as input: when to start recording the video, how long is each time step (framerate), and how many frames to record.
Note: note that the time values we need to compute are very small (e.g. light takes only ~3.33 * 10^-9 seconds to travel 1 meter), time is usually measured in optical path distance. See Wikipedia for more information. TL;DR opl = distance * refractive_index
Installation
We provide the package via PyPI. To install mitransient you need to run:
pip install mitransient
which will also install the mitsuba Python package as a dependency.
[!IMPORTANT]
mitransientandmitsubahave different variants that specify the number of channels (RGB image, monochromatic, etc.), hardware acceleration (execution in CPU, GPU, etc.). If you installmitransient/mitsubaviapip, you will have access to the following variants specified in this website. There are more variants available, but you will have to compile Mitsuba 3 yourself.
[!TIP] If you wish to use your own compiled Mitsuba 3, see the section below "If you use your own Mitsuba 3".
Requirements
Python >= 3.8mitsuba >= 3.6.0- (optional) For computation on the GPU:
Nvidia driver >= 495.89 - (optional) For vectorized / parallel computation on the CPU:
LLVM >= 11.1
After installation
At this point, you should be able to import mitsuba and import mitransient in your Python code (careful about setting the correct PATH environment variable if you have compiled Mitsuba 3 yourself, see the section below).
For NLOS data capture simulations, see https://github.com/diegoroyo/tal. tal is a toolkit that allows you to create and simulate NLOS scenes with an easier shell interface instead of directly from Python.
If you use your own Mitsuba 3
First, you will want to install mitransient without the mitsuba dependency:
pip install mitransient --no-dependencies
Then you will need to import mitsuba in your Python scripts. Concretely, the PYTHONPATH variable should point to the Mitsuba module that is built upon compilation. There are different ways to do so:
- One solution is to directly execute
setpath.shprovided after the compilation of the Mitsuba 3 repo (More info). This shell script will modify thePATHandPYTHONPATHvariables to load first this version of Mitsuba. - Another solution following the previous one is to directly set yourself the
PYTHONPATHenvironment variable as you wish. - Another solution for having a custom version globally available is by using
pip install . --editable. This will create a symlink copy of the package files inside the correspondingsite-packagesfolder and will be listed as a package installed ofpipand will be available as other packages installed. If you recompile them, you will still have the newest version directly to use. Please follow these instructions:- Go to
<mitsuba-path>/mitsuba3/build/python/drjitand executepip install . --editable. - Go to
<mitsuba-path>/mitsuba3/build/python/mitsubaand executepip install . --editable.
- Go to
- If you are a user of Jupyter Notebooks, the easiest solution will be to add the following snippet of code to modify the notebook's
PYTHONPATH:
import sys
sys.path.insert(0, '<mitsuba-path>/mitsuba3/build/python')
import mitsuba as mi
Usage
[!TIP] Check out the
examplesfolder for practical usage!
You are now prepared to render your first transient scene with mitransient. Running the code below will render the famous Cornell Box scene in transient domain and show a video.
import mitsuba as mi
mi.set_variant('llvm_ad_rgb')
import mitransient as mitr

scene = mi.load_dict(mitr.cornell_box())
img_steady, img_transient = mi.render(scene, spp=1024)

img_transient = mitr.vis.tonemap_transient(img_transient)
mitr.vis.show_video(img_transient)
Plugins implemented
[!TIP] You can also look at the plugins' documentation in our online documentation. Look on the left menu for Integrators, Films, Emitters and Sensors.
mitransient implements the following plugins which can be used in scene XML files and dictionaries. To view a description of their parameters, click on the name of your desired plugin.
film:transient_hdr_film: Transient equivalent of Mitsuba 3'shdrfilmplugin.phasor_hdr_film: Similar totransient_hdr_film, but stores the result in the frequency domain instead of the time domain.
integrators:transient_path: Transient path tracing for line-of-sight scenes. If you want to do NLOS simulations, usetransientnlospathinstead.transient_nlos_path: Transient path tracing with specific sampling routines for NLOS scenes (e.g. laser sampling and hidden geometry sampling of the "Non-Line-of-Sight Transient Rendering" paper).transient_prbvolpath: Path Replay Backpropagation for time-resolved volumetric path tracing.
emitters:angulararea: Similar to anareaemitter, but emits within a restricted angular range.
sensors:nlos_capture_meter: Can be attached to one of the scene's geometries, and measures uniformly-spaced points on such geometry (e.g. relay wall).
Other useful functions
See the full list on this website
Testing
Our test suite can be run using pytest on the root folder of the repo.
Contributors
 Diego Royo 🎨 💻 📣 📖 |
 Miguel Crespo 🎨 💻 📣 |
 Jorge Garcia Pueyo 🎨 💻 📣 📖 |
 DiegoBielsa 🐛 💻 📖 |
 p-luesia 📖 |
 Óscar Pueyo Ciutad 💻 📖 |
 Guillermo Enguita Lahoz 🎨 💻 📖 |
 蕉太狼 🐛 |
See emoji key for details.
Release history Release notifications | RSS feed


Download files
Download the file for your platform. If you're not sure which to choose, learn more about installing packages.
Source Distribution
Built Distribution
Filter files by name, interpreter, ABI, and platform.
If you're not sure about the file name format, learn more about wheel file names.
Copy a direct link to the current filters
File details
Details for the file mitransient-1.3.0.tar.gz.
File metadata
- Download URL: mitransient-1.3.0.tar.gz
- Upload date:
- Size: 55.2 kB
- Tags: Source
- Uploaded using Trusted Publishing? No
- Uploaded via: twine/6.2.0 CPython/3.11.3
File hashes
| Algorithm | Hash digest | |
|---|---|---|
| SHA256 |
cd452aec32497df5a1cdc1ba27013e1ac57c1b7d42235d7a4b59047e917fd083
|
|
| MD5 |
7d7846052f309f0339f9371396bbaf04
|
|
| BLAKE2b-256 |
9a0fd46395b94c38c30ec51714d20f9b146ef88541a145e3a435b41d799009ac
|
File details
Details for the file mitransient-1.3.0-py3-none-any.whl.
File metadata
- Download URL: mitransient-1.3.0-py3-none-any.whl
- Upload date:
- Size: 62.7 kB
- Tags: Python 3
- Uploaded using Trusted Publishing? No
- Uploaded via: twine/6.2.0 CPython/3.11.3
File hashes
| Algorithm | Hash digest | |
|---|---|---|
| SHA256 |
2a5b42703f6caf51f393242d80b33826a8a3b920fbf847dd9914bb507dedd5e6
|
|
| MD5 |
31fa51c92f20c4aa3aef31d22bb1cc9c
|
|
| BLAKE2b-256 |
a72f4c2f25784672e246af4e12cd60b3f7450649280adb0041494e7cbe8caa3a
|


