Pygments plugin for MMT surface syntax (lexer & style)

Project description


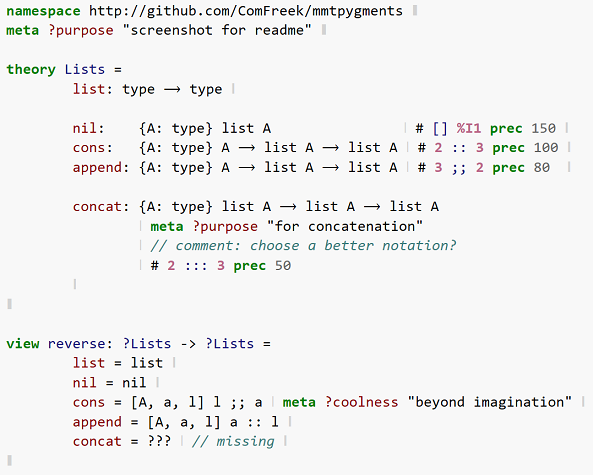
mmtpygments: Pygments plugin for MMT surface syntax
To support syntax highlighting of the MMT Surface Syntax from the MMT project this package is a Pygments plugin including
- a Pygments lexer (
mmt) - a recommended Pygments style for it (
mmtdefault) - and experimentally a Pygments lexer for MMT relational data (
mmtrel).
Collection of rendered codes: click here
Screenshot: (click for live version)
Installation
-
via Pip (easy)
pip install Pygments mmtpygments -
via
pipenvor other Python package managers superior to Pip:-
Run
pipenv install pygments mmtpygmentsin your project directory, e.g. containing the LaTeX files in which you'd like to use this -
Remember to use
mmtpygmentsfrom now on always in that virtual environment context: run your intended command withinpipenv shellFor example, if you'd like to use this in LaTeX and use TeXStudio as an IDE, start TeXStudio from within that shell.
This way, you don't clutter your whole PC with the Pip packages and more importantly, you document the Pip package versions in the
Pipfile.lockfile generated in step (2.1). -
Usage
CLI
pygmentize -f html -l mmt -O full,style=mmtdefault -o test.html test.mmt
This tells Pygments to use the HTML formatter (-f), the MMT lexer (-l) and to output a full HTML file using the mmtdefault style (-O) rendered of test.mmt into test.html (-o).
LaTeX (with minted)
minted is a LaTeX package rendering codes with Pygments as the backend.
% !TeX encoding = UTF-8
% !TEX TS-program = latexmk -xelatex -shell-escape -silent -latexoption="-synctex=1 -8bit" %
%
% ^^^ This is the build command. Install latexmk if you don't have it already.
%     You may choose an alternative LaTeX derivative, e.g. LuaLaTeX, but be warned that it must support Unicode!

\documentclass{article}

\usepackage{fontspec}

% Download GNU Unifont from http://unifoundry.com/unifont/index.html
% And save it, say, as "fonts/unifont-12.1.03.ttf"
\newfontfamily\unifont{unifont-12.1.03.ttf}[Path=./fonts/,NFSSFamily=unifont]

% Disable caching for debugging purposes (increases compilation times!)
\usepackage[cache=false]{minted}
\setminted{fontfamily=unifont,tabsize=2,breaklines=true}

\newminted[mmtcode]{mmt}{}
\newmintinline[mmtinline]{mmt}{}
\newmintedfile[mmtfile]{mmt}{}

\begin{document}
	% Variant 1: Code given in LaTeX, rendered in display mode
	\begin{mmtcode}
theory MyTheory = c : type ❘ # abc ❙❚
	\end{mmtcode}

	% Variant 2: Code given in LaTeX, rendered inline
	% You can use any delimiter you like, here we use /
	\mmtinline/theory MyTheory = c : type ❘ # abc ❙❚/

	% Variant 3: Code given externally in file, rendered in display mode
	% \mmtfile{your-mmt-file.mmt}
\end{document}
LaTeX Beamer: Use the fragile option for frames embedding codes: \begin{frame}[fragile] ... \end{frame}
See the minted manual for more information on how to customize it.
Common Error: Rendered PDF shows tab characters of source
If you tab characters in the MMT source being highlighted and they are shown in the PDF rendered by XeLaTeX, you face a known bug of XeLaTeX ([1], [2]). It can be solved by passing -8bit to XeLaTeX.
Development
- Install pipenv, which provides a consistent Python, pip and package environment locked in the committed
PipfileandPipfile.lockfiles. pipenv installgit submodule initgit submodule update
Testing
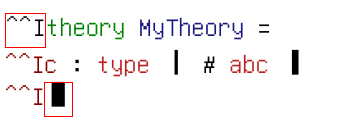
cd mmtpygments/testpipenv run python test.py ./(returns non-zero exit code on failure)- Open
index.htmlin a browser to see failures visually (red rectangles).
This test.py runs the lexer on large MMT archives containing a lot of MMT surface syntax. It recursively searches for MMT files in mmtpygments/test/data, on which it then runs the provided lexer and Pygment's HtmlFormatter. The rendered versions are written next to the original *.mmt files with an .html extension. Furthermore, index.html and amalgamation.html are generated to link and display the results, respectively.
The Travis build automatically runs test.py and deploys the results on the gh-pages branch, see https://comfreek.github.io/mmtpygments/ and especially https://comfreek.github.io/mmtpygments/mmtpygments/test/index.html.
Dev Workflow
For tinkering and testing the lexer, it is recommended to employ the same testing infrastructure as described above. Even though the Travis build fails on lexing error, test.py actually doesn't -- it just returns a non-zero exit code. In fact, it even generates the HTML renderings with red rectangles around lexing errors. Hence, while tinkering with the lexer, just regularly run test.py and look at the index.html locally in your browser to see any errors.
Publishing
Publishing is done automatically via .travis.yml upon tagged commits on the master branch. For that do
- Locally commit all your changes.
- Create a new version tag:
git tag -a vx.y.z -m "Version x.y.z, see CHANGELOG.md"(the tag name needs to start withvand a digit for Travis CI to pick it up, see.travis.yml) - Push the commit and the tag:
git push && git push --tags
Not recommended: If you really have to publish a version manually for whatever reason, do the following:
# Packaging
$ pipenv run python setup.py sdist bdist_wheel

# Checking if packages are okay (PyPi server will do the same)
$ pipenv run twine check dist/*

# Upload to Test PyPi repository
$ pipenv run twine upload --repository-url https://test.pypi.org/legacy/ dist/*

# Upload to real PyPi repository
$ pipenv run twine upload dist/*
For future maintainers: necessary changes in case of repository movement
In case you wish to host this repository or a fork thereof somewhere else, these are the places where you have to make changes:
README.md: Change all links referencing anything underhttps://ComFreek.github.io/mmtpygmentsto the URI where you deploy your things..travis.yml:- Change the base path with which
python test.pyis run to your hosting URI. - Change the secret value in under deploy/pypi to another PyPI token under which you are able to publish PyPI packages.
- Change the base path with which


Download files
Download the file for your platform. If you're not sure which to choose, learn more about installing packages.
Source Distribution
File details
Details for the file mmtpygments-1.0.0.tar.gz.
File metadata
- Download URL: mmtpygments-1.0.0.tar.gz
- Upload date:
- Size: 17.0 kB
- Tags: Source
- Uploaded using Trusted Publishing? No
- Uploaded via: twine/3.2.0 pkginfo/1.5.0.1 requests/2.24.0 setuptools/50.3.0 requests-toolbelt/0.9.1 tqdm/4.49.0 CPython/3.7.1
File hashes
| Algorithm | Hash digest | |
|---|---|---|
| SHA256 |
8a36310d9bce696e51a7b6f972521fb5ead4c25daaab88f371fbf0ec2198c783
|
|
| MD5 |
49e72f29a302a126da8d5b54834d51a4
|
|
| BLAKE2b-256 |
799f7639c8d6e325af71f6f623a8cdf0567c6d4f3abe930eda4e1b0018b7c3ab
|


