napari plugin for deep learning-based segmentation of bright field images

Project description
napari-aiSEGcell


A napari plugin to segment cell nuclei and whole cells in bright field microscopy images. napari-aisegcell uses
aisegcell for segmentation. This plugin can only be used to use already trained models for segmentation. If you
want to train a new model use aisegcell. Please cite this paper if you are using this plugin in your
research.
This napari plugin was generated with Cookiecutter using @napari's cookiecutter-napari-plugin template.
Contents
Installation
There are two ways to install napari-aisegcell: First, you can install napari-aisegcell from command line. Second, you
have napari already installed as a graphical user interface (GUI) and install napari-aisegcell from the GUI menu.
We recommend the command line installation as it provides fine-grained control of the installation to prevent conflicts with existing napari plugins. Use the one-click installation if you do not want to concern yourself with virtual environments or the command line. Just be aware that using the one-click installation may introduce conflicts with already installed plugins or new plugin installations may disrupt this plugin.
Installing napari-aisegcell requires ~5 min and was tested with
OS = macOS 12.6.3/ubuntu 22.10/windows 11
python = 3.13.9
torch = 2.9.0
torchvision = 0.24.0
lightning = 2.5.5
Command line
napari must be installed from command line to install napari aisegcell from command line. Installation requires a
command line application (e.g. Terminal) with git and python installed. If you do not have python installed
already, we recommend installing it using the Anaconda distribution.
If you operate on Windows we recommend using Anaconda Powershell Prompt as command line application.
An introductory tutorial on how to use git and GitHub can be found
here.
-
(Optional) If you already installed napari in a virtual environment you can skip this step. However, you may want to install
napari-aisegcellin a fresh environment to avoid conflicts with existing plugins. Create a new virtual environment fornapari. Here is a list of different python virtual environment tools. Open your command line application and create a (e.g.conda) virtual environmentconda create -n napari python=3.13
-
Activate your virtual environment that has
napariinstalled or you want to installnaparitoconda activate napari
-
Install
pip<24.4becauselight-the-torchcurrently does not support newerpipversions.python -m pip install "pip<24.4"
-
(Optional) If you use
Anaconda Powershell Prompt, installgitthroughcondaconda install -c anaconda git
-
Install
napari-aisegcell- from PyPI
pip install napari-aisegcell
- from GitHub (= latest development version)
pip install git+https://github.com/CSDGroup/napari-aisegcell.git
With step 4) completed you have successfully installed napari-aisegcell. You can proceed with the
documentation on how to use napari-aisegcell. NOTE, that when opening the plugin for the
first time, the remaining dependencies (torch, torchvision, pytorch-lightning) will be automatically installed
via light-the-torch. If you prefer to manually install the remaining
dependencies (i.e. prevent potential interference with your virtual environment), proceed with step 6).
-
(Optional)
GPUsgreatly speed up training and inference of aisegcell and are available fortorch(2.9.0) forWindowsandLinux. Check if yourGPU(s)are CUDA compatible (Windows,Linux) and update their drivers if necessary. -
(Optional) Install
torch/torchvisioncompatible with your system.aisegcellwas tested withtorchversion2.9.0,torchvisionversion0.24.0, andcudaversion12.6. Depending on your OS, yourCPUorGPU(andCUDAversion) the installation may change# Windows/Linux CPU pip install torch==2.9.0 torchvision==0.24.0 --index-url https://download.pytorch.org/whl/cpu # Windows/Linux GPU (CUDA 12.6) pip install torch==2.9.0 torchvision==0.24.0 --index-url https://download.pytorch.org/whl/cu126 # macOS CPU pip install torch==2.9.0 torchvision==0.24.0
-
(Optional) Install
lightning.aisegcellwas tested with version2.5.5.pip install lightning==2.5.5
One-click
(NOT YET AVAILABLE) Using the one-click installation of napari-aisegcell is as easy as opening napari, selecting
Plugins>Install/Uninstall Plugins... and searching for napari-aisegcell in the search bar. Select install and
restart napari for napari-aisegcell to appear in the list of installed plugins in the Plugins menu. Please
recall that one-click installing napari-aisegcell may interfere with existing plugin installations or new
plugin installations may interfere with the napari-aisegcell plugin.
Data
napari-aisegcell is currently intended for single-class semantic and instance segmentation. Input images are expected
to be 8-bit or 16-bit greyscale images. Segmentation masks are expected to decode background as 0 intensity and all intensities
>0 are converted to a single intensity value (255). Have a look at
this notebook
for a data example.
Documentation
napari-aisegcell has two modes: The layer mode and the batch mode. Layer mode is
intended to explore if existing trained models in napari-aisegcell are suitable for your data. Batch mode is
intended for high-throughput image segmentation once you have confirmed that existing models are well suited for
your data.
First launch
The first time you launch napari-aisegcell, torch, torchvision, pytorch-lightning will be automatically
installed if you have skipped steps 5)-7) of the installation. The napari window will freeze
during download and installation. Depending on your setup this may take several minutes (~GBs of download). Similarly,
the first time you are running a pre-trained model the model weights (.CKPT file) will be downloaded and will
delay the prediction (~MBs of download).
Launch napari
The napari bundled app is launched by opening the desktop shortcut. To launch napari as a command line
application
-
Open the terminal and activate the environment you installed
napari-aisegcellintoconda activate napari
-
Run
napariin terminalnapari
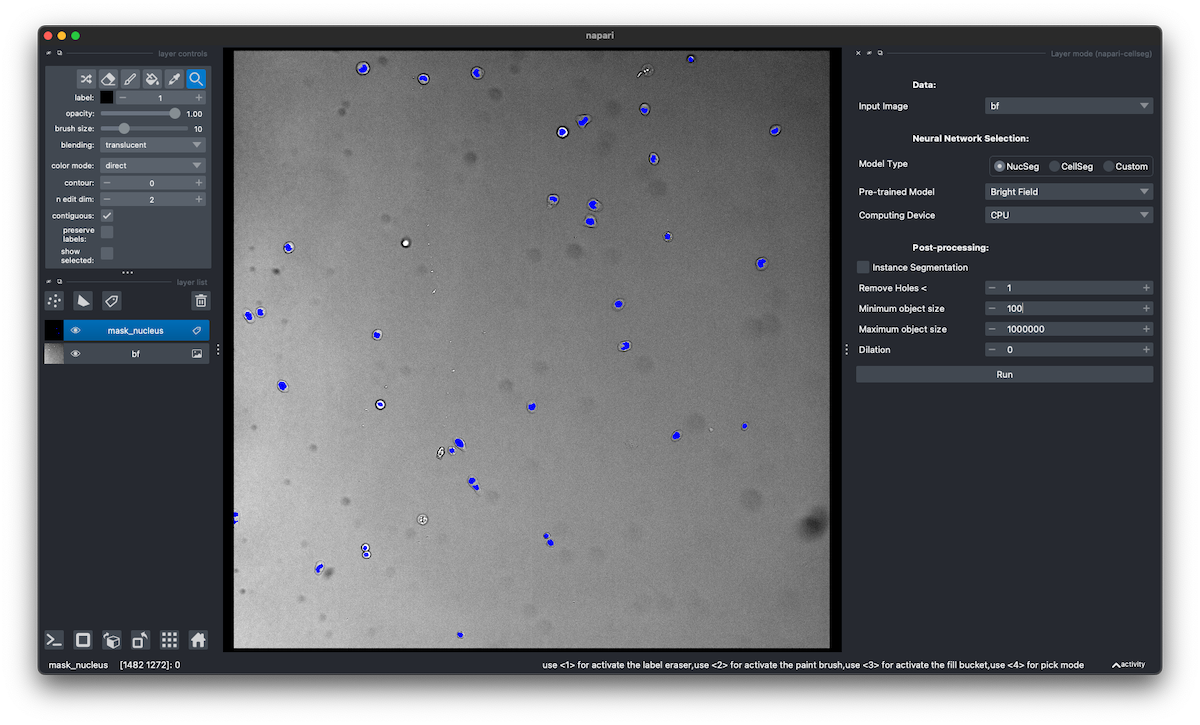
Layer mode
Open the layer mode in the menu Plugins>napari-aisegcell>Layer mode. Select the parameters you want to use to
obtain your segmentation and select the Run button.
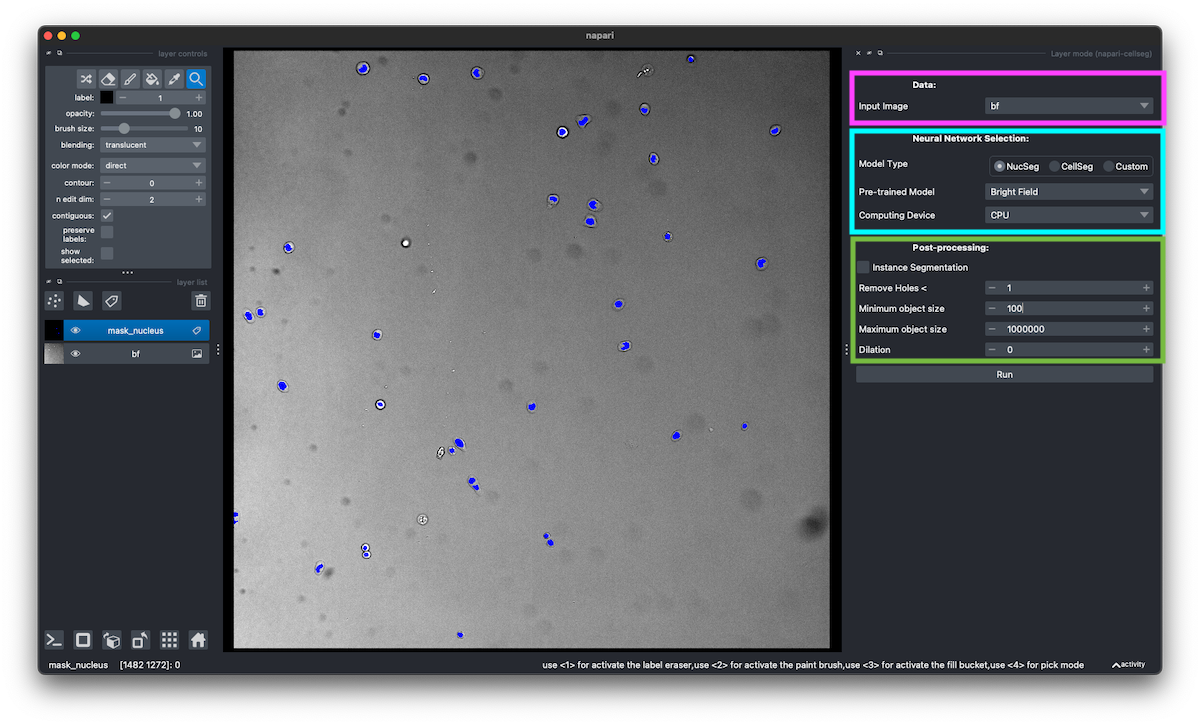
Data section
In the Data section (magenta) you can select the images you want to segment from a drop-down menu. Only images that are
loaded in the napari layer tab are available for selection.
Image formats must be readable by skimage.io.imread.
Neural network section
In the neural network section (cyan) you can select the neural net you want to use for segmentation. The section has three parameters
Model typeNucSeg: Select this option to use a pre-trained aisegcell model to segment nuclei (see trained models).CellSeg: Select this option to use a pre-trained aisegcell model to segment whole cells (see trained models).Custom: Select this option if you want to load a aisegcell model that does not ship withnapari-aisegcell. Custom models can be obtained by training your own aisegcell model or obtaining aisegcell models from 3rd parties. You must select the checkpoint (.ckpt) file in the emergingCustom Modelparameter.
Pre-trained Model: Drop-down menu to select the available pre-trained models forNucSegorCellSeg.Bright Field: a model to segment nuclei/whole cells in bright field. Currently, no other image modalities are available.
Computing Device: Drop-down menu that lists computing devices (CPU/GPUs) available with your currenttorchinstallation.
Post-processing section
In the post-processing section (green) a selection of common post-processing steps are available
Instance Segmentation: Check this box to return instance segmentations instead of semantic segmentations.Remove Holes <: Removes holes in objects (e.g. nuclei) <X pixels.Minimum object size: Removes objects of size <X pixels before the dilation step.Maximum object size: Removes objects of size >X pixels before the dilation step.Dilation: Dilate (>0) or erode (<0) objects by X pixels (see here).
Batch mode
Open the batch mode in the menu Plugins>napari-aisegcell>Batch mode. Select the parameters you want to use to
obtain your segmentations and select the Run button.
The neural network section and post-processing-section are the same as in the layer mode.
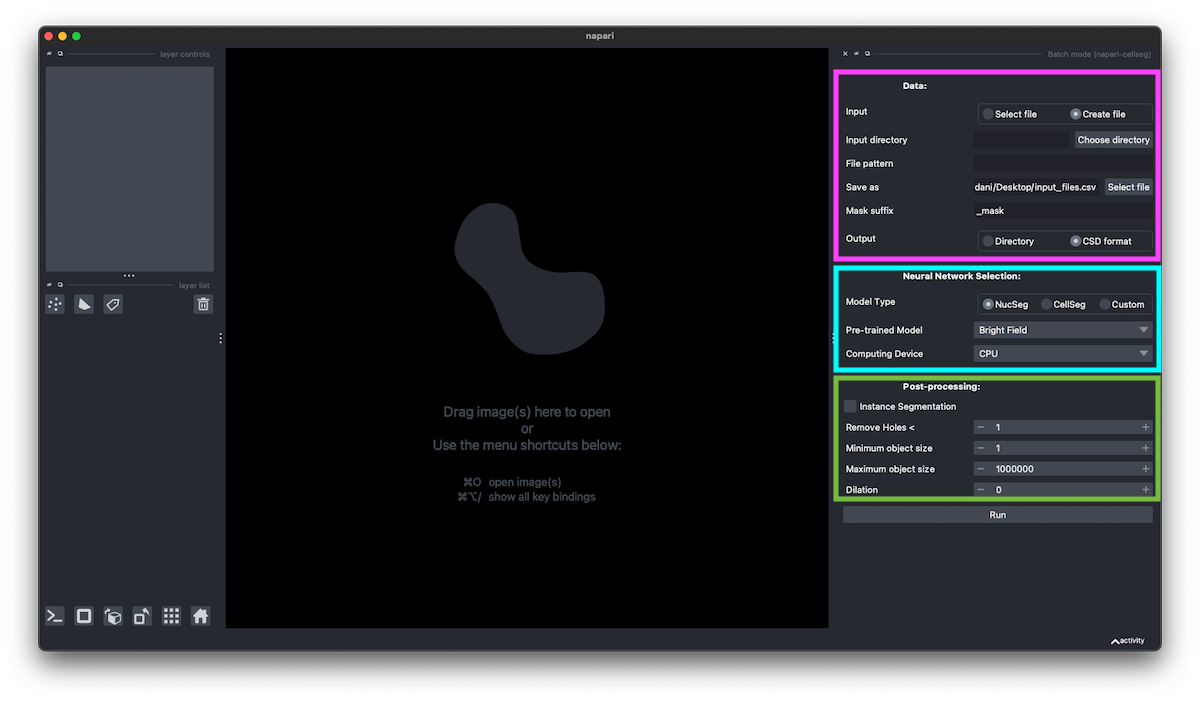
Data section
In the data section (magenta) you can select the images you want to submit for batch processing.
InputSelect file: Select an existing input CSV file that follows the aisegcell input formatCreate file: Create a CSV file that follows the aisegcell input formatInput directory: Select parent directory containing all images to segment. Images can be in subdirectories.File pattern: All files matching this pattern in your selectedInput directorywill be stored in the CSV file. Use wildcard characters like*to capture all images you want to segment in one run.- Example 1
*/*.png: will select allPNGfiles in in all sub-directories ofInput directory. - Example 2
position*z1.png: will select all files inInput directorythat start with "position" and end with "z1.png"
- Example 1
Save as: Name (and path) of the file that will be the input to your selected Neural Network. The file can be used as input toSelect file.Mask suffix: Mask suffix that will be appended to each mask file name.- Example
suffix = "_mask":my_image.png->my_image_mask.png
- Example
Output:Directory: Directory to which all segmentation masks will be saved. Be aware that input images with identical file names will be appended withMask suffixAND an ID.CSD format: Store segmentation masks following the storage system of the Cell Systems Dynamics group. CSD format finds the deepest common directory of all input images, creates folders 'Analysis/Segmentation_YYMMDD', and reconstructs the unique parts of all input paths in "Segmentation_YYMMDD".
Trained models
We provide trained models:
| modality | image format | model | example image | description | availability |
|---|---|---|---|---|---|
| bright field nucleus segmentation | 2D grayscale | U-Net | 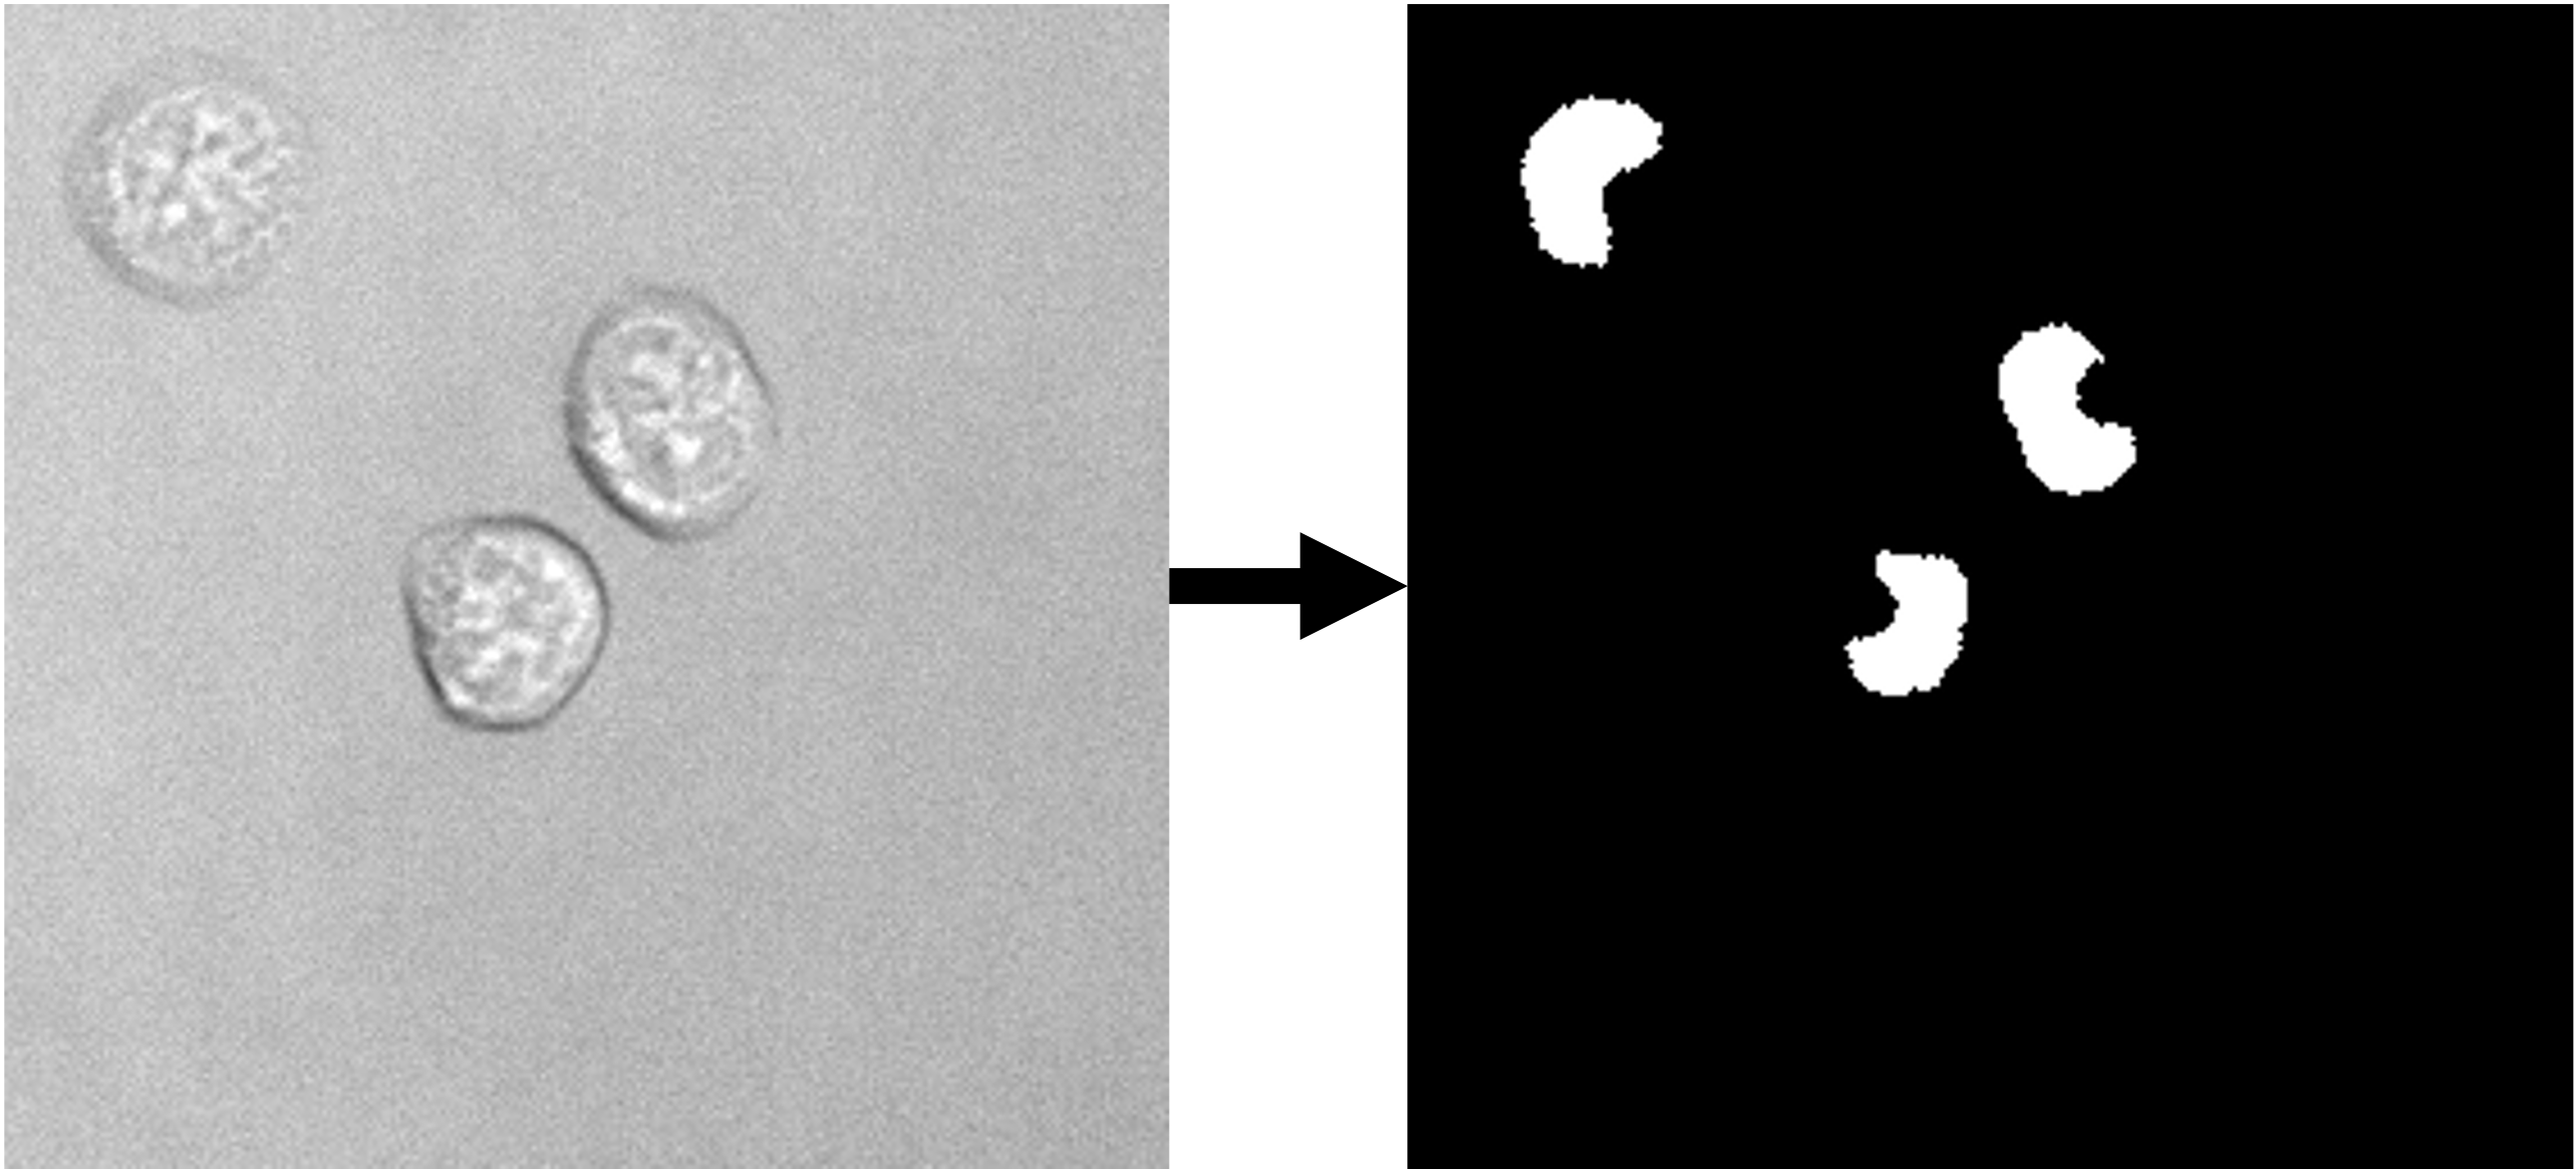 |
Trained on a data set (link to data set) of 9849 images (~620k nuclei). | ETH Research Collection |
| bright field whole cell segmentation | 2D grayscale | U-Net | 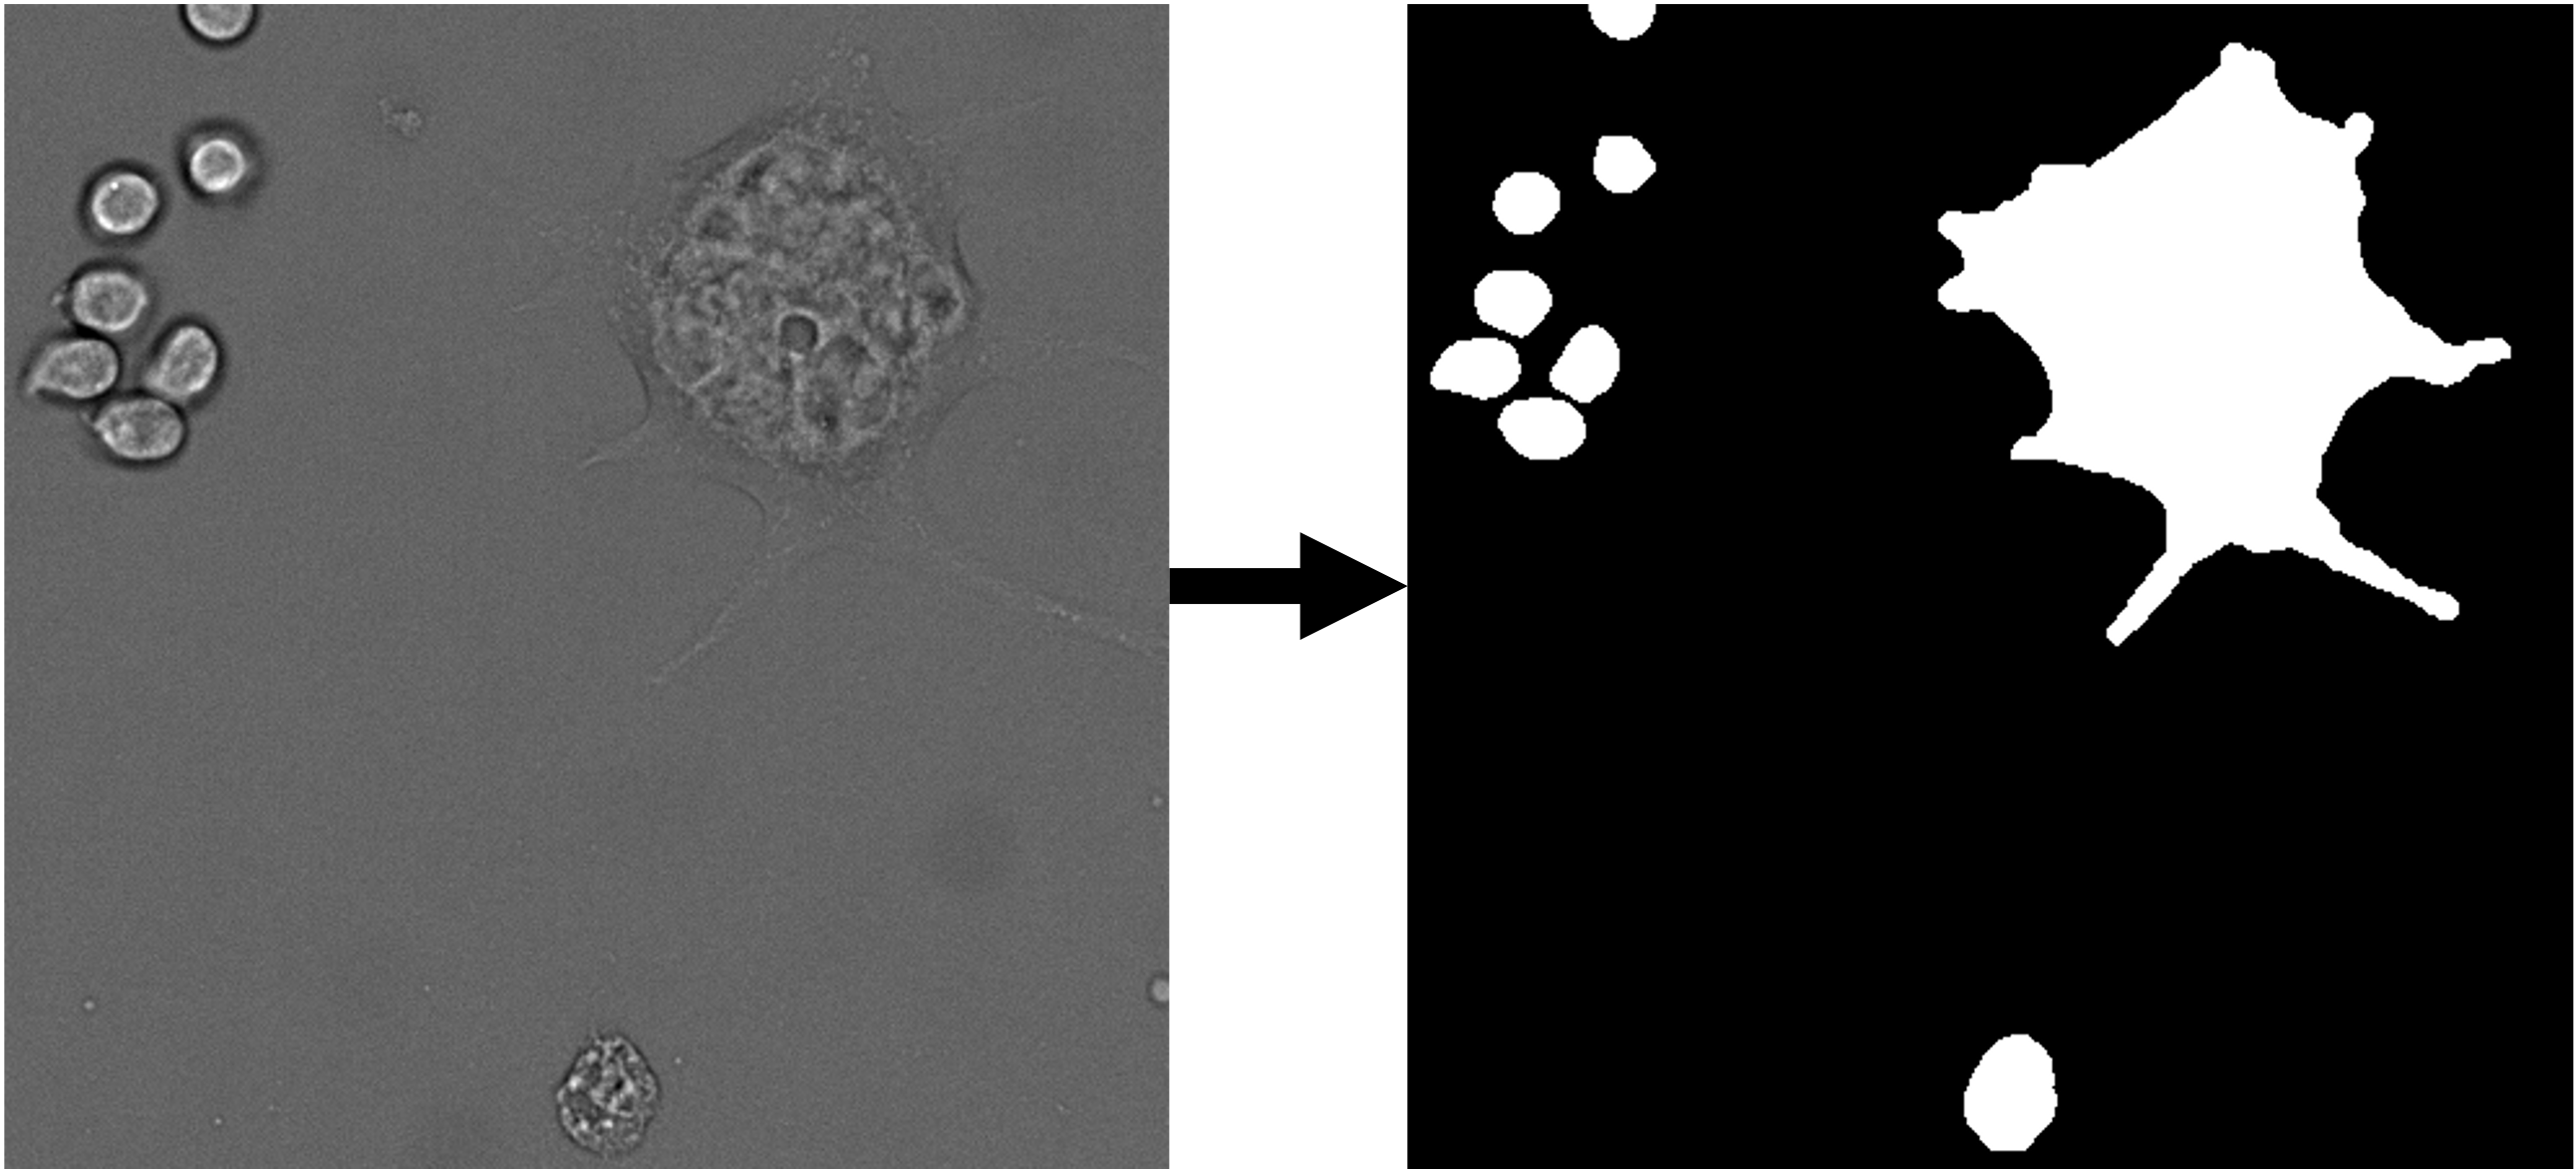 |
Trained on a data set (link to data set) of 224 images (~12k cells). | ETH Research Collection |
Image annotation tools
Available tools to annotate segmentations include:
Citation
@article{10.1371/journal.pcbi.1012361,
    doi = {10.1371/journal.pcbi.1012361},
    author = {Schirmacher, Daniel AND Armagan, Ümmünur AND Zhang, Yang AND Kull, Tobias AND Auler, Markus AND Schroeder, Timm},
    journal = {PLOS Computational Biology},
    publisher = {Public Library of Science},
    title = {aiSEGcell: User-friendly deep learning-based segmentation of nuclei in transmitted light images},
    year = {2024},
    month = {08},
    volume = {20},
    url = {https://doi.org/10.1371/journal.pcbi.1012361},
    pages = {1-28},
    number = {8},
}
Contributing
Contributions are very welcome. Tests can be run with tox, please ensure the coverage at least stays the same before you submit a pull request.
License
Distributed under the terms of the BSD-3 license, "napari-aisegcell" is free and open source software
Issues
If you encounter any problems, please file an issue along with a detailed description.
Release history Release notifications | RSS feed


Download files
Download the file for your platform. If you're not sure which to choose, learn more about installing packages.
Source Distribution
Built Distribution
Filter files by name, interpreter, ABI, and platform.
If you're not sure about the file name format, learn more about wheel file names.
Copy a direct link to the current filters
File details
Details for the file napari_aisegcell-0.2.0.tar.gz.
File metadata
- Download URL: napari_aisegcell-0.2.0.tar.gz
- Upload date:
- Size: 1.5 MB
- Tags: Source
- Uploaded using Trusted Publishing? No
- Uploaded via: twine/6.2.0 CPython/3.13.7
File hashes
| Algorithm | Hash digest | |
|---|---|---|
| SHA256 |
a77d628b5590554d5d23485b733bbaba82ac4667cc920e63648315d10da0469a
|
|
| MD5 |
e7779092e971ebf174328ff8704a0454
|
|
| BLAKE2b-256 |
f8ec5b31ba3f6d5bc304decc0bdaa43fed8c316727a01cc95dcba9cf047868a0
|
File details
Details for the file napari_aisegcell-0.2.0-py3-none-any.whl.
File metadata
- Download URL: napari_aisegcell-0.2.0-py3-none-any.whl
- Upload date:
- Size: 24.9 kB
- Tags: Python 3
- Uploaded using Trusted Publishing? No
- Uploaded via: twine/6.2.0 CPython/3.13.7
File hashes
| Algorithm | Hash digest | |
|---|---|---|
| SHA256 |
0d83b0495b1db94399d81ae40e7f8e7c580dedfff237985004eb042f9d350a42
|
|
| MD5 |
10984dfd79aff74d27eb431c19a8cf1e
|
|
| BLAKE2b-256 |
dcac8b476a798e767d7c5a159bcf15c2da7f5a158ee85f4da12d13e234a8ac4c
|


