Semantic Segmentation and Image processing using Deep Learning ONNX models packaged as *.czann files

Project description
napari-czann-segment


Semantic Segmentation of multidimensional images using Deep Learning ONNX models packaged as *.czann files.
This napari plugin was generated with Cookiecutter using @napari's cookiecutter-napari-plugin template.
Installation
Before installing, please setup a conda environment. If you have never worked with conda environments, go through this tutorial first.
You can then install napari-czann-segment via pip. You must choose either CPU or GPU support:
For CPU inference (works on all platforms):
pip install napari-czann-segment[cpu]
For GPU inference (Windows/Linux with NVIDIA GPU only):
pip install napari-czann-segment[gpu]
See CPU vs. GPU Inference for detailed GPU setup instructions.
What does the plugin do
The plugin allows you to:
- Use a *.czann file containing the Deep Neural Network (ONNX) for semantic segmentation and metadata
- Segmentation will be applied per 2D plane for all dimensions
- Processing larger multidimensional images it uses the cztile package to chunk the individual 2d arrays using a specific overlap.
- multidimensional images will be processed plane-by-plane
What does the plugin NOT do
Before one can actually use a model it needs to be trained, which is NOT done by this plugin.
There are two main ways hwo such a model can be created:
- Train the segmentation model fully automated on APEER and download the *.czann file
- Train your model in a Jupyter notebook etc. and package it using the czmodel python package as an *.czann
Using this plugin
Sample Data
A test image and a *.czann model file can be downloaded here.
PGC_20X.ome.tiff--> usePGC_20X_nucleus_detector.czannto segment
In order to use this plugin the user has to do the following things:
- Open the image using "File - Open Files(s)" (requires [napari-bioio] plugin).
- Click napari-czann-segment: Segment with CZANN model in the "Plugins" menu.
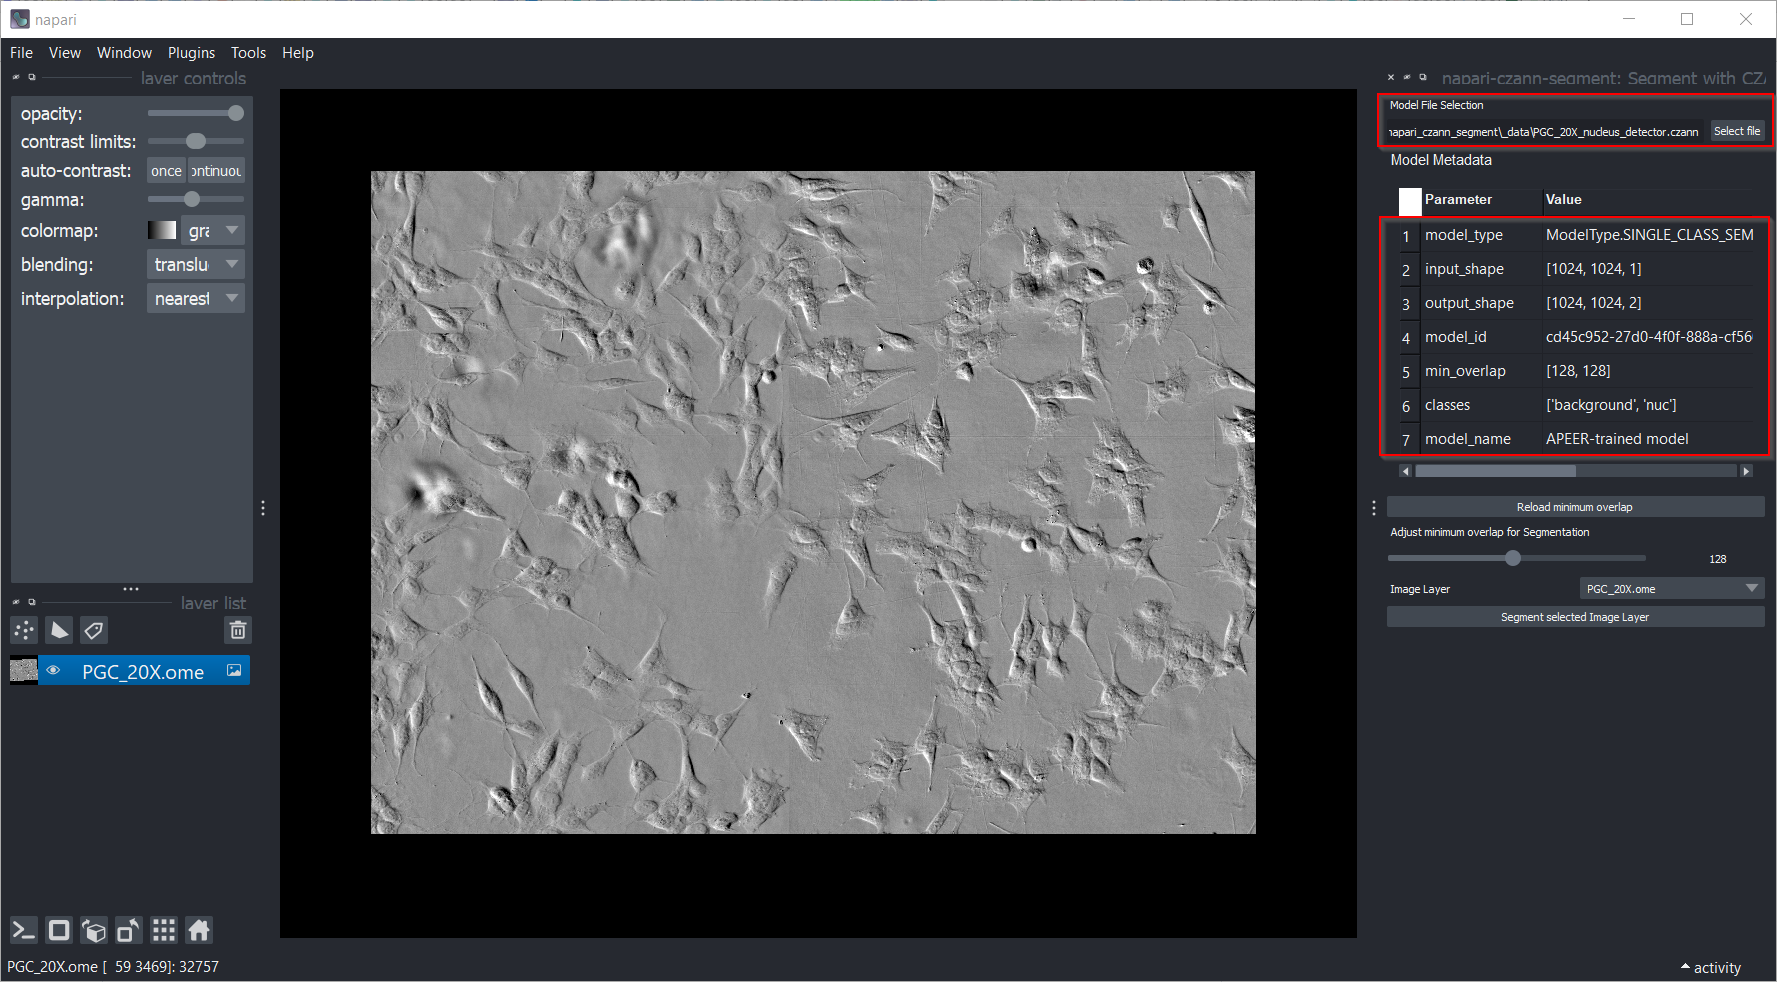
- Select a czann file to use the model for segmentation.
- metadata of the model will be shown (see example below)
| Parameter | Value | Explanation |
|---|---|---|
| model_type | ModelType.SINGLE_CLASS_SEMANTIC_SEGMENTATION | see: czmodel for details |
| input_shape | [1024, 1024, 1] | tile dimensions of model input |
| output_shape | [1024, 1024, 3] | tile dimensions of model output |
| model_id | ba32bc6d-6bc9-4774-8b47-20646c7cb838 | unique GUID for that model |
| min_overlap | [128, 128] | tile overlap used during training (for this model) |
| classes | ['background', 'grains', 'inclusions'] | available classes |
| model_name | APEER-trained model | name of the model |
- Adjust the minimum overlap for the tiling (optional, see cztile for details).
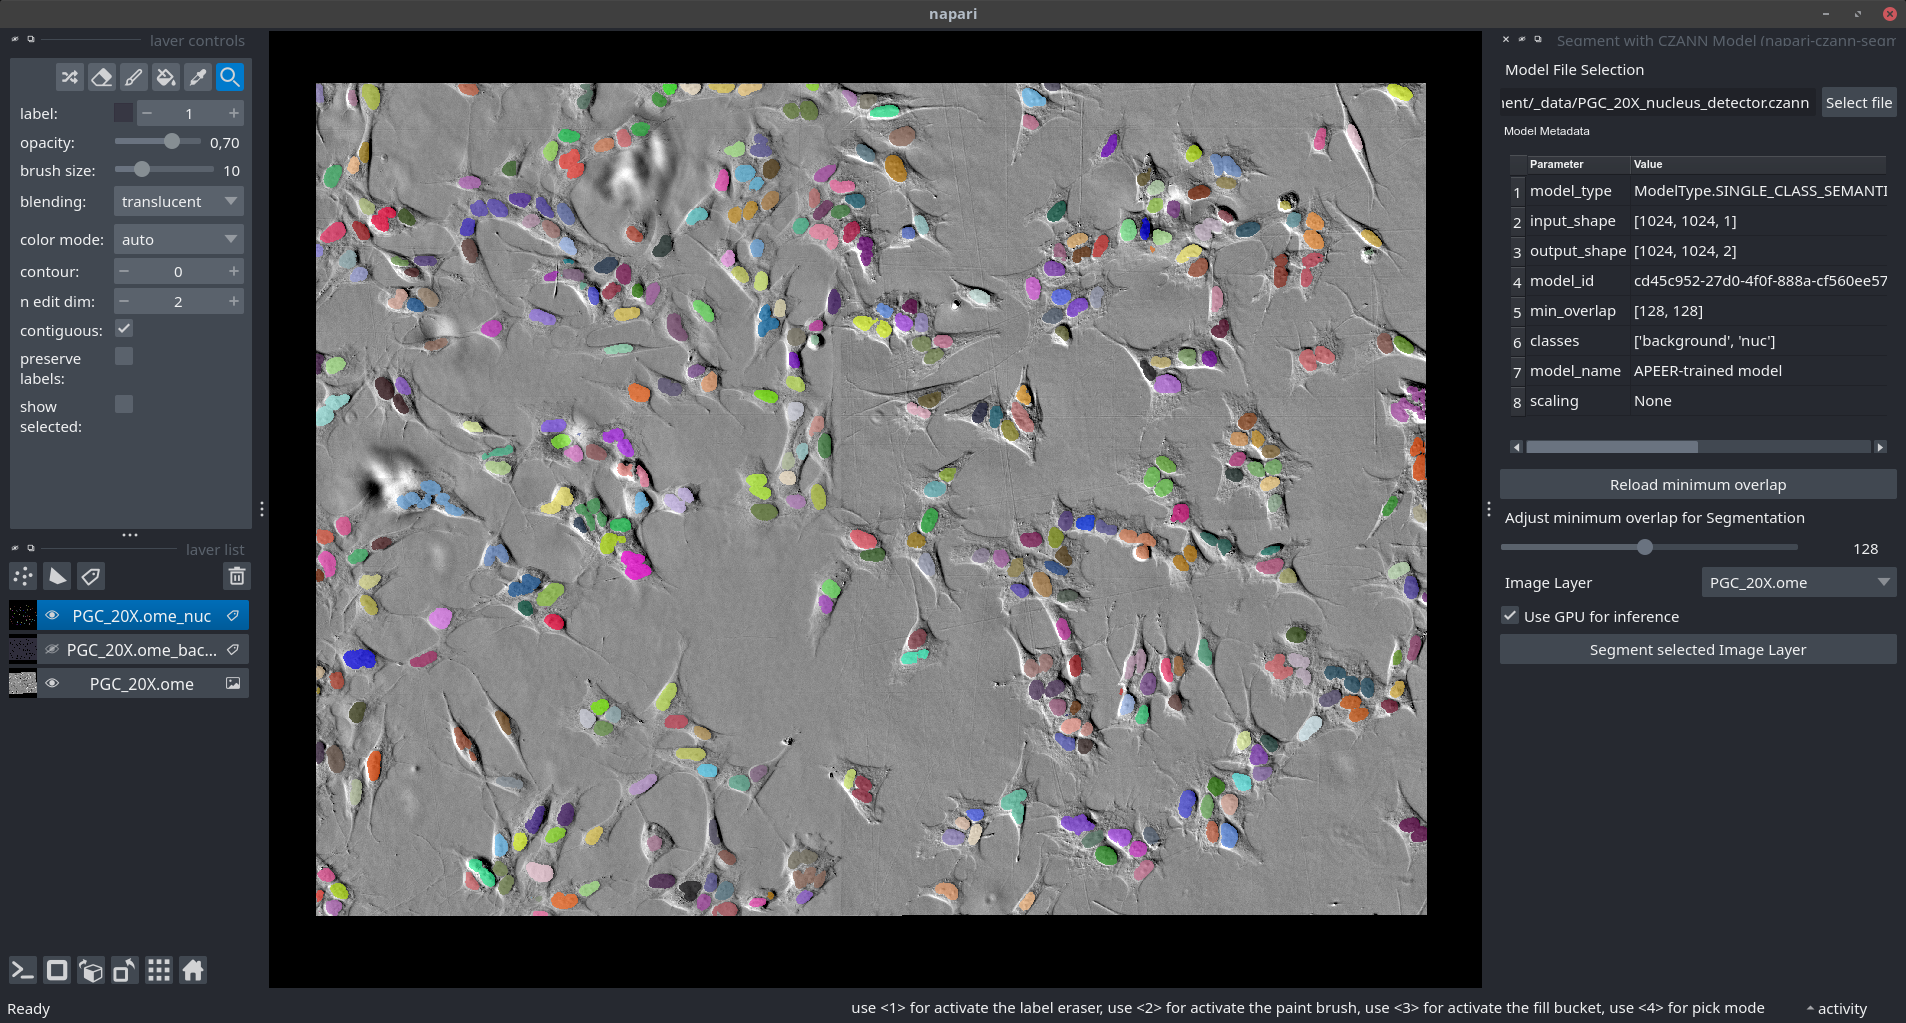
- Select the layer to be segmented.
- Toggle Use GPU for inference checkbox to enable / disable using a GPU (Nvidia) for the segmentation (experimental feature).
- Press Segment Selected Image Layer to run the segmentation.
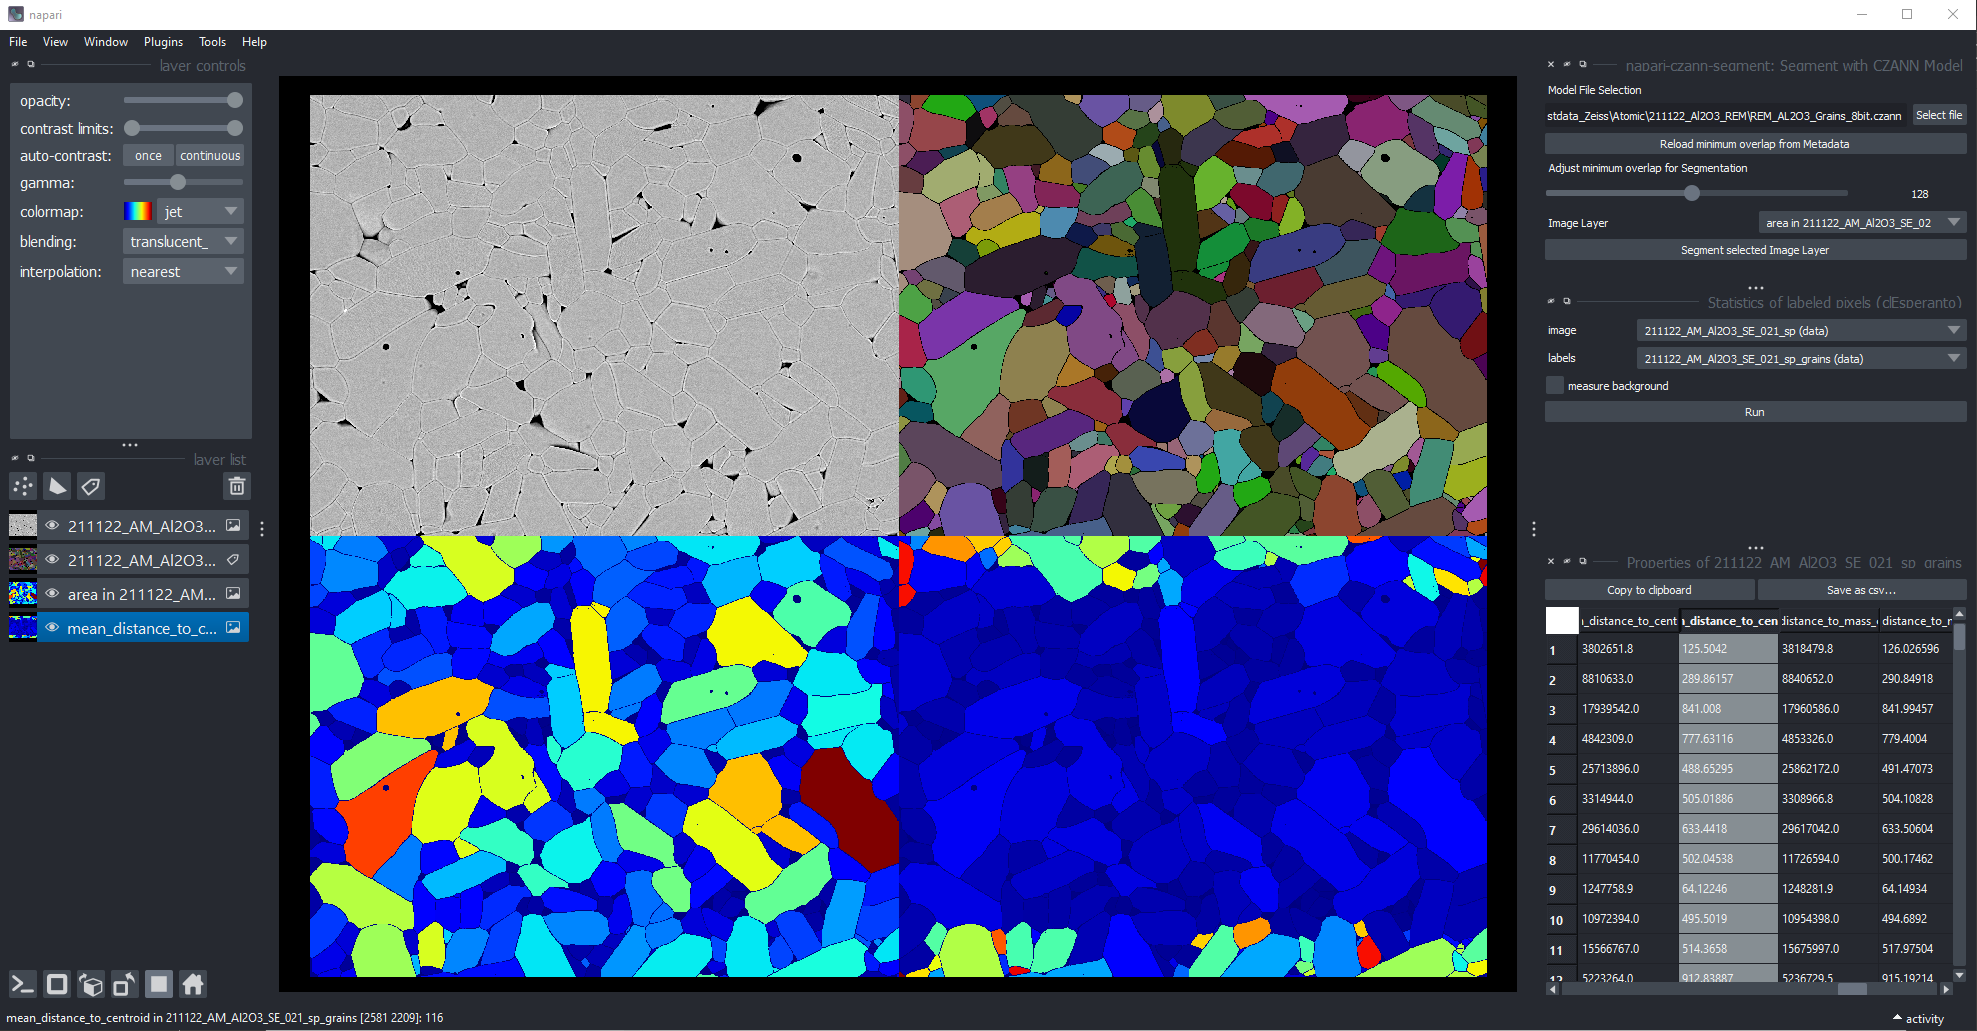
A successful is obviously only the starting point for further image analysis steps to extract the desired numbers from the segmented image. Another example is shown below demonstrating a simple "Grain Size Analysis" using a deep-learning model trained on APEER used in napari
Remarks
IMPORTANT: Currently the plugin only supports using models trained on a single channel image. Therefore, make sure that during the training on APEER or somewhere else the correct inputs images are used. It is quite simple to train a single RGB image, which actually has three channels, load this image in napari and notice only then that the model will not work, because the image will 3 channels inside napari.
CPU vs. GPU Inference
CPU (default - works everywhere)
CPU inference via ONNX-CPU works on all platforms (Windows, Linux, macOS including Apple Silicon):
pip install napari-czann-segment[cpu]
When the plugin starts, it checks GPU availability and logs the result. If no GPU is detected, the "Use GPU" checkbox is automatically disabled and all inference runs on CPU.
macOS
On macOS (both Intel and Apple Silicon), the plugin works with CPU inference only. NVIDIA CUDA is not available on macOS, so the [gpu] extra should not be installed — onnxruntime-gpu does not publish macOS wheels and installation will fail. Simply use:
pip install napari-czann-segment[cpu]
The GPU checkbox will be automatically disabled on macOS.
GPU (optional - Windows/Linux with NVIDIA GPU)
GPU acceleration uses ONNX-GPU and requires an NVIDIA GPU with the correct CUDA runtime libraries. For the ONNX Runtime versions targeted by this project, the [gpu] extra installs pinned pip nvidia-*-cu12 runtime packages, using a CUDA 12.4 + cuDNN 9.1 stack that still works on older NVIDIA GPUs such as GTX 10xx / Pascal.
Why the conda environment file is recommended:
The conda environment file (napari-env.yml) already has the correct versions of CUDA and cuDNN tested and working with onnxruntime-gpu. You don't need to guess which versions to install:
conda env create --file napari-env.yml
Then verify GPU support:
python -c "import onnxruntime; print(onnxruntime.get_available_providers())"
You should see CUDAExecutionProvider in the list.
If you must install manually:
Different versions of onnxruntime-gpu require different CUDA/cuDNN versions. Check the ONNX Runtime CUDA Provider documentation for your version's requirements.
For example, for onnxruntime-gpu >= 1.21, you need CUDA 12.x and cuDNN 9.x. The [gpu] extra pins tested runtime wheels:
-
If you previously installed with
[cpu], uninstall onnxruntime first:pip uninstall onnxruntime -y -
Install the GPU extra:
pip install napari-czann-segment[gpu] -
Verify GPU support:
python -c "import onnxruntime; print(onnxruntime.get_available_providers())"You should see
CUDAExecutionProviderin the list. If you only seeCPUExecutionProvider, the CUDA libraries are missing or incompatible — check the requirements and reinstall. -
(Alternative) Use conda packages if you prefer not to use pip-provided CUDA runtime wheels:
conda install nvidia::cuda-runtime nvidia::cudnn -
Use the repo environment file for a tested setup. See the example conda environment YAML:
conda env create --file napari-env.yml
Note: If you have PyTorch with CUDA installed, onnxruntime-gpu (>= 1.21) can automatically reuse PyTorch's CUDA/cuDNN DLLs via its preload_dlls() mechanism. The plugin calls this automatically at startup.
CUDA preflight check
Before running GPU inference, the plugin performs a one-time CUDA preflight per model: it creates a CUDA ONNX session and runs a single dummy inference in a separate subprocess. This is intentional — some CUDA/cuDNN/cuBLAS mismatches abort the process from native code (an error Python cannot catch), so running the probe out-of-process lets napari fall back to CPU safely instead of crashing. The result is cached per model for the session.
The first CUDA session on a machine can be slow to initialize (cuDNN/cuBLAS DLL loading, kernel JIT compilation, driver warm-up). If the preflight does not finish within its timeout, the plugin logs a warning and falls back to CPU for that session. If your GPU is healthy but simply slow to warm up, increase the timeout via an environment variable before launching napari:
# Windows (PowerShell) - timeout in seconds
$env:NAPARI_CZANN_CUDA_PREFLIGHT_TIMEOUT = "300"

# Linux / macOS
export NAPARI_CZANN_CUDA_PREFLIGHT_TIMEOUT=300
The default is 180 seconds.
Troubleshooting GPU
-
Only seeing
CPUExecutionProviderafter installing[gpu]: You likely have bothonnxruntimeandonnxruntime-gpuinstalled (they conflict). Solution: Runpip uninstall onnxruntime -yto remove the CPU version, keeping only the GPU version. -
Switching from
[cpu]to[gpu]: First uninstall the CPU version:pip uninstall onnxruntime -y, then install withpip install napari-czann-segment[gpu]. -
libcudnn.so.9,cublasLt64_12.dll, orcufft64_11.dllnot found: CUDA runtime libraries are missing. The easiest fix is ensuring you installed with[gpu]extra, which includes them. Alternatively, install via conda:conda install nvidia::cuda-runtime nvidia::cudnn. -
CUDNN_FE failure 11withno kernel image is available for execution on the device: The installed pipnvidia-*-cu12wheels are probably too new for your GPU generation. Reinstall the local package with the pinned[gpu]extra:pip install --force-reinstall -e .[gpu] -
Failed to allocate memory for requested bufferduring a Conv node: The GPU ran out of memory during inference. Lower the batch size in the plugin UI; the plugin also retries GPU inference with smaller batches and falls back to CPU if one tile still cannot fit. -
Plugin shows "GPU support is not available": Check the napari log output for detailed diagnostics. The plugin always falls back to CPU safely.
-
CUDA preflight ... timed outwarning / GPU falls back to CPU: The one-time CUDA warm-up exceeded the preflight timeout (default 180 s). If your GPU is healthy, raise it by settingNAPARI_CZANN_CUDA_PREFLIGHT_TIMEOUT(seconds) before launching napari — see CUDA preflight check. -
CUDA version mismatch:
onnxruntime-gpurequires specific CUDA versions. Check the ONNX Runtime GPU requirements.
For developers
-
Please clone this repository first using your favorite tool.
-
Ideally one creates a new conda environment or use an existing environment that already contains Napari.
Feel free to create a new environment using the example YAML file at your own risk:
cd the-github-repo-with-YAML-file
conda env create --file napari-env.yml
conda activate napari-env
- Install the plugin locally
Please run the following command:
pip install -e .
To install latest development version:
pip install git+https://github.com/sebi06/napari_czann_segment.git
Running tests
Run the automated test suite with:
pytest
The _tests/ directory also contains manual diagnostic scripts (test_color_conversion.py, diagnostic_color_test.py, debug_tiling.py) that perform full end-to-end inference on real CZI files and take several minutes. These are automatically skipped by pytest. To run them manually:
python src/napari_czann_segment/_tests/test_color_conversion.py
python src/napari_czann_segment/_tests/diagnostic_color_test.py
python src/napari_czann_segment/_tests/debug_tiling.py
Contributing
Contributions and Feedback are very welcome.
License
Distributed under the terms of the BSD-3 license, "napari-czann-segment" is free and open source software
Issues
If you encounter any problems, please file an issue along with a detailed description.
Release history Release notifications | RSS feed


Download files
Download the file for your platform. If you're not sure which to choose, learn more about installing packages.
Source Distribution
Built Distribution
Filter files by name, interpreter, ABI, and platform.
If you're not sure about the file name format, learn more about wheel file names.
Copy a direct link to the current filters
File details
Details for the file napari_czann_segment-0.1.0.tar.gz.
File metadata
- Download URL: napari_czann_segment-0.1.0.tar.gz
- Upload date:
- Size: 45.9 MB
- Tags: Source
- Uploaded using Trusted Publishing? No
- Uploaded via: twine/6.1.0 CPython/3.13.12
File hashes
| Algorithm | Hash digest | |
|---|---|---|
| SHA256 |
b96d217c02b386b28587c95c560db11bcc1eab7ffbed1403d70faf10061bd307
|
|
| MD5 |
2bd5b9380d4ef88e29d1113dc16f28cc
|
|
| BLAKE2b-256 |
d724b6499f068e73b6099fa70950b1737e7b61be83016cbe3a731c217c8a3f2f
|
File details
Details for the file napari_czann_segment-0.1.0-py3-none-any.whl.
File metadata
- Download URL: napari_czann_segment-0.1.0-py3-none-any.whl
- Upload date:
- Size: 34.2 MB
- Tags: Python 3
- Uploaded using Trusted Publishing? No
- Uploaded via: twine/6.1.0 CPython/3.13.12
File hashes
| Algorithm | Hash digest | |
|---|---|---|
| SHA256 |
273a8657977a5ea461b18172397ce2202f7c74918877764dea8154881f4af033
|
|
| MD5 |
08ea9e88bde327a49963765f22405c19
|
|
| BLAKE2b-256 |
1cceb063bda8232a97f13b4dc949dc7e2cc10e051feeafa5a6f64d0e6b579dc4
|


