OpenCL based GPU-accelerated image processing in napari
Project description
napari-pyclesperanto-assistant
The py-clEsperanto-assistant is a yet experimental napari plugin for building GPU-accelerated image processing workflows. It is part of the clEsperanto project. It uses pyclesperanto as backend for processing images.
Installation
Installation using the napari installer
Download and install napari.
Windows users please download pyopencl...cl12-cp38-cp38-win_amd64.whl. Use the command line to navigate to the folder where you downloaded it (for example the Downloads folder using cd Downloads). From there, run the following line after replacing <username> with your username:
C:\Users\<username>\AppData\Local\Programs\napari\python\python.exe -m pip install pyopencl-2020.2.2+cl12-cp38-cp38-win_amd64.whl
Start napari and navigate to its menu Plugins > Install/Uninstall Package(s).... Select napari-pyclesperanto-assitant from the list and install it by clicking the blue button on the right:
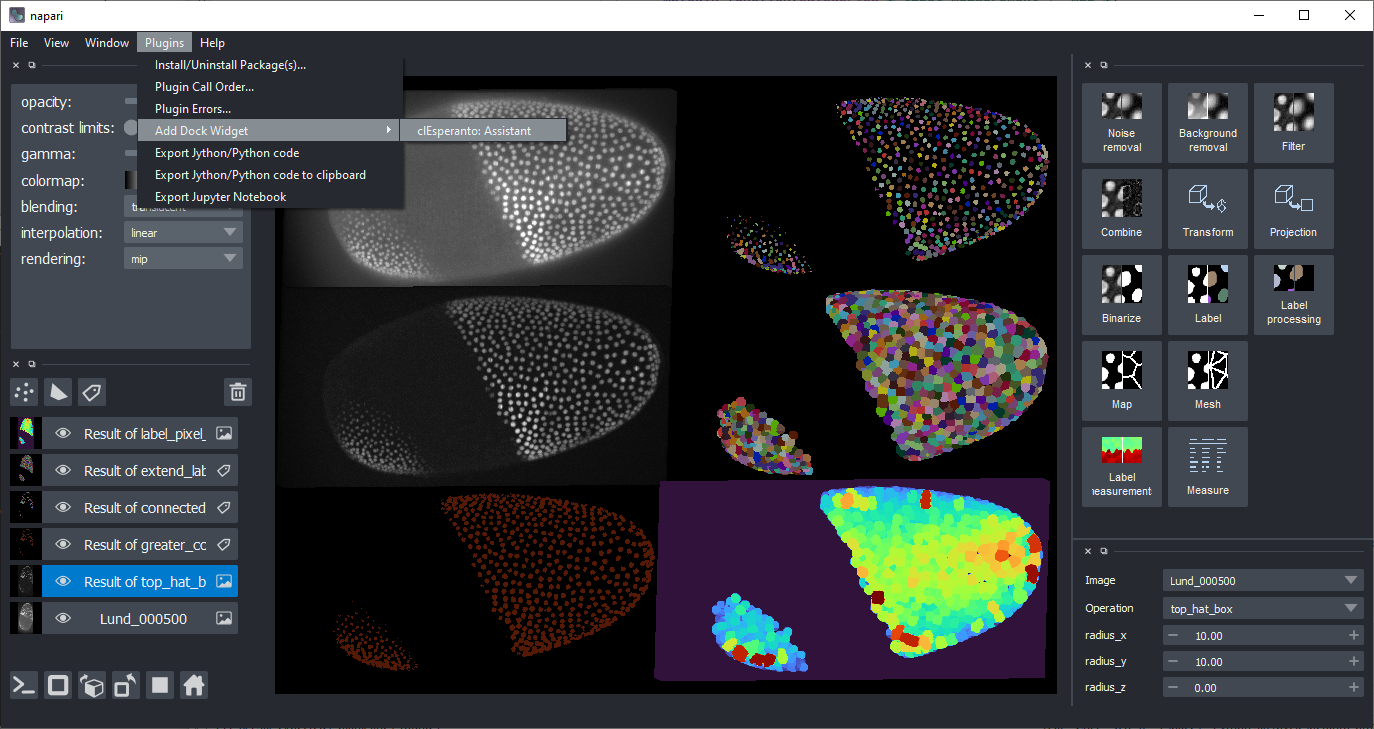
Restart napari. Afterwards, you should find the Assistant in the plugins menu:
Installation via conda and pip
If you have no python/conda environment installed yet, please follow the instructions here first.
Download and install napari-pyclesperanto-assitant uing pip. Windows users should follow the instructions in the section below in case of trouble.
pip install napari-pyclesperanto-assistant
Afterwards, you can start the assistant using the following command. Replace the url with an image file of your choice:
python -m napari_pyclesperanto_assistant https://github.com/clEsperanto/napari_pyclesperanto_assistant/raw/master/napari_pyclesperanto_assistant/data/CalibZAPWfixed_000154_max-16.tif
Installation on windows
On windows some additional steps are necessary. Download a pre-compiled wheel of pyopencl e.g. from here.
It is recommended to install pyopencl-...+cl12-cp38-cp38-win_amd64 - the cl12 and cp38 are important when choosing the right download. They stand for OpenCL 1.2 and Python 3.8.
Enter the correct pyopencl filename and execute this from the command line:
pip install pyopencl-2020.3.1+cl12-cp38-cp38-win_amd64.whl
In case napari doesn't start up with an error mentioning numpy (see also), execute this from the command line:
pip install numpy==1.19.3
Usage
This short tutorial demonstrates how to generate code using the pyclersperanto-assistant.
<iframe src="docs/images/pyclesperanto_assistant_screencast.mp4" width="600" height="300"></iframe> [Download workflow as video](docs/images/pyclesperanto_assistant_screencast.mp4)Start up the assistant
Open a command line and start up the assistant and pass the image file you want to process. The shown example image can be found online
python -m napari_pyclesperanto_assistant C:\structure\code\napari_pyclesperanto_assistant\napari_pyclesperanto_assistant\data\CalibZAPWfixed_000154_max-16.tif
Alternatively, you can attach the assistant to your napari from within your python code like this:
import napari

# create Qt GUI context
with napari.gui_qt():
    # start napari
    viewer = napari.Viewer()

    # attach the assistant
    import napari_pyclesperanto_assistant
    napari_pyclesperanto_assistant.napari_plugin(viewer)
napari will open with the assistant activated:
Set up a workflow
Choose categories of operations in the top right panel, for example start with denoising using a Gaussian Blur with sigma 1 in x and y:
Choose more processing steps. Note: You can change the input image/layer for each operation, the operation and its parameters in the bottom right panel. For example, continue with these steps
- Filter (Background Removal): Top hat, radius 5 in x and y
- Binarization: Threshold Otsu
- Label: Voronoi labeling
- Map: Touching neighbor count map
- Binarization: Detect label edges, with the result from the second last step as input.
Hide some layers showing intermediate results. Switch the bleinding of the final result layer to "additive" to see through it on the original image.
Code generation
In the plugins menu, you find two entries which allow you to export your workflow as Python/Jython code.
Export your workflow as Jupyter notebook. Start the notebook from the command line using
jupyter notebook my_notebook.ipynb
Alternatively, export the workflow as Jython/Python script. This script can be executed from the command line like this
python my_script.py
It can also be executed in Fiji, in case the CLIJx-assistant is installed.
Note: Depeending on which layers were visible while exporting the code, different code is exported. Only visible layers are shown. Change layer visibility and export the script again. If Fiji asks you if it should reload the script file, click on "Reload".
For developers
Getting the recent code from github and locally installing it
git clone https://github.com/clesperanto/napari_pyclesperanto_assistant.git

pip install -e ./napari_pyclesperanto_assistant
Optional: Also install pyclesperantos recent source code from github:
git clone https://github.com/clEsperanto/pyclesperanto_prototype.git

pip install -e ./pyclesperanto_prototype
Starting up napari with the pyclesperanto assistant installed:
ipython --gui=qt napari_pyclesperanto_assistant\napari_pyclesperanto_assistant
Feedback welcome!
clEsperanto is developed in the open because we believe in the open source community. Feel free to drop feedback as github issue or via image.sc
Project details
Release history Release notifications | RSS feed
Download files
Download the file for your platform. If you're not sure which to choose, learn more about installing packages.
Source Distribution
Built Distribution
Hashes for napari_pyclesperanto_assistant-0.7.5.tar.gz
| Algorithm | Hash digest | |
|---|---|---|
| SHA256 | f3ecf3d6c453f5e3460b31581c1a9419fb0e4599a964be7eb492d37819e7702c |
|
| MD5 | d27570dd15eb74daad19c5c23c075444 |
|
| BLAKE2b-256 | 9708d4343640132bc04d2a26ac27086c0cac487a4d90815d06526c26d803517d |
Hashes for napari_pyclesperanto_assistant-0.7.5-py3-none-any.whl
| Algorithm | Hash digest | |
|---|---|---|
| SHA256 | e23b571ba3bcbbaafcea361820837d27a53021e5b6003e41c3d1d22ac1a0187e |
|
| MD5 | 9041aadfc5476b96ea890d0f4c014992 |
|
| BLAKE2b-256 | f5e70a9d16f3d94c7fbd09a72a1d87452544a64fea29daef387acc25eb6154c6 |


