CLI application for efficient and optimized reconstruction of large-scale 3D building models.

Project description

Paper is now published. For more information, please refer to: Recent Advances in 3D Geoinformation Science
Optim3D: Efficient and scalable generation of large-scale 3D building


Command-Line Interface (CLI) application for efficient and optimized reconstruction of large-scale 3D building models.
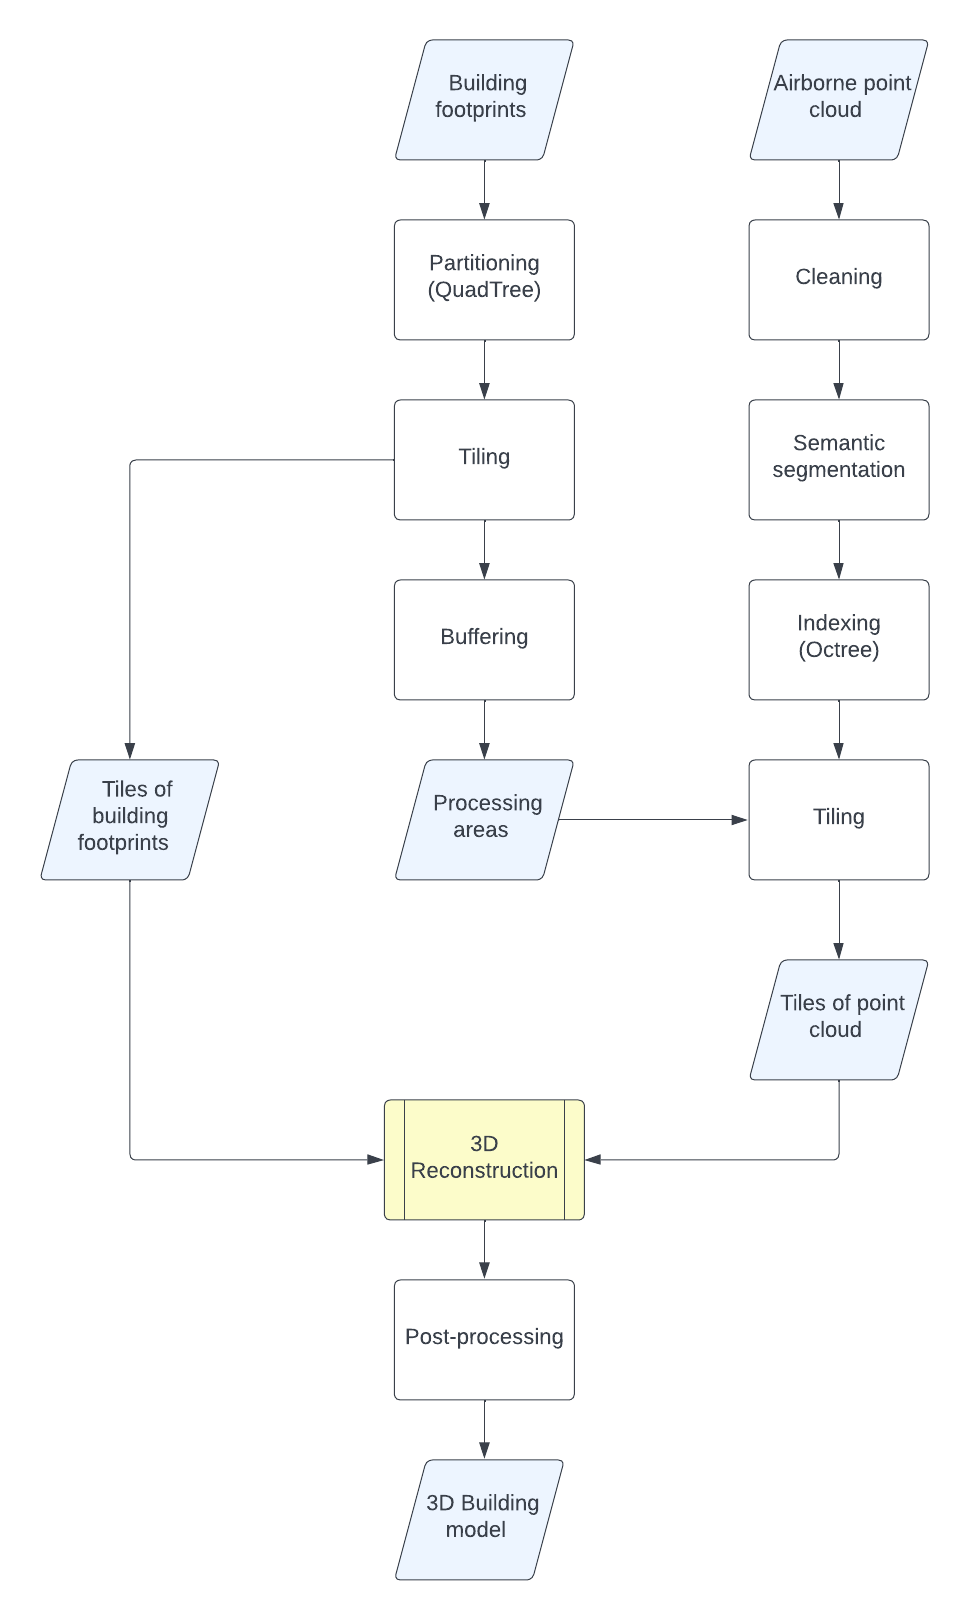
Optim3D is a powerful tool for efficient and scalable generation of highly detailed and large-scale 3D building models. The modeling process is based on GeoFlow. The tool focuses mainly on preparing data for efficient reconstruction through indexing, tiling and parallel computing, which significantly reduces the processing time and resources required to generate large-scale 3D building models.
Documentation
If you are using Optim3D, we highly recommend that you take the time to read the documentation.
Installation
NOTE: Before installing Optim3D. It is important to have GeoFlow-bundle installed on your machine. Please read the LICENSE file of Geoflow-bundle before usage.
Requirements
- Python >= 3.9
- PDAL >= 2.4.0
- Entwine >= 3.1.0
- Geoflow-bundle >= 2022.06.17
- click >= 8.0.1
- geopandas >= 1.0.1
- osmnx >= 2.0.1
- rich >= 13.9.0
Download from PyPI
You can install optim3d in your Conda environment by running the following commands:
conda create --name optimenv python==3.9
conda activate optimenv
conda install -c conda-forge pdal python-pdal
conda install -c conda-forge entwine
pip install optim3d
If conda is not installed on your machine, you can install it by following the instructions on the official website.
If installing PDAL and Python-PDAL is slow, you can use Mamba as a package manager. Mamba is a faster and more efficient package manager than Conda, particularly when it comes to installation, updates and dependency resolution. This is because Mamba is written in C++ and uses multithreading to parallelize operations, whereas Conda is written in Python and does not take advantage of multiple cores as effectively.
Mamba can be used in a similar way to Conda for creating and managing Conda environments:
conda create --name optimenv python=3.9
conda activate optimenv
conda install mamba -c conda-forge
mamba install pdal python-pdal -c conda-forge
mamba install entwine -c conda-forge
pip install optim3d
Building from source
You can also build everything from source (see INSTALL.md). A Docker image is also available.
Quick Start
Usage
After installation, you have a small program called optim3d. Use optim3d --help to see the detailed help:
Usage: optim3d [OPTIONS] COMMAND [ARGS]...

  CLI tool to manage full optimized reconstruction of large-scale 3D building
  models.

Options:
  --help  Show this message and exit.

Commands:
  prepare      Prepare the output folder structure.
  index2d      QuadTree indexing and tiling of 2D building footprints.
  index3d      OcTree indexing of 3D point cloud using Entwine.
  tile3d       Tiling of point cloud using the calculated processing areas.
  reconstruct  Optimized 3D reconstruction of buildings using GeoFlow.
  post         Postprocess the generated CityJSON files.
The process consists of six steps or commands that must be executed in a specific order to achieve the desired outcome.
Step 1 : Prepare the output folder structure
Before starting the 3D reconstruction process, it is necessary to prepare the output folder structure. This is done using the first command prepare. Use optim3d prepare --help to see the detailed help:
Usage: optim3d prepare [OPTIONS]

  Prepare the output folder structure.

Options:
  --output PATH              Output directory.  [default: output]
  --footprint_tiles PATH     Footprint tiles directory.  [default:
                             footprint_tiles]
  --indexed_pointcloud PATH  Indexed pointcloud directory.  [default:
                             indexed_pointcloud]
  --model PATH               Model directory.  [default: model]
  --pointcloud_tiles PATH    Pointcloud tiles directory.  [default:
                             pointcloud_tiles]
  --folder_structure PATH    Folder structure file.  [default:
                             folder_structure.xml]
  --help                     Show this message and exit.
For example, you can use the following command to prepare the output folder structure:
optim3d prepare
This command will create the following folder structure in the output folder:
├── output
│   ├── footprint_tiles
│   ├── indexed_pointcloud
│   ├── model
│   ├── pointcloud_tiles
│   └── folder_structure.xml
You can specify the output folder using the --output option. For example, to save the results in the results folder, use the following command:
optim3d prepare --output results
The file folder_structure.xml contains the structure of the output folder. You can modify it according to your needs, but it is recommended to keep the default structure.
Step 2 : 2D building footprints indexing and tiling
Quadtree-based tiling scheme is used for spatial partitioning of building footprints. This assures that the reconstruction time per tile is more or less the same and that the tiles available for download are similar in file size. This is done using the first command index2d. Use optim3d index2d --help to see the detailed help:
Usage: optim3d index2d [OPTIONS] [FOOTPRINTS]

  QuadTree indexing and tiling of 2D building footprints.

Options:
  --output PATH                   Output directory.  [default: output]
  --folder-structure PATH         Folder structure file.  [default:
                                  folder_structure.xml]
  --osm ('WEST', 'NORTH', 'EAST', 'SOUTH')
                                  Download footprints from OSM in [west north
                                  east south] format.  [default: -1, -1, -1,
                                  -1]
  --osm-save-path PATH            Path to save downloaded OSM footprints
                                  (optional).
  --quadtree-fname PATH           Filename for the QuadTree file (forced to
                                  GPKG format).  [default: quadtree.gpkg]
  --processing-areas-fname PATH   Filename for the processing areas file
                                  (forced to GPKG format).  [default:
                                  processing_areas.gpkg]
  --crs INTEGER                   Coordinate Reference System (EPSG).
  --max INTEGER                   Max number of buildings per tile.  [default:
                                  3500]
  --help                          Show this message and exit.
We recommend using a building footprints file instead of downloading from OSM. If your file path is data/buildings.gpkg, you can use the following command:
optim3d index2d data/buildings.gpkg
If you changed the output folder structure, you can specify the output folder using the --output option. For example, to save the results in the results folder, use the following command:
optim3d index2d data/buildings.gpkg --output results
While it is possible to download building footprints from OSM, it is recommended to use a file instead. If you want to download building footprints from OSM, you can specify the bounding box using the --osm option. For example, to download building footprints in the bounding box [5.5, 50.6, 5.7, 50.8], use the following command:
optim3d index2d --osm 5.5 50.6 5.7 50.8
This will download the building footprints from OSM, index them using the quadtree scheme, and save the results in the output folder. You can specify the path to save the downloaded OSM footprints using the --osm-save-path option. For example, to save the downloaded OSM footprints in the data folder, use the following command:
optim3d index2d --osm 5.5 50.6 5.7 50.8 --osm-save-path osm_footprints.shp
Step 3 : OcTree indexing of the 3D point cloud
Processing large point cloud datasets is hardware-intensive. Therefore, it is necessary to index the 3D point cloud before processing. The index structure makes it possible to stream only the parts of the data that are required, without having to download the entire dataset. In this case, the spatial indexing of the airborne point cloud is performed using an octree structure. This is done using the second command index3d. Use optim3d index3d --help to see the detailed help:
Usage: optim3d index3d [OPTIONS] POINTCLOUD

  OcTree indexing of 3D point cloud using Entwine.

Options:
  --output PATH            Output directory.  [default: output]
  --folder-structure PATH  Folder structure file.  [default:
                           folder_structure.xml]
  --help                   Show this message and exit.
For example, if your point cloud file is data/pointcloud.laz, you can use the following command:
optim3d index3d data/pointcloud.laz
Step 4 : Tiling of the 3D point cloud
The tiling of the indexed point cloud is based on the processing areas already calculated. This is achieved using the third command tile3d. Use optim3d tile3d --help to see the detailed help:
Usage: optim3d tile3d [OPTIONS]

  Tiling of point cloud using the calculated processing areas.

Options:
  --output PATH            Output directory.  [default: output]
  --folder-structure PATH  Folder structure file.  [default:
                           folder_structure.xml]
  --areas PATH             Processing areas file.  [default:
                           processing_areas.gpkg]
  --max-workers INTEGER    Maximum number of workers for tiling.  [default: 8]
  --help                   Show this message and exit.
For example, you can use the following command to tile the indexed point cloud:
optim3d tile3d
If you changed the processing area default file name, you can specify the path to the processing areas file using the --areas option. For example, if the processing areas file is data/areas.gpkg, you can use the following command:
optim3d tile3d --areas data/areas.gpkg
Step 5 : 3D reconstruction of building models tile by tile
In this step, we perform the 3D reconstruction of building models. The process make use of GeoFlow to generate highly detailed 3D building models tile by tile. This is achieved using the fourth command reconstruct. Use optim3d reconstruct --help to see the detailed help:
Usage: optim3d reconstruct [OPTIONS]

  Optimized 3D reconstruction of buildings using GeoFlow.

Options:
  --output PATH            Output directory.  [default: output]
  --folder-structure PATH  Folder structure file.  [default:
                           folder_structure.xml]
  --max-workers INTEGER    Maximum number of workers for reconstruction.
                           [default: 8]
  --help                   Show this message and exit.
For example, you can use the following command to reconstruct the 3D building models:
optim3d reconstruct
The maximum number of workers for reconstruction can be specified using the --max-workers option. This parameter depends on your hardware configuration, and it is used to parallelize the reconstruction process. For example, to use 16 workers, you can use the following command:
optim3d reconstruct --max-workers 4
We recommend using a maximum number of workers less than the number of CPU cores available on your machine. This ensures that the reconstruction process does not consume all the resources and that the machine remains responsive. It also prevents the command from skipping tiles due to insufficient resources.
Step 6 : Post-processing of CityJSON files
The generated CityJSON files should be post-processed to correct the City Objects IDs. This is done using the fifth command post. Use optim3d post --help to see the detailed help:
Usage: optim3d post [OPTIONS]

  Postprocess the generated CityJSON files.

Options:
  --output PATH            Output directory.  [default: output]
  --folder-structure PATH  Folder structure file.  [default:
                           folder_structure.xml]
  --help                   Show this message and exit.
For example, you can use the following command to post-process the generated CityJSON files:
optim3d post
Results
The results of each command are saved in the output folder with the following structure:
├── output
│   ├── footprint_tiles
│   │   ├── *.cpg
│   │   ├── *.dbf
│   │   ├── *.prj
│   │   ├── *.shp
│   │   ├── *.shx
│   ├── indexed_pointcloud
│   │   ├── ept-data
│   │   │   ├── *.laz
│   │   ├── ept-hierarchy
│   │   │   ├── 0-0-0-0.json
│   │   ├── ept-sources
│   │   │   ├── *.json
│   │   ├── ept.json
│   │   ├── ept-build.json
│   ├── model
│   │   ├── cityjson
│   │   ├── *.city.json
│   │   ├── obj
│   │   ├── *.obj
│   │   ├── *.obj.mtl
│   ├── pointcloud_tiles
│   │   ├── *.las
│   ├── folder_structure.xml
│   ├── processing_areas.gpkg
│   └── quadtree.gpkg
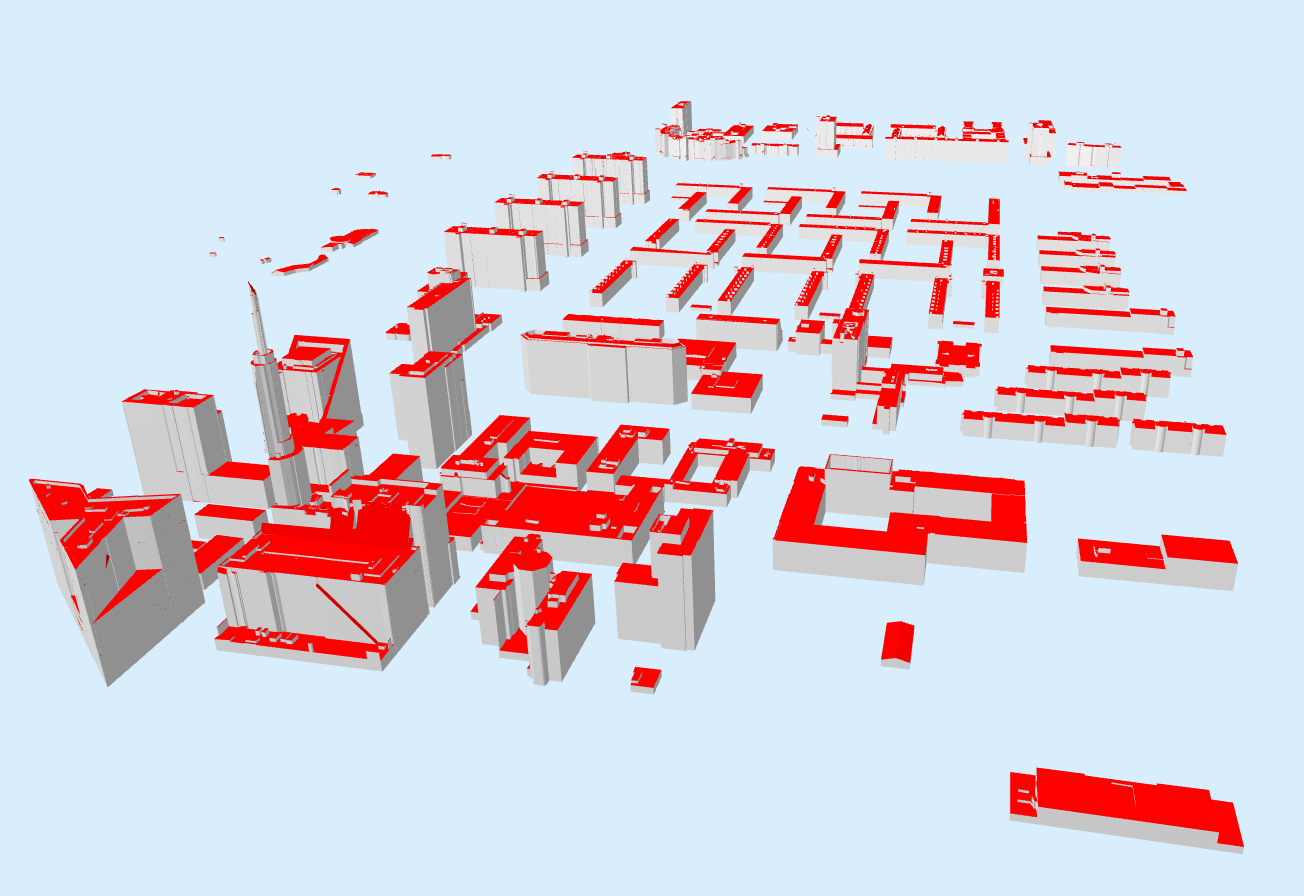
The 3D building models can be inspected using Ninja, the official web viewer for CityJSON files.
Docker Image
WARNING: The Docker image is outdated and does not include the latest version of Optim3D. We recommend building from source or using the PyPI package.
Optim3D is also available as Docker image.
These are the steps to run Optim3D as a Docker container:
- First pull the image using the
docker pullcommand:
docker pull yarroudh/optim3d
- To run the Docker container and mount your data inside it, use the
docker runcommand with the-voption to specify the path to the host directory and the path to the container directory where you want to mount the data folder. For example:
docker run -d -v ABSOLUTE_PATH_TO_HOST_DATA:/home/user/data yarroudh/optim3d
This command will start a Docker container in detached mode, mount the ABSOLUTE_PATH_TO_HOST_DATA directory on the host machine to the /home/user/data directory inside the container, and run the yarroudh/optim3d image. Do not change the path of the directory inside the container.
- Find the container ID and copy it. You can use the
docker pscommand to list all running containers and their IDs. - Launch a command inside the container using
docker exec, use the container ID or name and the command you want to run. For example:
docker exec CONTAINER_ID optim3d index2d data/FILE_NAME
docker exec CONTAINER_ID optim3d index3d data/FILE_NAME
docker exec CONTAINER_ID optim3d tiler3d
docker exec CONTAINER_ID optim3d reconstruct
docker exec CONTAINER_ID optim3d post
- To copy the output of the command from the container to a local path, use the
docker cpcommand with the container ID or name, the path to the file inside the container, and the path to the destination on the host machine. For example:
- To copy the output of one command:
docker cp CONTAINER_ID:/home/user/output/footprint_tiles PATH_ON_HOST_MACHINE
This will copy the output of footprints tiling. Please check the results section for the output structure.
- To copy the output of all the commands:
docker cp CONTAINER_ID:/home/user/output PATH_ON_HOST_MACHINE
- Finally, after executing all the commands and copying the results to your local machine, you can stop the Docker container using the
docker stopcommand followed by the container ID or name:
docker stop CONTAINER_ID
Related repositories
Automatic correction of buildings ground floor elevation in 3D City Models
GeoFlow requires that the point cloud includes some ground points around the building so that it can determine the ground floor elevation. However, for aerial point clouds, buildings surrounded by others may not meet this condition which may result in inaccurate height estimation above the ground. This can be resolved using ZRect3D, a tool for automatic correction of buildings ground-floor elevation in CityJSON files using ground points from LiDAR data.
License
This software is under the BSD 3-Clause "New" or "Revised" license which is a permissive license that allows you almost unlimited freedom with the software so long as you include the BSD copyright and license notice in it. Please read the LICENSE and the COPYING files for more details.
Citation
The recommended citation format for this repository is provided in the accompanying BibTeX citation. Additionally, please make sure to comply with any licensing terms and conditions associated with the use of this repository.
@InProceedings{10.1007/978-3-031-43699-4_50,
  author="Yarroudh, Anass
  and Kharroubi, Abderrazzaq
  and Billen, Roland",
  editor="Kolbe, Thomas H.
  and Donaubauer, Andreas
  and Beil, Christof",
  title="Optim3D: Efficient and Scalable Generation of Large-Scale 3D Building Models",
  booktitle="Recent Advances in 3D Geoinformation Science",
  year="2024",
  publisher="Springer Nature Switzerland",
  address="Cham",
  pages="835--849",
}
Yarroudh, A., Kharroubi, A., Billen, R. (2024). Optim3D: Efficient and Scalable Generation of Large-Scale 3D Building Models. In: Kolbe, T.H., Donaubauer, A., Beil, C. (eds) Recent Advances in 3D Geoinformation Science. 3DGeoInfo 2023. Lecture Notes in Geoinformation and Cartography. Springer, Cham. https://doi.org/10.1007/978-3-031-43699-4_50
About Optim3D
This software was developped by Anass Yarroudh, a Research Engineer at the GeoScITY department of the University of Liege. For more detailed information please contact us via ayarroudh@uliege.be, we are pleased to send you the necessary information.
Release history Release notifications | RSS feed


Download files
Download the file for your platform. If you're not sure which to choose, learn more about installing packages.
Source Distribution
Built Distribution
Filter files by name, interpreter, ABI, and platform.
If you're not sure about the file name format, learn more about wheel file names.
Copy a direct link to the current filters
File details
Details for the file optim3d-0.4.1.tar.gz.
File metadata
- Download URL: optim3d-0.4.1.tar.gz
- Upload date:
- Size: 28.6 kB
- Tags: Source
- Uploaded using Trusted Publishing? No
- Uploaded via: twine/6.1.0 CPython/3.9.21
File hashes
| Algorithm | Hash digest | |
|---|---|---|
| SHA256 |
f36e14f17d690c37d8264595ba9f1aaf30e6dbf880dfbbf1e61351cd208e64cd
|
|
| MD5 |
2ca23a05e3bf9879932d9dd346d9655f
|
|
| BLAKE2b-256 |
d7088ac016035f2d5400cff2dbc07310669f6f76f8c00a8255132a7b351b5864
|
File details
Details for the file optim3d-0.4.1-py3-none-any.whl.
File metadata
- Download URL: optim3d-0.4.1-py3-none-any.whl
- Upload date:
- Size: 25.4 kB
- Tags: Python 3
- Uploaded using Trusted Publishing? No
- Uploaded via: twine/6.1.0 CPython/3.9.21
File hashes
| Algorithm | Hash digest | |
|---|---|---|
| SHA256 |
3c32e3469a9e5def2f6cb18a86e0f1a9fd77ea8a104d549665b58bc8c3edbbe7
|
|
| MD5 |
eea9de4a36126c5d1cee498be65bb95a
|
|
| BLAKE2b-256 |
e10b6b40118790fb2656a14fc0b26ff6b53541559064641b6a7d8cbf9ed2c5c3
|


