A simple SSH host manager in terminal

Project description
A simple SSH host manager in terminal.
Introduction
Pickhost allows you to manage SSH login information (e.g., host, user, comments, etc.) in an simple INI style config file and select one item from them in an interactive way in terminal. It's implemented using PyPick.
Compared with existing SSH managers (as far as I know, all of them are GUI applications), pickhost is simple to config and quick to launch. It's non-disruptive and integrates with your workflow well if you spend most of your time in terminal.
The following is an example screenshot:

Install
As Python2 will be EOL'ed soon, PyPick supports only Python3. To install it, run:
$ python3 -m pip install pickhost
A Quick-Start Guide
A Simple Example
To use pickhost, you need to add your hosts to a config file. Pickhost looks for its config file at $HOME/.config/pickhost/hosts by default. You can specify a custom config file by using -f option. Config file is of INI format. You can edit it with any editor you like. Pickhost provides a convenient option -e, which opens the file using vi or $EDITOR if it's set.
So, if this is the first time you run pickhost, you should run the following command to edit the default config file:
$ pickhost -e
As an example you can add the following lines to it:
[ARM servers]
server-5 = rayx@10.64.4.5 #centos 7.4
server-66 = root@10.64.4.66 #ubuntu 16.04

[Benchmarking]
arm-server = rayx,root@10.64.37.55 #Centriq 2400, 192G RAM
x86-server = rayx,root@10.64.37.51 #Xeon Gold 5118, 192G RAM
test-client = rayx,root@10.64.37.182
The file contains two sections (BTW, section is not required but it's a useful way to organize your hosts). Each line in them defines a host. They are in the following format:
<name> = <users>@<host> #<comment>
nameis an arbitray string you'd like to call the host. It mustn't have any of these characters:=,@,#.usersis a comma separated list of user names. The first value in the list is displayed by default. You can go through other values by pressingu.hostis the host to be ssh'ed into. It can be any valid hostname accepted by SSH client on your machine. For example, it can be IP address, short hostname, FQDN, or a hostname translated by SSH client (seeHostNameoption in ssh_config(5) man page).commentis an arbitrary string. It provides additional information about the host, like what project it's used for, its configuration, etc.
Then you run pickhost command:
$ pickhost
It reads the config file and generates a list like the following:
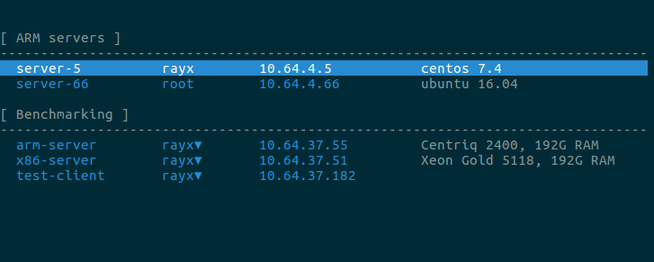
You can press UP and DOWN (or vi style j and k) to navigate through items in the list, press ENTER (or SPACE) to select an entry, or press ESC (or q) to quit without selecting anything.
Note that there is a small triangle ▾ after user name in some entries. That indicates there are multiple user name values and you can press u to select one of them.
Now suppose you navigate to the first entry in 'Benchmarking' section. Press u once to change user name from 'rayx' to 'root', then press ENTER to select the entry. Pickhost would print its value in the following format on stderr:
$ pickhost
export PH_USER=root
export PH_HOST=10.64.37.55
export PH_NAME=arm-server
That's pretty much the basic usage of the tool. Next we'll talk about how to use the above output in shell script and a few more useful features of pickhost.
Integrating Pickhost with Shell Script
Pickhost command output is expected to be consumed by shell script. Below is an example shell function on how to do that:
function pick {
    unset PH_NAME PH_USER PH_HOST
    eval $(pickhost 2>&1 >/dev/tty)
    # Return if no entry is selected.
    [[ -n $PH_NAME ]] || return 0
    echo "Logging into ${PH_NAME}..."
    ssh ${PH_USER}@${PH_HOST}
}
If you want to use pickhost in your Python program, you can instantiate the PickHost class from pickhost module. The details are out of the scope of this tutorial, so please refer to the code.
Last Accessed Host
Now you have run pickhost for the first time and selected an entry. If you run it again, the list changes a bit:

Note there is a last accessed entry at the top of the list, which contains the entry you selected last time. You can start a new login session to the same host by pressing ENTER. This is a useful feature to save a lot of key press in a busy work day.
Parent/Child Relationship among Hosts
You can define parent/child relationship between hosts. This is particularly useful when you need to deal with VMs in your work. Below is an example config file:
[ARM servers]
server-5 = rayx@10.64.4.5 #centos 7.4
server-5->vm-176 = root,rayx@192.168.122.176 #qemu: hotplugging
server-5->vm-176->nested-vm = root,rayx@191.168.56.18 #nested-vm
server-5->vm-37 = root,rayx@192.168.122.37 #qemu: virtio-block
server-66 = root@10.64.4.66 #ubuntu 16.04

[Benchmarking]
arm-server = rayx,root@10.64.37.55 #Centriq 2400, 192G RAM
x86-server = rayx,root@10.64.37.51 #Xeon Gold 5118, 192G RAM
test-client = rayx,root@10.64.37.182
As you may notice, a child host's name contains all its ancestor names, separated by ->. With this config file pickhost generates a list like the following, which shows the relationship visually and helps you to identify a VM quickly.
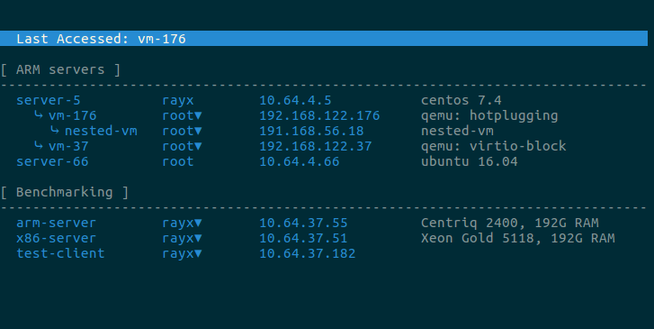
Note that, if entries in a section have parent/child relationship, pickhost determines the appropriate position of each entry and makes sure a child host appears after its parent host. So if you like, you don't have to arrange their order manually. For example, the config file below generates the same list:
[ARM servers]
server-5 = rayx@10.64.4.5 #centos 7.4
server-66 = root@10.64.4.66 #ubuntu 16.04
server-5->vm-176 = root,rayx@192.168.122.176 #qemu: hotplugging
server-5->vm-37 = root,rayx@192.168.122.37 #qemu: virtio-block
server-5->vm-176->nested-vm = root,rayx@191.168.56.18 #nested-vm

[Benchmarking]
arm-server = rayx,root@10.64.37.55 #Centriq 2400, 192G RAM
x86-server = rayx,root@10.64.37.51 #Xeon Gold 5118, 192G RAM
test-client = rayx,root@10.64.37.182
Highlighting a Host
It's often that you access a few hosts more frequently than the others. For those frequently accessed hosts, you may want to highlight them so that you can easily identify them. This is particularly useful if you have a long list.
You can highlight an entry by adding ! character after the host name. Below is an example:
[ARM servers]
server-5 = rayx@10.64.4.5 #centos 7.4
server-5->vm-176! = root,rayx@192.168.122.176 #qemu: hotplugging
server-5->vm-176->nested-vm = root,rayx@191.168.56.18 #nested-vm
server-5->vm-37 = root,rayx@192.168.122.37 #qemu: virtio-block
server-66 = root@10.64.4.66 #ubuntu 16.04

[Benchmarking]
arm-server! = rayx,root@10.64.37.55 #Centriq 2400, 192G RAM
x86-server = rayx,root@10.64.37.51 #Xeon Gold 5118, 192G RAM
test-client = rayx,root@10.64.37.182
With this config file pickhost generates a list like this:

Using the tool on macOS
First make sure python3 is installed on your macOS.
$ python3 --version
Then run the command to install the tool:
$ python3 -m pip install --user pickhost
That will install the package under ~/Library/Python/<version>/lib/python/site-packages/pickhost and an executable file under ~/Library/Python/<version>/bin.
Then add the following to your ~/.profile:
py3ver=$(python3 --version | awk '{print $2}')
py3ver=${py3ver%.*}
PATH=$PATH:${HOME}/Library/Python/${py3ver}/bin
# Fix locale
export LC_ALL=en_US.UTF-8
export LANG=en_US.UTF-8
The last two lines fix a common issue on macOS, which is not specific to this tool. You may want to change en_US to your language code (e.g. zh_CN, etc.)
Then just follow the QuickStart guide above to setup and run the tool. The default config file is located at ~/Library/Application Support/pickhost/config on macOS.
Manual
 $ pickhost -h
usage: pickhost [-h] [-f file] [-e]

optional arguments:
  -h, --help  show this help message and exit
  -f file     config file
  -e          edit config file rather than show it
TODO
- Allow user to set theme (e.g., width and color of the columns)
Other Projects
-
stormssh: https://github.com/emre/storm
-
ssh-config: https://github.com/dbrady/ssh-config
All these three projects are CLI tools helping user modify ssh config. Pickhost is different in that it focuses on helping user select a host. It's the only tool that provides features like groups, last accessed host, parent/child relationship, and host highlighting, etc.
Release history Release notifications | RSS feed


Download files
Download the file for your platform. If you're not sure which to choose, learn more about installing packages.
Source Distributions
Built Distribution
Filter files by name, interpreter, ABI, and platform.
If you're not sure about the file name format, learn more about wheel file names.
Copy a direct link to the current filters
File details
Details for the file pickhost-0.2.1-py3-none-any.whl.
File metadata
- Download URL: pickhost-0.2.1-py3-none-any.whl
- Upload date:
- Size: 11.0 kB
- Tags: Python 3
- Uploaded using Trusted Publishing? No
- Uploaded via: twine/3.2.0 pkginfo/1.6.1 requests/2.25.0 setuptools/50.3.2 requests-toolbelt/0.9.1 tqdm/4.54.0 CPython/3.8.6
File hashes
| Algorithm | Hash digest | |
|---|---|---|
| SHA256 |
5b4c612f79f03beb8ff82720e24af6310b9aacd13c8d4e02b2002d474aaf5249
|
|
| MD5 |
197a08c6a2f7b4206da1cad0d7376724
|
|
| BLAKE2b-256 |
cf077680313b2bc503e64b926b1a3710663a0baedde45d902b6b27f079da5957
|


