HF radio messaging web app using pyjs8call

Project description
Portal Messenger


HF radio messaging web app using pyjs8call.
βeta Software
This software is currently in a beta state. This means that the software will likely change in the future, and that there will be bugs. You can provide feedback in the Discussions section of the repository.
Responsibility
It is the station operator's responsibility to ensure compliance with local laws.
It is the user's responsibility to manage their local network and implement good security practices (ex. using a firewall). Portal Messenger uses the Flask development server for simplicity and should only be used on a local network. Do not make Portal Messenger available on the internet.
Features
- Web based interface accessible form the local network on desktop or mobile
- Text messaging style conversations with options to insert pre-formatted JS8Call commands
- Station presence indicator and time since last heard
- Views for station activity, directed messages, network activity, local station propagation map, and persistent settings
- Simple application installation, including cross-platform desktop shortcut creation
Getting Started
Installation
Note: the latest Portal Messenger version has not been released to PyPi yet, coming soon :)
Refer to the pyjs8call documentation for information on installing JS8Call. The radio interface and audio devices should be configured directly in the JS8Call application settings before running Portal Messenger.
-
Pip install the application:
pip install portalmessenger(use pip3 if python3 is not the default on your system) -
Create a desktop shortcut to run JS8Call and open Portal Messenger in the default web browser:
python -m portalmessenger --shortcut --browseror
Create a desktop shortcut to run JS8Call headless (Linux only) and access Portal Messenger from another device:
python -m portalmessenger --shortcut --headlessor
Start Portal Messenger directly from the command line:
python -m portalmessenger --settings ~/.config/pyjs8call.ini --browser
Use the IP address and port printed to the command line at startup (ex. 192.168.0.20:5000) to access Portal Messenger from another device.
Command Line Interface (CLI)
A command line interface is available for the portalmessenger module as of version 0.1.0. CLI usage is as follows:
USAGE: python -m portalmessenger [OPTIONS]

OPTIONS:
    -a, --host
        Accept requests from this host address, defaults to 0.0.0.0 (all hosts)
    -p, --port
        Web server port, defaults to 5000
    -j, --headless
        Run the JS8Call application headless (Linux only)
    -s, --settings
        Path to pyjs8call settings file (NOT JS8CALL CONFIG FILE), see pyjs8call.settings.Settings.load
    -d, --debug
        Enable pyjs8call debug output
    -b, --browser
        Open a browser window to 127.0.0.1 after starting the application server
    -c, --shortcut
        Create a desktop shortcut to launch the application, then exit (*)

(*) Additional arguments will be included in the desktop shortcut command
Views
Menu Items
Selecting the menu icon ( ) displays the main application menu. The available menu items are the same in most views, with a few exceptions noted in the relevant sections below.
- Activity: Navigate to the station activity view
- Network: Navigate to the network activity view
- Propagation Map: Navigate to the propagation map view
- Settings: Navigate to the settings view
- Close Portal: Stop the application
Activity
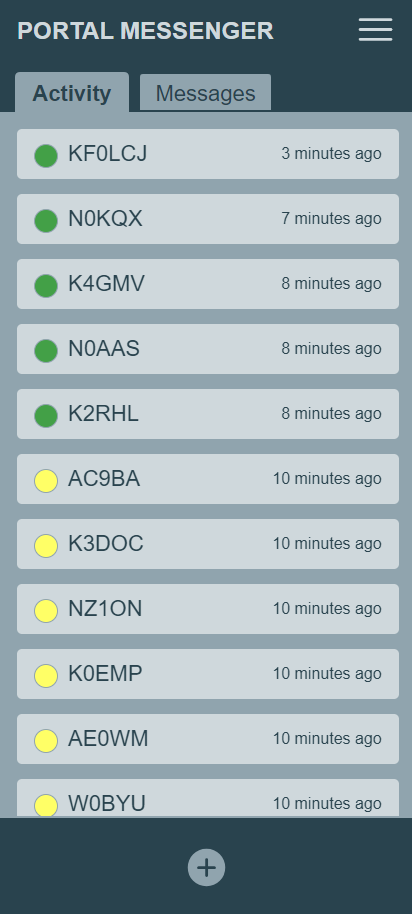
There are two tabs in the Activity view: Activity and Messages. The Default Tab setting is used to select which of these two tabs is displayed when navigating to the Activity view (see the Settings section for more information). The Activity tab displays each heard station's presence indicator, callsign, and time since last heard. The Messages tab displays a station's presence indicator, callsign, and time since last heard when there are stored messages (incoming and/or outgoing) associated with that station. The Messages tab will indicate the number of unread messages (when greater than zero), and stations with unread messages will have a bold callsign.
Select a station to send a message or see stored message history (see the Conversation view section for more information). Use the add icon ( ) near the bottom of the view to start a new conversation with a station. After pressing the add icon, you will enter the station callsign or group designator and then press Add. You will be redirected to the conversation for that station or group.
The Activity view is dynamic and will update automatically as stations are heard and messages are received. Stations are shown in order of time since last heard. The Aging (minutes) setting is used to set how long after being heard a station will be displayed in the list.
When the Messages tab is selected, the menu will include an additonal Delete Messages... option. After selecting this menu option, a delete icon ( ) will be displayed on each station message. Selecting the delete icon will remove all stored messages associated with that station and remove the station from the list. Select anywhere on the view (other than a delete icon) to hide the delete icons.
Conversation
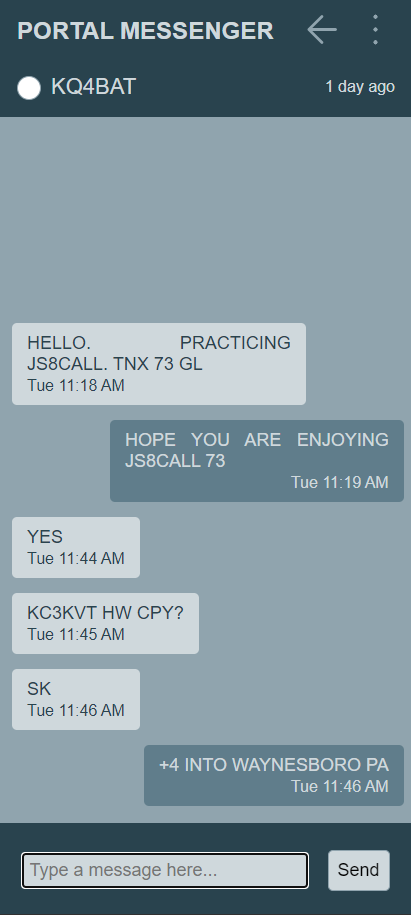
When a station is selected, the user will navigate to the Conversation view. This view displays the station's presence indicator, callsign, and time since last heard. An outgoing message can be entered in the text field near the bottom of the view. Press Enter or select the Send button to send the message. Outgoing messages are queued for transmit and will be sent in order. Outgoing message status is indicated immediately below the outgoing message. Outgoing message status may be: Queued, Sending, Sent, or Failed. Once the outgoing message is sent, the Sent status will be displayed for 10 seconds before being hidden. Navigating away from the Conversation view will not affect the outgoing message.
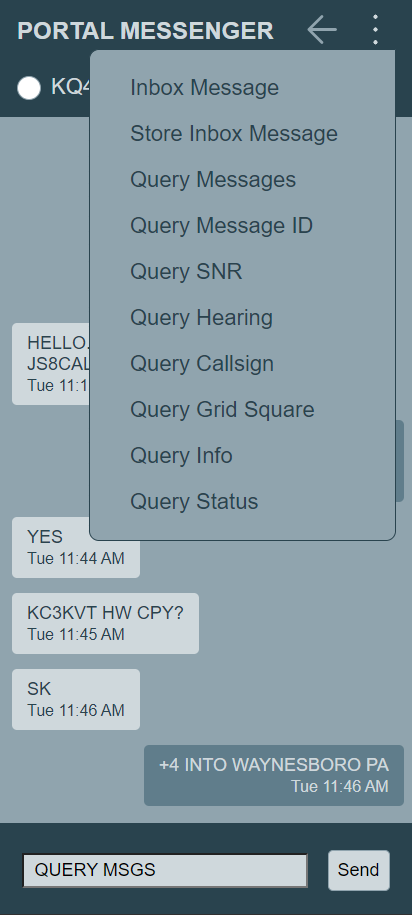
Selecting the Conversation context menu icon ( ) in the upper right corner of the view displays a list of pre-formatted JS8Call command messages. Selecting a command from the list will insert the pre-formatted command text in the outgoing message field. Text in square brackets (including the brackets) should be replaced with applicable information. For example, the following text is inserted in the outgoing message field when the command Query Callsign is selected:
QUERY CALL [callsign] where [callsign] should be replaced with the callsign to be queried, resulting in an outgoing message field like QUERY CALL OH8STN. On displays with a small vertical height (ex. Raspberry Pi 7-inch display) scrolling may be required within the context menu to see all command message options.
Selecting the back icon ( ) in the upper right corner of the view navigates back to the Activity view.
Network
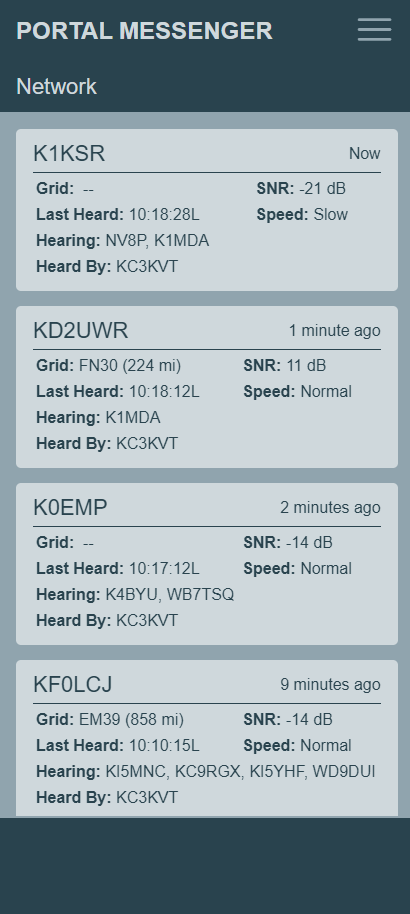
The Network view displays detailed information about each heard station:
- Grid: Grid square and distance (km or mi depending on JS8Call configuration)
- SNR: Signal-to-noise ratio of station's last activity
- Last Heard: Local time of station's last activity
- Speed: JS8Call modem speed of station's last activity
- Hearing: Other stations hearing the station
- Heard By: Other stations heard by the station
Select a station to send a message or see stored message history (see the Conversation view section for more information).
The Network view is dynamic and will update automatically as stations are heard. Stations are shown in order of time since last heard. The Aging (minutes) setting is used to set how long after being heard a station will be displayed in the list. In order to provide more network information, Hearing and Heard By activity with an age of 10 times the Aging (minutes) setting are included for each station.
Propagation Map
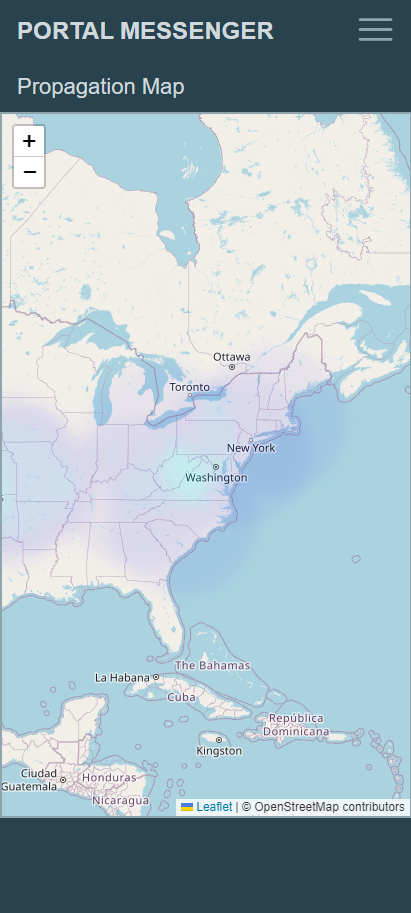
The Propagation Map view displays a map centered on the local station's grid square (or Washington D.C. USA if no grid square is configured). Heard station data is analyzed to determine the median SNR for each "heard" grid square over a 60 minute period. This data is displayed as a heat map to indicate an approximation of current propagation conditions relative to the local station. The heat map is updated with the latest heard station data each time the view is loaded, or every 5 minutes while the view is active.
Settings
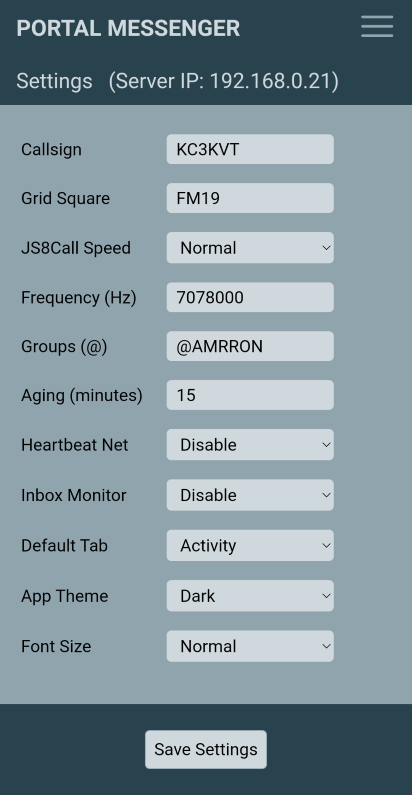
The Settings view displays a list of application settings:
- Callsign: Callsign of the local station (changing this setting requires JS8Call to restart)
- Grid Square: Grid square of the local station
- JS8Call Speed: Speed setting of the JS8Call modem (changing this setting requires JS8Call to restart)
- Frequency (Hz): Radio frequency setting for JS8Call and the controlled radio
- Groups (@): JS8Call groups to participate in (changing this setting requires JS8Call to restart)
- Aging (minutes): How long after being heard a station will be displayed in activity lists
- Heartbeat Net: Whether the pyjs8call heartbeat function is enabled or disabled
- Inbox Monitor: Whether the pyjs8call inbox monitor function is enabled, enabled with periodic query to @ALLCALL, or disabled
- Default Tab: Which tab to display when navigating to the Activity view
- App Theme: Whether the app should use a light or dark color theme
- Font Size: Whether the app should use a normal or large font size
Press the Save Settings button near the bottom of the view after making changes. Some settings are set via the JS8Call configuration file, which requires the JS8Call application to be restarted for those settings to take effect. JS8Call will be restarted automatically as needed while saving settings, which may take several seconds depending on the hardware platform. A message is displayed indicating that JS8Call is restarting. A success message is displayed once all changes have been saved and implemented. If an error occurs during setting validation, an error message is displayed below the setting field containing the error.
Additional JS8Call settings can be configured using the --settings CLI option to specify a pyjs8call settings file. See pyjs8call.settings.Settings.load for more information, including pyjs8call settings file configuration options.
Release history Release notifications | RSS feed

Download files
Download the file for your platform. If you're not sure which to choose, learn more about installing packages.
Source Distribution
File details
Details for the file portalmessenger-0.1.0.tar.gz.
File metadata
- Download URL: portalmessenger-0.1.0.tar.gz
- Upload date:
- Size: 2.3 MB
- Tags: Source
- Uploaded using Trusted Publishing? No
- Uploaded via: twine/4.0.2 CPython/3.11.7
File hashes
| Algorithm | Hash digest | |
|---|---|---|
| SHA256 |
078abd2c5eea373dc8e260fee5f98eed9ccb24b28a520bfb427630b14e38d64b
|
|
| MD5 |
7d1201a79979b4494370421ba8c235ee
|
|
| BLAKE2b-256 |
5a7c6a1bb2992161d22033e619ab16aa59d39e06ebb2c45cce3fbde4060b5167
|


