ProteusAI is a python package designed for AI driven protein engineering.

Project description
ProteusAI
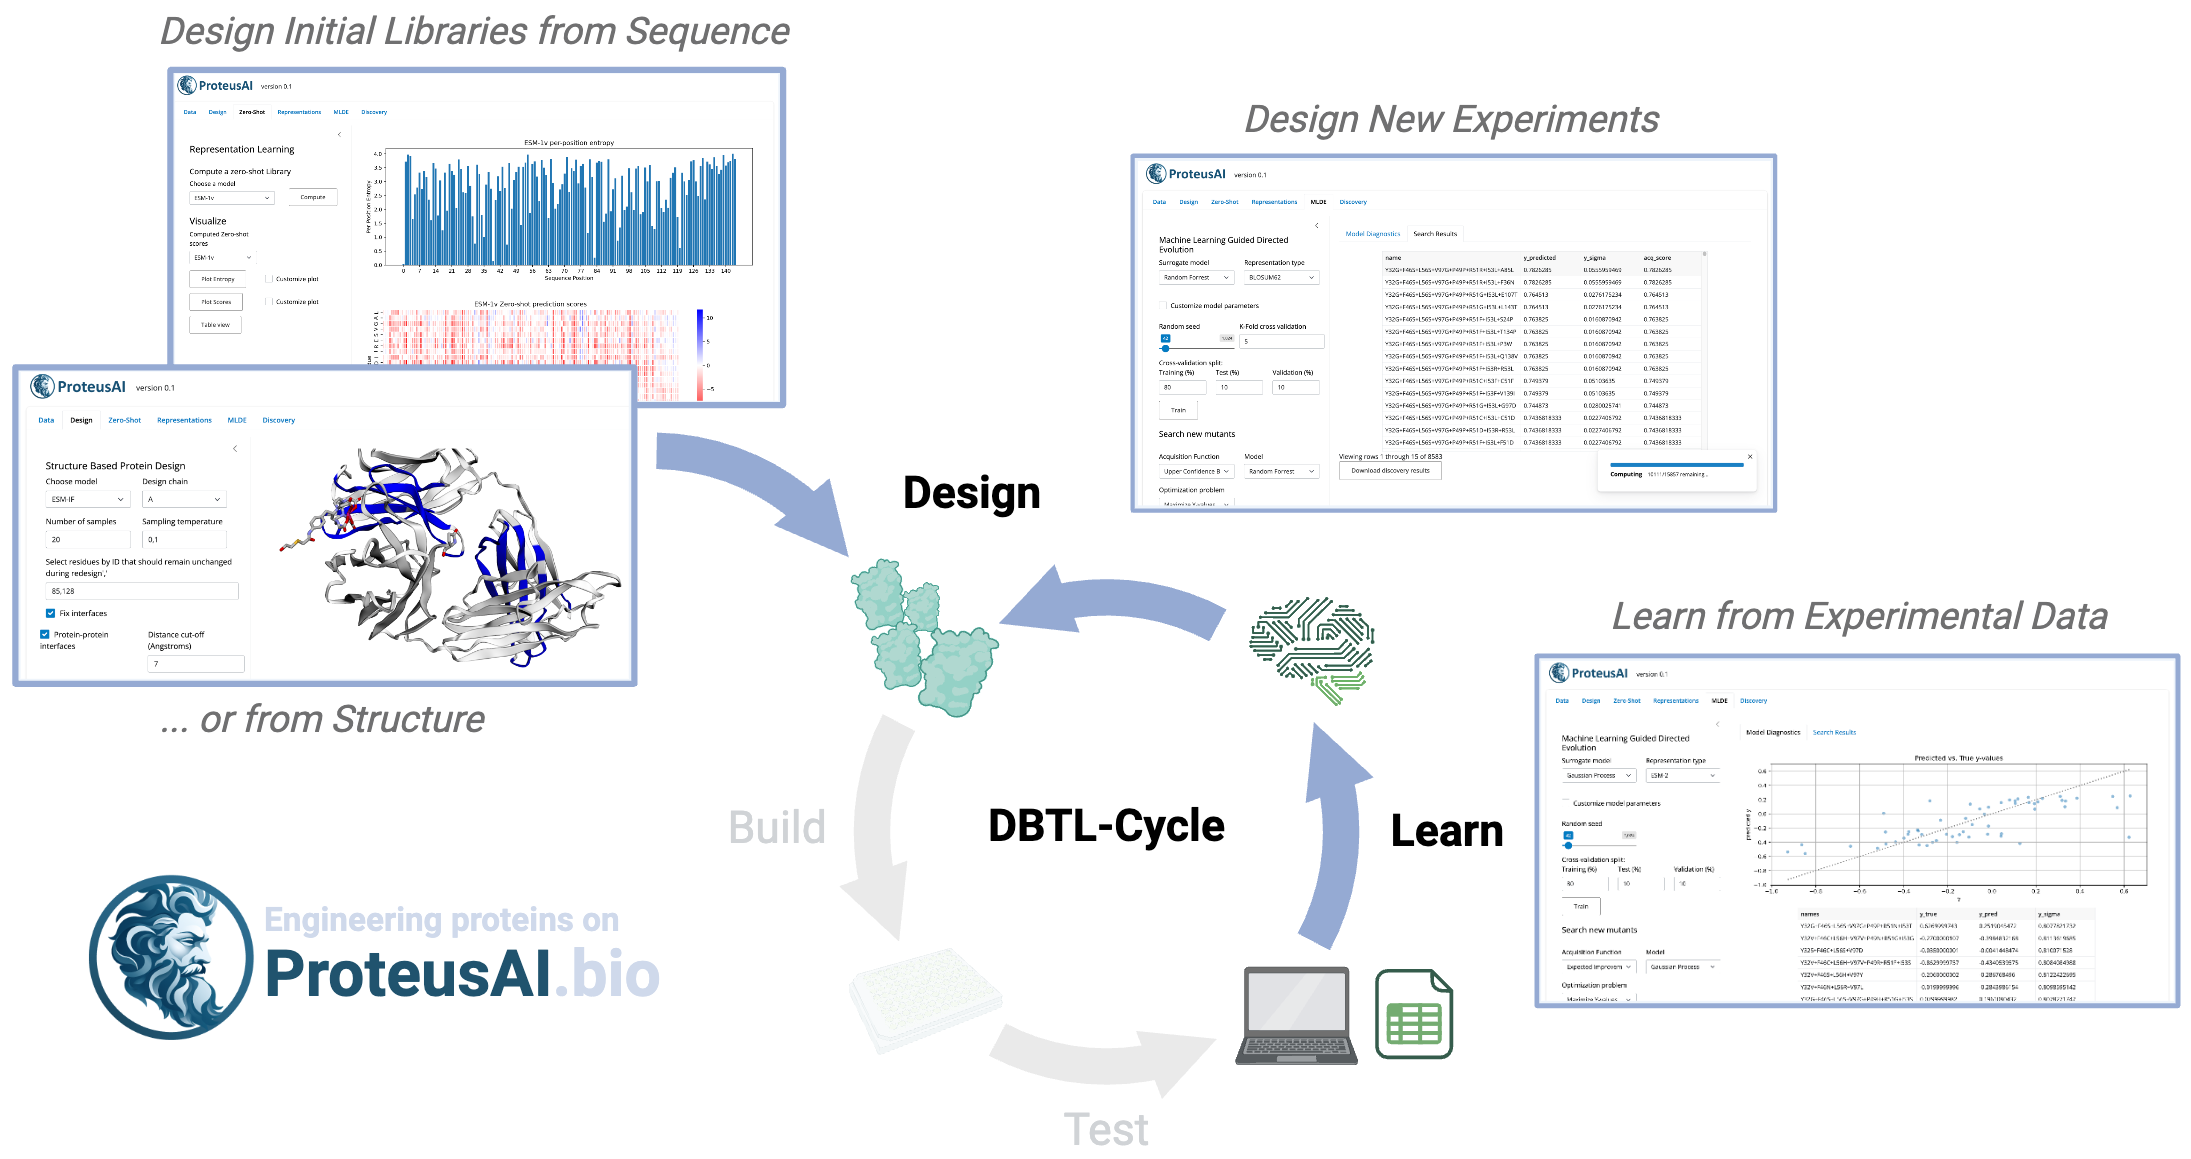
ProteusAI is a library for machine learning-guided protein design and engineering. The library enables workflows from protein structure prediction, the prediction of mutational effects-, and zero-shot prediction of mutational effects. The goal is to provide state-of-the-art machine learning for protein engineering in a central library.
ProteusAI is primarily powered by PyTorch, scikit-learn, and ESM protein language models.
Cite our preprint here.
Test out the ProteusAI web app proteusai.bio
Getting started
The commands used below are tested on Ubuntu 20.04 and IOS. Some tweaks may be needed for other OS. We recommend using conda environments to install ProteusAI.
Clone the repository and cd to ProteusAI:
git clone https://github.com/jonfunk21/ProteusAI.git
cd ProteusAI
Install the latest version of proteusAI in a new environment
conda env create -n proteusAI
conda activate proteusAI
This uses the environment.yml file to install the dependencies.
GPU support
By default proteus will install torch-scatter using cpu compatible binaries.
If you want to take full advantage of GPUs for the Design module consider
uninstalling the default torch-scatter, and replace it with the CUDA
compatible version:
pip uninstall torch-scatter
pip install torch-scatter -f https://data.pyg.org/whl/torch-${TORCH_VERSION}+cuda.html
If you have acces to GPUs you can run ESM-Fold. Unfortunately the installation of openfold can be unstable for some people. Please follow installation instructions on of the ESM repository and use the discussions in the issues section for help.
Install using pip locally for developement
Install a local version which picks up the latest changes using an editable install:
# conda env create -n proteusAI python=3.8
# conda activate proteusAI
pip install -e . --find-links https://data.pyg.org/whl/torch-2.4.1+cpu.html
Troubleshooting
You can check a working configuration for a Ubuntu machine (VM)
in the proteusEnvironment.yml file. The latest versions can be checked by us via
our actions.
Setting shiny server
Install Shiny Server on Ubuntu 18.04+ (the instructions for other systems are availabe at posit.co, please skip the section about R Shiny packages installation) with the following commands:
sudo apt-get install gdebi-core
wget https://download3.rstudio.org/ubuntu-18.04/x86_64/shiny-server-1.5.22.1017-amd64.deb
sudo gdebi shiny-server-1.5.22.1017-amd64.deb
Edit the default config file /etc/shiny-server/shiny-server.conf for Shiny Server (the sudo command or root privileges are required):
# Use python from the virtual environment to run Shiny apps
python /home/proteus_developer/miniforge3/envs/proteusAI_depl/bin/python;

# Instruct Shiny Server to run applications as the user "shiny"
run_as shiny;

# Never delete logs regardless of the their exit code
preserve_logs true;

# Do not replace errors with the generic error message, show them as they are
sanitize_errors false;

# Define a server that listens on port 80
server {
  listen 80;

  # Define a location at the base URL
  location / {

    # Host the directory of Shiny Apps stored in this directory
    site_dir /srv/shiny-server;

    # Log all Shiny output to files in this directory
    log_dir /var/log/shiny-server;

    # When a user visits the base URL rather than a particular application,
    # an index of the applications available in this directory will be shown.
    directory_index on;
  }
}
Restart the shiny server with the following command to apply the server configuration changes:
sudo systemctl restart shiny-server
If you deploy the app on your local machine, be sure that the port 80 is open and not blocked by a firewall. You can check it with netstat:
nc <your-ip-address> 80
If you deploy the app on your Azure Virtual Machine (VM), please add an Inbound Port rule in the Networking - Network Settings section on Azure Portal. Set the following properties:
Source: Any
Source port ranges: *
Destination: Any
Service: HTTP
Destination port ranges: 80
Protocol: TCP
Action: Allow
Other fields can beleaft as they are by default.
Finally, create symlinks to your app files in the default Shiny Server folder /srv/shiny-server/:
sudo ln -s /home/proteus_developer/ProteusAI/app/app.py /srv/shiny-server/app.py
sudo ln -s /home/proteus_developer/ProteusAI/app/logo.png /srv/shiny-server/logo.png
If everything has been done correctly, you must see the application index page available at http://127.0.0.1 (if you deploy your app locally) or at http://<insert-your-public-VM-IP-address-here> (if you deploy your app on an Azure VM). Additionally, the remote app can still be available in your local browser (the Shiny extension in Visual Studio must be enabled) if you run the following terminal command on the VM:
/home/proteus_developer/miniforge3/envs/proteusAI_depl/bin/python -m shiny run --port 33015 --reload --autoreload-port 43613 /home/proteus_developer/ProteusAI/app/app.py
If you get warnings, debug or "Disconnected from the server" messages, it is likely due to:
- absent python modules,
- updated versions of the current python modules,
- using relative paths instead of absolute paths (Shiny Server sees relative paths as starting from
/srv/shiny-server/folder) or - logical errors in the code.
In order to debug the application, see what is written in the server logs under /var/log/shiny-server (the log_dir parameter can be reset in the Shiny Server instance config file /etc/shiny-server/shiny-server.conf).
Note on permissions:
The app may give some problems due to directories not having permissions to create directories or load files to certain directories. When this happen, a solution found was to use the following:
chmod 777 directory_name
Release history Release notifications | RSS feed


Download files
Download the file for your platform. If you're not sure which to choose, learn more about installing packages.
Source Distribution
File details
Details for the file proteusai-0.1.1.tar.gz.
File metadata
- Download URL: proteusai-0.1.1.tar.gz
- Upload date:
- Size: 81.0 kB
- Tags: Source
- Uploaded using Trusted Publishing? No
- Uploaded via: twine/6.0.1 CPython/3.12.8
File hashes
| Algorithm | Hash digest | |
|---|---|---|
| SHA256 |
13f70908b57fd7fab240ee4fe2e4d265152c12903bf1f9e0c06f050c8e5d658d
|
|
| MD5 |
ef9e0273e17fd42e3cbd306e74217ab1
|
|
| BLAKE2b-256 |
29d79d21301f3f02b36e85faabec977e9391d4b36ef2341c31c229827fa51dca
|


