Python wrapper library around the common I2C controller register pattern.

Project description
Python I2C Register 

Python wrapper library around the common I2C controller register pattern.
I2C Register is a python library which aims to make communicating with registers on I2C devices dead simple. It is meant to directly transfer the Register Definitions pages of a data sheet into your program.
Table Of Contents
Installation
I2C Register is available as a PIP package with the name py-i2c-register.
Simply use PIP to install:
pip install --user py-i2c-registerYou will then be able to include the py_i2c_register module and its various classes:
from py_i2c_register.register_list import RegisterList
from py_i2c_register.register import Register
from py_i2c_register.register_segment import RegisterSegment
Quick Example
Take these control register definitions from a data sheet:
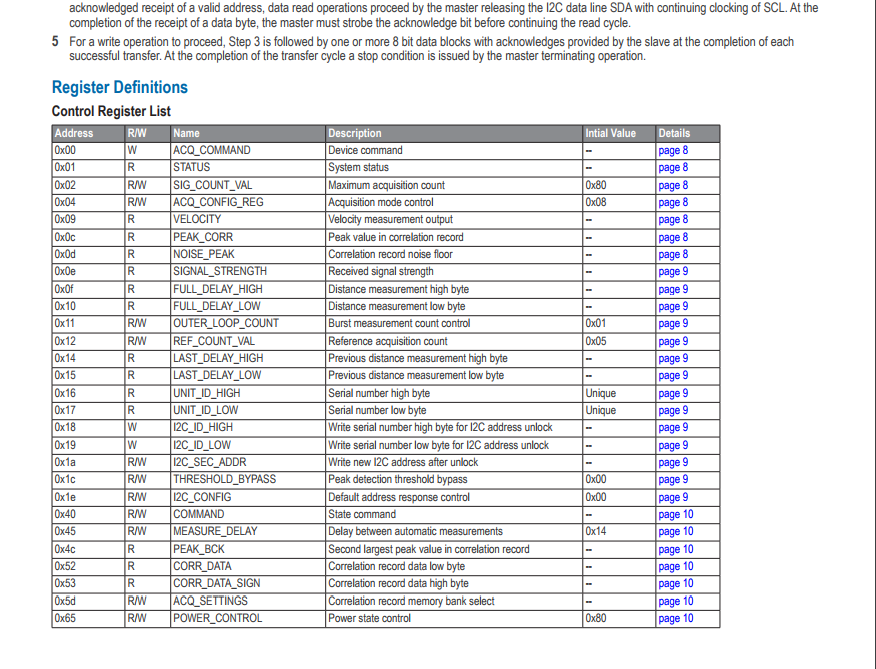
Example Hardware Data Sheet Register Definitions page 1
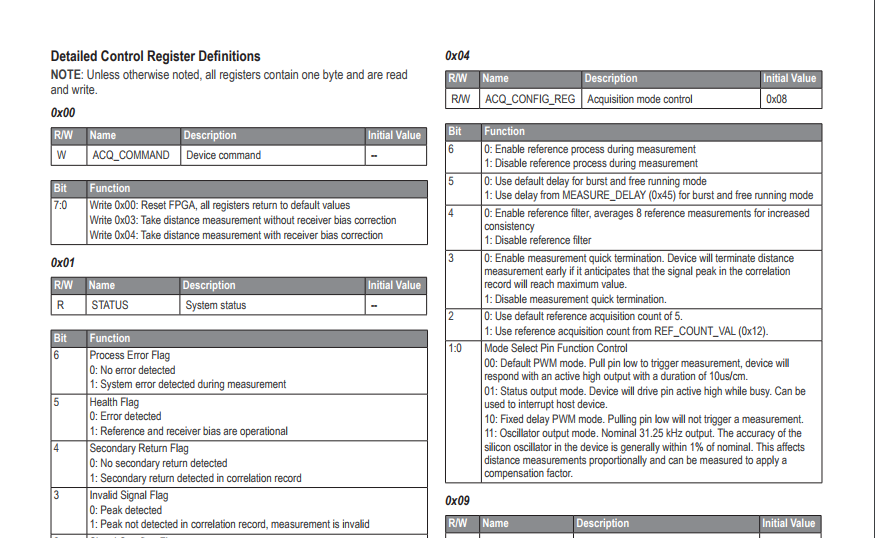
Example Hardware Data Sheet Register Definitions page 2
With the help of the I2C Register library they can easily be represented and manipulated.
from py_i2c_register.register_list import RegisterList
from py_i2c_register.register import Register

# Create RegisterList instance to hold registers, device's i2c address is 0x62
controls = RegisterList(0x62, i2c, {})

# Add a definition for an ACQ_COMMAND (Acquisition Command) register, address 0x00 with WRITE permissions
controls.add("ACQ_COMMAND", 0x00, Register.WRITE, {})\
    .add("ACQ_COMMAND", 0, 7, [0] * 8)  # Define the segment of bits to read with LSB index of 0 and MSB index of 7

# Add a definition for a STATUS register, address 0x01 with READ permissions
controls.add("STATUS", 0x01, Register.READ, {}) \
    # Define various individual Register Segments which each signify different parts of the status
    .add("PROC_ERROR_FLAG", 6, 6, [0]) \
    .add("HEALTH_FLAG", 5, 5, [0]) \
    .add("SECONDARY_RET_FLAG", 4, 4, [0]) \
    .add("INVALID_SIGNAL_FLAG", 3, 3, [0]) \
    .add("SIGNAL_OVERFLOW_FLAG", 2, 2, [0]) \
    .add("REFERENCE_OVERFLOW_FLAG", 1, 1, [0]) \
    .add("BUSY_FLAG", 0, 0, [0])

# Add a definition for a VELOCITY register, address 0x09 with READ permissions
controls.add("VELOCITY", 0x09, Register.READ, {})\
    .add("VELOCITY", 0, 7, [0] * 8)  # Define the segment of bits to read for velocity value with LSB index of 0 and MSB index of 7


# Super simple to read and write values
# Set ACQ_COMMAND Register bits to value of 0x04, then write to register
controls.set_bits_from_int("ACQ_COMMAND", "ACQ_COMMAND", 0x04, write_after=True)

# Read STATUS register for BUSY_FLAG value and convert to an integer
busy = controls.to_int("STATUS", "BUSY_FLAG", read_first=True)

# Read VELOCITY register and convert to two's compliment integer
velocity = controls.to_twos_comp_int("VELOCITY", "VELOCITY", read_first=True)
Systems Overview
The main class this library provides is the RegisterList class. This class manages a list of Register definitions. It also provides some useful helper methods to make performing certain common actions quick and easy.
Creating a RegisterList
To create a RegisterList import the register_list.RegisterList class. Then call the constructor giving it a I2C device address, an I2C Object, and any Registers you have already defined:
from py_i2c_register.register_list import RegisterList
controls = RegisterList(0x62, i2c, {})
The provided I2C Device address will be used to contact the device which holds the registers over I2C. The I2C Object depends on your platform, see the documentation for more information. In most cases you can provide an empty Register map as well.
Defining Registers
After you create a RegisterList you must define some Registers to control. A Register is defined by a name (for easy programmatic access), an I2C address, and a string containing IO operation permissions. The RegisterList class provides a useful add(reg_name, reg_addr, reg_permissions, reg_segments) method for adding Registers.
from py_i2c_register.register import Register
controls.add("REGISTER_NAME", 0x00, Registers.READ + Register.WRITE, {})
This would define a Register with the name REGISTER_NAME, the address 0x00 and the permission to read and write to/from it.
Adding RegisterSegments
To actually read or write to/from a Register you need to define at least one RegisterSegment. These describe how bits read from registers map to sub values. This could be useful if a device for example: provides a health register and each bit represents a different system’s health. You define RegisterSegments by giving a name (for easy programmatic access) and the index of the segment’s least and most significant bits. The previously mentioned RegisterList.add() method returns the Register that it just created. You can then in turn use a similar helper method that Register provides called add(seg_name, lsb_i, msb_i, default_bits):
controls.add("HEALTH", 0x00, Registers.READ, {})\
    .add("LEFT_MOTOR_FLAG", 2, 2, [0])\
    .add("RIGHT_MOTOR_FLAG", 1, 1, [0])\
    .add("NETWORK_FLAG", 0, 0, [0])
This would define a Register named HEALTH at address 0x00 with read permissions. This Register would have 3 RegisterSegments. These 3 register segments would look at bits 0, 1, and 2 for the status of the left and right motors as well as some made up network module.
Reading from RegisterSegments
The RegisterList provides some useful helper methods for reading RegisterSegments as integer values. They are called to_int and to_twos_comp_int. They both take the name of a Register and RegisterSegment to read. Optionally you can pass a read_first value. When True these methods will read the Register off the I2C device before returning the RegisterSegment value:
network_status = controls.to_int("HEALTH", "NETWORK_FLAG", read_first=True)
velocity = controls.to_twos_comp_int("VELOCITY", "VELOCITY", read_first=True)
This would read the NETWORK_FLAG segment of the HEALTH register and the VELOCITY segment of the VELOCITY register.
Ontop of using RegisterLists helper methods one can access raw RegisterSegment values via the RegisterSegment.bits array. This array contains the raw 0 or 1 values of the register. Just be sure to call Register.read before accessing the RegisterSegment.bits array:
controls.get("VELOCITY").read()
velocity_bits = controls.get("VELOCITY").get("VELOCITY").bits
Writing to RegisterSegments
The RegisterList class provides the set_bits and set_bits_from_int helper methods. Similar to the reading helper methods mentioned above set_bits and set_bits_from_int both also take a Register and RegisterSegment name as their first two parameters. The third value of both functions is the value to set. In the case of the set_bits method it is expected to be an array of bits to set. In the case of the set_bits_from_int method it is expected to be an integer value to set. The set_bits and set_bits_from_int methods also offer an optional write_after flag. If True they will write the value of the Register to the I2C device after the value has been set.
controls.set_bits("ACQ_COMMAND", "ACQ_COMMAND", [0, 0, 0, 0, 0, 1, 0, 0], write_after=True)
controls.set_bits_from_int("ACQ_COMMAND", "ACQ_COMMAND", 0x04, write_after=True)
This would set the ACQ_COMMAND segment of the ACQ_COMMAND register to the value 0x04 using the set_bits and set_bits_from_int methods.
Writing Wrapper Classes
I2C Register’s simple architecture lends itself well to being used in hardware wrapper classes. All one must do is create a class with its own RegisterList instance. Then add Register and RegisterSegment definitions in the __init__() method:
from py_i2c_register.register_list import RegisterList
from py_i2c_register.register import Register

class LidarLiteV3():
    # Register and Segment name constants
    REG_ACQ_COMMAND = "ACQ_COMMAND"
    SEG_ACQ_COMMAND = REG_ACQ_COMMAND

    REG_STATUS = "STATUS"
    SEG_PROC_ERROR_FLAG = "PROC_ERROR_FLAG"
    SEG_HEALTH_FLAG = "HEALTH_FLAG"
    SEG_SECONDARY_RET_FLAG = "SECONDARY_RET_FLAG"
    SEG_INVALID_SIGNAL_FLAG = "INVALID_SIGNAL_FLAG"
    SEG_SIGNAL_OVERFLOW_FLAG = "SIGNAL_OVERFLOW_FLAG"
    SEG_REFERENCE_OVERFLOW_FLAG = "REFERENCE_OVERFLOW_FLAG"
    SEG_BUSY_FLAG = "BUSY_FLAG"

    REG_VELOCITY = "VELOCITY"
    SEG_VELOCITY= REG_VELOCITY

    REG_DISTANCE = "DISTANCE"
    SEG_DISTANCE = REG_DISTANCE

    def __init__(self):
        # Create some device specific I2C Object
        self.i2c = ...

        # Configure control registers
        self.controls = RegisterList(0x62, self.i2c, {})
        self.controls.add(LightLiteV3.REG_ACQ_COMMAND, 0x00, Register.WRITE, {}) \
            .add(LightLiteV3.SEG_ACQ_COMMAND, 0, 7, [0] * 8)

        self.controls.add(LightLiteV3.REG_STATUS, 0x01, Register.READ, {}) \
            .add(LightLiteV3.SEG_PROC_ERROR_FLAG, 6, 6, [0]) \
            .add(LightLiteV3.SEG_HEALTH_FLAG, 5, 5, [0]) \
            .add(LightLiteV3.SEG_SECONDARY_RET_FLAG, 4, 4, [0]) \
            .add(LightLiteV3.SEG_INVALID_SIGNAL_FLAG, 3, 3, [0]) \
            .add(LightLiteV3.SEG_SIGNAL_OVERFLOW_FLAG, 2, 2, [0]) \
            .add(LightLiteV3.SEG_REFERENCE_OVERFLOW_FLAG, 1, 1, [0]) \
            .add(LightLiteV3.SEG_BUSY_FLAG, 0, 0, [0])

        self.controls.add(LightLiteV3.REG_VELOCITY, 0x09, Register.READ, {})\
            .add(LightLiteV3.SEG_VELOCITY, 0, 7, [0] * 8)

        self.controls.add(LightLiteV3.REG_DISTANCE, 0x8f, Register.READ, {})\
            .add(LightLiteV3.SEG_DISTANCE, 0, 15, [0] * 16)

    # Provide useful helper methods
    def measure(self):
        self.controls.set_bits_from_int(LidarLiteV3.REG_ACQ_COMMAND, LidarLiteV3.SEG_ACQ_COMMAND, 0x04, write_after=True)

    def distance(self):
        return self.controls.to_int(LidarLiteV3.REG_DISTANCE, LidarLiteV3.SEG_DISTANCE, read_first=True)

    def velocity(self):
        return self.controls.to_int(LidarLiteV3.REG_VELOCITY, LidarLiteV3.SEG_VELOCITY, read_first=True)

# Now using your hardware has never been easier
lidar = LidarLiteV3()

while True:
    lidar.measure()
    print("Car is going {} m/s when it was {} m away".format(lidar.velocity(), lidar.distance()))
Development
The code for I2C Register is located in the py_i2c_register directory. Feel free to contribute by opening a pull request. I try to test and document as much as I can.
Supported Python Versions: 2.7, 3.6
Running Tests
To run tests a couple python packages are required. To install them you can run the test-install Make target:
make test-installYou can then run test by executing the test Make target:
make testTo see a more detailed HTML report you can run the test-html Make target. The results will then be saved to htmlcov/index.html.
Distribution
This repository provides a PIP package called py-i2c-register. To publish this distribution a variety of helpers are provided in the Makefile.
Setup
The Pandoc tool is required for the release process along with some miscellaneous Python packages. Please refer to the Pandoc Website for installation instructions. You can install the misc. Python packages with the dist-install Make target:
make dist-installYou can verify that all distribution dependencies are install and accessible by running the dist-check Make target. If it exits successfully all dependencies were found.
Finally you must create .pypirc file in your home directory with the contents:
[distutils]
index-servers=pypi

[pypi]
repository = https://upload.pypi.org/legacy/
username = Your Username
password = Your Password
This gives the PyPi release tool some basic configuration options and your credentials.
Steps
This section details the steps required to release this package.
Test
Ensure that all tests pass by running the test Make target:
make test
Clean and build
Clean up previous distribution materials by running the dist-clean Make target:
make dist-cleanBuild the distribution by running the dist-build Make target:
make dist-build
Upload
Upload the distribution to PyPi by running the dist-upload Make target:
make dist-uploadThis requires that you have a .pypirc file setup with your username and password
The Makefile provides a useful target which runs steps 1 and 2 under one command named dist. However the upload step must still be completed separately.


Download files
Download the file for your platform. If you're not sure which to choose, learn more about installing packages.
Source Distribution
File details
Details for the file py-i2c-register-0.0.8.tar.gz.
File metadata
- Download URL: py-i2c-register-0.0.8.tar.gz
- Upload date:
- Size: 16.2 kB
- Tags: Source
- Uploaded using Trusted Publishing? No
File hashes
| Algorithm | Hash digest | |
|---|---|---|
| SHA256 |
42ac9c9475252a177a08745b34888d69c91d69149249cb50c7faf082127094a7
|
|
| MD5 |
18909219c7f9e1c84885b7a6bf706137
|
|
| BLAKE2b-256 |
d4839cdb8238b72eab114a6fc101598a44bf0749e0e05f386aa4f3f0553f86e2
|


