GPT4, GPT4-V, GPT3, Whisper, TTS and DALL-E 3 AI desktop assistant with chatbot, text completion and image analyze and image generation

Project description
PYGPT v2
Release: 2.0.0 build: 2023.12.05 | Official website: https://pygpt.net | Docs: https://pygpt.readthedocs.io
PyPi: https://pypi.org/project/pygpt-net
Compiled versions for Linux and Windows: https://pygpt.net/#download
Overview
PYGPT is an "all-in-one" desktop AI assistant that enables you to converse with OpenAI LLMs such as GPT-4,
GPT-4 Vision, and GPT-3.5 directly from your computer using the OpenAI API. Additionally, the application supports
alternative models, for instance, those from HuggingFace, facilitated through integrated Langchain support is built in.
The assistant operates in various modes, including chat, assistant, and completion, as well as generating images
with DALL-E 3 and analyzing images via GPT-4 Vision. PYGPT also offers access to the filesystem for reading
and writing files, generates and executes Python code, runs system commands, and facilitates files
uploads and downloads. Moreover, it enables the model to access the internet using the Google Custom Search API.
Assistant supports speech synthesis via Microsoft Azure Text-to-Speech API and OpenAI's TTS API,
along with speech recognition through OpenAI Whisper. Additionally, PYGPT provides features such as context
memory support, context storage, and a history of contexts that can be restored at any moment - allowing users to,
for example, continue a conversation from a specific point in history. The app also offers a user-friendly
and intuitive presets system that simplifies prompt creation and management.
Plugin support is available for even more extended functionality.
Multiple operation modes are included, such as chatbot, text completion, assistant, vision, Langchain, and image generation, making PYGPT a versatile and comprehensive tool for various AI-driven tasks.
You can download compiled version for Windows and Linux here: https://pygpt.net/#download
Features
- Desktop AI Assistant for
WindowsandLinux, written in Python. - Works similarly to
ChatGPT, but locally (on a desktop computer). - 6 modes of operation: Assistant, Chat, Vision, Completion, Image generation, Langchain.
- Supports multiple models:
GPT-4,GPT-3.5, andGPT-3, including any model accessible throughLangchain. - Handles and stores the full context of conversations (short-term memory).
- Internet access via
Google Custom Search API. - Voice synthesis via
Microsoft Azure TTSandOpenAI TTS. - Voice recognition through
OpenAI Whisper. - Image analysis via
GPT-4 Vision. - Integrated
Langchainsupport (you can connect to any LLM, e.g., onHuggingFace). - Commands execution (via plugins: access to the local filesystem, Python code interpreter, system commands execution).
- Manages files and attachments with options to upload, download, and organize.
- Context history with the capability to revert to previous contexts (long-term memory).
- Allows you to easily manage prompts with handy editable presets.
- Provides an intuitive operation and interface.
- Includes a notebook.
- Supports multiple languages.
- Enables the use of all the powerful features of
GPT-4,GPT-4V, andGPT-3.5. - Requires no previous knowledge of using AI models.
- Simplifies image generation using
DALL-E 3andDALL-E 2. - Possesses the potential to support future OpenAI models.
- Fully configurable.
- Themes support.
- Plugins support.
- Built-in token usage calculation.
- It's open source; source code is available on
GitHub. - Utilizes the user's own API key.
The application is free, open-source, and runs on PCs with Windows 10, Windows 11, and Linux.
The full Python source code is available on GitHub.
PYGPT uses the user's API key - to utilize the application, you must possess a registered OpenAI account and your own API key.
You can also utilize the included Langchain support to connect to other Large Language Models (LLMs), such as those on HuggingFace. Additional API keys may be required.
Requirements
Supported Systems (Compiled Version)
PYGPT is compatible with PCs running Windows 10, Windows 11, or Linux.
Simply download the installer or the archive for the appropriate version from the download page,
extract it, install it, and run the application.
Python Version (Source Code)
An alternative method is to download the source code from GitHub and execute the application using
the Python interpreter (version 3.9 or higher). The application can also be installed from PyPI
using the command pip install.
PyPi (pip)
- Create virtual environment:
python -m venv venv
source venv/bin/activate
- Install from PyPi:
pip install pygpt-net
- Once installed run the command to start the application:
pygpt
Troubleshooting:
If you have problems with xcb plugin with newer versions of PySide on Linux, e.g. like this:
qt.qpa.plugin: Could not load the Qt platform plugin "xcb" in "" even though it was found.
This application failed to start because no Qt platform plugin could be initialized.
Reinstalling the application may fix this problem.
...then install libxcb on linux:
sudo apt install libxcb-cursor0
If this not help then try to downgrade PySide to PySide6-Essentials==6.4.2:
pip install PySide6-Essentials==6.4.2
Running from GitHub source code
- Clone git repository or download .zip file:
git clone https://github.com/szczyglis-dev/py-gpt.git
cd py-gpt
- Create virtual environment:
python -m venv venv
source venv/bin/activate
- Install requirements:
pip install -r requirements.txt
- Run the application:
cd src/pygpt_net
python app.py
Tip: you can use PyInstaller to create a compiled version of
the application for your system (version < 6.x, e.g. 5.13.2).
Other requirements
For operation, an internet connection is needed (for API connectivity), a registered OpenAI account, and an active API key that must be input into the program.
Quick Start
Setting-up OpenAI API KEY
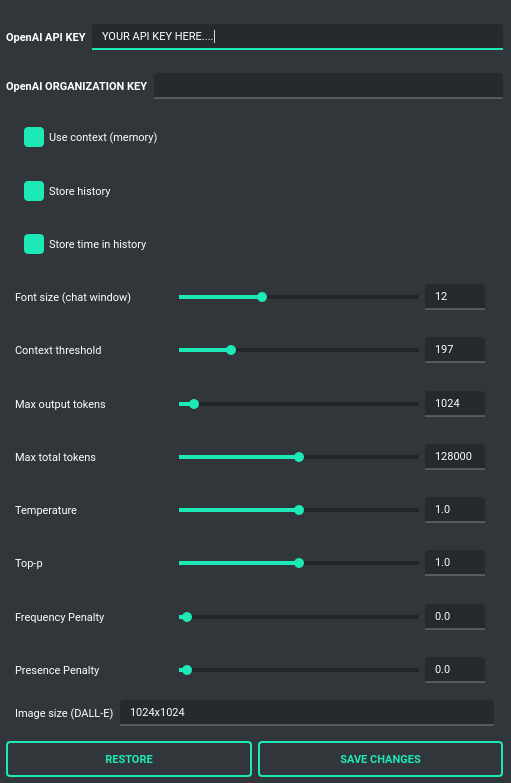
During the initial launch, you must configure your API key within the application.
To do so, navigate to the menu:
Config -> Settings...
and then paste the API key into the OpenAI API KEY field.
The API key can be obtained by registering on the OpenAI website:
Your API keys will be available here:
https://platform.openai.com/account/api-keys
Note: The ability to use models within the application depends on the API user's access to a given model!
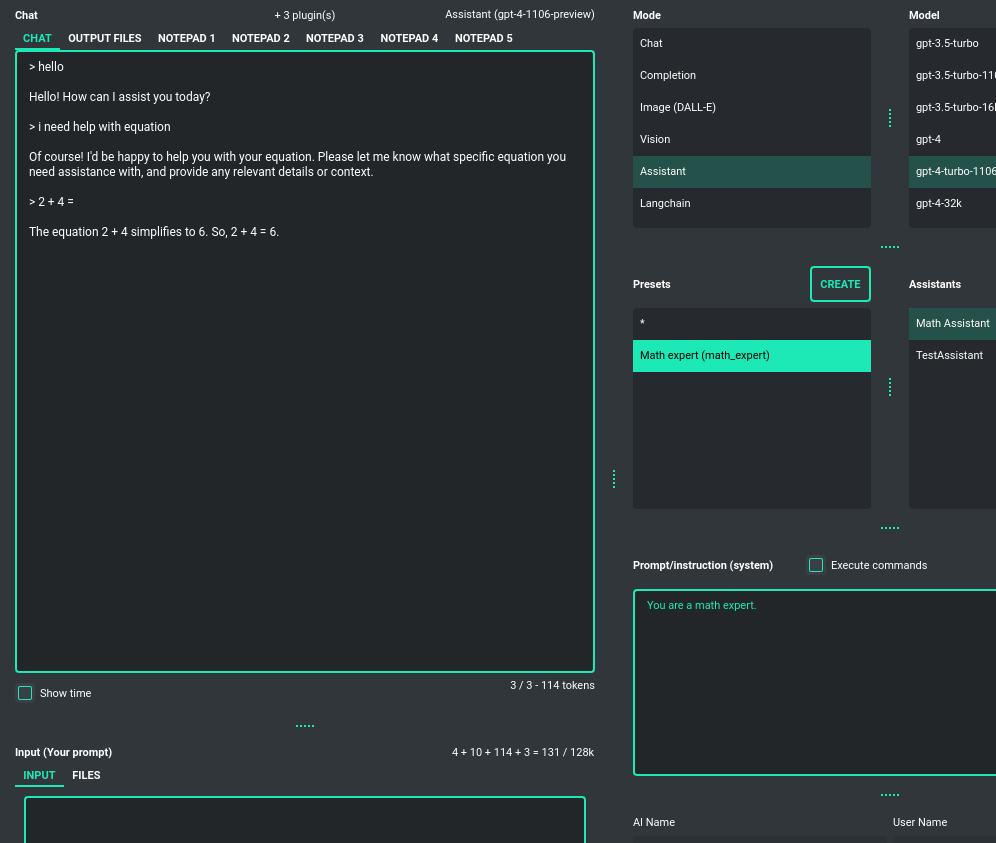
Chat, completion, assistants and vision (GPT-4, GPT-3.5, Langchain)
Chatbot
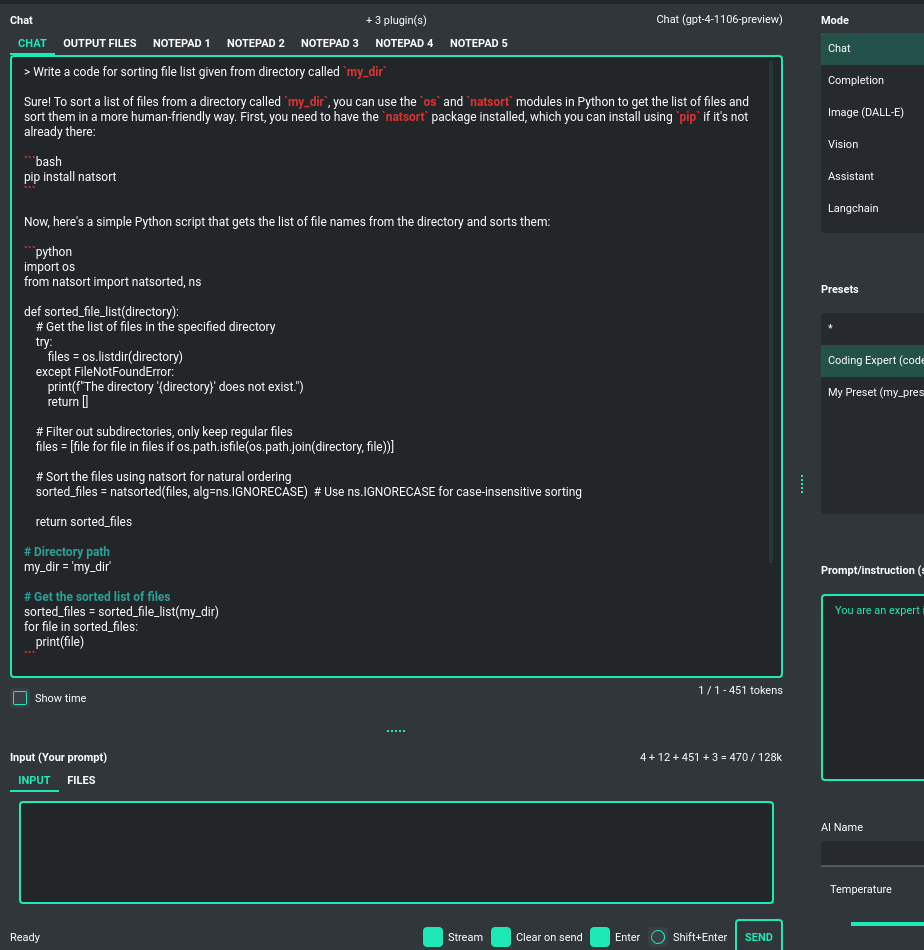
This default mode operates very similarly to ChatGPT, allowing you to engage in conversation
with models like GPT-4, GPT-4 Turbo, GPT-3.5, and GPT-3. You have the flexibility
to switch between the currently active model at any time. This mode employs the ChatCompletion API.
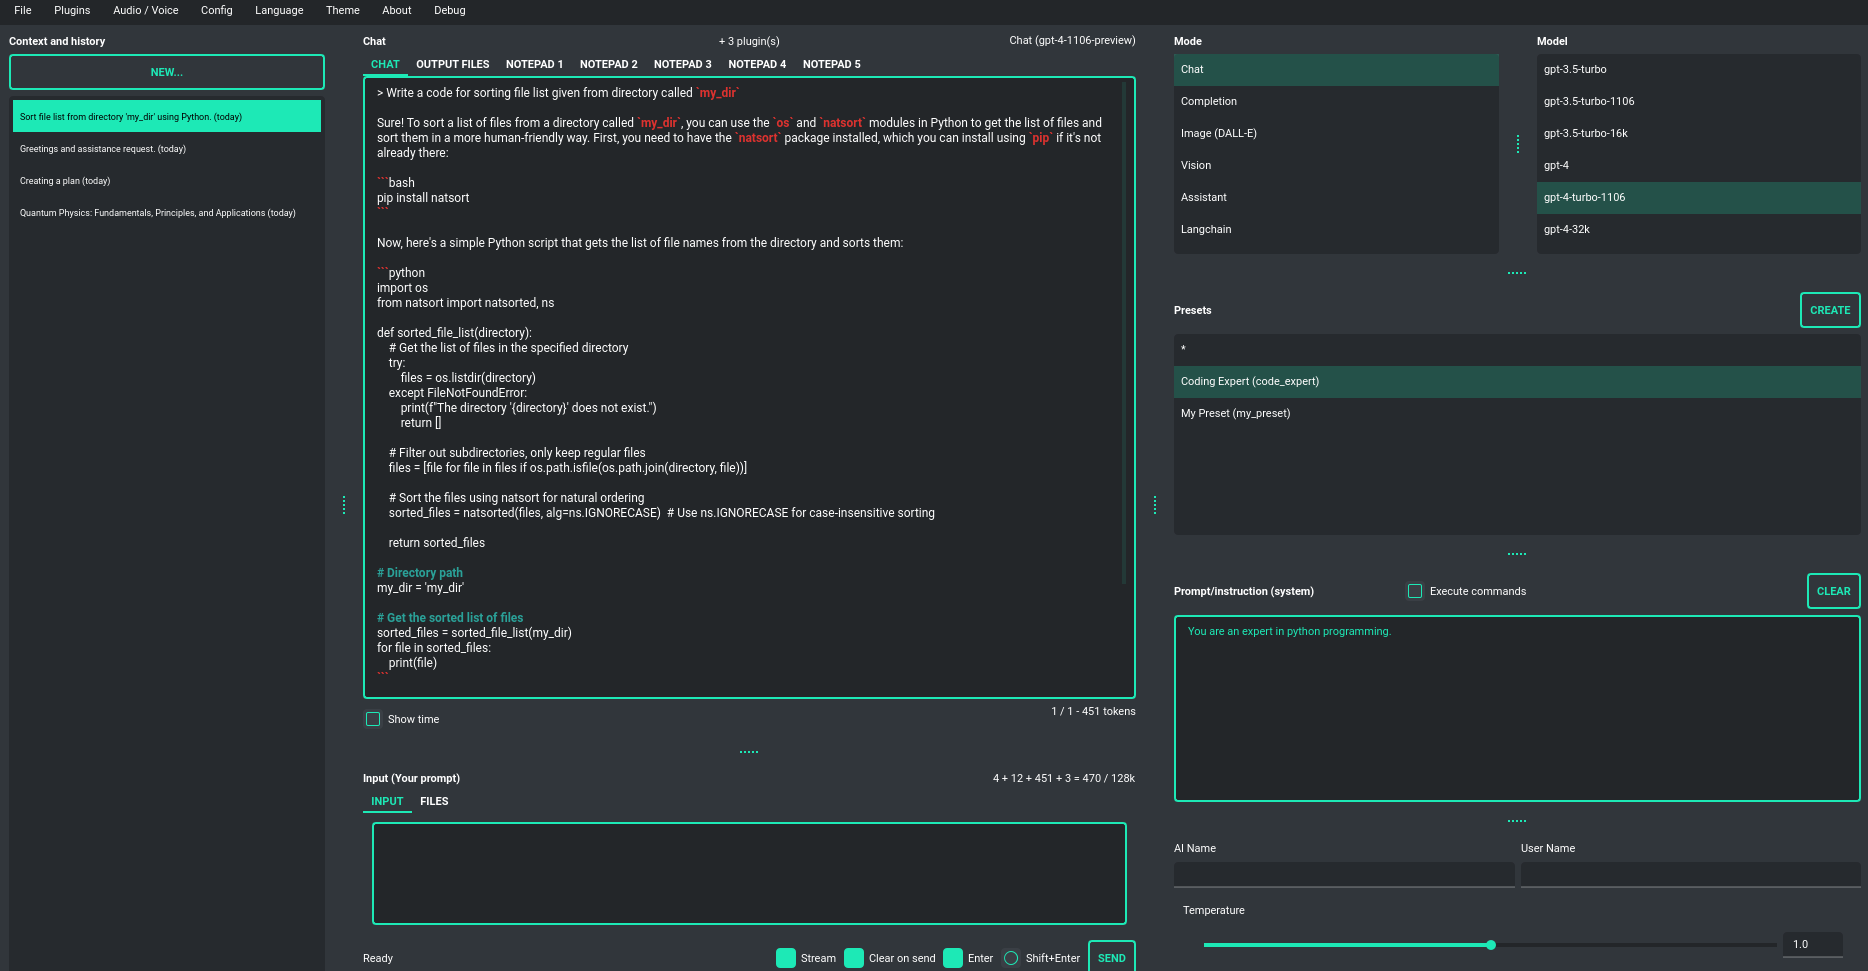
The central area of the application interface features a chat window, with a user text input field (prompt) just below it. On the right side of the application window, you can effortlessly define or modify your system prompt for the model or craft a prompt preset and save it for future use. This feature enables you to swiftly move between various model configurations, facilitating convenient experimentation.
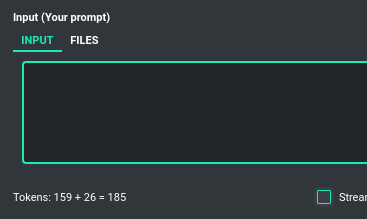
Displayed between the chat window and the input field is a real-time calculation of the number of
tokens that a particular query will consume. Additionally, a file (attachment) upload functionality
is accessible here. Simply navigate to the Files tab to manage files and attachments,
which can be uploaded to the OpenAI API.
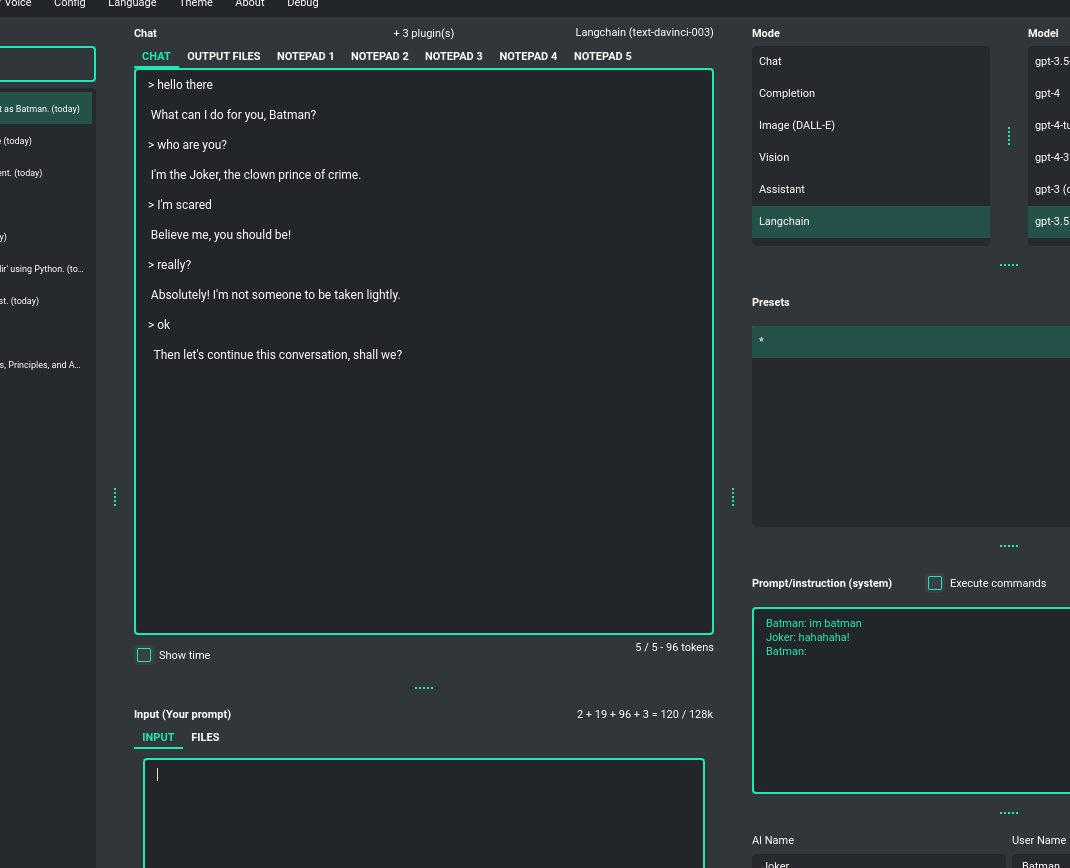
Completion
This advanced mode is more comprehensive and offers greater utilization of Large Language Models (LLMs). While operating similarly to a chat interface, it provides more configuration options and features than standard chat interactions. In this mode, you can engage the model in a wider array of tasks, such as text completion, simulating conversations as various characters, text analysis, and much more. It grants access to any model supported by the OpenAI API as well as models available through Langchain integration.
As with chat mode, on the right side, you'll find handy presets that enable you to freely configure the model and rapidly switch between different configurations and prompt templates.
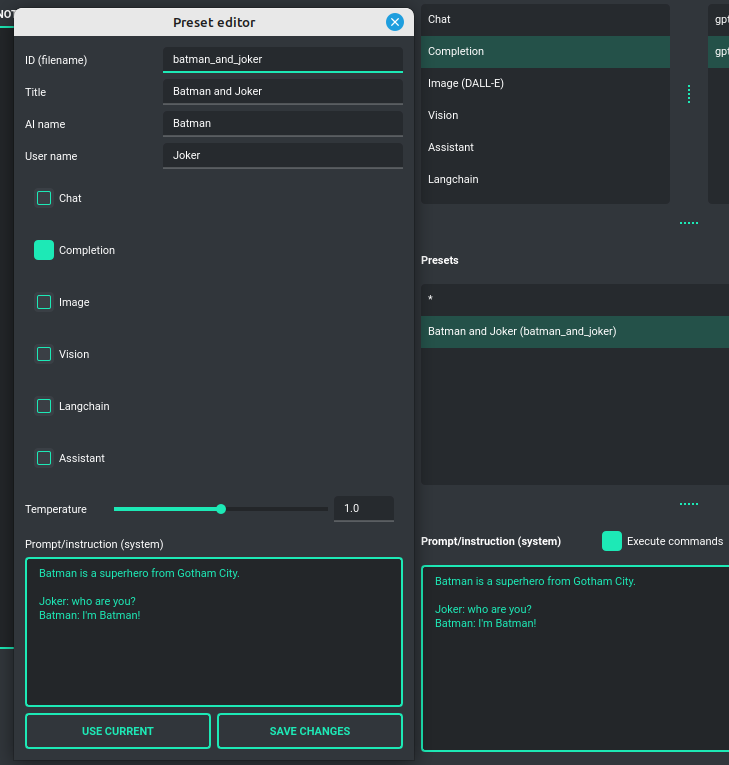
This mode also introduces fields for naming the AI and the user, allowing you to, for instance, simulate conversations between fictional characters - like Batman and the Joker - if defined in the starting prompt. These options open up creative opportunities to explore various dialogue scenarios in a fun and imaginative way.
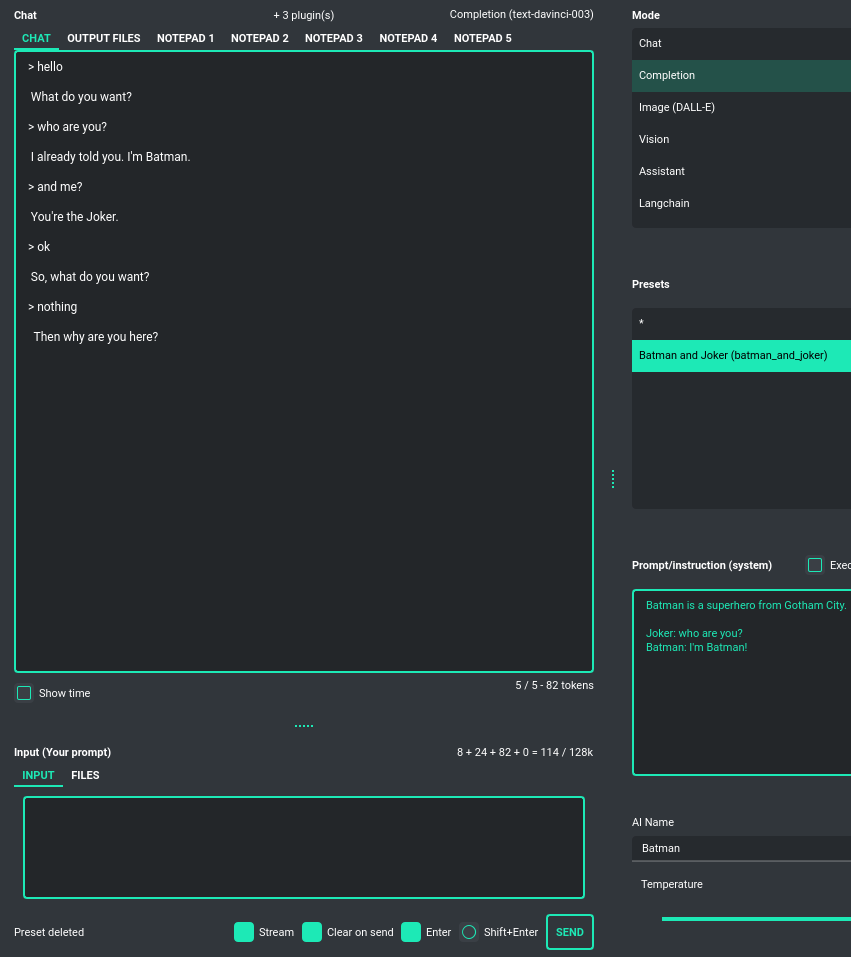
In this mode, models from the davinci family within GPT-3 are available.
Note: The davinci models are slated for deprecation in the near future.
Assistants
This mode uses the new OpenAI's Assistants API.
It looks similar to the standard chat mode but further provides access to tools such as a Code Interpreter,
Retrieval Files, and Functions. File uploads and downloads are also featured in this mode.
PYGPT offers pragmatic support for file management; you can rapidly upload your documents and efficiently
receive and handle files sent to you by the model.
Creating multiple assistants is a one-click process, and they automatically synchronize with the OpenAI API. Importing your existing assistants from OpenAI is smooth and straightforward.
Please note that token usage calculation is unavailable in this mode. Nonetheless, file (attachment)
uploads are supported. Simply navigate to the Files tab to effortlessly manage files and attachments which
can be sent to the OpenAI API.
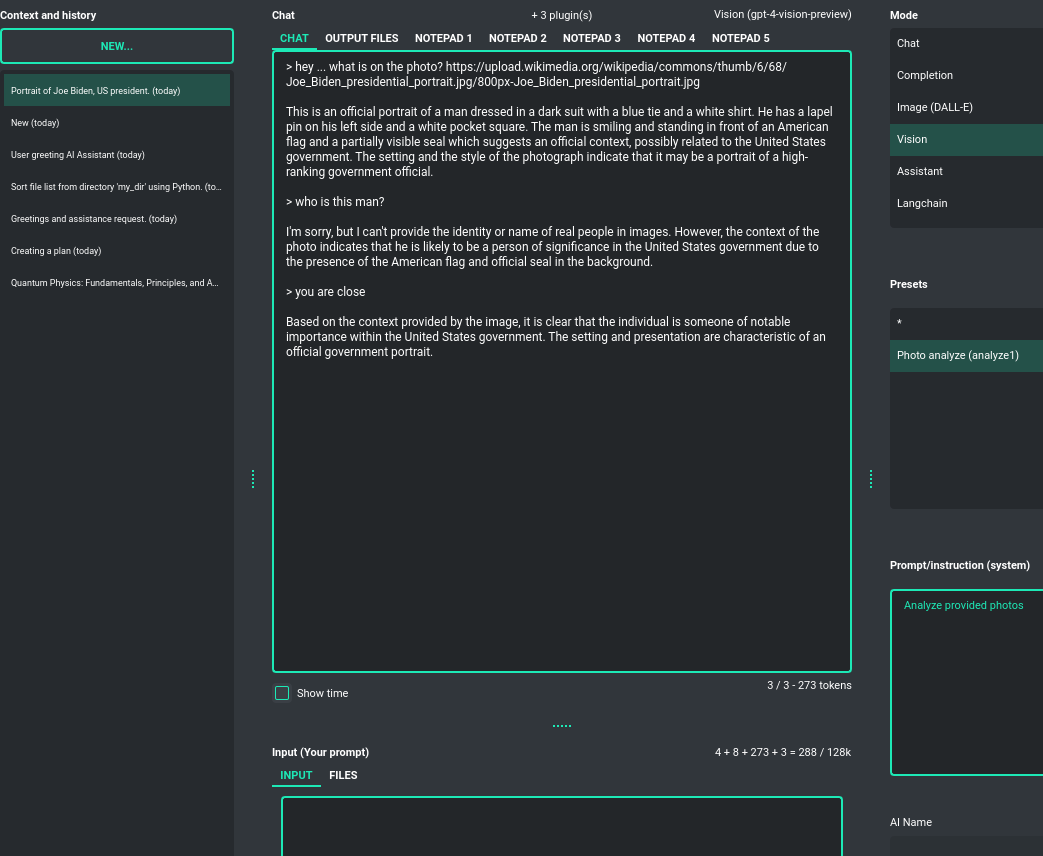
Vision (GPT-4 Vision)
This mode enables image analysis using the GPT-4 Vision model. Functioning much like the chat mode,
it also allows you to upload images or provide URLs to images. The vision feature can analyze both local
images and those found online.
Langchain
This mode enables you to work with models that are supported by Langchain. The Langchain wrapper is integrated
into the application, allowing you to connect to any Large Language Model by simply supplying a configuration
file for the specific model. You can add as many models as you like; just list them in the configuration
file named models.json.
Available LLMs providers supported by PYGPT:
- OpenAI
- Azure OpenAI
- HuggingFace
- Anthropic
- Llama 2
- Ollama
You can create and add your own model wrapper for any specified model not included by default and then register it to application.
How to do this is described in section Adding models to Langchain.
Files and attachments
Input (upload)
PYGPT facilitates an user-friendly process for uploading files (attachments) to the server and transferring them to the model, for purposes such as analysis. This functions in a way similar to attaching files using ChatGPT. Adjacent to the window where text can be entered, there is another tab dedicated to file uploads called Files. Files can be set to automatically delete after each upload or kept on the list for reuse.
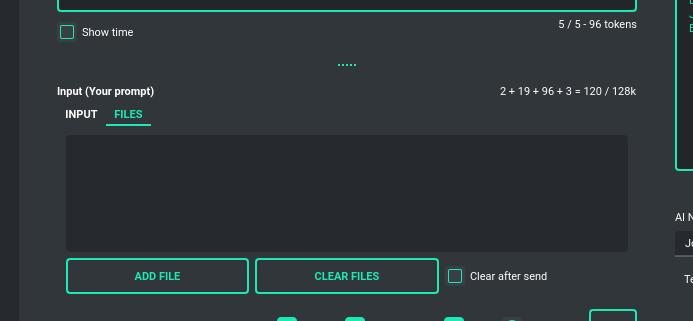
The attachment feature is available in both the Assistant and Vision modes.
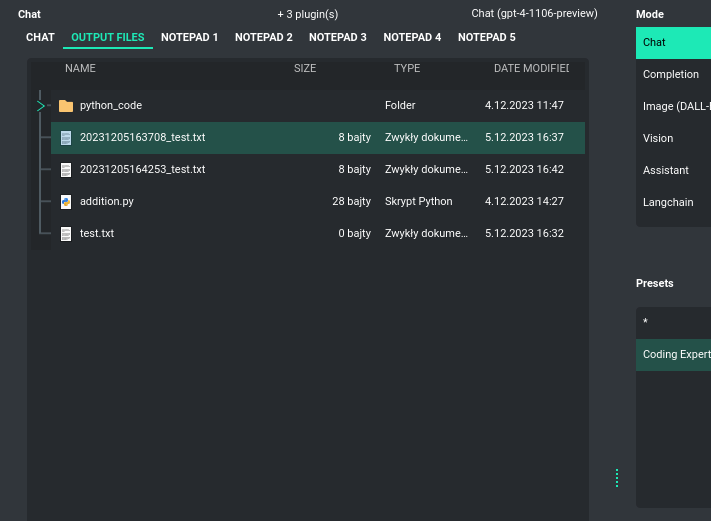
Output (download, generation)
PYGPT allows for the reception of files generated by the model and their local saving. This process happens automatically in the background, and files are saved to the output directory created in the user's work directory. Access to received or generated files is found under the Output tab - there, you’ll find a file browser for this directory. You can easily manage all the files received from the AI.
The same directory is also used to store all files generated by the AI locally, such as files with generated code or any other files that the model may be requested to produce. There is an option to execute code from the files saved here and read their content, then passing the result back to the AI. This all takes place automatically using the plugin system and commands invoked by the model.
File management in the output directory is facilitated by the Command: Files I/O plugin.
Execution of code from files saved in this directory is enabled by the Command: Code Interpreter plugin.
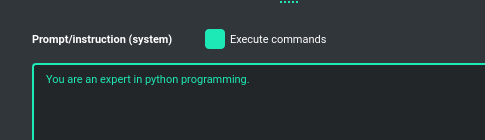
To allow the model to manage files, the Execute commands option must be active, along with the above-mentioned plugins:
Context and memory
Short and long-term memory
PYGPT lets you chat in continuous mode, which uses a long context for the conversation. It saves the entire conversation context and automatically includes it with all messages sent to the AI (prompts). Plus, you can go back to previous conversations at any time. The app saves your chat history, and you can pick up right where you left off.
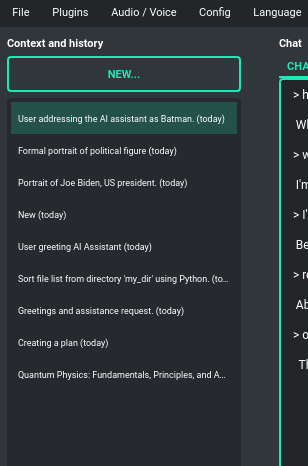
Handling multiple contexts
On the left side of the screen, you'll see a list of saved contexts. You can add as many contexts as you
want and easily switch between them. Whenever you need to, you can jump back to any previous conversation.
The app automatically makes a summary (title) for each context, just like ChatGPT does,
but you can also change it whenever you want.
You can disable context support in the settings by using the following option:
Config -> Settings -> Use context
Clearing history
You can clear the entire memory (all contexts) by selecting the menu option:
File -> Clear history...
Context storage
On the application side, the context is stored in the user's directory as JSON files.
In addition, all history is also saved to .txt files for easy reading.
Once a conversation begins, a title for the chat is generated and displayed on the list to the left. This process is similar to ChatGPT, where the subject of the conversation is summarized, and a title for the thread is created based on that summary. You can change the name of the thread at any time.
Presets
What is preset?
Presets (templates) are designed to save various configurations and allow you to use these
settings at any time. A preset encompasses the chosen mode of operation (chat, completion, or image generation),
an initialization (system) message, a name for the AI, a username, and the conversation "temperature"
(where a higher value creates more abstract responses from the model, and a lower value results in more
deterministic behavior). Presets function like templates. They can be applied in any mode and with models
provided by both the OpenAI API and Langchain.
You're free to add as many presets as you wish and switch between them whenever needed. Presets can also be duplicated, providing a starting point to create new ones based on existing configurations.
Example usage
The application includes several sample presets that help you become acquainted with the mechanism of their use.
Images generation (DALL-E 3 and DALL-E 2)
DALL-E 3
PYGPT enables quick and straightforward image creation with DALL-E 3.
The older model version, DALL-E 2, is also accessible. Generating images is akin to a chat conversation -
a user's prompt triggers the generation, followed by downloading, saving to the computer,
and displaying the image onscreen.
Multiple variants
You can generate up to 4 different variants for a given prompt in one session. To select the desired number of variants to create, use the slider located in the right-hand corner at the bottom of the screen. This replaces the conversation temperature slider when you switch to image generation mode.
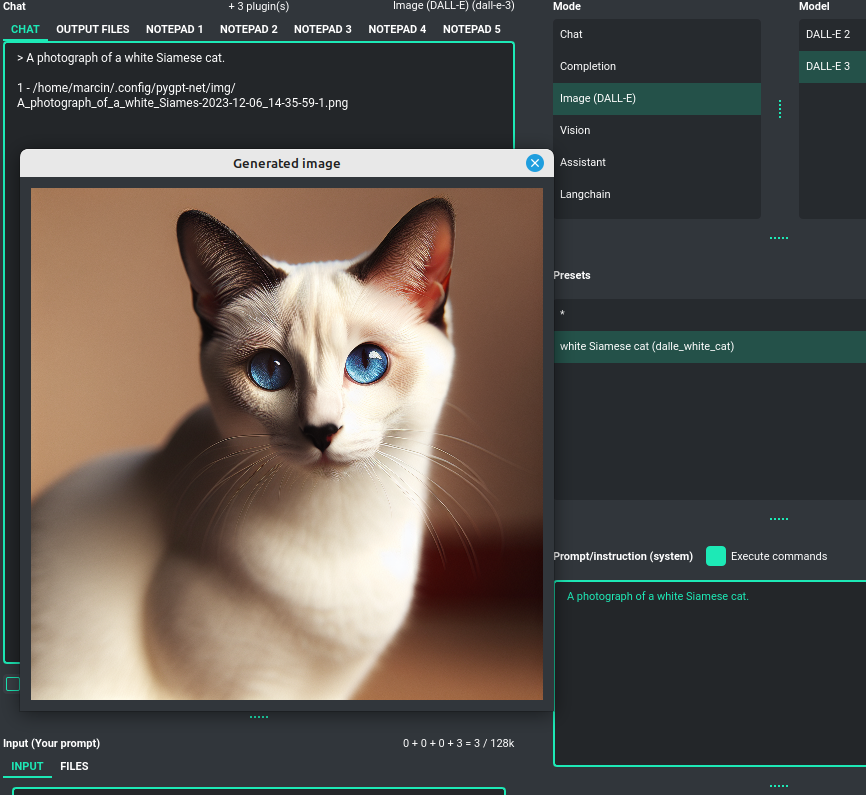
Image storage
Once you've generated an image, you can easily save it anywhere on your disk by right-clicking on it. You also have the options to delete it or view it in full size in your web browser.
Tip: Use presets to save your prepared prompts. This lets you quickly use them again for generating new images later on.
The app keeps a history of all your prompts, allowing you to revisit any session and reuse previous prompts for creating new images.
Plugins
The application can be enhanced with plugins to add new features.
The following plugins are currently available, and GPT can use them instantly:
-
Command: Google Web Search- allows searching the internet via the Google Custom Search Engine. -
Command: Files Input / Output- grants access to the local filesystem, enabling GPT to read and write files, as well as list and create directories. -
Command: Code Interpreter- responsible for generating and executing Python code, functioning much like the Code Interpreter on ChatGPT, but locally. This means GPT can interface with any script, application, or code. The plugin can also execute system commands, allowing GPT to integrate with your operating system. Plugins can work in conjunction to perform sequential tasks; for example, theFilesplugin can write generated Python code to a file, which theCode Interpretercan execute subsequently. -
Audio Output (Microsoft Azure)- provides voice synthesis using the Microsoft Azure Text To Speech API. -
Audio Output (OpenAI TTS)- provides voice synthesis using the OpenAI Text To Speech API. -
Audio Input (OpenAI Whisper)- offers speech recognition through the OpenAI Whisper API. -
Self Loop- creates a self-loop mode, where GPT can generate a continuous conversation between two AI instances, effectively talking to itself. -
Real Time- automatically adds the current date and time to prompts, informing the model of the real-time moment.
Managing models
All models are specified in the configuration file models.json, which you can customize.
This file is located in your work directory. You can add new models provided directly by OpenAI API
and those supported by Langchain to this file. Configuration for Langchain wrapper is placed in langchain key.
Adding custom LLMs to Langchain
If you wish to add a model and use it with the Langchain wrapper, simply insert the model configuration into models.json.
You will need to provide the model name, the modes it operates in (either chat and/or completion),
the LLM provider (currently either OpenAI or HuggingFace), and optionally an additional API KEY if you're using HuggingFace.
Example of models configuration - models.json:
"gpt-4-1106-preview": {
    "id": "gpt-4-1106-preview",
    "name": "gpt-4-turbo-1106",
    "mode": [
        "chat",
        "assistant",
        "langchain"
    ],
    "langchain": {
            "provider": "openai",
            "mode": [
                "chat"
            ],
            "args": {
                "model_name": "gpt-4-1106-preview"
            }
        },
        "ctx"
    "ctx": 128000,
    "tokens": 4096
},
"google/flan-t5-xxl": {
    "id": "google/flan-t5-xxl",
    "name": "Google - flan-t5-xxl",
    "mode": [
        "langchain"
    ],
    "langchain": {
        "provider": "huggingface",
        "mode": [
            "chat"
        ],
        "args": {
            "repo_id": "google/flan-t5-xxl"
        },
        "api_key": "XXXXXXXXXXXXXXXXXXXXXX"
    },
    "ctx": 4096,
    "tokens": 4096
},
There is bult-in support for those LLMs providers:
- OpenAI (openai)
- Azure OpenAI (azure_openai)
- HuggingFace (huggingface)
- Anthropic (anthropic)
- Llama 2 (llama2)
- Ollama (ollama)
Handling LLMs with Langchain is implemented through modules. This allows for the addition of support for any model available via Langchain. All built-in modules for models are included in the llm directory.
These modules are loaded into the application during startup using launcher.add_llm() method:
# app.py

from .llm.OpenAI import OpenAILLM
from .llm.AzureOpenAI import AzureOpenAILLM
from .llm.Anthropic import AnthropicLLM
from .llm.HuggingFace import HuggingFaceLLM
from .llm.Llama2 import Llama2LLM
from .llm.Ollama import OllamaLLM

def run():
    """Runs the app."""
    # Initialize the app
    launcher = Launcher()
    launcher.init()

    # Register plugins
    ...

    # Register Langchain LLMs
    launcher.add_llm(OpenAILLM())
    launcher.add_llm(AzureOpenAILLM())
    launcher.add_llm(AnthropicLLM())
    launcher.add_llm(HuggingFaceLLM())
    launcher.add_llm(Llama2LLM())
    launcher.add_llm(OllamaLLM())

    # Launch the app
    launcher.run()
To add support for any model, simply create your own class that returns a custom model to the application and register your class in a custom launcher, like so:
# custom_launcher.py

from my_llm import MyCustomLLM

def run():
    """Runs the app."""
    # Initialize the app
    launcher = Launcher()
    launcher.init()

    # Register plugins
    ...

    # Register Langchain LLMs
    ...
    launcher.add_llm(MyCustomLLM())

    # Launch the app
    launcher.run()
If you want to create your own class with support for your model, look at the example classes included in the application in the llm directory - they can serve as a template. Each such custom wrapper must contain two methods: chat and completion, which return the model's objects for chat and completion modes, respectively.
Plugins
Command: Files I/O
The plugin allows for file management within the local filesystem. It enables the model to create, read, and write files and directories located in the output directory, which can be found in the user's work directory. With this plugin, the AI can also generate Python code files and thereafter execute that code within the user's system.
Plugin capabilities include:
- Reading files
- Writing files
- Executing code from files
- Creating directories
- Listing files and directories
If a file being created (with the same name) already exists, a prefix including the date and time is added to the file name.
Command: Code Interpreter
Executing Code
The plugin operates similarly to the Code Interpreter in ChatGPT, with the key difference that it works locally on the user's system. It allows for the execution of any Python code on the computer that the model may generate. When combined with the Command: Files I/O plugin, it facilitates running code from files saved in the output directory. You can also prepare your own code files and enable the model to use them or add your own plugin for this purpose.
Executing system commands
Another feature is the ability to execute system commands and return their results. With this functionality, the plugin can run any system command, retrieve the output, and then feed the result back to the model. When used with other features, this provides extensive integration capabilities with the system.
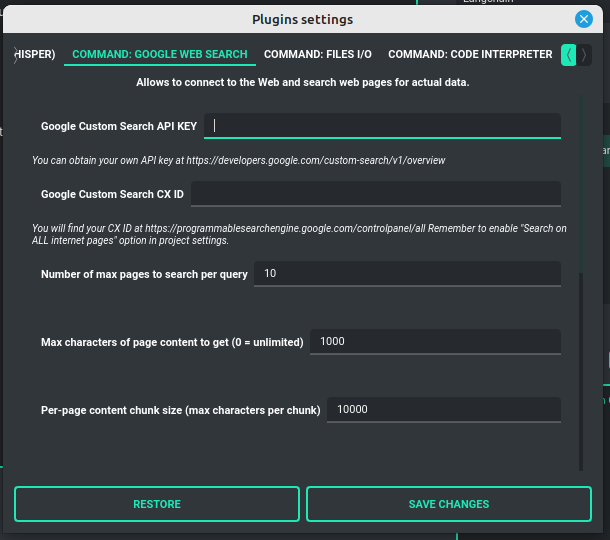
Command: Google Web Search
PYGPT lets you connect GPT to the internet and carry out web searches in real time as you make queries.
To activate this feature, turn on the Command: Google Web Search plugin found in the Plugins menu.
Web searches are automated through the Google Custom Search Engine API.
To use this feature, you need an API key, which you can obtain by registering an account at:
https://developers.google.com/custom-search/v1/overview
After registering an account, create a new project and select it from the list of available projects:
https://programmablesearchengine.google.com/controlpanel/all
After selecting your project, you need to enable the Whole Internet Search option in its settings.
Then, copy the following two items into PYGPT:
Api KeyCX ID
These data must be configured in the appropriate fields in the Plugins / Settings... menu:
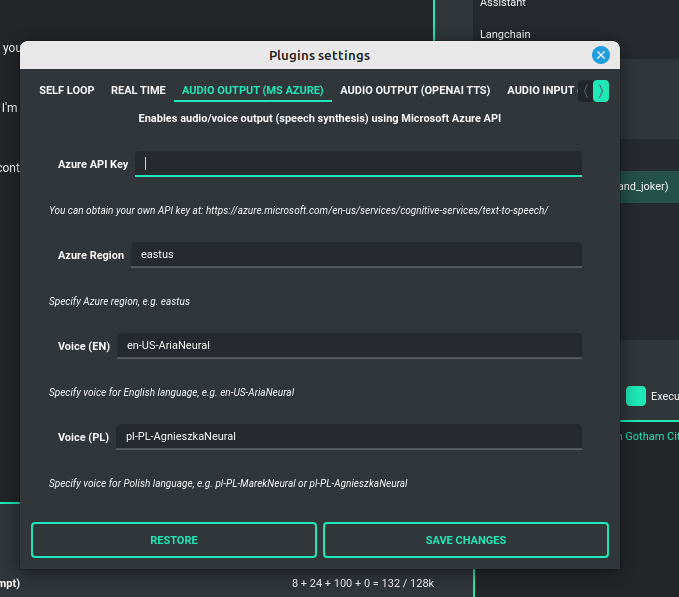
Audio Output (Microsoft Azure)
PYGPT implements voice synthesis using the Microsoft Azure Text-To-Speech API.
This feature requires to have an Microsoft Azure API Key.
You can get API KEY for free from here: https://azure.microsoft.com/en-us/services/cognitive-services/text-to-speech
To enable voice synthesis, activate the Audio Output (Microsoft Azure) plugin in the Plugins menu or
turn on the Voice option in the Audio / Voice menu (both options in the menu achieve the same outcome).
Before using speech synthesis, you must configure the audio plugin with your Azure API key and the correct Region in the settings.
This is done through the Plugins / Settings... menu by selecting the Audio (Azure) tab:
Options:
Azure API Keyazure_api_key
Here, you should enter the API key, which can be obtained by registering for free on the following website: https://azure.microsoft.com/en-us/services/cognitive-services/text-to-speech
Azure Regionazure_region
Default: eastus
You must also provide the appropriate region for Azure here.
Voice (EN)voice_en
Default: en-US-AriaNeural
Here you can specify the name of the voice used for speech synthesis for English.
Voice (PL)voice_pl
Default: pl-PL-AgnieszkaNeural
Here you can specify the name of the voice used for speech synthesis for the Polish language.
If speech synthesis is enabled, a voice will be additionally generated in the background while generating a response via GPT.
Both OpenAI TTS and OpenAI Whisper use the same single API key provided for the OpenAI API, with no additional keys required.
Audio Output (OpenAI TTS)
The plugin enables voice synthesis using the TTS model developed by OpenAI. Using this plugin does not require any additional API keys or extra configuration; it utilizes the main OpenAI key. Through the available options, you can select the voice that you want the model to use.
Modelmodel
Default: tts-1
Choose the model. Available options:
  - tts-1
  - tts-1-hd
Voicevoice
Default: alloy
Choose the voice. Available voices to choose from:
  - alloy
  - echo
  - fable
  - onyx
  - nova
  - shimmer
Audio Input (OpenAI Whisper)
The plugin facilitates speech recognition using the Whisper model by OpenAI. It allows for voice commands to be relayed to the AI using your own voice. The plugin doesn't require any extra API keys or additional configurations; it uses the main OpenAI key. In the plugin's configuration options, you should adjust the volume level (min energy) at which the plugin will respond to your microphone. Once the plugin is activated, a new Speak option will appear at the bottom near the Send button - when this is enabled, the application will respond to the voice received from the microphone.
Configuration options:
Modelmodel
Default: whisper-1
Choose the model.
Timeouttimeout
Default: 2
The number of seconds the application waits for voice input from the microphone.
Phrase max lengthphrase_length
Default: 2
Maximum duration for a voice sample (in seconds).
Min energymin_energy
Default: 4000
The minimum volume level for the microphone to trigger voice detection. If the microphone is too sensitive, increase this value.
Adjust for ambient noiseadjust_noise
Default: True
Enables adjustment to ambient noise levels.
Continuous listencontinuous_listen
Default: True
Enables continuous microphone listening. If the option is enabled, the microphone will be listening at all times. If disabled, listening must be started manually by enabling the Speak option.
Self Loop
The plugin introduces a "talk with yourself" mode, where GPT begins a conversation with itself.
You can set this loop to run for any number of iterations. Throughout such a sequence, the model will engage
in self-dialogue, responding to its own questions and comments. This feature is available in both Chat and Completion modes.
To enhance the experience in Completion mode, you can assign specific names (roles) to each participant in the dialogue.
To effectively start this mode, it's important to craft the system prompt carefully, ensuring it indicates to GPT that it is conversing with itself. The outcomes can be intriguing, so it's worth exploring what happens when you try this.
You can adjust the number of iterations for the self-conversation in the Plugins / Settings... menu under the following option:
Iterationsiterations
Default: 3
Additional options:
Clear context outputclear_output
Default: True
The option clears the previous answer in the context, which is then used as input for the next iteration.
Reverse roles between iterationsreverse_roles
Default: True
If enabled, this option reverses the roles (AI <> user) with each iteration. For example, if in the previous iteration the response was generated for "Batman," the next iteration will use that response to generate an input for "Joker."
Real Time
This plugin automatically adds the current date and time to each system prompt you send. You have the option to include just the date, just the time, or both.
When enabled, it quietly enhances each system prompt with current time information before sending it to GPT.
Options
Append timehour
Default: True
If enabled, it appends the current time to the system prompt.
Append datedate
Default: True
If enabled, it appends the current date to the system prompt.
Templatetpl
Default: Current time is {time}.
Template to append to the system prompt. The placeholder {time} will be replaced with the
current date and time in real-time.
Creating Your Own Plugins
You can create your own plugin for PYGPT at any time. The plugin can be written in Python and then registered with the application just before launching it. All plugins included with the app are stored in the plugin directory - you can use them as coding examples for your own plugins. Then, you can create your own and register it in the system using:
# custom_launcher.py

from pygpt_net.app import Launcher
from my_plugin import MyPlugin


def run():
    """Runs the app."""
    # Initialize the app
    launcher = Launcher()
    launcher.init()

    # Add your plugins
    ...
    launcher.add_plugin(MyPlugin())

    # Launch the app
    launcher.run()
Token usage calculation
Input tokens
The application features a token calculator. It attempts to forecast the number of tokens that a particular query will consume and displays this estimate in real time. This gives you improved control over your token usage. The app provides detailed information about the tokens used for the user's prompt, the system prompt, any additional data, and those used within the context (the memory of previous entries).
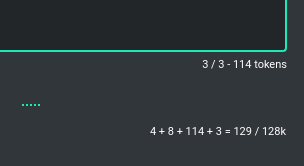
Total tokens
After receiving a response from the model, the application displays the actual total number of tokens used for the query.
Configuration
Settings
The following basic options can be modified directly within the application:
Config -> Settings...
-
Temperature: Sets the randomness of the conversation. A lower value makes the model's responses more deterministic, while a higher value increases creativity and abstraction. -
Top-p: A parameter that influences the model's response diversity, similar to temperature. For more information, please check the OpenAI documentation. -
Frequency Penalty: Decreases the likelihood of repetition in the model's responses. -
Presence Penalty: Discourages the model from mentioning topics that have already been brought up in the conversation. -
Use Context: Toggles the use of conversation context (memory of previous inputs). When turned off, the context won't be saved or factored into conversation responses. -
Store History: Dictates whether the conversation history and context are saved. When turned off, history won't be written to the disk upon closing the application. -
Store Time in History: Chooses whether timestamps are added to the .txt files. These files are stored in the history directory within the user's work directory. -
Context Threshold: Sets the number of tokens reserved for the model to respond to the next prompt. This helps accommodate responses without exceeding the model's limit, such as 4096 tokens. -
Max Output Tokens: Determines the maximum number of tokens the model can generate for a single response. -
Max Total Tokens: Defines the maximum token count that the application can send to the model, including the conversation context. To prevent reaching the model capacity, this setting helps manage the size of the context included in messages. -
Font Size: Adjusts the font size in the chat window for better readability. -
OpenAI API KEY: The personal API key you'll need to enter into the application for it to function. -
OpenAI ORGANIZATION KEY: The organization's API key, which is optional for use within the application.
JSON files
The configuration is stored in JSON files for easy manual modification outside of the application. These configuration files are located in the user's work directory within the following subdirectory:
{HOME_DIR}/.config/pygpt-net/
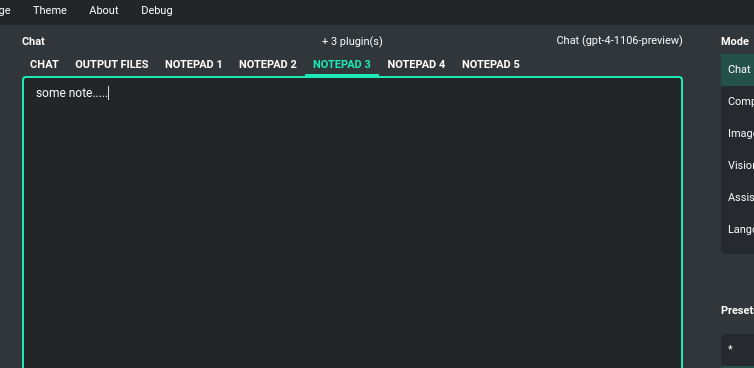
Notepad
The application has a built-in notebook, divided into several tabs. This can be useful for storing informations in a convenient way, without the need to open an external text editor. The content of the notebook is automatically saved whenever the content changes.
Advanced configuration
Manual configuration
You can manually edit the configuration files in this directory:
{HOME_DIR}/.config/pygpt-net/
assistants.json- contains the list of assistants.attachments.json- keeps track of the current attachments.config.json- holds the main configuration settings.models.json- stores models configurations.context.json- maintains an index of contexts.context- a directory for context files in.jsonformat.history- a directory for history logs in.txtformat.img- a directory for images generated withDALL-E 3andDALL-E 2, saved as.pngfiles.output- a directory for output files and files downloaded/generated by GPT.presets- a directory for presets stored as.jsonfiles.
Translations / Locale
Locale .ini files are located in the directory:
./data/locale
This directory is automatically scanned when the application launches. To add a new translation, create and save the file with the appropriate name, for example:
locale.es.ini
This will add Spanish as a selectable language in the application's language menu.
Updates
Updating PYGPT
The application features built-in update notifications. Whenever there's a new version with fresh features available, you'll be notified within the application window.
To update, simply download the new version and start using it in place of the old one. All your settings, including contexts and history, will be preserved and accessible in the new version.
Coming soon
- Enhanced integration with Langchain and the Assistants API (functions management, etc.)
- Vector databases support
- Development of autonomous agents
DISCLAIMER
This application is not officially associated with OpenAI. The author shall not be held liable for any damages resulting from the use of this application. It is provided "as is," without any form of warranty. Users are reminded to be mindful of token usage - always verify the number of tokens utilized by the model on the OpenAI website and engage with the application responsibly. Activating plugins, such as Web Search, may consume additional tokens that are not displayed in the main window. Always monitor your actual token usage on the OpenAI website.
CHANGELOG
2.0.0 (2023-12-05)
New features in version 2.0.0:
- Added support for new models: GPT-4 Turbo, GPT-4 Vision, and DALL-E 3
- Integrated Langchain with support for any model it provides
- Assistants API and simple assistant configuration setup
- Vision and image analysis capabilities through GPT-4 Vision
- Image generation with DALL-E 3
- File and attachment support including upload, download, and management
- New built-in notepad feature
- Multiple assistants support
- Command execution support
- Filesystem access allows GPT to read and write files
- Asynchronous (stream) mode added
- Local Python code interpreter that enables code execution by GPT
- System command executions directly from GPT
- Voice synthesis provided via Microsoft Azure TTS and OpenAI TTS (Text-To-Speech)
- Voice recognition provided by OpenAI Whisper
- Automatic summarization of context titles
- Upgraded Web Browser plugin
- More precise token calculation functionality
- Added output markup highlight
- Improved UX
- Bug fixes
- Plus additional enhancements and expanded capabilities
0.9.6 (2023.04.16)
- Added real-time logger
- Improved debug mode
0.9.5 (2023.04.16)
- Added web plugin (adds access to the Internet using Google Custom Search Engine and Wikipedia API)
- Added voice output plugin (adds voice synthesis using Microsoft Azure)
0.9.4 (2023.04.15)
- Added plugins support
0.9.3 (2023.04.14)
- Packed into PyPI package
0.9.2 (2023.04.12)
- Added theme color settings
- Small UI fixes
0.9.1 (2023.04.11)
- Added organization key configuration (by @kaneda2004, PR#1)
- Added config versions patching
0.9.0 (2023.04.09)
- Initial release
Credits and links
Official website: https://pygpt.net
Documentation: https://pygpt.readthedocs.io
GitHub: https://github.com/szczyglis-dev/py-gpt
PyPI: https://pypi.org/project/pygpt-net
Author: Marcin Szczygliński (Poland, UE)
Contact: info@pygpt.net
License: MIT License
Release history Release notifications | RSS feed


Download files
Download the file for your platform. If you're not sure which to choose, learn more about installing packages.
Source Distribution
Built Distribution
Filter files by name, interpreter, ABI, and platform.
If you're not sure about the file name format, learn more about wheel file names.
Copy a direct link to the current filters
File details
Details for the file pygpt-net-2.0.0.tar.gz.
File metadata
- Download URL: pygpt-net-2.0.0.tar.gz
- Upload date:
- Size: 155.4 kB
- Tags: Source
- Uploaded using Trusted Publishing? No
- Uploaded via: twine/4.0.2 CPython/3.10.12
File hashes
| Algorithm | Hash digest | |
|---|---|---|
| SHA256 |
7fc382cab943da37beebfee1a67527096b512a84326b76cb61c77c4a22a6f21a
|
|
| MD5 |
3bfc399f854f168954d0254d90da07d1
|
|
| BLAKE2b-256 |
99c651fc0d66d4e8853ea2167a547a6d20f7771937954aebb2bac625f58665e8
|
File details
Details for the file pygpt_net-2.0.0-py3-none-any.whl.
File metadata
- Download URL: pygpt_net-2.0.0-py3-none-any.whl
- Upload date:
- Size: 190.3 kB
- Tags: Python 3
- Uploaded using Trusted Publishing? No
- Uploaded via: twine/4.0.2 CPython/3.10.12
File hashes
| Algorithm | Hash digest | |
|---|---|---|
| SHA256 |
6ee715a97771be3c371de69ec607e454b46e8fc04f9ef49349cea965c1f6c37e
|
|
| MD5 |
353dbc0e121697fea9a3e1a9ea2bfe3d
|
|
| BLAKE2b-256 |
9ca7e71907e900dd1eb40ad5f8506167e061cda5024acc3331e7f115b2d4b8af
|


