Save on disc added, Get image added


Project description
Basler PyPylon OpenCV viewer for Jupyter Notebook
Easy to use Jupyter notebook viewer connecting Basler Pylon images grabbing with OpenCV image processing. Allows to specify interactive Jupyter widgets to manipulate Basler camera features values, grab camera image and at once get an OpenCV window on which raw camera output is displayed or you can specify an image processing function, which takes on the input raw camera output image and display your own output.
Installation
pip install pypylon-opencv-viewer
Usage
To start working, launch Jupyter notebook and connect to Basler camera. Here is an example how you can do it:
from pypylon import pylon

# Pypylon get camera by serial number
serial_number = '222222222'
camera = pylon.InstantCamera(pylon.TlFactory.GetInstance().CreateDevice(pylon.CDeviceInfo().SetFullName(serial_number)))

# VERY IMPORTANT STEP! To use Basler PyPylon OpenCV viewer you have to call .Open() method on you camera
camera.Open()
Now we can start working with our viewer. Basically we need 3 things: connected camera, features we want to work with (you can find them in official Basler documentation, for now this library supports only boolean and numeric features) and image processing function we want to apply on grabbing images. Image processing function is not a requirement, you don't have to specify one, in this case you'll get raw camera output.
List of features
Features - list of dicts.
Dict structure:
name- camera pylon feature name, example: "GainRaw" (required)type- widget input type, allowed valuesint,float,bool,int_text,float_text(optional, default: "int")value- widget input value (optional, default: current camera feature value)max- maximum widget input value, only numeric widget types (optional, default: camera feature max value)min- minimum widget input value, only numeric widget types (optional, default: camera feature min value)step- step of allowed input value (optional, default: camera feature increment, if not exist =1)
Example configuration you can see below:
# List of features to create wigets
features = [
    {
        "name": "GainRaw",
        "type": "int"
    },
    {
        "name": "Height",
        "type": "int_text",
        "max": 1000,
        "min": 100,
        "step": "5"
    },
    {
        "name": "Width",
        "type": "int_text",
        "max": 1000,
        "min": 100,
        "step": "5"
    },
    {
        "name": "AcquisitionFrameRateEnable",
        "type": "bool"
    },
    {
        "name": "AcquisitionFrameRateAbs",
        "type": "int",
        "max": 60,
        "min": 10
    }
]
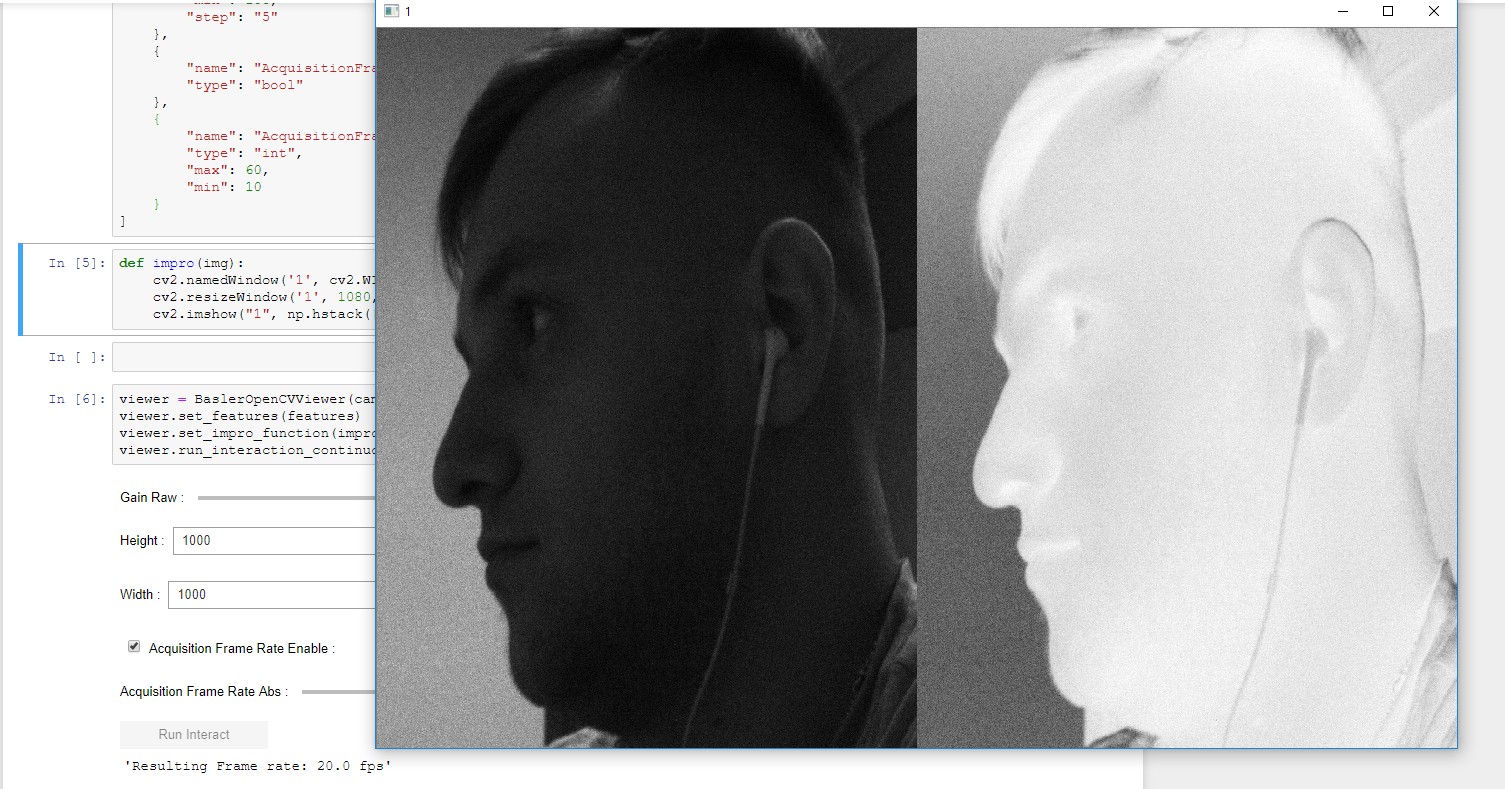
Example image processing function
Just example image processing function, which negatives the image. Image has to be the only argument in it. If you want some image to be shown, you have to do it yourself inside the function. DON'T DESTROY ALL OpenCV windows in it.
import numpy as np
import cv2

def impro(img):
    cv2.namedWindow('1', cv2.WINDOW_NORMAL | cv2.WINDOW_GUI_NORMAL)
    cv2.resizeWindow('1', 1080, 720)
    cv2.imshow("1", np.hstack([img, (255-img)]))
Viewer
We have prepared all required parts. Now we just set them to the viewer object and launch image grabbing:
run_interaction_continuous_shot for continuous or run_interaction_single_shot for single shot.
from pypylon_opencv_viewer import BaslerOpenCVViewer

viewer = BaslerOpenCVViewer(camera)
viewer.set_features(features)
viewer.set_impro_function(impro)
viewer.run_interaction_continuous_shot()
Now we see some similar image, we can setup camera features values. Push Run interaction to let it go.
To close OpenCV windows just push 'Q' on your keyboard. You don't have to launch this cell once more to try the same
procedure with the image, just change wanted values and push the button. That's it!

Save or get image from camera
In previous steps we set up camera features parameters using widgets. Now we can save camera image on disc or get raw openCV image.
# Save image
viewer.save_image('~/Documents/images/grabbed.png')

# Get grabbed image
img = viewer.get_image()


Download files
Download the file for your platform. If you're not sure which to choose, learn more about installing packages.
Source Distribution
File details
Details for the file pypylon-opencv-viewer-1.0.1.0.tar.gz.
File metadata
- Download URL: pypylon-opencv-viewer-1.0.1.0.tar.gz
- Upload date:
- Size: 6.0 kB
- Tags: Source
- Uploaded using Trusted Publishing? No
- Uploaded via: twine/1.12.1 pkginfo/1.4.2 requests/2.19.1 setuptools/40.2.0 requests-toolbelt/0.8.0 tqdm/4.26.0 CPython/3.6.6
File hashes
| Algorithm | Hash digest | |
|---|---|---|
| SHA256 |
d5b99075f9f23a760c6c7a493be6b12acf20624b8c5a0aad1b8adadb20fdfe77
|
|
| MD5 |
29f1b16500579732ba0244c8dd0e144d
|
|
| BLAKE2b-256 |
462f632e8a94f06986b2c2410aa65ea36aecf4880484e4a0c2fd031971c7758d
|


