PyQt OpenAI example
Project description
pyqt-openai

Example of using OpenAI with PyQt (Python cross-platform GUI toolkit)
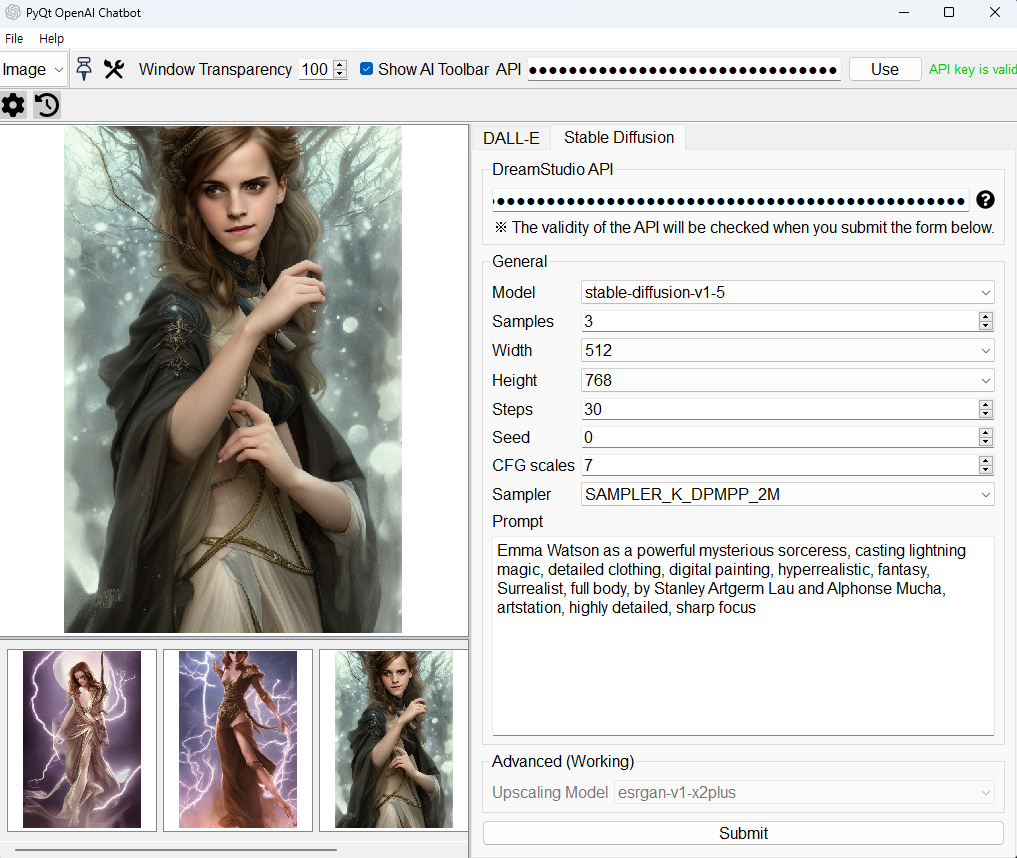
This shows an example of using OpenAI with PyQt as a chatbot and using DALL-E or Stable Diffusion as a image generation tool.
Even though this project has become too huge to be called an 'example'.
The major advantage of this package is that you don't need to know other language aside from Python.
If you want to study openai with Python-only good old desktop software, this is for you.
The OpenAI model this package uses is the gpt-3.5-turbo model(which is nearly as functional as ChatGPT) by default. You can use gpt-4 as well.
Image generation feature(DALL-E and Stable Diffusion) available since v0.1.4.
Stable Diffusion used DreamStudio API. This is not entirely free like stable-diffusion-webgui.
But this is very lightweight and more accessible. don't need CUDA, torch, expansive PC, anything.
This is using sqlite as a database.
You can select the model at the right side bar.
An internet connection is required.
Table of Contents
Feature
-
basically this is desktop application version of ChatGPT with image generation tool.
-
text streaming (enable by default, you can disable it)
-
AI remembers past conversation
-
-
conversation management
-
add & delete conversations
-
save conversations
-
rename conversation
-
everything above is saved in an SQLite database file named conv.db.
-
-
support GPT-4 and every other models below GPT3
-
support prompt generator (manageable, autosaved in database)
-
support slash commands
-
support beginning and ending part of the prompt
-
you can run this in background application
- notification will pop up when response is generated
-
you can make window stack on top or control its transparency
-
image generation (DALL-E, Stable Diffusion with DreamStudio API)
-
you can copy and download the image if you want. just hover the mouse cursor over the image.
Requirements
-
qtpy - the package allowing you to write code that works with both PyQt and PySide
-
PyQt5 >= 5.14 or PySide6
-
openai
-
aiohttp - for openai dependency
-
pyperclip - to copy prompt text from prompt generator
-
stability_sdk - for Stable Diffusion
Preview & Usage
Overview
Windows
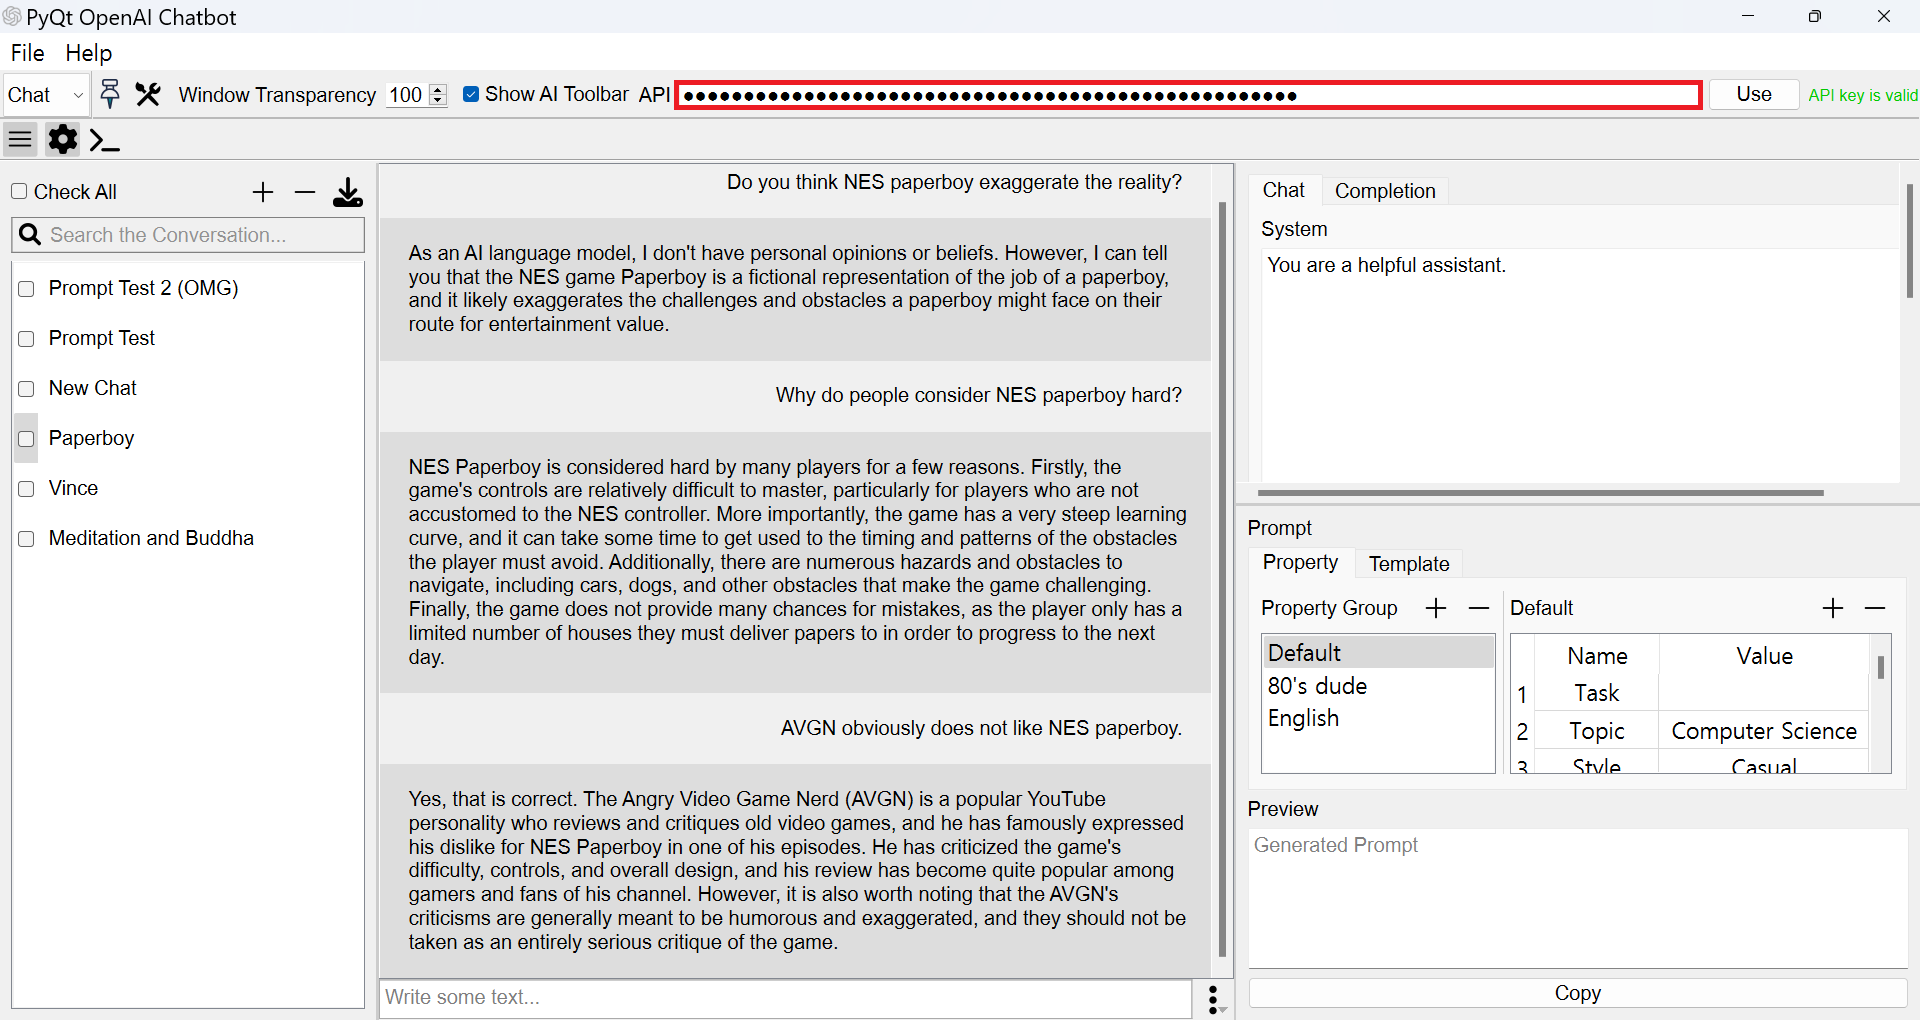
You have to write your openai api key inside the red box. see How to install
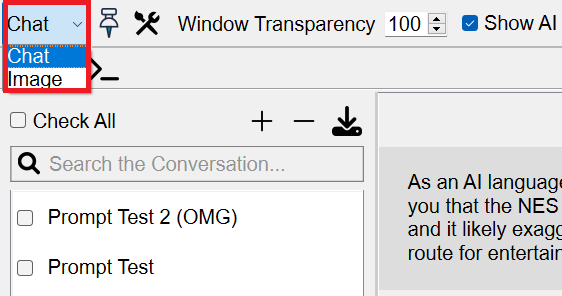
You can change screen between text chatbot and image generating tool screen.
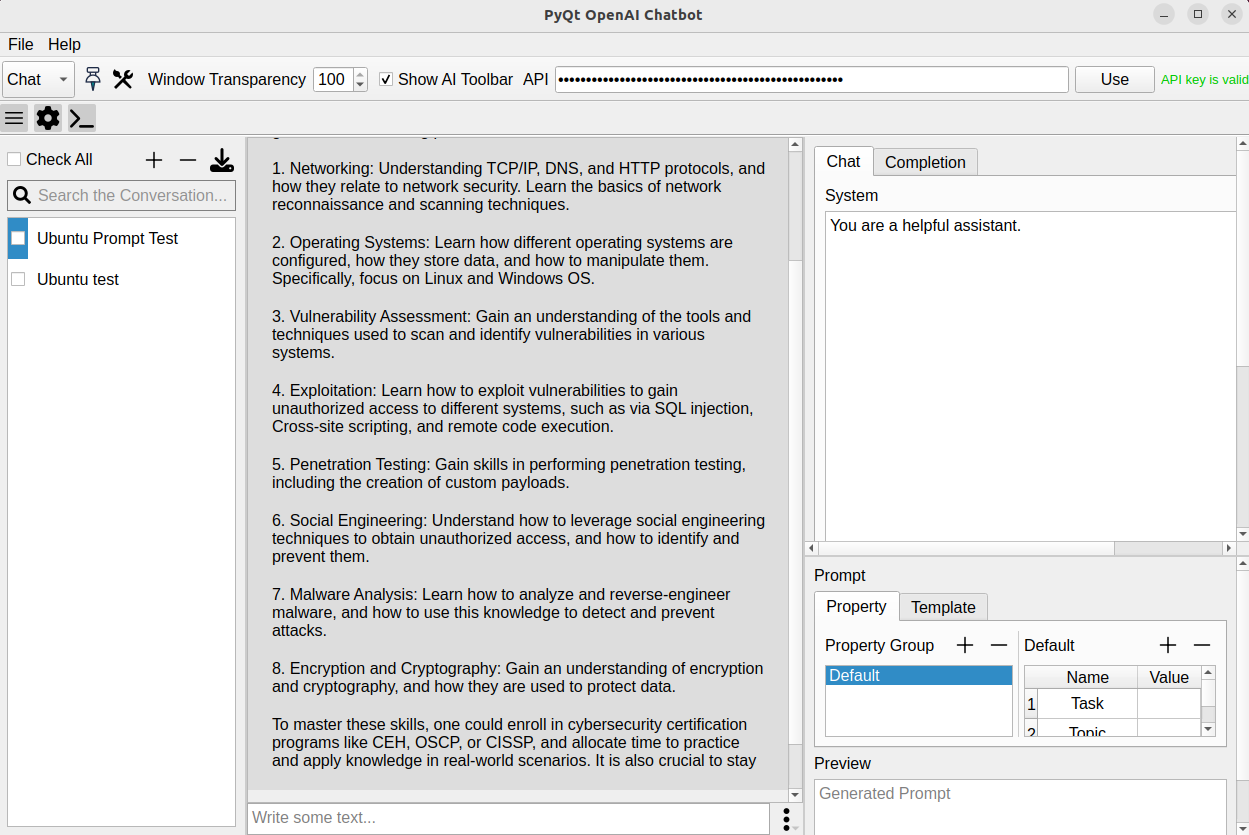
Linux (Ubuntu)
If you use MacOS, please give me the pyqt-openai screen image from it.
Conversation
Preview 1
I recorded this preview long time ago so GUI is different from the current version, but way of operating it is pretty much the same.
Preview 2 (using prompt feature)
https://github.com/yjg30737/pyqt-openai/assets/55078043/841a1505-f1cc-452e-99ab-0a9c661e6ead
Prompt Generator
How to Generate
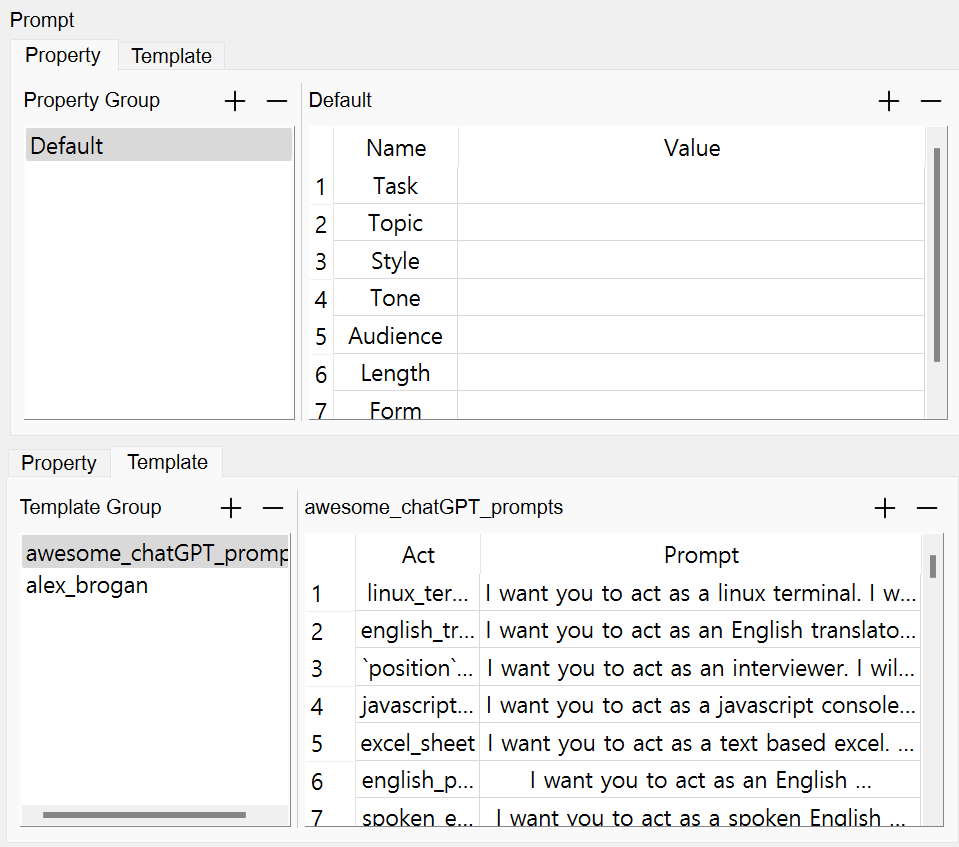
This application has two types of prompts. One is "Properties" and the other one is "Template". Properties are sets of attributes that are useful for forming the premises of a question. Templates are sentences that correspond to a single command. You can input a command to generate a sentence. This can be used as a question in itself.
Both types can be managed as groups. After cloning or installing, if you run the program immediately, you will be able to see the default group and the items included in the group, just like the screen.
For properties, there is a group named "Default" that provides a set of attributes referenced here.
For templates, there are the "awesome_chatGPT_prompt" and "alex_brogan" (example prompt for Alex Brogan) groups provided. Any custom template items created prior to version 0.1.6 will be moved to the Miscellaneous group.
With using these prompts you can pretty much get any response you want.
You can use the additional prompt feature by "prompt menu" right next to "prompt input" field.
Since v0.1.6, awesome-chatgpt-prompt is included as template group by default.
Prompt Generator Preview
Generating the prompt (Properties)
https://github.com/yjg30737/pyqt-openai/assets/55078043/e168c0e6-41b4-4ad5-95e6-3c42c9c23602
I recorded using the Windows recording feature. As a result, the "Add Dialog" that prompts for entering a group name does not appear in the preview. When you add a group, you will see the Add Dialog as expected.
Then, how to generate template type prompt? Click any item in the group, it will be shown in the preview.
You can copy that generated text with clicking "copy" button and include it to your prompt input.
If you add a property group or template group with items, you can use it as a command by typing its name to the prompt input.
Use prompt as a command
https://github.com/yjg30737/pyqt-openai/assets/55078043/df0d3923-1fbe-4dda-af6f-4e4d1e572553
In this preview, i pressed the keyboard shortcut of each actions(show beginning, show ending, support prompt command) to use it rather than clicking them with mouse.
I made the command suggestion GUI resemble the Discord command autocomplete popup, with which a lot of people have become accustomed.
Image Generation
How to Install
-
git clone ~
-
cd pyqt-openai
-
pip install -r requirements.txt
-
cd pyqt_openai
-
You should put your api key in the line edit. You can get it in official site of openai. Sign up and log in before you get it.
Be sure, this is a very important API key that belongs to you only, so you should remember it and keep it secure.
- python main.py
If installation doesn't work, you can contact me with bring up new issue in issue tab or check the troubleshooting below even it is only about very specific error.
Note
If you use Linux and see this error:
qt.qpa.plugin: could not load the qt platform plugin "xcb" in "" even though it was found


this application failed to start because no qt platform plugin could be initialized, reinstalling the application may fix this problem
run this command:
sudo apt-get install libxcb-xinerama0
Troubleshooting
If you see this error while installing the openai package
subprocess-exited-with-error
download the package itself from pypi.
Unzip it, access the package directory, type
python setup.py install
That will install the openai.
Note: I don't know this can happen in newer version of openai as well, so tell me if you know about something
Contact
You can join pyqt-openai's Discord Server to have a conversation about it or AI-related stuff 🙂
Note
I recommend to install sqlite management software. It's not necessary to run this app (obviously), but it's good practice to manage database about conversation history with AI and to know how this works.
TODO list
-
DB for images (to further experiement of both DALL-E and Stable Diffusion or other image generation engine)
-
show the explanation of every model and terms related to AI (e.g. temperature, topp..)
-
save conversation history with other format (xlsx, csv, etc.)
-
tokenizer
-
highlight the source (optional, eventually)
-
support multiple language
-
use SQLAlchemy (maybe not)
-
show reason when the chat input is disabled for some reasons
-
add the basic example sources of making deep learning model with PyTorch (eventually)
See Also
-
join gpt4 waitlist - i took 1 month to get access from it
Project details
Release history Release notifications | RSS feed
Download files
Download the file for your platform. If you're not sure which to choose, learn more about installing packages.
Source Distribution
Built Distribution
File details
Details for the file pyqt-openai-0.1.61.tar.gz.
File metadata
- Download URL: pyqt-openai-0.1.61.tar.gz
- Upload date:
- Size: 90.5 kB
- Tags: Source
- Uploaded using Trusted Publishing? No
- Uploaded via: twine/4.0.2 CPython/3.10.4
File hashes
| Algorithm | Hash digest | |
|---|---|---|
| SHA256 | 3ba02e354064e34dc01ba9b052ca79a73eb17e45ff13c8703417c321e4f7213e |
|
| MD5 | a7365767b1a797df40cb3870a1147587 |
|
| BLAKE2b-256 | ac99fb4d90b19073bff410a656df1ad901d72d27c589f6f6df934b252caa0729 |
File details
Details for the file pyqt_openai-0.1.61-py3-none-any.whl.
File metadata
- Download URL: pyqt_openai-0.1.61-py3-none-any.whl
- Upload date:
- Size: 111.4 kB
- Tags: Python 3
- Uploaded using Trusted Publishing? No
- Uploaded via: twine/4.0.2 CPython/3.10.4
File hashes
| Algorithm | Hash digest | |
|---|---|---|
| SHA256 | fd417a9f693b155e8feeb217b1d93825dcc62b45984a53ad8cc4690b058d3af1 |
|
| MD5 | b50e1df87cfe08eb60c3c6305225a624 |
|
| BLAKE2b-256 | 6b9d436344590006d7fff20278c67cdf953155626b88ad72475b669399da3a11 |


