Quick Sqlite Tools

Project description
Quick SQLite Cmd/Script Tools
Introduction to Qsqlite
- A command line tool to interactively manipulate sqlite or mysql databases for fast data processing, analysis, statistics, and graphical presentation;
- General sqlite operations (just like the sqlite cmd tools); can be easily manipulated using sql statements.
- Support sqlite and sqlite memory database (:memory:), support mysql database, copy whole mysql database to sqlite, copy tables between different sqlite databases.
- Load csv/tsv or json data, or export select results to csv/tsv file.
- Draw graphs with the data obtained by select statement, such as: scatter, line, histogram (distribution), violin graph (based on data distribution).
- Provide a series of extended sqlite functions, supporting regular operations, text-based sum operations, Chinese ID recognition, and other extended functions.
- A script interpreter that can write script files to batch and automate a series of operations to achieve data processing, analysis, and report output;
- Provides sql statement-based scripting capabilities, allowing you to automate batch operations and output the results to an html file.
- Support extended loop/lend with nested support for loop statements, which is convenient for some operations that can't be handled by sql statements.
- Support for formatting the output syntax of select results, to facilitate the generation of formatted reports.
- The graphs are saved inline in the output html file, so that only a single html file can be sent to show all the graphs in their entirety.
- A Web Server and Job Server that can provide web or scheduled task processing backend services based on a database;
- The web server can be scripted to enable data query and data insertion operations to facilitate the interaction of data statistics and analysis results in a browser-based.
- Job server can be defined by scripts to achieve regular data cleaning, data aggregation, analysis, report generation, and output as local files or send emails to share the results.
- A python libray Can be imported using: from Qsqlite import Qexec , for use in python or jupyter/ipython ipynb notebooks using Qexec(cmds) calls, cmds can be a string with newlines,including a series of commands or a command.
- Summary: With sqlite's powerful sql syntax and high performance, Qsqlite hopes to enable you to efficiently use the power of sqlite and sql syntax to quickly organize, analyze, aggregation, and show result; and collaborate with Excel by exporting/importing csv/tsv files when needed to achieve greater efficiency.
Quickly start
- install
- pip3 install Qsqlite , and then open cmd/Term enter: Qsqlite
- Copy Qsqlite.py to local directory, and then open cmd/Term python Qsqlite.py (please using python3)
- Now you can enter sql cmd or ? get help or copy below code to try it.
  # open memory database
  open :memory:
  # create demo table
  create table demo(ID text, Name text, Age integer)
  # using loop/lend insert data to table
  loop [ [i, i**2] for i in range(1,100) ]
  insert into demo values ('_^1_', 'User_^1_', _^2_)
  lend
  # select data
  info
  select count(*) from demo
  select * from demo limit 10 >[- ID: _@1_, Name: _@2_, Age: _@3_]
  # draw data
  draw l select age from demo; draw ll select id,age from demo
- Try running the demo script file in the demo directory, using the python3 Qsqlite.py script filename to run.
- qloop.txt loop/lend function demo
- qdraw.txt html output and drawing demo (requires two csv files in the demo directory)
- qweb.txt Web server demo
- qjob.txt Job task server demo
- qnotebook.ipynb iPython notebook demo
Qsqlite function
1. Basic database operation functions
- 1.1 Open a SQLite database
- open dbname opens a sqllite database file.
- open :memory: open sqlite memory database file; can use memory database for temporary data processing, transit.
- db show current open database name.
- If the provided file name does not exist, a new database file will be created.
- 1.2 MySQL Database Support
- create a MySQL database connection with mysql dbname server user password
- For example: mysql test 127.0.0.1 root pwd (To set the MySQL port number, use: mysql test 127.0.0.1:3308 root pwd)
- You can set multiple MySQL databases with mysql command and then switch them with open;
- Enter mysql will display currently mysql server list; if none setup, a reminder will show;
- Use open #dbname# to open/switch the MySQL database;
- some MySQL commands
- show databases Lists all databases on the database server
- show tables Lists all tables in the current database
- show keys from tb Lists the indexes contained in a table
- 1.3 Common Commands
- ? Show help info, or ? str search help str.
- clear Clear Screen. (on windows using cls).
- { } Code block support. Allows you to separate code into lines for easy reading and understanding.
     # support sql code block
     {
       select v.a, c.b, info from v, c
         where v.id = c.id and
           c.y > 1000
     }
- info Shows the table information of the currently open database
- info 1 Show index information for the currently open database
- info 2 Show the currently connected MySQL tables (including the number of records and the space occupied by the tables)
- info 3 Show the table structure of the currently connected MySQL with comment information
- dinfo on/off Turn on/off the display of database query debugging information
- ls Lists files in the current directory, supports ls *.db wildcard, easy to filter files
- l List the 12 most recently used operation commands
- la Lists all history commands
- l0 execute the last operation instruction, you can also use the corresponding serial number to execute the previous operation instructions, for example: l3, l22
- l> file Save history to file.
- l< file Load history from file.
- 1.4 Database copy operation
- copy db tableDest select * from tabSource
- is used to copy table data between multiple databases, for example, to copy the contents of the tabSource table in the current database to the tableDest table in the other database.
- Example: Copy the contents of tableA in database A.db to NewA in database B.db
- open A.db
- info 1 , list the database table structure with info, and copy the tableA table structure creation statement
- open B.db , open B database, use the creation statement you just copied to create the NewA table in B database
- open A.db , switch back to database A
- use the [ copy B NewA select * from tableA ] command to copy the tableA table contents of database A to database B NewA table (because of the use of select statement, so you can use where conditions or other ways to filter, organize, and process the data flexibly)
- you can use [ open :memory: ] to open memory database for data transfer and processing; you can also use MySQL database for operation
- dump #mysqldb# sqlitedb
- Copy all tables from mysqldb database to a sqlite database; this command automatically scans the mysql database table structure, creates the table in the sqlite database, and completes the data copy.
- You can use dump #mysqldb# :memory: to copy data to a memory sqlite database
- copy db tableDest select * from tabSource
- 1.5 Query output formatting operations
- >[ ]
- The default select query results are listed automatically without special handling, unless you want to format the output, which can be adjusted with >[ ] after the statement
- For example select * from table >[- ID: @1, Name: @2(@3), Age: @4]
- Here @1 is the first column returned by the select statement, @2 is the second column, and so on; if you want to display the order number (starting from 1 and increasing automatically), you can use @0, for example: select * from table limit 10 >[ @0 ID: @1, Name: @2]
- >[ ]
- 1.6 Execute Script
- exec file Execute file script, etc: exec qTest.txt will execute qTest.txt script.
2 import and export data
- 2.1 Load csv/tsv file using: loadcsv file.csv tab01
- Load the file.csv file, create the table tab01 automatically according to the csv column, and insert the data.
- tab01 ( "r1" text, "r2" text, "r3" text )
- If the csv file contains table header information (the first line of the csv file), the parameter 1 can be added at the end for correct identification.
- using: loadcsv filecsv tab01 1
- Set the table information based on the csv table header information, for example
- tab01 ( "ID" text, "Name" text, "Tele" text )
- loadcsv also support tsv format file (\t split type), just using: loadcsv test.tsv tb1 1
- loadcsv also support bioinformatics .maf/.vcf/.sam/.gtf/.gff/.gpd/.gct file, just using: loadcsv test.maf tb1 or loadcsv test.vcf tb1
- loadcsv support gzip / zip file, Judging by file extension; etc: test.tsv.gz / test.gtf.gz / test.csv.zip
- Load the file.csv file, create the table tab01 automatically according to the csv column, and insert the data.
- 2.2 Exporting csv/tsv
- Use >csv csv/tsv file name 0/1 (The parameter 0/1 indicates whether to export the table header information. 0-no export, 1-export)
- if file name has xxx.tsv will export tsv format, otherwise csv format.
- if file name has xxx.tsv.gz or xxx.csv.gz , will be exported in the corresponding format and gzip compressed.
- Example: select * from table1 where n=300 >csv user1.csv 1 , export the contents of a table to user1.csv file by select and export the table header information (the first line of the exported csv file is the database table header information)
- Example: select ID, name, sum(val) as val from tab1 group by ID limit 100 >csv test1.csv 0
- 2.3 Load Simply json data, Example: JSON file t1.json like this:
[{"Corp": "Apple", "ID": 123}, {"Corp": "Microsoft", "ID": 456}, {"Corp": "IBM", "ID": 789}]
- using: loadjson t1.json corp
- will read t1.json file, and create corp table
- corp ( "Corp" text, "ID" integer )
- and then insert all json file data.
- will read t1.json file, and create corp table
- 2.4 Load Complex json data, Example: JSON file t2.json like this (all we need data in "Return" item, so need let Qsqlite know it):
{"Result":0, "Return":[{"Corp": "Apple", "ID": 123, "Product":[{"ID":1,"Name":"iPhone"}, {"ID":2,"Name":"iPad"}, {"ID":3,"Name":"Mac"}], "Profit":[{"Type":"Profit1","P":3456789}]}, {"Corp": "Microsoft", "ID": 456, "Product":[{"ID":11,"Name":"Windows"}, {"ID":12,"Name":"Office"}]}, {"Corp": "IBM", "ID": 789, "Product":[{"ID":21, "Name":"MainFrame"}], "Profit":[{"Type":"Profit1","P":1234567}, {"Type":"Profit2","P":336699}] }], "Ref":1234567}
- using: loadjson t2.json ncorp Return
- will read t2.json file, get Return item info, create ncorp, ncorp_Product, ncorp_Profit 3 tables.
- ncorp ( "Corp" text, "ID" integer, "Product" text, "Profit" text )
- ncorp_Product ( "t_ID" text, "ID" integer, "Name" text )
- ncorp_Profit ( "t_ID" text, "Type" text, "P" integer )
- why 3 tables? because Qsqlite found json data include a sub-list call Product and Profit, so auto create other 2 sub-tables.
- Note: Currently only the first level of sub-table creation is supported, it will not be recursive to the following levels.
- will read t2.json file, get Return item info, create ncorp, ncorp_Product, ncorp_Profit 3 tables.
- 2.5 Load Bioinformatics GenBank Format Features Data.
- using: loadgb gbfile tb01
- load bioinformatics GenBank file (etc: .gb/.gbff/.gpff) features info to table.
- A file that will import to three tables, table structure
- (01) tb01 (input table name)
- locus text, type text, gene text, start integer, end integer,location text, product text, protein_id text, note text
- (02) tb01_def (table name add _def, corresponding to the definition of each LOCUS)
- locus text, locusinfo text, reference text, accession text, version text, dblink text, keywords text, source text, organism text, comment text
- (03) tb01_ref (table name add _ref, corresponding to all the contents of each LOCUS' REFERENCE description)
- locus text, reference text, title text, authors text, journal text, pubmed text, remark text
- (01) tb01 (input table name)
- A GenBank file may contain more than one Features block, which can be distinguished by locus;
- start, end content only for (123..345) Simple location, for join/complement such complex location, fill in 0, 0, real content in the location field.
- The note field is a compound field that aggregates all other contents of Features here, using item1=value1;item2=value2 ... Schema expression.
- The translation content of Features, the file's sequence information ORIGIN are ignored.
- Support xxx.gb.gz or xxx.gbff.gz, if file name last .gz , will open it's as gzip format.
- using: loadgb gbfile tb01
- 2.6 Crawl website data, parse and write to database
- using: loop loadweb url=https://xxx.xxx.com/xxx re=(\d+), base on python regular module, Qsqlite loop nesting function, can achieve complex web data crawling and content extraction, and then write to the database.
- loadweb parameter:
- Required: url=web url address, include https:// or http://. Qsqlite will crawl the web page, and then extract the content using the pythone regular module.
- Required: re=the regular expression. This expression using by Python re.findall against the fetched page, get data.
- Optional: ext=additional parameter to pass the parameters from the previous loop to the next, e.g. ext=^1, ^3
- Example: (For more detailed and complete examples, please refer to the demo directory qCrawlWeb.txt script.)
# This example will crawl the content of the HPA, extract the data, and write it to a database table for the next level of content crawling.
open :memory:
# Create crawl task table, save page url, number of records, crawl flag
create table job(pre text, type text, n integer, source text, flag integer)
# Crawl/parse data
loop loadweb url=https://www.proteinatlas.org/humanproteome/proteinclasses re=<td nowrap>((?: ){0,20}).+?</td>(?:.|\n)+?<a href="/search/protein_class:(.+?)">(\d+)</a>(?:.|\n)+?rel="noopener">(.*?)</a>
insert into job values('_^1_', '_^2_', _^3_, '_^4_', 0)
lend
update job set pre = replace(pre,' ','-')
- 2.7 Downloading files from websites
- Using: download url filename
- Example: download https://xxx.xxx.com/web/file01.csv t.csv (will download the linked file to the local t.csv; if the file already exists, it will be skipped)
- This function can be combined with 2.6 crawl analysis function to achieve batch file downloads by replacing parameters with loops.
- Using: download url filename
3. Draw functions (line, histogram, Violin box, scatter)
- 3.1 draw s Scatter plot
- One dataset, as Y-coordinate, automatically generates X-coordinate from 0-N.
- draw s select y from table
- Two data sets, then as X,Y coordinates.
- draw s select x, y from table
- Three data sets, the first two as X,Y coordinates, the second as point size Parameters.
- draw s select x, y, size from table
- Four data sets, the first two are X,Y coordinates, the last two are point size, point color parameters.
- draw s select x, y, size, color from table
- One dataset, as Y-coordinate, automatically generates X-coordinate from 0-N.
- 3.2 draw l line plot, plot one or more sets of data���
- One dataset, as Y-coordinate, automatically generates X-coordinate from 0-N.
- draw l select y from table
- Two data sets, then as X label, Y coordinates.
- draw l select x_label, y from table
- Multiple data sets, the first one as X_label, The latter all as Y-coordinates, superimposed.
- draw l select x_label, y1, y2, ... from table
- draw l2 means the data of X-axis is not the system generated 0-N equal scale data, but the first item of select result.
- draw l2 select x, y1, y2 from table
- draw l2 select x, y1, y2, y3 from table
- draw l2x select x, y from table (logarithmic processing of X-axis)
- draw l2l select x, y from table (double logarithmic processing of X-Y-axis)
- draw lx means logarithmic processing of X-axis; draw ly means logarithmic processing of Y-axis; draw ll means double logarithmic processing of X-Y-axis;
- draw ls plots multiple columns of data on different subplots, side by side;
- draw ls select x_label, y1, y2 from table (draw two sub-plot, one is x_label, y1, other is x_label, y2)
- draw lsy select x_label, y1, y2 from table (draw two sub-plot and ogarithmic processing of Y-axis)
- One dataset, as Y-coordinate, automatically generates X-coordinate from 0-N.
- 3.3 draw b bar plot, plot one or more sets of data���
- One dataset, as Y-coordinate, automatically generates X-coordinate from 0-N.
- draw b select y from table
- Two data sets, then as X label, Y coordinates.
- draw b select x_label, y from table
- Multiple data sets, the first one as X_label, The latter all as Y-coordinates, superimposed.
- draw b select x_label, y1, y2, ... from table
- draw b2 means the data of X-axis is not the system generated 0-N equal scale data, but the first item of select result.
- draw b2 select x, y1, y2 from table
- draw b2 select x, y1, y2, y3 from table
- draw b2x select x, y from table (logarithmic processing of X-axis)
- draw b2l select x, y from table (double logarithmic processing of X-Y-axis)
- draw bx means logarithmic processing of X-axis; draw by means logarithmic processing of Y-axis; draw bl means double logarithmic processing of X-Y-axis;
- draw bs plots multiple columns of data on different subplots, side by side;
- draw bs select x_label, y1, y2 from table (draw two sub-plot, one is x_label, y1, other is x_label, y2)
- draw bsy select x_label, y1, y2 from table (draw two sub-plot and ogarithmic processing of Y-axis)
- One dataset, as Y-coordinate, automatically generates X-coordinate from 0-N.
- 3.4 draw h plots the distribution (histogram), taking only the first column of the result set;
- draw hx indicates logarithmic processing of the x-axis of the distribution;
- draw hy denotes logarithmic processing of the Y-axis of the distribution;
- draw hl denotes double logarithmic processing of the X-Y axis;
- 3.5 draw v means to draw the violin box distribution, taking only the first column of the result set;
- 3.6 draw multiple function, which plots different types of plots in a single output image in subplot mode, and divides the subplots by ;. For example, the following example will draw 4 subgraphs
- draw l select a,b,c from t1; draw hl select a from t2; draw ll select a,b from t3; draw v select a from t4
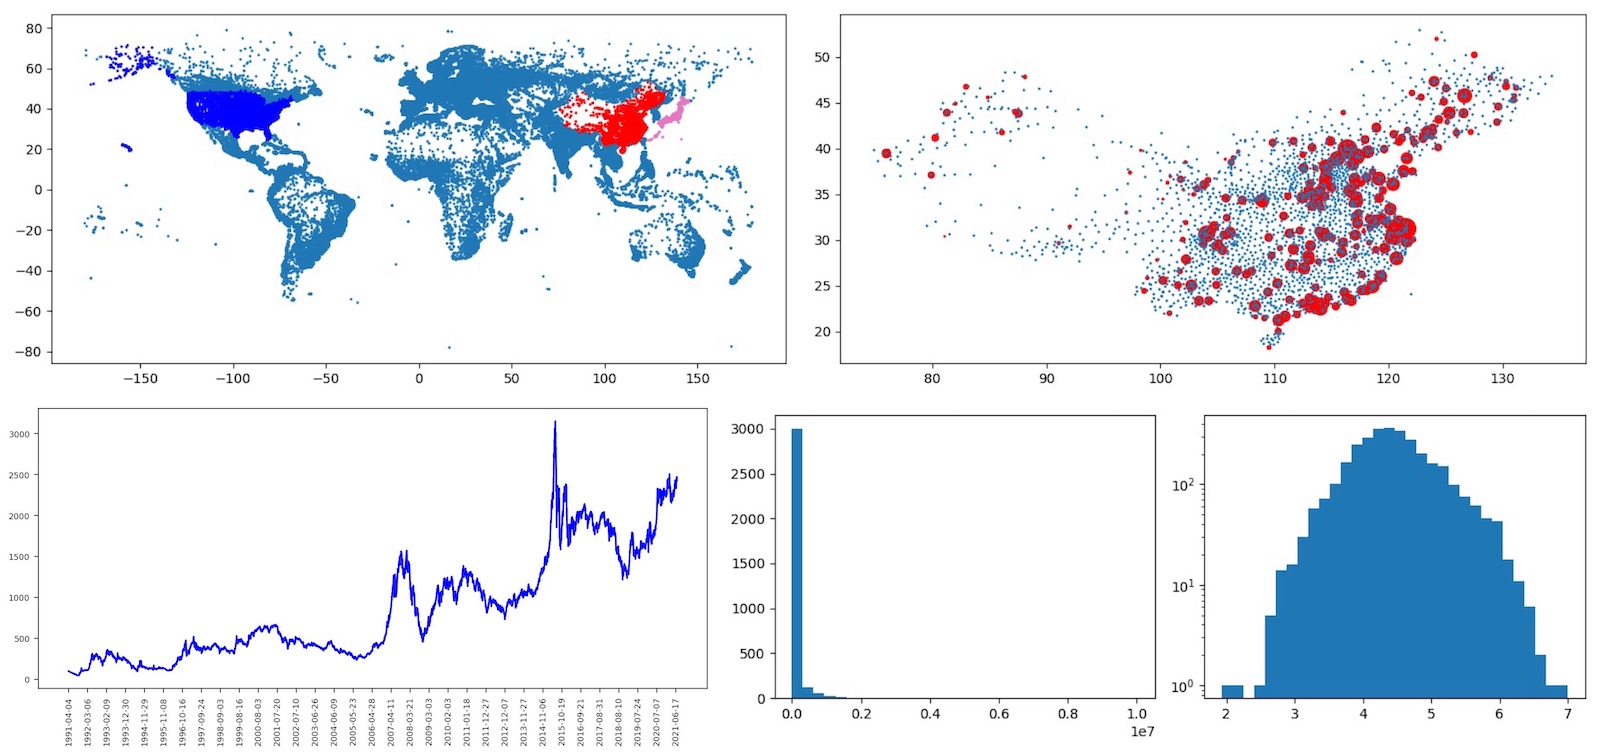
- 3.7 The demo script for the Draw function can be found in the qdraw.txt script file in the Demo directory. Run it with python3 Qsqlite.py qdraw.txt, and a city_map.html file will be generated. (Note: The demo script will use the cn_city_l3_xy.csv and cn_city_l2_xyp.csv files in the demo directory, please make sure they exist)
4. SQLite extended functions
- row string accumulation: csum(column name), like SQLite's default sum() function, sum() sum the values of each column and returns the total; while csum() combine each column as a string.
- select csum('apple','ibm','oracle') return 'apple ibm oracle'
- select mID,csum(nName),count(*) from T group by mID or select csum(nName||'-'||nOrg) ...
- regular judgment function: regexp(regular expression, column/string) used to determine whether the content of a column matches the regular expression; the return result is Boolean (True/False)
- select * from tab1 where regexp('^1[0-9]{9}$',mobile) = false
- regular extract function: regfind(regular expression,column/string,n) used to extract content from column/string using regular, n=1 means get the 1st result, 2 means get the 2nd result, n = 0 means get all results, split by spaces between results.
- select regfind('1(. *?) 2','1hello2 1good2',1) n=1 return hello, n=2 return good, n=0 return hello good
- regular replacement function: regsub(regular expression,replacement string,column/string) Use regular matching to replace a string
- regsub('([\d]{3})','#\1#','Test000-372') -> Test#000#-#372#
- string de-duplication: destr(column/string,separator) used to split a string connected by a separator, de-duplicate the elements, and then combine them back.
- select destr('123456 345 789 345',' ') Return: 123456 345 789
- Chinese ID validity check: idcheck(column/string,f) return true if the ID is valid; (f=0 15/18 bits are counted, f=1 only 18 bits, f=2 only 15 bits).
- Chinese ID checksum bit generation: idchecksum(column/string) according to 17 bits, generate the last checksum bit.
- Chinese old ID card conversion to new: idconv(column/string) will be the old 15 for the ID card, automatically converted to 18 for the (including check digit calculation)
- power operation: power(2,3) means calculate 2^3;
- power(2,0.5) calculates the square root of 2; power(2,1.0/3) calculates the cube root of 2, note that the use of 1.0, not 1
- standard deviation calculation: std(2,3,4,5) Used in database statistics, e.g. select std(mM) from T1 calculate the standard deviation of a set of data;
- Median calculation: median(2,3,4,5) Used in database statistics, e.g. select median(mM) from T1 to calculate the median of a set of data;
- list index selection: slist('1,2,3,4,5',2) return 3, that is, the string will split by ',' and then select the second element (starting with 0)
- If the index exceeds, then return the last element; can use negative values, for example: slist('1,2,3,4,5',-2) return 4; similarly, beyond the range, return the first value; can also slist('apple,ibm',1)
- return the first N items of the spliced string: ctop('string', 'split char', n)
- ctop('1 2 3 4 5', ' ', 2) return '1 2'; ctop('1,2,3,4,5', ',', 3) return '1,2,3'
- When using csum to combine the result set into a string, if you want to get the topN items, you can use this function, for example: ctop(csum(name||count(*)),' ',10), so that for each group by data, only the first 10 are selected
- return the number of regulars found: regfn(',','1,2,3,4,5,6') returns 5, meaning 5 commas were found
- N row moving average calculation: navg(column name, n)
- Suppose a stock price table, storing the price information of each stock by date, structure: ID text, date text, open integer, close integer
- If you want to calculate the 7-day moving average of the open price, it is difficult to do it at once with SQL statements, but this function provides such support
- draw l select date, open, navg(open, 7) from stock where ID='Apple'
- The above statement draws the open price curve, and overlays the 7-day moving average;
- Restrictions: Because this extension uses global variables, only one navg statement can be used in a query, if more than one is used, it will result in data errors;
- inter-row difference calculation: rdelta(column name)
- Suppose a covid19 table, storing the number of confirmed in each country by date, with the following structure: CID text, date text, confirmed text
- You want to calculate the new confirmed per day, because the table include total confirmed , so you actually need to calculate the difference between two rows. this function provides such support
- select date, rdelta( confirmed+0 ) as d_confirmed from covid19 where CID='US'
- Why using confirmed+0? because confirmed is text type, using this method conver to integer.
- The above statement calculates the number of new confirmed per day; the first row is filled with a null value because the data cannot be calculated.
- Restrictions: Because this extension uses global variables, only one rdelta statement can be used in a single query, if more than one is used, the data will be incorrect;
- inter-row string difference counter cindex(column name)
- Suppose a book book table, record book information by type, table structure: ID text, type text, name text, content as follows:
001 G01 book1
002 T11 book2
003 G03 book3
004 T11 book4
005 T11 book5
006 G03 book6
007 G03 book7
- Want to get 2 books from each type, if use group by, only get one book from each type, this function can be implemented simply
- select type, ID, name, cindex(type) as cnt from (select * from book order by type) as b where cnt <4 , the result is as follows
G01 001 book1 2 G03 003 book3 2 G03 006 book6 4 T11 002 book2 2 T11 004 book4 4- Using a subquery, sort the data; this ensures that we need the type to be in order, so that we can correctly identify type changes;
- In the where condition, we want to get 2 books, but why 4? Because cindex is called 2 times per row (the select statement cindex(type) as cnt part, and the where cnt<4 part), so *2 is needed
- Constraint: Because this extension uses global variables, only one navg statement can be used in a single query, and using more than one will result in data
- Caution: The use of the cindex() value in the where condition requires 2, i.e., when you need <10, set it to <102
- Return the combined descriptive statistics summary(column name)
- This function will return a string containing: count; maximum; minimum; mean; median; standard deviation; 16 interval data distribution
- This gives you a comprehensive statistical description of the entire data in one function
- result like: cnt=176; max=1.8; min=0.0; avg=0.1029; med=0.06434; std=0.18108; his=[86,76,7,2,1,1,0,2,0,0,0,0,0,0,0,1]
5. Scripting Support
- 5.1 Scripting Overview
- The scripting feature allows you to put a series of commands into a script file and execute them in batches when needed;
- Use python3 Qsqlite script filename to execute the script file;
- In the script file, if you need to comment the content, you can use a python-like commenting method
- Comment with #
- Comment the content with ''' for multi-line comments
- 5.2 Output to html function
- html html filename turns on output to html files, chtml turns off html output. (This allows a part of the script to be displayed on the screen and another part to be output to the html file, and when chtml is encountered, the file will be closed and the latter content will be output to the screen)
- Example:
  # Open database
  open test.db
  # Open html file output function
  html test.html
  echo ## test report
  select * from demo where name like '%apple%' >[- ID:_@1_, Name:_@2_]
  echo ## Icon test
  draw l select date, scorp from report
  ## Close html file
  chtnl
  # This part will be output to the screen
  select * from test
- You can output one part to a file (html file1 ... chtml), and another part to another file (html file2 ... chtml);
- The output to html function, for all graphics operations (draw), is embedded in the html file, so you only need to copy a single html file to include the image automatically;
- 5.3 echo output
- echo will output everything that follows to the terminal or html text
- Take advantage of the echo feature to beautify html formatting, for example:
- An echo will output a blank line directly
- echo can be followed by some html statements, for example
- You can also use echo to output styles after html to change the display mode
  html test.html
  echo <style type="text/css">ul {list-style: square;} </style>
  echo # Test Report
  echo ## Report 001
  echo * Here blod content
  echo - item 001
  echo  - subitem 001.001
  echo <h1>Title</h1>
  echo <br>
  echo <a href="/list?test">Get List</a>
  chtml
- 5.4 loop/lend Loop function
- The loop / lend function can solve many problems that cannot be achieved with a single SQL statement, and can be combined with in-memory database relay to achieve more powerful functions;
- The loop command can be followed by a query statement or a Python like list (simulating a SQL query statement returning a result set)
- loop select mID, name from tab1 where mTime > 10 (this query returns two result sets ^1 -> mID, ^2 -> name)
- loop [ (123,'name1',1.2), (345,'name2',2.3) ] (this way we can define the result of the loop manually, e.g. ^1 -> 123, ^2 -> name1, _^3 -> 1.2)
- loop [ (i+1, i+2) for i in range(12) ] can be used to construct the loop in this way (Python syntax, since it is parsed by eval)
- loop actually has an implicit argument ^0, which is the row number of the result set, e.g. select returns 1 for the first row and 2 for the second, or the [()] list returns 1 for the first and 2 for the second.
- The instruction sandwiched between the loop / lend instructions will be executed multiple times depending on how many select or list elements follow the loop;
- Example: use direct definition of result list, one result per line, two lines in total; use echo to display the content (trick: ^ substitution can be used in >[])
  loop [ (333,), (666,) ]
  echo # _^0_  --  _^1_
  select * from tab1 where name like '%Test_^1_%' and id = _^0_ >[ Query %Test_^1_% Result���_@1_, _@2_ ]
  lend
- loop / lend supports nested functions, you can use nesting to achieve complex functions, e.g.
  # loop need open database
  open :memory:
  # level 1
  loop [ (i+1, ) for i in range(9) ]
    echo ==== _^1_ ====
    # level 2
    loop [ (_^1_, i+1, _^1_*(i+1), ) for i in range(9)]
      echo _^1_ * _^2_ = _^3_
    lend
  lend
- loop / lend together with :memory: memory database can solve many complex query requirements. Example: count two parameters by date and merge them together; (combined with group by / max for vertical merging)
  open :memory:
  create table T (gtime text , c integer, n integer)
  open db1
  loop select substr(mBTime,1,10) from tab1 where mTime > 10 group by substr(mBTime,1,10)
  copy :memory: T select '_^1_',count(*),0 from tab3 where xxx group by xxx
  copy :memory: T select '_^1_',0,count(*) from tab6 where xxx group by xxx
  open :memory:
  select gtime,max(c),max(n) from T group by gtime >[_@1_ Arg1: _@2_, Arg2:_@3_]
- 5.5 Advanced functions of loop
- In combination with the getTableCols function, loop can convert a table with many columns into a horizontal table.
- For example, table htab (id text, name text, "1/1/21" text, "1/2/21" text, "1/3/21" text ... "12/31/21" text) with 367 columns
- Want to convert to a 4 column table vtab (id text, name text, date text, v integer)
- In combination with the getTableCols function, loop can convert a table with many columns into a horizontal table.
  # This loop will list all the date columns of the table ( [2:] means extract the date column after id, name )
  # getTableCols('tableName') returns data [ orderID, col name, col type, ...] , we use the second data col name.
  loop [ i for i in getTableCols('htab')[2:] ]
    # Each loop will read one column of data and insert it into the vtab table
    # Note: the '_^2_' means string for date; the "_^2_" means htab's cols
    insert into vtab select id, name, '_^2_', "_^2_" from htab
  lend
- For a more detailed and complete example, please refer to qcov.txt in the demo directory (download the Hopkins University covid-19 dataset from GitHub, and then convert it, using it)
6. WebServer support (single-threaded)
- 6.1 Setting up the web server
- Use @webserver ip:port in the script file to start the web server; scripts with @webserver are judged to be web scripts, and the program will keep running until the user ctrl + c to exit, or terminate the process.
- WebServer only supports single thread, just to make it easier to access data with the web, not for performance reasons
- After starting the server, use the open statement to open the database so that subsequent pages can access it.
- 6.2 Adding a Web page
- Add a page/function description with @page url, below this statement is the standard database manipulation script; use multiple @pages to configure multiple page functions
- The parameters that follow the browser url are parsed inside the script as #1 #2 ... pattern. For example /user?apple&ipad&iphone, then: #1 for apple, #2 for ipad, #3 for iphone, connected by &; if there is no corresponding variable, then #2 or #3 will be used instead.
  # open Web Server, web address : http://127.0.0.1:8080
  @webserver 127.0.0.1:8080
  # open database
  open my.db

  # define page /user
  @page user
  echo ## Query User Result
  select * from user where name like '%_#1_%'
  draw l select date,record from urec where name like '%_#1_%'

  # define page /time
  @page time
  echo <b> Time </b>
  select strftime('%Y-%m-%d %H:%M','now','localtime') >[Time is: _@1_]
- You can then query http://127.0.0.1:8080/user?tom in your browser to get the results
- Use ip:port/ to access the root directory and get a list of all configured @pages; if you want to set your own or do not want the system to list @pages, you can set the root directory.
@page / echo Welcome My Web Home. - 6.3 Implementing html form / input box manipulation commands via webinput
- Use webinput url prompt1(width)(preset content) prompt2(width)(preset content) ~submit button content; Example:
- webinput /query name(6)() address(12)(address should be detailed to room number) ~query
- If you want the buttons to be arranged vertically (one button per line), change the ~ at the end to ^, for example:
- webinput /query name(6)() address(12)() ^query
- If you want to add hidden parameters, add _ in front of the prompt, e.g:
- webinput /query name(6)() address(12)() _type()(123) ~query
- When the submit button is pressed, the page pointed to by the url will be called, and the parameters will be passed in order, using the form #1 #2, etc. to get them in order, and the same for the hidden parameters
- You can put webinput to select * from table >[ webinput name(6)(@1) address(12)(@2)... ] Implementing Default Content Padding
- Use webinput url prompt1(width)(preset content) prompt2(width)(preset content) ~submit button content; Example:
- 6.4 For the complete WebServer demo script, see the qweb.txt script file in the Demo directory, which can be run with python3 Qsqlite.py qweb.txt and accessed by typing http://127.0.0.1:8080 into your browser.
7. Job Task Service
- This feature allows you to execute scripts at regular intervals according to the configuration of the script file, and save the results to a file or send them by email.
- 7.1 @jobserver Start the tasks server
- 7.2 @mail [1234567][12:20] [srv:port user pwd] [email title] [mail address] Scheduled email tasks
- All the results will be sent in html format, you need to provide: mail server information, mail title, recipient list (multiple mail addresses separated by spaces)
- 7.3 @job [1234567][12:20] [html file name] Timed job execution and outputting the result to html file
- 7.4 In the above operation, the file name, email title can be replaced with @Date , @Time , which will be replaced with the current date and time during execution
- For example: [outfile_@Date_-@Time.html] or email title [@Date Daily Report].
- 7.5 Timing options
- Date selection: [1234567] for 7 days per week (all days), [135] for 1/3/5 days per week
- Time selection: [12:20] indicates 12:20 on the corresponding day
- If you need to set more than one time in a day, you can set more than one @mail or @job to achieve this
- Example:
  # Start Job Server
  @jobserver

  # Specify week 1 - Sunday, daily 03:30 Execute the following script and save it to the file out_date.html
  @job [0123456] [03:30] [out__@Date_.html]
  echo 'Test Service'
  select 1+2+3

  # Specify Sunday, Wednesday 00:03 to execute the following script and send an email to the specified email address
  @mail [03] [00:03] [smtp.office365.com:587] [xxx@hotmail.com] [mail pwd] [Log analysis _@Date_ Test on _@Time_] [xxx@me.com abcd@outlook.com]
  echo mail server email
  select 1+2+3+4+5+6
- 7.6 For the complete JobServer demo script, please refer to the qjob.txt script file in the Demo directory. Please open the file with an editor, modify the corresponding mail server, address, password and other related information, and then run it with python3 Qsqlite.py qjob.txt.
8. WebServer & JobServer running in the background
- If running in the background on Linux, you can use:
- Qsqlite scrip.txt >> out.log & (or nohup Qsqlite scrip.txt >> out.log &)
- or Python3 Qsqlite.py scrip.txt >> out.log & (or nohup Python3 Qsqlite.py scrip.txt &)
- If you do not redirect the output, the execution may be interrupted in the background!!!
9. Python, iPython or Jupyter
- In Python program or iPython notebook, you can import Qsqlite.
  # import Qexec, Qselect
  from Qsqlite import Qexec, Qselect
  script = '''
    open :memory:
    create table test (id text, name text)
    insert into test values('123','Apple')
    insert into test values('678','Google')
    select * from test
  '''
  Qexec(script)
  # Qselect( dbname, select command )
  row_info, result = Qselect(':memory:', 'select * from test')
  # row_info ['id', 'name']
  print(row_info)
  # select result  [ ['123', 'Apple'], ['678', 'Google'] ]
  print(result)
  # you can using row_info, result in your program
- Please check demo directory qnotebook.ipynb file for the complete demo.
Development Background
- 2020 Spring break wrote a program to collect online user data every minute and save it to an SQlite database. in order to analyze this data interactively and display it graphically, it needs to be implemented in Python code, and the code needs to be adjusted every time the data is analyzed, so the hands-on writing of a tool is desired for automation.
- the initial version was just an interactive tool supporting basic database operations, such as opening the database, viewing the database structure, executing SQL queries, and plotting query results with Matplotlib.
- Later it was found that some operations needed to be executed continuously, so a scripting function was added, which could save a series of scripts to a file and execute this script file directly afterwards.
- In the process of using, there are constantly some functions that cannot be satisfied, so it keeps adding functions, such as: output content customization, importing/exporting csv files, loop function, memory database support, outputting results to html files, regular functions with SQLite extension, MySQL support, web server, task server, etc...
Version History
- 2020/02/16 V0.1 First Version.
- 2020/04/25 V0.5 Add SQLite Ext function and export to HTML.
- 2020/04/28 V0.7 Add MySQL Support, include dump mysql to sqlite.
- 2020/05/14 V0.71 Fix Some MySQL Bug.
- 2020/07/05 V0.72 Fix draw l None data bug.
- 2020/07/15 V0.73 SQliteCopy Change fetchall() to fetchone(), use less memory.
- 2020/09/08 V0.74 Add Qexec function and cmd History function l/la/l0/lxx.
- 2020/12/21 V0.75 Add MySQL support.
- 2021/01/06 V0.80 Add WebServer Support. using @webserver @page config.
- 2021/01/28 V0.81 Add sub LOOP/LEND Support.
- 2021/05/30 V0.83 Add JobServer support job & email.
- 2021/09/03 V0.85 Add form / input support for WebServer.
- 2021/10/20 V0.86 Fix a bug in regfind.
- 2022/02/25 V0.87 Add loadjson function.
- 2022/02/28 V0.88 Add draw scatter function.
- 2022/03/08 V0.89 BugFix and add ls cmd and optimize loadcsv/>csv function.
- 2022/03/13 V0.9 BugFix and add some demo.
- 2022/03/14 V0.91 Add navg, rdelta sqlite ext-function and rewrite help.
- 2022/03/27 V0.93 Add draw bar function, SQLite median, Qselect function.
- 2022/04/02 V0.95 Add tsv/maf/vcf file support on loadcsv, load Chinese font for draw.
- 2022/04/08 V0.96 Add .sam/.gtf/.gff/.gpd file support on loadcsv, add loadgb / exec function.
- 2022/04/20 V0.97 Add ext-sql function: summary, and loop loadweb, download function.
- 2024/04/25 V0.973 fix summary std function bug, add >csv support tsv format. add .gz/.zip support.
- 2024/05/15 V0.974 Add .gct file support on loadcsv
sqlite references
- SQlite3 Doc
- SQlite3 System Function Ref
- SQlit Ext
- Regex Doc
Release history Release notifications | RSS feed


Download files
Download the file for your platform. If you're not sure which to choose, learn more about installing packages.
Source Distribution
qsqlite-0.974.tar.gz
(63.7 kB
view details)
Built Distribution
Filter files by name, interpreter, ABI, and platform.
If you're not sure about the file name format, learn more about wheel file names.
Copy a direct link to the current filters
Qsqlite-0.974-py3-none-any.whl
(50.2 kB
view details)
File details
Details for the file qsqlite-0.974.tar.gz.
File metadata
- Download URL: qsqlite-0.974.tar.gz
- Upload date:
- Size: 63.7 kB
- Tags: Source
- Uploaded using Trusted Publishing? No
- Uploaded via: twine/5.0.0 CPython/3.9.6
File hashes
| Algorithm | Hash digest | |
|---|---|---|
| SHA256 |
566c4041ef6de22de3a79b75e096162a75baab72e5ec55d12a4fbd55d46a1175
|
|
| MD5 |
ed504bef837fabfa7cdf3bd599db2fc5
|
|
| BLAKE2b-256 |
175969b7d7e7b3d8313badac8b3ee2213d83b39395b237675e64ca38d022802a
|
File details
Details for the file Qsqlite-0.974-py3-none-any.whl.
File metadata
- Download URL: Qsqlite-0.974-py3-none-any.whl
- Upload date:
- Size: 50.2 kB
- Tags: Python 3
- Uploaded using Trusted Publishing? No
- Uploaded via: twine/5.0.0 CPython/3.9.6
File hashes
| Algorithm | Hash digest | |
|---|---|---|
| SHA256 |
a0849d6bd135cd9f5fd394cbe1cfeb608217f561df02afc41edfe3cc4d1ba07f
|
|
| MD5 |
55b75b8e148cadc6419e5c7cc7f1f6e5
|
|
| BLAKE2b-256 |
a81674326e5f18e618f85fdfb041be0a632357619b02375b9a3cd5d5d4074bfd
|


