A REST API Automation Library for Robot Framework

Project description
Robot Framework - RESTLibrary
Introduction
RESTLibrary provides a feature-rich and extensible infrastructure which is required for making any REST/HTTP call along with all the possible range of features which one might need for doing end-to-end REST API automation using robotframework. All the repetitive tasks which API automation developer has to perform frequently are taken care as part of standard features of the library, like JSON comparison, benchmarking, file upload, file download, authentication, logging/reporting, response channelization, runtime variable resolution etc.
The library exposes a single keyword - Make HTTP Request, which has all the possible parameters to take care of all the features required for end-to-end REST API Automation.
This library is tightly coupled with robotframework and designed/developed for robotframework users only, it is not intended to be used as a standalone python library.

Prerequisites
RESTLibrary has following prerequisites:
robotframework>=3.1.2
requests>=2.25.1
jsonpath-ng>=1.5.0
jsonschema>=3.2.0
setuptools>=39.1.0
you can install all the prerequisites either one by one or using the requirements.txt provided with source code:
pip install -r requirements.txt
Installation
RESTLibrary can be easily installed using pip with following command:
pip install robotframework-restlibrary
Alternatively it can also be installed from the sourcecode:
python setup.py install
Make HTTP Request
Make HTTP Request is the main keyword of RESTLibrary, it has all the possible parameters which are needed for making any HTTP/REST request along with other parameters needed for various facets of REST API Automation. Rest of the document explains about various parameters of Make HTTP Request and their usage examples.
Simple HTTP Request
These are the first two parameters to the keyword and the only mandatory parameters as well, rest all other parameters are optional based on the use case
- requestid : an alphanumeric value which helps identify an HTTP request uniquely
- url : entire URI which needs to be invoked, including query parameters.
Example
*** Settings ***
Library         RESTLibrary

*** Test Cases ***
Get All Users on First Page
      Make HTTP Request   get all users    https://reqres.in/api/users?page=1
HTTP Request Variations
- method : HTTP method/verb to be used for the REST call, default is GET, other supported values are HEAD, POST, PUT, PATCH and DELETE
- requestHeaders : a dictionary of all the headers which need to be passed with HTTP request, default is empty dictionary which means no headers.
- requestBody : payload/data to be posted along with the request, it can be either a file-path or content itself
- timeout : request timeout in seconds
Example
*** Settings ***
Library         RESTLibrary

*** Test Cases ***
Create User
      Make HTTP Request   create a new user    https://reqres.in/api/users    method=POST    requestHeaders={'Content-Type' : 'application/json', 'Accept' : 'application/json'}       requestBody={"name":"deepak", "job":"automation developer"}    timeout=15
Authentication
- authType : Type of authentication to be used, default is NoAuth, means no authentication (default can be changed while importing the library with authType=<myDefaultAuthType> parameter), other supported value is Basic. You can also choose not to use authType variable and provide auth token on your own while making the request in request headers or url based on your API.
- username : username to be used for authentication while making the request, you can also declare a global/suite/test variable ${username} beforehand rather than passing it with each request. username passed with request will override the global variable.
- password : password to be used for authentication while making the request, you can also declare a global/suite/test variable ${password} beforehand rather than passing it with each request. password passed with request will override the global variable.
Example
*** Settings ***
Library         RESTLibrary

*** Variables ***
${username}=    deepak
${password}=    Pass1

*** Test Cases ***
Get All Users
      # this request will be processed using NoAuth authType which is default
      Make HTTP Request   get all users    https://reqres.in/api/users?page=1

      # this request will be processed using Basic authType
      Make HTTP Request   get all users    https://reqres.in/api/users?page=1   authType=Basic

      # this request will be processed using Basic authType
      Make HTTP Request   get all users    https://reqres.in/api/users?page=1   authType=Basic        username=dchourasia     password=Password1
Custom Authentication
You can also implement custom authentication using a robot keyword or a python function:
- this keyword / function will always have an input parameter of "requestInfo" object
- using this "requestInfo" object you can insert your auth token in url or header of the request.
- Make sure to import your custom auth library/resource file settings section of the suite
- provide the keyword/function name as the value of authType parameter.
- detailed examples of custom authentication can be found in tests directory of the source code.
Example
*** Settings ***
Library         RESTLibrary

*** Variables ***
${username}=    deepak
${password}=    Pass1

*** Test Cases ***
Get All Users
      # this request will be processed using given authType, username and password, custom auth is implemented using a robot keyword in "Keywords" secction
      Make HTTP Request   get all users with custom auth    https://reqres.in/api/users?page=1      authType=set my auth token        username=dchourasia     password=Password1

*** Keywords ***
set my auth token
    [Arguments]  ${request info}
    # here is the example how you can update the url to include custom auth token for your request
    ${request info.url}=    Set Variable    ${request info.url}&token=customAuthToken

    # here is the example how you can update the request headers to include custom auth token for your request
    Set To Dictionary   ${request info.requestHeaders}      customAuthHeaderName=customAuthToken

    # return final requestInfo object after all the updates
    [Return]  ${request info}
Response Channelization
Response Channelization (RC) is special and unique feature of RESTLibrary, which lets you extract and channelize the data from response of one API call to next API call with least efforts and in scalable manner.
- It can channelize data from response body and response headers both.
- In case of response body channelization you can either channelize selective data or entire body itself based on your need.
- While channelizing entire body you also have an option to update it if needed.
RC Syntax (RC === Response Channelization)
<<<rc, src_request_id, rcType, selector>>> An RC block is always written between <<< and >>> tokens. Here are the details about 4 comma separated parameters inside RC block
- rc : this is name of the keyword, so it's value will always be rc
- src_request_id : this is id of the source request from which you want to extract and channelize the data
- rcType : this variable denotes whether you want to extract data from response body or response headers, supported values are body and header
- selector : using this variable you can specify what data you want to extract. It can have many values based on rcType.
| rcType | selector | examples | comments |
|---|---|---|---|
| body | jsonPath | $.id | selecting id |
| $.items[?(@.name="user1")].id | selecting id of the item which has name as user1 | ||
| json | {"name" : "user1_updated"} | will return entire response body with updated name | |
| {"$.items[*].name" : "user1_updated"} | will return entire response body with updated name of every item in the json | ||
| {"$.items[*].name" : "<<<DELETE>>>"} | will return entire response body after deleting name node from every item in the json | ||
| {} | will return entire response body as is without any changes | ||
| header | headerName | etag | will return etag header value from the response headers of the src request |
PS - jsonpath is a language like xpath to select single/multiple nodes from a given json. There are multiple tutorials on web to learn this.
Here are few resources to learn jsonpath:
- jsonpath tutorial : https://goessner.net/articles/JsonPath/index.html#e2
- jsonpath evaluator : https://jsonpath.com/
RC Examples
*** Settings ***
Library         RESTLibrary

*** Test Cases ***
Get All Users
      Make HTTP Request   get all users    https://reqres.in/api/users?page=1

Get User
      # here we are using RC to chennelize id of the newly created user dynamically from the "create user" response body, id is needed to get the user
      Make HTTP Request   get user details    https://reqres.in/api/users/<<<rc, get all users, body, $.data[0].id>>>     method=GET    requestHeaders={'Accept' : 'application/json'}

Update User
      # here we are using RC to channelize entire response body of "create user" along with a name update, we are also channelizing etag header
      Make HTTP Request   update the user    https://reqres.in/api/users/<<<rc, get all users, body, $.data[0].id>>>    method=PUT    requestHeaders={'Content-Type' : 'application/json', 'Accept' : 'application/json', 'Etag' : '<<<rc, get user details, header, Etag>>>'}       requestBody=<<<rc, get user details, body, {"data" : {"first_name":"deepak", "last_name" : "chourasia"}}>>>

Delete User
      # here again we are channelizing user id which is needed to delete the user
      Make HTTP Request   delete the user    https://reqres.in/api/users/<<<rc, get all users, body, $.data[0].id>>>     method=DELETE      expectedStatusCode=204
Runtime Variable Resolution
This is again a unique feature of RESTLibrary, which allows you to embed robot variables and RCs inside json files (and any other files as well which have text content type), which you might use for storing request payloads and baselines. RESTLibrary will ensure to resolve these variables/RCs at runtime when the request is being processed.
Example
Content of createUser.json file:

{
   "name" : "${name}",
   "job" : "${job}"
}
*** Settings ***
Library         RESTLibrary

*** Test Cases ***
Create Multiple Users
      Create User    Deepak       Automation Developer
      Create User    Evans        UX Designer
      Create User    Elizabeth    Software Developer
      Create User    Stephen      Project Manager

*** Keywords ***
Create User
    [Arguments]  ${name}    ${job}
    Make HTTP Request   create a new user    https://reqres.in/api/users       requestBody=${EXECDIR}/inputs/createUser.json    method=POST    requestHeaders={'Content-Type' : 'application/json', 'Accept' : 'application/json'}        expectedStatusCode=201
PS :
- These variables should have one of the following scope in order to be resolved inside json file : global variables, suite variables, test variables or keyword arguments
- RCs can also be embedded inside json files, they will also get resolved at runtime
Datetime Stamping
RESTLibrary has a special variable : <<<NOW>>>
- This variable automatically gets replced by the current datetime stamp
- datetime format is %d%m%y%H%M%S%f, this always generates a 18 digit number, which is entirely unique
- You can embed this variable anywhere in the request body, headers, json payload or benchmark files
- This can be used to generate unique data values without any extra efforts.
Example
*** Settings ***
Library         RESTLibrary

*** Test Cases ***
Create Unique Users
      # All these 4 requests will create users with unique name
      Create New User
      Create New User
      Create New User
      Create New User

*** Keywords ***
Create New User
    Make HTTP Request   create a new user    https://reqres.in/api/users       requestBody=${EXECDIR}/inputs/createUniqueUser.json    method=POST    requestHeaders={'Content-Type' : 'application/json', 'Accept' : 'application/json'}    expectedStatusCode=201
Content of createUniqueUser.json file:

{
   "name" : "user_<<<NOW>>>",
   "job" : "Automation Developer"
}
Baselining / Benchmarking
There are set of parameters which allows you to provide benchmark for any rest request. REST API response is automatically compared against these benchmarks and differences are reported in robot report and test is marked as Pass/Fail accordingly.
- expectedStatusCode : This parameter facilitates verification of http status code, it's default value is 200
- expectedResponseBody : Expected response body or the baseline which you expect the HTTP request to return, it can either be a file path or in-place json.
- You can also use regular expressions in json node values, if you just want to verify pattern rather than actual value.
- You can use <<<SKIP>>> as the node value if you want to skip the verification of a specific node
- responseVerificationType : This parameter influences the json comparison of response body and benchmark. It's default value is 'FULL', other supported value is 'PARTIAL'.
- In case of 'FULL' verification both the JSONs are thoroughly compared from both the sides and any differences found are reported in the robot report
- in case of 'PARTIAL' verification, you can provide partial json with few nodes in expectedResponseBody which you intend to verify (all the nodes in HTTP response will not be verified, only nodes provided in the expectedResponseBody will be verified)
- expectedResponseHeaders : Expected response headers which you expect the HTTP request to return, it should be a dictionary
- It is always 'PARTIAL' comparison, it will only compare the headers which you supply as expectedResponseHeaders
- You can use regular expressions here as well, if you just want to verify pattern
- expectedResponseSchema : JSON Schema to validate the structure of HTTP response (if you just want to verify the response json structure):
- You can use any JSONSchemaGenerator utility to generate the schema, for example : https://www.jsonschema.net/home
- You can either provide the jsonschema file path or the schema itself as the parameter value
- It uses JSONSchema Draft-7
- verificationScheme : this parameter is useful to specify how we want our baseline to get compared with response. It's a list of schemes, each scheme is a json object with predefined structure.
- NotSorted Verification : If there is a list of objects in your response and objects are listed in random order, then using NotSorted scheme you can enforce an orderless comparison with benchmark
- Syntax Example - verificationScheme=[{"path": "$.data","type": "NotSorted","key": "email"}]
- path is the jsonpath of the list node, type is the type of scheme and key is a node-name which has a unique value in each object of the list, you can also provide a composite key with comma separated node-names
- Sort : This will sort a list of objects in your response based on given key before comparing it with benchmark
- Syntax Example - verificationScheme=[{"path": "$.data","type": "Sort","key": "email"}]
- path is the jsonpath of the list node, type is the type of scheme and key is a node-name which has a unique value in each object of the list, you can also provide a composite key with comma separated node-names
- key can be skipped if you have a list of values rather than objects
- you can provide multiple schemes separated by comma as the parameter value
- NotSorted Verification : If there is a list of objects in your response and objects are listed in random order, then using NotSorted scheme you can enforce an orderless comparison with benchmark
- ignoreNodes : using this parameter you can completely ignore a set of nodes from the benchmark comparison, this is a quick way to ignore multiple nodes
- it's a list of jsonpaths of the nodes which you want to ignore
- Syntax example : ignoreNodes=["$.id", "$.data[*].links"]
Examples
*** Settings ***
Library         RESTLibrary

*** Test Cases ***
Create User
      # this example demonstrates a Partial benchmark verification using in-place json along with status code verification
      Make HTTP Request   create a new user    https://reqres.in/api/users    method=POST       requestBody={"name":"deepak", "job":"automation developer"}     expectedStatusCode=201      expectedResponseBody={"id" : "[0-9]{1,6}"}    responseVerificationType=Partial

Get all users
      # this example demonstrates verificationScheme along with ignoreNodes
      Make HTTP Request   Get all the users    https://reqres.in/api/users?page=1    method=GET     verificationScheme=[{"path": "$.data","type": "NotSorted","key": "email"}]     ignoreNodes=["$.total", "$.data[*].id"]      expectedResponseBody=${EXECDIR}/baselines/getAllUsersBenchmark.json

Get User
      # this example demonstrates a Full benchmark comparison using a benchmark json file along with response header verification
      Make HTTP Request   get the user    https://reqres.in/api/users/<<<rc, Get all the users, body, $.data[0].id>>>     method=GET    requestHeaders={'Accept' : 'application/json'}      expectedResponseBody=${EXECDIR}/baselines/getUserBenchmark.json       expectedResponseHeaders={'Content-Type' : 'application/json; charset=utf-8'}    responseVerificationType=Partial
Content of getUserBenchmark.json file:

{
    "data": {
        "id": "<<<SKIP>>>",
        "email": "<<<rc, Get all the users, body, $.data[0].email>>>",
        "first_name": "<<<rc, Get all the users, body, $.data[0].first_name>>>",
        "last_name": "<<<rc, Get all the users, body, $.data[0].last_name>>>",
        "avatar": "https:\\/\\/(.*)-image.jpg"
    }
}
Content of getAllUsersBenchmark.json file:

{
	"page": 1,
	"per_page": 6,
	"total": 12,
	"total_pages": 2,
	"data": [
		{
			"id": 1,
			"email": "george.bluth@reqres.in",
			"first_name": "George",
			"last_name": "Bluth",
			"avatar": "https://reqres.in/img/faces/1-image.jpg"
		},
		{
			"id": 2,
			"email": "janet.weaver@reqres.in",
			"first_name": "Janet",
			"last_name": "Weaver",
			"avatar": "https://reqres.in/img/faces/2-image.jpg"
		},
		{
			"id": 3,
			"email": "emma.wong@reqres.in",
			"first_name": "Emma",
			"last_name": "Wong",
			"avatar": "https://reqres.in/img/faces/3-image.jpg"
		},
		{
			"id": 4,
			"email": "eve.holt@reqres.in",
			"first_name": "Eve",
			"last_name": "Holt",
			"avatar": "https://reqres.in/img/faces/4-image.jpg"
		},
		{
			"id": 5,
			"email": "charles.morris@reqres.in",
			"first_name": "Charles",
			"last_name": "Morris",
			"avatar": "https://reqres.in/img/faces/5-image.jpg"
		},
		{
			"id": 6,
			"email": "tracey.ramos@reqres.in",
			"first_name": "Tracey",
			"last_name": "Ramos",
			"avatar": "https://reqres.in/img/faces/6-image.jpg"
		}
	],
	"support": {
		"url": "https://reqres.in/#support-heading",
		"text": "To keep ReqRes free, contributions towards server costs are appreciated!"
	}
}
Content Types Supported
- requestDataType : type of content which is being posted to server, default is JSON, other supported values are TEXT and FILE
- responseDataType : type of content which is expected to be returned in response, default is JSON, other supported values are TEXT and FILE
Examples
*** Settings ***
Library         RESTLibrary

*** Test Cases ***
Make POST request with text payload
    Make HTTP Request   create a new user    https://reqres.in/api/users    method=POST       requestBody=I am sending text    expectedStatusCode=201
Download File
If you have a REST API which downloads a file, then use below parameters:
- responseDataType : this needs to be set as File, as mentioned in previous section
- downloadFilePath : full path of the file including filename, where you want the file to get downloaded
- this is optional, if you don't provide downloadFilePath then file will get downloaded to current folder with a datetime stamp as file name (with no extension)
Examples
*** Settings ***
Library         RESTLibrary

*** Test Cases ***
Download file
      Make HTTP Request   download the document    https://file-examples-com.github.io/uploads/2017/10/file-sample_150kB.pdf    method=GET   responseDataType=File    downloadFilePath=${EXECDIR}/downloads/sample.pdf
Upload File(s)
If you have a REST API which uploads file(s):
- requestDataType : this needs to be set as File, as mentioned in previous section
- files : this is where you provide details of the files which need to be uploaded, it is a dictionary
- below formats are supported:
- {'fieldName' : 'filePath/fileContent'}
- {'fieldName' : ['fileName', 'filePath']}
- {'fieldName' : ['fileName', 'filePath', 'content-type']}
- {'fieldName' : ['fileName', 'filePath', 'content-type', {custom_headers}]}
- you should choose the format which your REST API has implemented, your dev team can provide more info
- you can add any number of files to the dictionary if your API supports multi-file upload
- below formats are supported:
Examples
*** Settings ***
Library         RESTLibrary

*** Test Cases ***
Upload Image
      Make HTTP Request   upload image    https://images.google.com/searchbyimage/upload    method=POST   requestDataType=File     files={'encoded_image' : ['sample.jpeg', '${EXECDIR}/inputs/sample.jpeg', 'image/jpeg']}
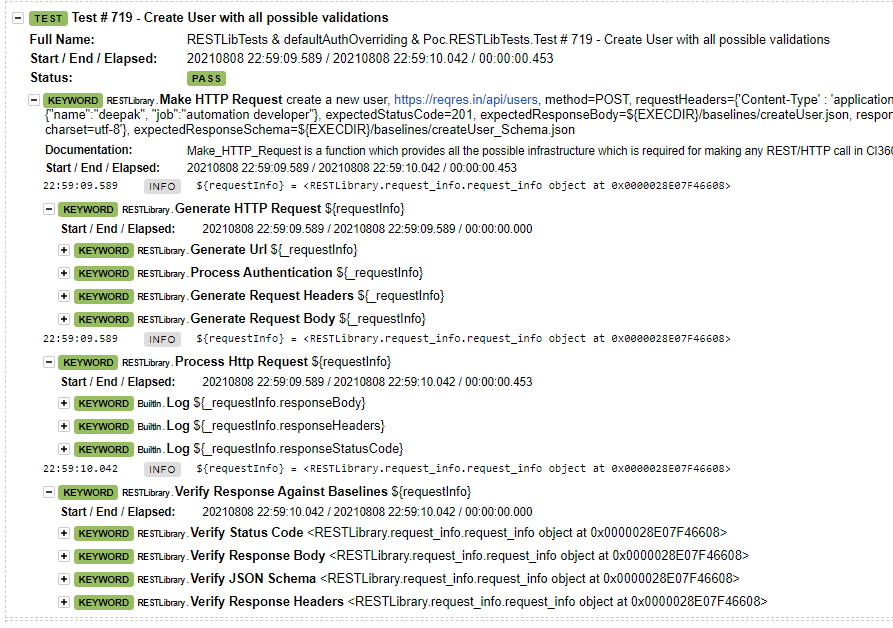
Reporting
Every Make HTTP Request execution logs all the possible data about the request, its response and benchmarking along with any errors/exceptions.
Below are the major sections/subsections in the report, subsections are displayed based on the request parameters:
- Generate HTTP Request
- Generate Url
- Process Authentication
- Generate Request Headers
- Generate Request Body
- Process HTTP Request
- Log ${_requestInfo.responseBody}
- Log ${_requestInfo.responseHeaders}
- Log ${_requestInfo.responseStatusCode}
- Verify Response Against Baselines
- Verify Status Code
- Verify Response Body
- Verify Response Headers
- Verify JSON Schema
Extracting data from RESTLibrary
If needed you can extract all the response data from "Make HTTP Request" and utilize it later based on your use case
Examples
*** Settings ***
Library         RESTLibrary

*** Test Cases ***
Create User
      ${requestInfo}=  Make HTTP Request   create a new user    https://reqres.in/api/users    method=POST       requestBody={"name":"deepak", "job":"automation developer"}     expectedStatusCode=201      expectedResponseBody={"name" : "deepak"}    responseVerificationType=Partial    expectedStatusCode=201
      Log ${requestInfo.responseBody}
      Log ${requestInfo.responseHeaders}
      Log ${requestInfo.responseStatusCode}
Execute RC
This is second and the last keyword in RESTLibrary.
- As the name suggests it enables you to instantly evaluate any Response Channelization (RC), and store the value to any robot variable
- you can also use <<<NOW>>> variable and other robot variable in your RC
Examples
*** Settings ***
Library         RESTLibrary

*** Test Cases ***
Create User
      Make HTTP Request   create a new user    https://reqres.in/api/users    method=POST       requestBody={"name":"deepak", "job":"automation developer"}     expectedStatusCode=201      expectedResponseBody={"name" : "deepak"}    responseVerificationType=Partial
      ${userId}=    Execute RC    <<<rc, create a new user, body, $.id>>>
Contributions
Creator and maintainer : Deepak Chourasia
License
RESTLibrary is open source software provided under the Apache License 2.0
Release history Release notifications | RSS feed

Download files
Download the file for your platform. If you're not sure which to choose, learn more about installing packages.
Source Distribution
Built Distribution
Filter files by name, interpreter, ABI, and platform.
If you're not sure about the file name format, learn more about wheel file names.
Copy a direct link to the current filters
File details
Details for the file robotframework-restlibrary-1.0.tar.gz.
File metadata
- Download URL: robotframework-restlibrary-1.0.tar.gz
- Upload date:
- Size: 39.2 kB
- Tags: Source
- Uploaded using Trusted Publishing? No
- Uploaded via: twine/3.4.2 importlib_metadata/4.0.1 pkginfo/1.7.1 requests/2.26.0 requests-toolbelt/0.9.1 tqdm/4.60.0 CPython/3.7.6
File hashes
| Algorithm | Hash digest | |
|---|---|---|
| SHA256 |
ff587d9d648093cbb4362e5ecc6bfe72461f971fd8ed075974a8bb19697d3e89
|
|
| MD5 |
089f6194df2e3c32f9a6c7408e9d9ce9
|
|
| BLAKE2b-256 |
f67575f8914551c2340459960779847e0e1c038c8cf0463d5027277e759d966b
|
File details
Details for the file robotframework_restlibrary-1.0-py3-none-any.whl.
File metadata
- Download URL: robotframework_restlibrary-1.0-py3-none-any.whl
- Upload date:
- Size: 36.8 kB
- Tags: Python 3
- Uploaded using Trusted Publishing? No
- Uploaded via: twine/3.4.2 importlib_metadata/4.0.1 pkginfo/1.7.1 requests/2.26.0 requests-toolbelt/0.9.1 tqdm/4.60.0 CPython/3.7.6
File hashes
| Algorithm | Hash digest | |
|---|---|---|
| SHA256 |
7e015aecc787fbf296a1f2d39f440a5b563ff23535f45a86b2f7c07a14146dd8
|
|
| MD5 |
3d147761b3ace47b93525c4079ec37f7
|
|
| BLAKE2b-256 |
d67f4cec94d906aa005610c5bf0b5c441415ec90942beffe0b9707276fce8c6f
|


