Python scripting library for generating designs readable by scadnano.
Verified details
These details have been verified by PyPIProject links
GitHub Statistics
Maintainers


Project description
scadnano Python package


scadnano ("scriptable-cadnano") is a program for designing synthetic DNA structures such as DNA origami. The scadnano Python package (source code repository here) is a library for programmatically creating and editing these nanostructures. The scadnano project is developed and maintained by the UC Davis Molecular Computing group. Note that cadnano is a separate project, developed and maintained by the Douglas lab at UCSF.
If you find scadnano useful in a scientific project, please cite its associated paper:
scadnano: A browser-based, scriptable tool for designing DNA nanostructures.
David Doty, Benjamin L Lee, and Tristan Stérin.
DNA 2020: Proceedings of the 26th International Conference on DNA Computing and Molecular Programming
[ paper | BibTeX ]
Note: If you are reading this on the PyPI website, some of the links below won't work. Many are relative links intended to be read on the GitHub README page.
Table of contents
- Overview
- Reporting issues
- Installation
- Example
- Abbreviated syntax with chained methods
- StrandBuilder object for iteratively building up strands with many domains
- Tutorial
- API documentation
- Other examples
- Contributing
Overview
This package is used to write Python scripts outputting .sc files readable by scadnano, a web application useful for displaying and manually editing these structures. The purpose of this module is to help automate some of the task of creating DNA designs, as well as making large-scale changes to them that are easier to describe programmatically than to do by hand in the scadnano web interface.
We will try to announce breaking changes (and possibly new features) under the GitHub releases page. The version numbers in this Python library repo and the web interface repo won't always advance at the same time, and sometimes a feature is supported in one before the other.
Following semantic versioning, version numbers are major.minor.patch, i.e., version 0.9.2 has minor version number 9. Prior to version 1.0.0, when a breaking change is made, this will increment the minor version (for example, going from 0.9.4 to 0.10.0). After version 1.0.0, breaking changes will increment the major version.
Reporting issues
Please report issues in the web interface at the scadnano web interface GitHub repository, and report issues in the Python scripting library at the scadnano Python package GitHub repository.
Installation
Short version: type this at the command line:
pip install scadnano
Read below for troubleshooting suggestions if that didn't work.
Getting Python
The scadnano Python package requires Python version 3.9 or later.
To check your current version of Python, open a command line and type
python --version
If it is version 2.7 or below, type
python3 --version
If that fails, or reports Python version 3.8 or below, you will have to install a later version of Python. Follow this link to install Python. You may also use an alternative Python distribution, such as Anaconda.
Installing the scadnano Python package
Once Python is installed, there are two ways you can install the scadnano Python package:
-
pip (recommended)
Use pip to install the package by executing the following at the command line:
pip install scadnanoIf it worked, you should be able to open a Python interpreter and import the scadnano module:
Python 3.7.9 (default, Aug 31 2020, 17:10:11) [MSC v.1916 64 bit (AMD64)] :: Anaconda, Inc. on win32
Type "help", "copyright", "credits" or "license" for more information.
>>> import scadnano as sc
>>> print(sc.Domain(helix=1, forward=True, start=0, end=8))
Domain(, helix=1, forward=True, start=0, end=8)
>>>
Troubleshooting
If the above does not work for you, here are some things to try.
If your Python installation does not already have pip installed, you may have to install it. Executing this Python script should work; see also https://docs.python.org/3/installing/index.html or https://www.liquidweb.com/kb/install-pip-windows/.
Once pip is installed, or if you believe it is already installed, check your version of
pipby typingpip --versionIt should say something like
pip 19.3.1 from ...lib\site-packages\pip (python 3.8)If the version of Python at the end is Python 3.9 or higher, you are good. If it is version 2.7 or lower, type
pip3 --versionIf that works and shows Python 3.9 or higher, you are good, but you should type
pip3in the subsequent instructions instead ofpip. -
download
As a simple alternative (in case you run into trouble using pip), you can simply download the scadnano.py file. However, you need to first install two packages that are required by scadnano: Install openpyxl and tabulate by typing the following at the command line:
pip install openpyxl tabulate.Download and place the following files in your PYTHONPATH (e.g., in the same directory as the scripts you are running). Note: If you are reading this on the PyPI website or anywhere other than GitHub, the links below won't work. They are relative links intended to be read on the GitHub README page.
- required: scadnano.py
- optional: modifications.py; This contains some common DNA modifications such as biotin and Cy3.
- optional: origami_rectangle.py; This can help create origami rectangles, but it is not necessary to use scadnano.
To download them, right-click on "Raw" near the top and select (in Chrome or Firefox) "Save link as...":
The scadnano package uses the Python package xlwt to write Excel files, so xlwt must be installed in order to call the method
Design.write_idt_plate_excel_file()to export an Excel file with DNA sequences. To install xlwt, typepip install xlwtat the command line. (If you instead use pip to install the scadnano package, xlwt will be automatically installed.)

Example
Consider the following design:
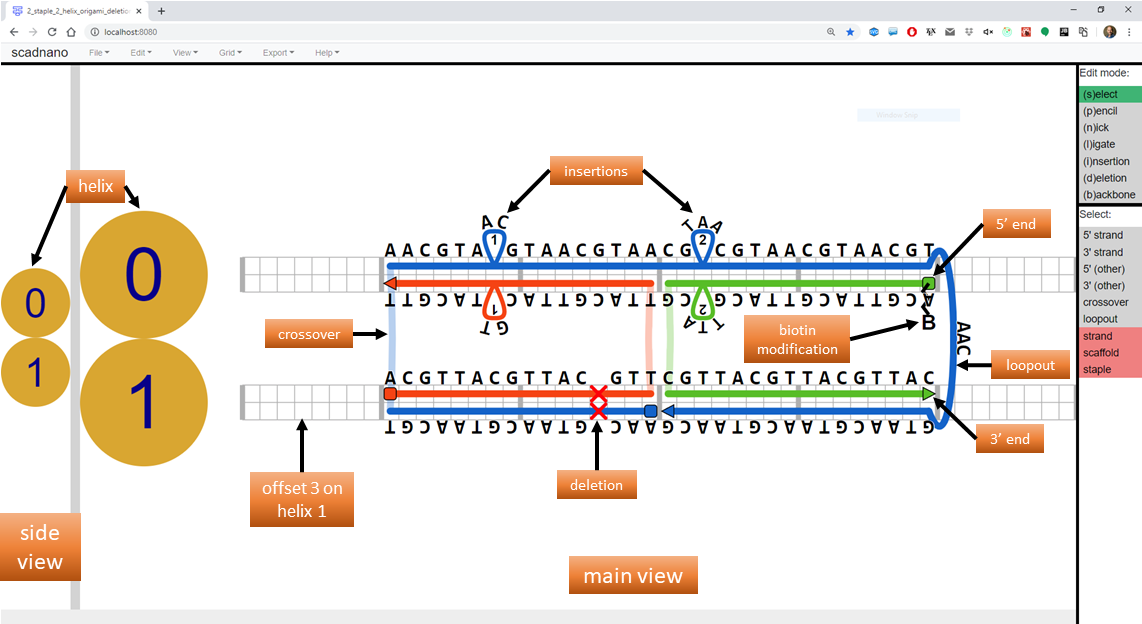
The following Python script produces this design.
import scadnano as sc
import modifications as mod


def create_design() -> sc.Design:
    # helices
    helices = [sc.Helix(max_offset=48), sc.Helix(max_offset=48)]

    # left staple
    stap_left_domain1 = sc.Domain(helix=1, forward=True, start=8, end=24)
    stap_left_domain0 = sc.Domain(helix=0, forward=False, start=8, end=24)
    stap_left = sc.Strand(domains=[stap_left_domain1, stap_left_domain0])

    # right staple
    stap_right_domain0 = sc.Domain(helix=0, forward=False, start=24, end=40)
    stap_right_domain1 = sc.Domain(helix=1, forward=True, start=24, end=40)
    stap_right = sc.Strand(domains=[stap_right_domain0, stap_right_domain1])
    stap_right.set_modification_5p(mod.biotin_5p)

    # scaffold
    scaf_domain1_left = sc.Domain(helix=1, forward=False, start=8, end=24)
    scaf_domain0 = sc.Domain(helix=0, forward=True, start=8, end=40)
    loopout = sc.Loopout(length=3)
    scaf_domain1_right = sc.Domain(helix=1, forward=False, start=24, end=40)
    scaf = sc.Strand(domains=[scaf_domain1_left, scaf_domain0, loopout, scaf_domain1_right], is_scaffold=True)

    # whole design
    design = sc.Design(helices=helices, strands=[scaf, stap_left, stap_right], grid=sc.square)

    # deletions and insertions added to design are added to both strands on a helix
    design.add_deletion(helix=1, offset=20)
    design.add_insertion(helix=0, offset=14, length=1)
    design.add_insertion(helix=0, offset=26, length=2)

    # also assigns complement to strands other than scaf bound to it
    design.assign_dna(scaf, 'AACGT' * 18)

    return design


if __name__ == '__main__':
    design = create_design()
    design.write_scadnano_file(directory='output_designs')
Running the code above produces a .sc file that, if loaded into scadnano, should appear as in the screenshot above. The web interface README explains many of the terms used in the code (domain, helix, loopout, insertion, etc.).
Abbreviated syntax with chained methods
Instead of explicitly creating variables and objects representing each domain in each strand, there is a shorter syntax using chained method calls. Instead of the above, create only the helices first, then create the Design. Then strands can be added using a shorter syntax, to describe how to draw the strand starting at the 5' end and moving to the 3' end. The following is a modified version of the above create_design function using these chained methods:
def create_design() -> sc.Design:
    # helices
    helices = [sc.Helix(max_offset=48), sc.Helix(max_offset=48)]

    # whole design
    design = sc.Design(helices=helices, grid=sc.square)

    # for absolute offsets, call method "to"
    # left staple
    design.draw_strand(1, 8).to(24).cross(0).to(8)

    # for relative offsets, call method "move"
    # right staple
    design.draw_strand(0, 40).move(-16).cross(1).move(16).with_modification_5p(mod.biotin_5p)

    # scaffold
    design.draw_strand(1, 24).move(-16).cross(0).move(32).loopout(1, 3).move(-16).as_scaffold()

    # deletions and insertions added to design are added to both strands on a helix
    design.add_deletion(helix=1, offset=20)
    design.add_insertion(helix=0, offset=14, length=1)
    design.add_insertion(helix=0, offset=26, length=2)

    # also assigns complement to strands other than scaf bound to it
    design.assign_dna(design.scaffold, 'AACGT' * 18)

    return design
Documentation is available in the API docs.
StrandBuilder object for iteratively building up strands with many domains
The method Design.draw_strand, as well as all those that follow it in a chained method call (e.g., move, cross, etc.) all return an instance of the class StrandBuilder.
Above, that StrandBuilder instance is anonymous, i.e., never assigned to a variable.
Some long strands may be easier to specify with loops, for example an M13 scaffold strand for an origami.
If so, then to use the above methods, assign the StrandBuilder object to a variable, and call the relevant methods on that object to build up the strand in each iteration of the loop.
For example, the following modification of the above create_design function creates a linear scaffold strand that zig-zags back and forth across 32 helices:
def create_design() -> sc.Design:
    num_helices = 32
    helices = [sc.Helix(max_offset=200) for _ in range(num_helices)]
    design = sc.Design(helices=helices, grid=sc.square)
    strand_builder = design.draw_strand(0, 0)
    for helix in range(num_helices):
        # move forward if on an even helix, otherwise move in reverse
        move_distance = 200 if helix % 2 == 0 else -200
        strand_builder.move(move_distance)
        if helix < 31: # crossover to next helix, unless it's the last helix
            strand_builder.cross(helix + 1)
    strand_builder.as_scaffold()
    return design
API Documentation
Online documentation of the package API (which classes, methods, functions, and constants are provided by the package) is located here: https://scadnano-python-package.readthedocs.io
Tutorial
A tutorial shows how to create a "standard" 24-helix DNA origami rectangle using the scadnano Python package.
Other examples
Note: If you are reading this on the PyPI website, the links below won't work. They are relative links intended to be read on the GitHub README page.
Several example scripts are located in the examples/ subfolder. Their output is contained in the examples/output_designs/ subfolder.
Contributing
If you wish to contribute to scadnano, please see the CONTRIBUTING document to contribute to the scadnano Python package. There is also a CONTRIBUTING document for the web interface.
Project details
Verified details
These details have been verified by PyPIProject links
GitHub Statistics
Maintainers
Release history Release notifications | RSS feed


Download files
Download the file for your platform. If you're not sure which to choose, learn more about installing packages.
Source Distribution
Built Distribution
Filter files by name, interpreter, ABI, and platform.
If you're not sure about the file name format, learn more about wheel file names.
Copy a direct link to the current filters
File details
Details for the file scadnano-0.20.1.tar.gz.
File metadata
- Download URL: scadnano-0.20.1.tar.gz
- Upload date:
- Size: 116.8 kB
- Tags: Source
- Uploaded using Trusted Publishing? Yes
- Uploaded via: twine/6.1.0 CPython/3.12.9
File hashes
| Algorithm | Hash digest | |
|---|---|---|
| SHA256 |
f6756c75e0f177479861a254392c6aff751c904ce4751e17e0afb6da79e2a72a
|
|
| MD5 |
ba8891854fe93bc9357d7b84b6c2d510
|
|
| BLAKE2b-256 |
156aba94aab059e1b8046c010cc7092413d93e05871df6094f7400b66829934f
|
Provenance
The following attestation bundles were made for scadnano-0.20.1.tar.gz:
Publisher:
release.yml on UC-Davis-molecular-computing/scadnano-python-package
-
Statement:
-
Statement type:
https://in-toto.io/Statement/v1 -
Predicate type:
https://docs.pypi.org/attestations/publish/v1 -
Subject name:
scadnano-0.20.1.tar.gz -
Subject digest:
f6756c75e0f177479861a254392c6aff751c904ce4751e17e0afb6da79e2a72a - Sigstore transparency entry: 275000707
- Sigstore integration time:
-
Permalink:
UC-Davis-molecular-computing/scadnano-python-package@90e9e7562656f30aa8847d666e85b27d0e05f7d5 -
Branch / Tag:
refs/heads/main - Owner: https://github.com/UC-Davis-molecular-computing
-
Access:
public
-
Token Issuer:
https://token.actions.githubusercontent.com -
Runner Environment:
github-hosted -
Publication workflow:
release.yml@90e9e7562656f30aa8847d666e85b27d0e05f7d5 -
Trigger Event:
push
-
Statement type:
File details
Details for the file scadnano-0.20.1-py3-none-any.whl.
File metadata
- Download URL: scadnano-0.20.1-py3-none-any.whl
- Upload date:
- Size: 113.2 kB
- Tags: Python 3
- Uploaded using Trusted Publishing? Yes
- Uploaded via: twine/6.1.0 CPython/3.12.9
File hashes
| Algorithm | Hash digest | |
|---|---|---|
| SHA256 |
633e63d3e11d704ce9c8f2098c2ad72a36962643f843c68a44162345a2046eb4
|
|
| MD5 |
80ed3c18601112f2f41bdf101fb70f76
|
|
| BLAKE2b-256 |
58f0ae3b8fbeab0429fe1772d169e17aac221861bc1a0763f4195dac30cf4f00
|
Provenance
The following attestation bundles were made for scadnano-0.20.1-py3-none-any.whl:
Publisher:
release.yml on UC-Davis-molecular-computing/scadnano-python-package
-
Statement:
-
Statement type:
https://in-toto.io/Statement/v1 -
Predicate type:
https://docs.pypi.org/attestations/publish/v1 -
Subject name:
scadnano-0.20.1-py3-none-any.whl -
Subject digest:
633e63d3e11d704ce9c8f2098c2ad72a36962643f843c68a44162345a2046eb4 - Sigstore transparency entry: 275000713
- Sigstore integration time:
-
Permalink:
UC-Davis-molecular-computing/scadnano-python-package@90e9e7562656f30aa8847d666e85b27d0e05f7d5 -
Branch / Tag:
refs/heads/main - Owner: https://github.com/UC-Davis-molecular-computing
-
Access:
public
-
Token Issuer:
https://token.actions.githubusercontent.com -
Runner Environment:
github-hosted -
Publication workflow:
release.yml@90e9e7562656f30aa8847d666e85b27d0e05f7d5 -
Trigger Event:
push
-
Statement type:


