The ScientISST SENSE Python API


Project description
scientisst-sense-api-python
The ScientISST SENSE Python API.
Learn how to use it, check examples, and much more here!
Installing
# Getting this repository
git clone https://github.com/scientisst/scientisst-sense-api-python.git
Dependencies
Dependencies are specified in the requirements.txt file.
Install them using pip:
pip install -r requirements.txt
Using Docker in Linux
When running the API on Linux, if issues arise, it is recommended to try using it inside a docker container.
First, install docker.
Then, clone the repository and navigate to the directory:
# Getting this repository
git clone https://github.com/scientisst/scientisst-sense-api-python.git
cd scientisst-sense-api-python
Then, build the docker container with:
sudo docker build -t sense_docker .
It is required to build the container only once. Finally, run the container with:
sudo docker run -v /var/run/dbus/:/var/run/dbus/:z --privileged -it sense_docker
This will open a terminal inside the container with access to bluetooth and Wi-Fi. To exit the container run:
exit
Running
Automatic
- Pair your device
- Run:
python sense.py
- Select the device from the list displayed:
ScientISST devices:
[1] ScientISST-ab-de - 08:3A:F2:49:AB:DE
[2] ScientISST-ac-be - 08:3A:F2:49:AC:BE
Connect to:
- Hit
CTRL-Cwhen you wish to stop.
Help
$ python sense.py -h

usage: sense.py [args] address

description: The program connects to the ScientISST Sense device and starts an acquisition, providing the option to store the received data in a .csv file.

positional arguments:  address               Linux: bluetooth MAC address, Mac: serial port address, Windows: bluetooth serial COM port

optional arguments:
  -h, --help            show this help message and exit
  -f FS, --frequency FS
                        sampling frequency, default: 1000
  -c CHANNELS, --channels CHANNELS
                        analog channels, default: 1,2,3,4,5,6
  -d DURATION, --duration DURATION
                        duration in seconds, default: unlimited
  -o OUTPUT, --output OUTPUT
                        write report to output file, default: None
  -s, --lsl             stream data using Lab Streaming Layer protocol
  -q, --quiet           don't print ScientISST frames
  -v, --verbose         log sent/received bytes
Manual
Linux
Pair and trust the ScientISST Sense board:
bluetoothctl
scan on
pair XX:XX:XX:XX:XX
trust XX:XX:XX:XX:XX
You can now run the sense.py script:
python sense.py XX:XX:XX:XX:XX
Mac
First, you need to pair the ScientISST sense device in the Bluetooth Settings section. Then, you'll need to find the serial port address using the Terminal:
ls /dev/tty.ScientISST*
Copy the String like: /dev/tty.ScientISST-XX-XX-SPP_SE.
You can now run the sense.py script:
python sense.py /dev/tty.ScientISST-XX-XX-SPP_SE
Windows
Turn the ScientISST Sense board on.
Now, go to Control Panel > Hardware and Sound > Devices and Printers. Select "Add a device". Select the ScientISST Sense board, hit "next" until its set up.
While connected to the board, search "Bluetooth settings" on the Control Panel, then go to the "COM ports" tab and check the port name for the outgoing entry. Copy the String like: COMX
You can now run the sense.py script:
python sense.py COMX
Example
Example usage to acquire AI1 at 10Hz sample rate (Linux):
python3 sense.py -f 10 -c 1 -o output.csv 08:3A:F2:49:AC:D2
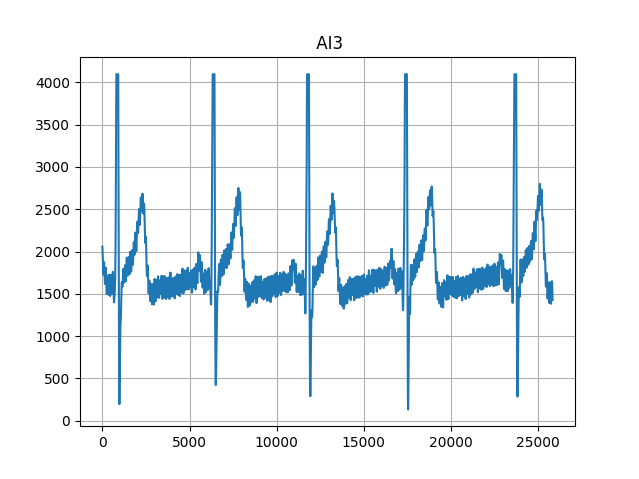
Plot
Dependencies:
- pandas
- numpy
- matplotlib
python plot_output.py
Disclaimer
This is not a medical device certified for diagnosis or treatment. It is provided to you as is only for research and educational purposes.
Acknowledgments
This work was partially supported by Fundação para a Ciência e Tecnologia (FCT) under the projects’ UIDB/50008/2020 and DSAIPA/AI/0122/2020 (AIMHealth) through IT—Instituto de Telecomunicações, which is gratefully acknowledged.
Release history Release notifications | RSS feed


Download files
Download the file for your platform. If you're not sure which to choose, learn more about installing packages.
Source Distribution
Built Distribution
Filter files by name, interpreter, ABI, and platform.
If you're not sure about the file name format, learn more about wheel file names.
Copy a direct link to the current filters
File details
Details for the file scientisst_sense-1.2.0.tar.gz.
File metadata
- Download URL: scientisst_sense-1.2.0.tar.gz
- Upload date:
- Size: 19.7 kB
- Tags: Source
- Uploaded using Trusted Publishing? No
- Uploaded via: twine/5.1.1 CPython/3.9.20
File hashes
| Algorithm | Hash digest | |
|---|---|---|
| SHA256 |
ba13f0ad01042d1f6a492988b352ccd95c57d4580a74eff44975ba00a7ed195c
|
|
| MD5 |
2df21b75f5b45460fde119b4fe73a215
|
|
| BLAKE2b-256 |
f8a83bec31d6a3ab0a220adabba008431fef1ab6210df2ca1d3bb88d3b26e480
|
File details
Details for the file scientisst_sense-1.2.0-py3-none-any.whl.
File metadata
- Download URL: scientisst_sense-1.2.0-py3-none-any.whl
- Upload date:
- Size: 21.8 kB
- Tags: Python 3
- Uploaded using Trusted Publishing? No
- Uploaded via: twine/5.1.1 CPython/3.9.20
File hashes
| Algorithm | Hash digest | |
|---|---|---|
| SHA256 |
41ad5738c3ae42d85d89a0ded106dd22cdbaff731c83f91d9fe402cfbc5f8eff
|
|
| MD5 |
c1b06333b382a8a5e36fc4a8e590014d
|
|
| BLAKE2b-256 |
ce5dab591f6587e5b3c5bc0c61ae586ac39aa6791d68186c4533970cc3165d57
|


