Seeq Add-on that integrates with Microsoft Azure Machine Learning (AML) models as a web service


Project description

Introduction
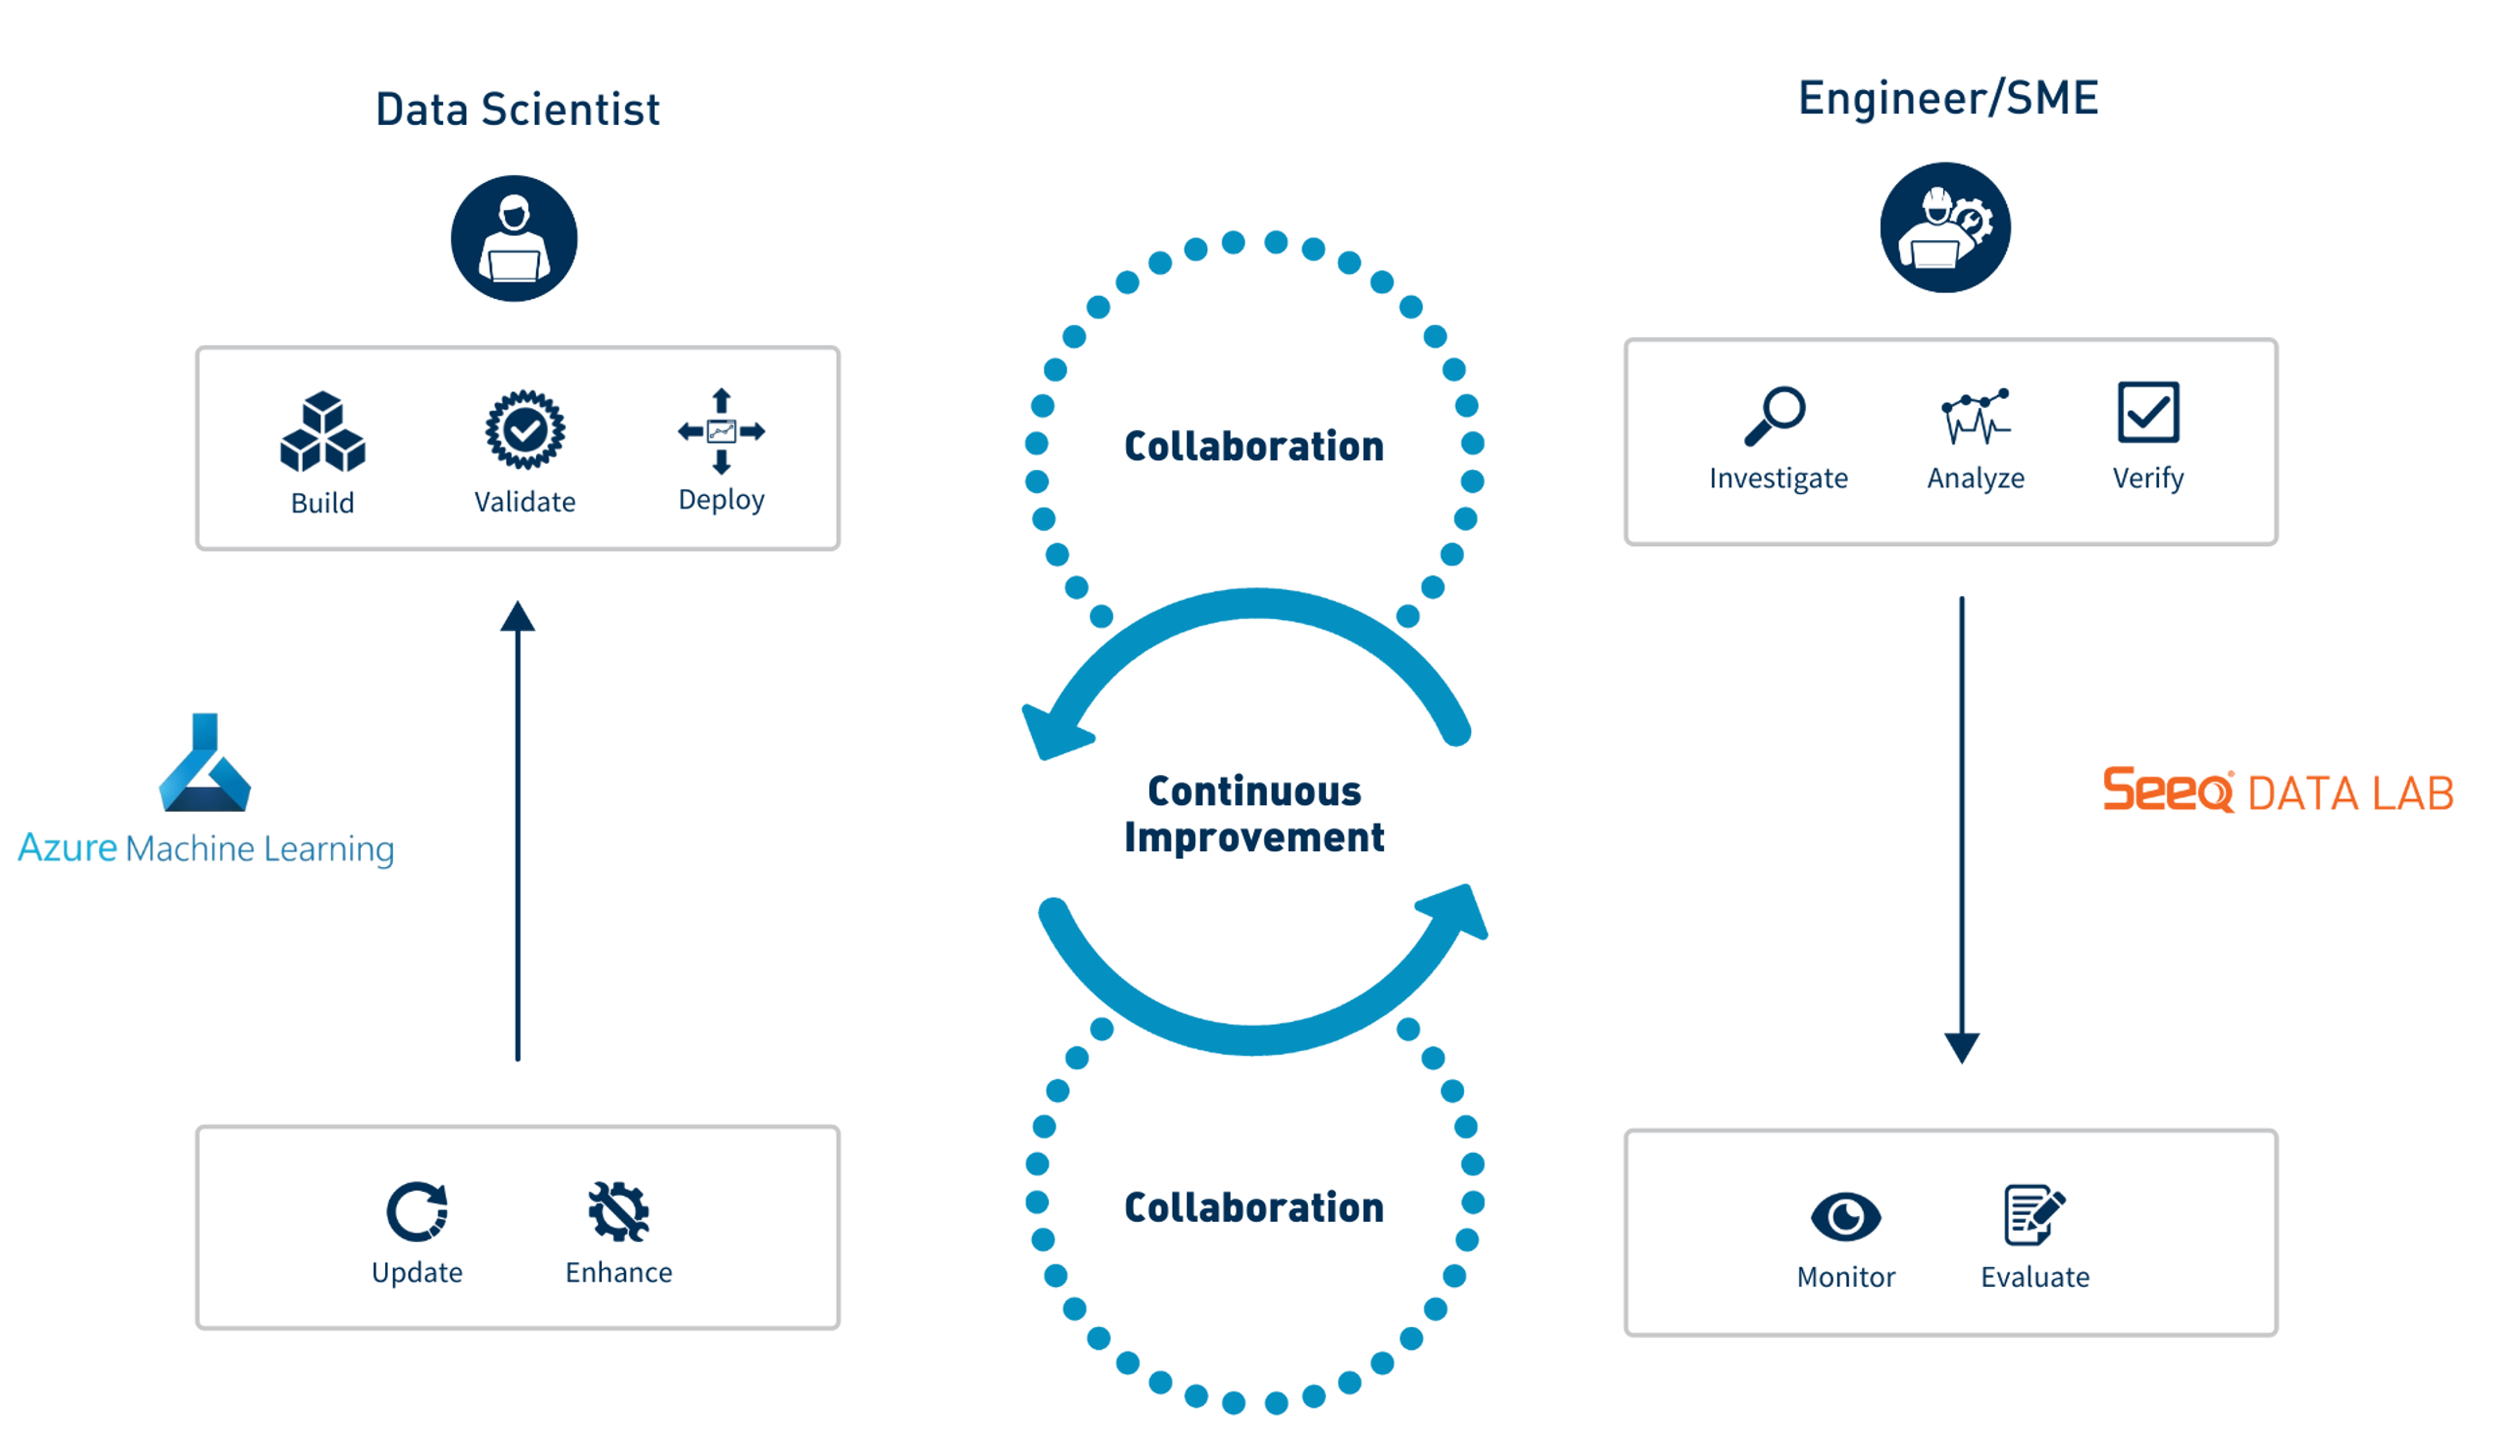
seeq-azureml provides an example framework that allows a data scientist working in Azure ML Studio and a plant engineer or subject matter expert (SME) working in Seeq to collaborate and develop an effective, sustainable solution for high value problems in manufacturing.
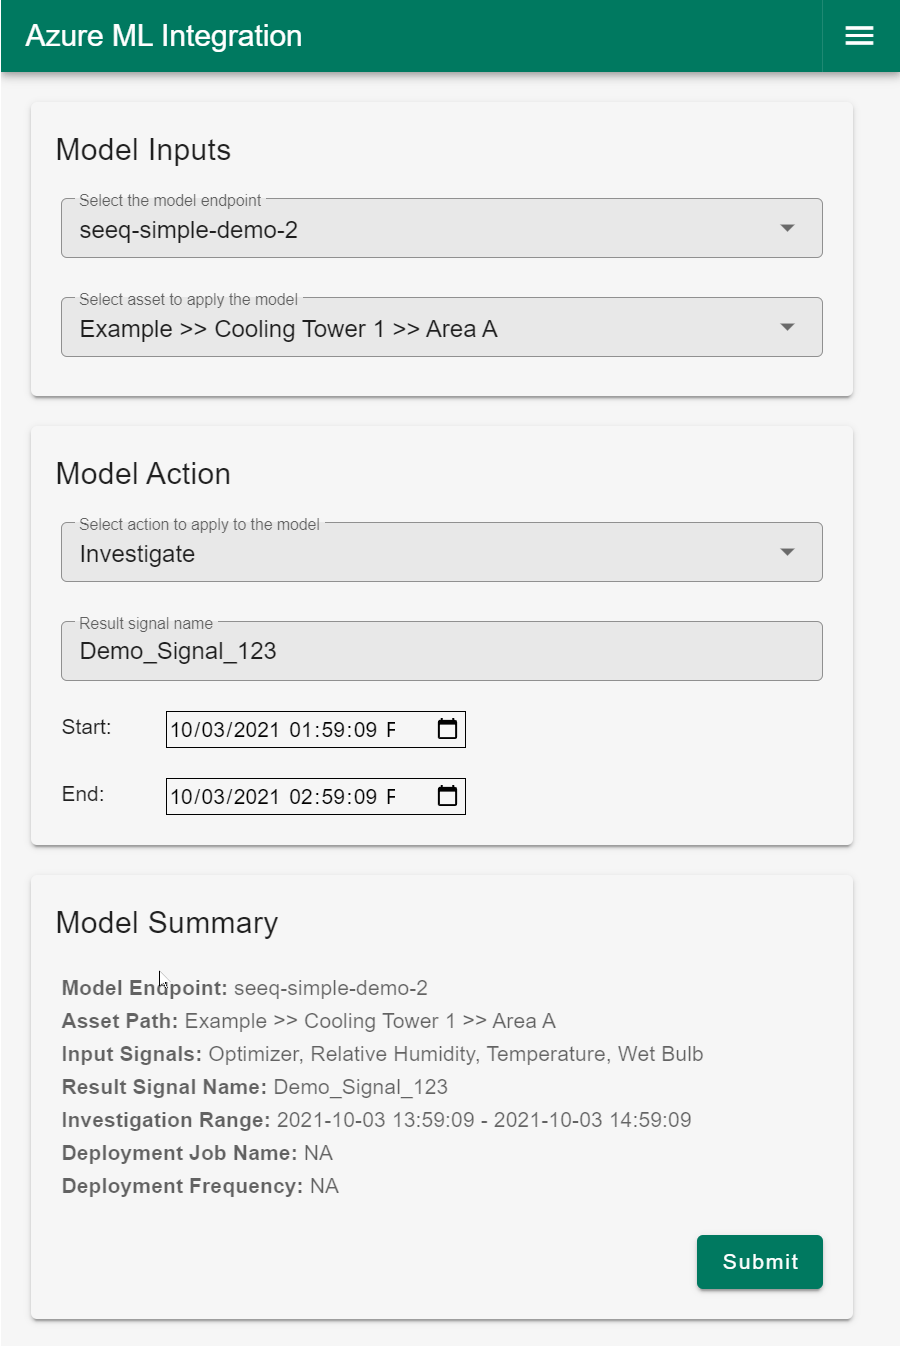
This python module integrates with Microsoft Azure Machine Learning (AML) models as a web service and can be installed as a Seeq Add-on in Seeq Workbench. The plant engineer and/or SME interacts with the module through an easy to use UI from which they can accomplish critical activities such as ad hoc/historical evaluations, model deployment in real time, scaling to other assets, etc.
The Seeq Add-on is distributed as an example of a collaborative workflow between data scientists (model builders) and plant engineers/SMEs (model consumers). Users are encouraged to fork the repo and make the necessary modifications/enhancements that addresses the specific needs/workflows of their organization.
Important Note:
The seeq-azureml add-on is meant to be used for proof-of-concept models only. There are four significant caveats that users should be aware of when using this add-on:
- A new Azure app registration must be set up to provide the identity to Seeq via OIDC (Open ID Connect).
- The Azure app registration needs contributor access to the AzureML Studio workspace.
- A secret needs to be generated and configured in an ini file as per the instructions on the Seeq Add-on Installation section of the documentation.
- This add-on has very limited capability for scalability to multiple assets.
Documentation
The documentation for seeq-azureml can be found here.
User Guide
seeq-azureml User Guide provides a more in-depth explanation of how this Seeq Add-on enables engineers and SMEs in OT to directly interface with models built by data science teams in Azure ML Studio and that have been registered and deployed in an AML endpoint as a cloud service.
For additional details on the Data Scientist workflow, take a look at this video.
For additional details on the Engineering workflow, take a look at this video.
Installation
The backend of seeq-azureml requires Python >3.7 or later.
Dependencies
See requirements.txt file for a list of
dependencies and versions. Additionally, you will need to install the seeq module with the appropriate version that
matches your Seeq server. For more information on the seeq module see seeq at pypi
User Installation Requirements (Seeq Data Lab)
If you want to install seeq-azureml as a Seeq Add-on Tool, you will need:
- Seeq Data Lab (> R50.5.0, >R51.1.0, >R52.1.0, or >=R53)
seeqmodule whose version matches the Seeq server version, and the version of SPy >= 182.25- Seeq server admin access
- Enable Add-on Tools in the Seeq server
User Installation (Seeq Data Lab)
The latest build of the project can be found here as a wheel file. The file is published as a courtesy and does not imply any guarantee or obligation for support from the publisher.
Pre-requisites
Before installing the seeq-azureml Seeq Add-on, you will have to create an Azure application and service
principal. Follow the steps
in here to
create your application, and
choose Option 2
for the Authentication method.
Seeq Add-on Installation
Once the Azure application and service principal have been created. Follow these steps to install the Seeq Add-on:
- Create a new Seeq Data Lab project and open the Terminal window
- Run
pip install seeq-azureml - Run
python -m seeq.addons.azureml [--users <users_list> --groups <groups_list>] - Create an
aml_config.inifile in the~/.seeqfolder of the Seeq Data Lab Project with the information required to connect to the Azure ML services. The following steps summarized how to create theaml_config.inifile in the correct Seeq Data Lab location and where to get the values required for the configuration.- Download the
aml_config.iniconfiguration file from here - Upload the file to the Seeq Data Lab project using the
Uploadbutton located in the top-right corner of the home page of the project. - From the Seeq Data Lab project home page, open the uploaded file and modify the fields appropriately:
- The
SUBSCRIPTION_ID,RESOURCE_GROUP, andWORKSPACE_NAMEcan be obtained by logging into the Azure portal and clicking on the Machine Learning service . Once in the Machine Learning service, click on the desiredWORKSPACE_NAMEfrom the list. TheOverviewtab will show a list ofEssentialsfrom which you can take the values forSUBSCRIPTION_IDandRESOURCE_GROUP. - The
TENANT_ID,APP_ID, andAPP_SECRETare obtained when creating the Azure application in the section Get tenant and app ID values for signing in , Option 2 . - Save the
aml_config.inifile.
- The
- Back to the Terminal window from Steps 1 and 2, run the command
mv aml_config.ini .seeq/to move theaml_config.inifile to the appropriate folder.
- Download the
Note: If Step 3 gives an error make sure that the seeq module is >= a.b.c.182.25 where a.b.c are explained here
Development
We welcome new contributors of all experience levels.
Important links
- Official source code repo: https://github.com/seeq12/seeq-azureml
- Issue tracker: https://github.com/seeq12/seeq-azureml/issues
Source code
You can get started by cloning the repository with the command:
git clone git@github.com:seeq12/seeq-azureml.git
Installation from source
For development work, it is highly recommended creating a python virtual environment and install the package in that working environment. If you are not familiar with python virtual environments, you can take a look here
Once your virtual environment is activated, you can install seeq-azureml from source with:
python setup.py install
Testing
There are two main ways to test seeq-azureml: automatic testing mainly for the backend, and user interface testing.
Automatic Testing
After installing from source, you can launch the test suite from the root directory of the project (i.e. seeq-azureml
directory). There are two types of automatic tests set up: 1) unit test and system test. The system and unit tests
can be run at the same time or independently. Use the pytest markers defined in pytest.ini to run only one set of
tests at a time.
For example, to run only the unit tests:
pytest -v -m unit
The system tests require a connection to both a Seeq server and Azure ML Studio. Before running system tests, you will
have to provide the required variables in tests/test_config.ini. Please be careful not to commit your credentials in
the configuration file back into the repository. To avoid committing changes in the configuration file, run the
following command in the root directory of the project before modifying the configuration file.
git update-index --assume-unchanged tests/test_config.ini
Then, you can fill out the configuration file and use it for the tests. Lastly, make sure that the seeq module version
in your local environment should match the Seeq server version.
To run only the system tests (after modifying tests/test_config.ini):
pytest -v -m system
To run all tests (both unit and system tests):
pytest -v
User Interface Testing
To test the UI, use the developer_notebook.ipynb in the development folder of the project. This notebook can also be
used while debugging from your IDE. You can also create a whl first, install it on your virtual environment, and then
run developer_notebook.ipynb notebook there.
Changelog
The changelog can be found here
Support
Code related issues (e.g. bugs, feature requests) can be created in the issue tracker
Maintainer: Seeq
Citation
Please cite this work as:
seeq-azureml
Seeq Corporation, 2021
https://github.com/seeq12/seeq-azureml
Release history Release notifications | RSS feed


Download files
Download the file for your platform. If you're not sure which to choose, learn more about installing packages.
Source Distributions
Built Distribution
Filter files by name, interpreter, ABI, and platform.
If you're not sure about the file name format, learn more about wheel file names.
Copy a direct link to the current filters
File details
Details for the file seeq_azureml-0.1.3-py3-none-any.whl.
File metadata
- Download URL: seeq_azureml-0.1.3-py3-none-any.whl
- Upload date:
- Size: 46.9 kB
- Tags: Python 3
- Uploaded using Trusted Publishing? No
- Uploaded via: twine/4.0.1 CPython/3.8.13
File hashes
| Algorithm | Hash digest | |
|---|---|---|
| SHA256 |
743e541444e14d93929565ef409cb529c15d1abbddf71af880752e62fbc66f10
|
|
| MD5 |
456615f29fca167b63c70e75ab9f0683
|
|
| BLAKE2b-256 |
3e9e8a520d7beb46b489a39782dfab5a119eec0cdfa6249354e67e46627b715e
|


