Software and instructions for setting up and running an autonomous (self-driving) laboratory optics demo using dimmable RGB LEDs, a 10-channel spectrometer, a microcontroller, and an adaptive design algorithm.

Project description


If you're reading this on GitHub, navigate to the documentation for tutorials, APIs, and more
self-driving-lab-demo 
Software and instructions for setting up and running an autonomous (self-driving) laboratory optics demo using dimmable RGB LEDs, an 8-channel spectrophotometer, a microcontroller, and an adaptive design algorithm, as well as extensions to liquid- and solid-based color matching demos.
Demos
This repository covers three teaching and prototyping demos for self-driving laboratories in the fields of optics (light-mixing), chemistry (liquid-mixing), and solid-state materials science (solid-mixing).
CLSLab:Light
NOTE: Some updates have occurred since the creation of the video tutorial and the publication of the manuscript. Please read the description section of the YouTube video and see https://github.com/sparks-baird/self-driving-lab-demo/issues/245.
| White paper [postprint] | Build instructions manuscript | YouTube build instructions | Purchase* |
|---|
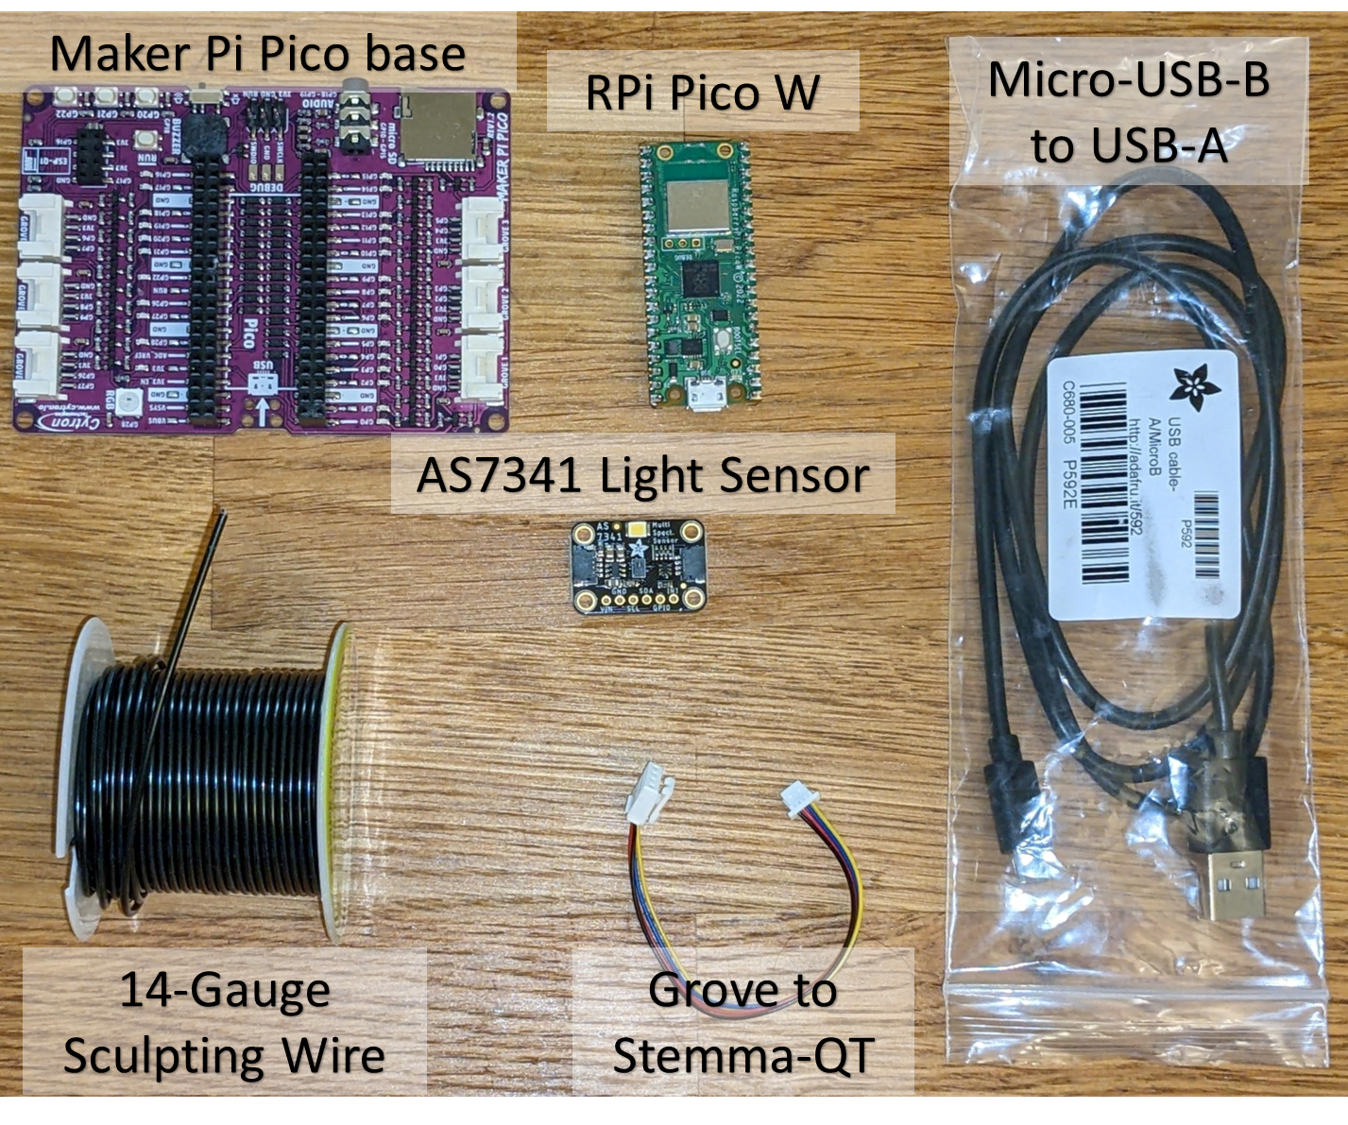
Self-driving labs are the future; however, the capital and expertise required can be daunting. We introduce the idea of an experimental optimization task for less than $100, a square foot of desk space, and an hour of total setup time from the shopping cart to the first "autonomous drive." For our first demo, we use optics rather than chemistry; after all, light is easier to move than matter. While not strictly materials-based, importantly, several core principles of a self-driving materials discovery lab are retained in this cross-domain example:
- sending commands to hardware to adjust physical parameters
- receiving measured objective properties
- decision-making via active learning
- utilizing cloud-based simulations
The demo is accessible, extensible, modular, and repeatable, making it an ideal candidate for both low-cost experimental adaptive design prototyping and learning the principles of self-driving laboratories in a low-risk setting.
| Summary | Unassembled | Assembled |
|---|---|---|
 |
 |
 |
Users
University instructors utilizing CLSLab-Light during Spring 2023: 4 (~40 kits in total)
At-cost Commercialization
- GroupGets round 1: funded and fulfilled (19 kits)
- GroupGets round 2: funded and fulfilled (20 kits)
*CLSLab:Light is stocked in the GroupGets Store. It has a higher GroupGets fee (only GroupGets sees the extra profit). If you don't want to wait for new rounds and you'd rather order a pre-built kit, this is the best option right now.
CLSLab:Liquid
| Bill of materials |
|---|
We extend the light-mixing demo to a color-matching materials optimization problem using dilute colored dyes. This optimization task costs less than 300 USD, requires less than three square feet of desk space, and less than three hours of total setup time from the shopping cart to the first “autonomous drive.” The demo is modular and extensible; additional peristaltic pump channels can be added, the dye reservoirs can be increased, and chemically sensitive parts can be replaced with chemically resistant ones.
| Summary | Schematic | Assembled |
|---|---|---|
 |
 |
 |
CLSLab:Solid
There are few to no examples of a low-cost demo platform involving the handling of solid-state materials (i.e., powders, pellets). For this demo, we propose using red, yellow, and blue powdered wax as a replacement for the liquid colored dyes. The demo is more expensive due to the need for robotics. The demo involves using tealight candle holders, transferring them to a rotating stage via a robotic arm, dispensing a combination of powders, melting the wax via an incandescent light bulb, measuring a discrete color spectrum, and moving the completed sample to a separate sample storage area.

See Also
- Journal of Brief Ideas submission
- Hackaday project page
- Adafruit Forum: Developing a closed-loop feedback system via DotStar LEDs
Basic Usage
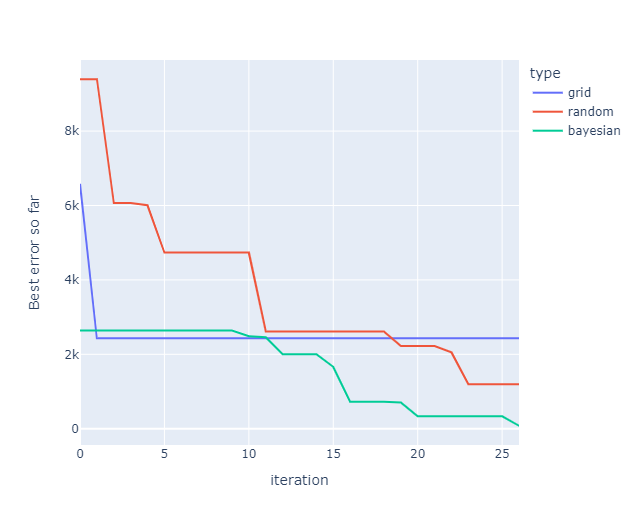
I recommend going through the introductory Colab notebook, but here is a shorter version of how an optimization comparison can be run between grid search, random search, and Bayesian optimization using a free public demo.
Basic Installation
pip install self-driving-lab-demo
Client Setup for Public Test Demo
from self_driving_lab_demo import (
    SelfDrivingLabDemoLight,
    # SelfDrivingLabDemoLiquid,
    mqtt_observe_sensor_data,
    get_paho_client,
)

PICO_ID = "test"
sensor_topic = f"sdl-demo/picow/{PICO_ID}/as7341/"  # to match with Pico W code

# instantiate client once and reuse to avoid opening too many connections
client = get_paho_client(sensor_topic)

sdl = SelfDrivingLabDemoLight(
    autoload=True,  # perform target data experiment automatically, default is False
    observe_sensor_data_fn=mqtt_observe_sensor_data,  # default
    observe_sensor_data_kwargs=dict(pico_id=PICO_ID, client=client),
    simulation=False,  # default
)
Optimization Comparison
from self_driving_lab_demo.utils.search import (
    grid_search,
    random_search,
    ax_bayesian_optimization,
)

num_iter = 27

grid, grid_data = grid_search(sdl, num_iter)
random_inputs, random_data = random_search(sdl, num_iter)
best_parameters, values, experiment, model = ax_bayesian_optimization(sdl, num_iter)
Visualization
import plotly.express as px
import pandas as pd

# grid
grid_input_df = pd.DataFrame(grid)
grid_output_df = pd.DataFrame(grid_data)[["frechet"]]
grid_df = pd.concat([grid_input_df, grid_output_df], axis=1)
grid_df["best_so_far"] = grid_df["frechet"].cummin()

# random
random_input_df = pd.DataFrame(random_inputs, columns=["R", "G", "B"])
random_output_df = pd.DataFrame(random_data)[["frechet"]]
random_df = pd.concat([random_input_df, random_output_df], axis=1)
random_df["best_so_far"] = random_df["frechet"].cummin()

# bayes
trials = list(experiment.trials.values())
bayes_input_df = pd.DataFrame([t.arm.parameters for t in trials])
bayes_output_df = pd.Series(
    [t.objective_mean for t in trials], name="frechet"
).to_frame()
bayes_df = pd.concat([bayes_input_df, bayes_output_df], axis=1)
bayes_df["best_so_far"] = bayes_df["frechet"].cummin()

# concatenation
grid_df["type"] = "grid"
random_df["type"] = "random"
bayes_df["type"] = "bayesian"
df = pd.concat([grid_df, random_df, bayes_df], axis=0)

# plotting
px.line(df, x=df.index, y="best_so_far", color="type").update_layout(
    xaxis_title="iteration",
    yaxis_title="Best error so far",
)
Example Output
Advanced Installation
PyPI
conda create -n self-driving-lab-demo python=3.10.*
conda activate self-driving-lab-demo
pip install self-driving-lab-demo
Local
In order to set up the necessary environment:
- review and uncomment what you need in
environment.ymland create an environmentself-driving-lab-demowith the help of conda:conda env create -f environment.yml - activate the new environment with:
conda activate self-driving-lab-demo
NOTE: The conda environment will have self-driving-lab-demo installed in editable mode. Some changes, e.g. in
setup.cfg, might require you to runpip install -e .again.
Optional and needed only once after git clone:
-
install several pre-commit git hooks with:
pre-commit install
# You might also want to run `pre-commit autoupdate`
and checkout the configuration under
.pre-commit-config.yaml. The-n, --no-verifyflag ofgit commitcan be used to deactivate pre-commit hooks temporarily. -
install nbstripout git hooks to remove the output cells of committed notebooks with:
nbstripout --install --attributes notebooks/.gitattributes
This is useful to avoid large diffs due to plots in your notebooks. A simple
nbstripout --uninstallwill revert these changes.
Then take a look into the scripts and notebooks folders.
Dependency Management & Reproducibility
- Always keep your abstract (unpinned) dependencies updated in
environment.ymland eventually insetup.cfgif you want to ship and install your package viapiplater on. - Create concrete dependencies as
environment.lock.ymlfor the exact reproduction of your environment with:conda env export -n self-driving-lab-demo -f environment.lock.yml
For multi-OS development, consider using--no-buildsduring the export. - Update your current environment with respect to a new
environment.lock.ymlusing:conda env update -f environment.lock.yml --prune
Project Organization
├── AUTHORS.md              <- List of developers and maintainers.
├── CHANGELOG.md            <- Changelog to keep track of new features and fixes.
├── CONTRIBUTING.md         <- Guidelines for contributing to this project.
├── Dockerfile              <- Build a docker container with `docker build .`.
├── LICENSE.txt             <- License as chosen on the command-line.
├── README.md               <- The top-level README for developers.
├── configs                 <- Directory for configurations of model & application.
├── data
│   ├── external            <- Data from third party sources.
│   ├── interim             <- Intermediate data that has been transformed.
│   ├── processed           <- The final, canonical data sets for modeling.
│   └── raw                 <- The original, immutable data dump.
├── docs                    <- Directory for Sphinx documentation in rst or md.
├── environment.yml         <- The conda environment file for reproducibility.
├── models                  <- Trained and serialized models, model predictions,
│                              or model summaries.
├── notebooks               <- Jupyter notebooks. Naming convention is a number (for
│                              ordering), the creator's initials and a description,
│                              e.g. `1.0-fw-initial-data-exploration`.
├── pyproject.toml          <- Build configuration. Don't change! Use `pip install -e .`
│                              to install for development or to build `tox -e build`.
├── references              <- Data dictionaries, manuals, and all other materials.
├── reports                 <- Generated analysis as HTML, PDF, LaTeX, etc.
│   └── figures             <- Generated plots and figures for reports.
├── scripts                 <- Analysis and production scripts which import the
│                              actual PYTHON_PKG, e.g. train_model.
├── setup.cfg               <- Declarative configuration of your project.
├── setup.py                <- [DEPRECATED] Use `python setup.py develop` to install for
│                              development or `python setup.py bdist_wheel` to build.
├── src
│   └── self_driving_lab_demo <- Actual Python package where the main functionality goes.
├── tests                   <- Unit tests which can be run with `pytest`.
├── .coveragerc             <- Configuration for coverage reports of unit tests.
├── .isort.cfg              <- Configuration for git hook that sorts imports.
└── .pre-commit-config.yaml <- Configuration of pre-commit git hooks.
Note
This project has been set up using PyScaffold 4.2.3.post1.dev10+g7a0f254 and the dsproject extension 0.7.2.post1.dev3+g948a662.
Release history Release notifications | RSS feed


Download files
Download the file for your platform. If you're not sure which to choose, learn more about installing packages.
Source Distributions
Built Distribution
Filter files by name, interpreter, ABI, and platform.
If you're not sure about the file name format, learn more about wheel file names.
Copy a direct link to the current filters
File details
Details for the file self_driving_lab_demo-0.8.13-py3-none-any.whl.
File metadata
- Download URL: self_driving_lab_demo-0.8.13-py3-none-any.whl
- Upload date:
- Size: 1.1 MB
- Tags: Python 3
- Uploaded using Trusted Publishing? No
- Uploaded via: twine/6.2.0 CPython/3.12.3
File hashes
| Algorithm | Hash digest | |
|---|---|---|
| SHA256 |
a6e97d7e4987aa0ef1d7f69d9b310153704338db61edccc3ae10cea88e88d04c
|
|
| MD5 |
9ffd3928ede77c5c7713a2b65cba3ce8
|
|
| BLAKE2b-256 |
5a370df0270062175e8b73014a9421baa9fc49a3741d02e2c91a13973bc7c9de
|


