A tiny Raspberry Pi powered ePaper ticker.

Project description
🚀 tinyticker 🚀
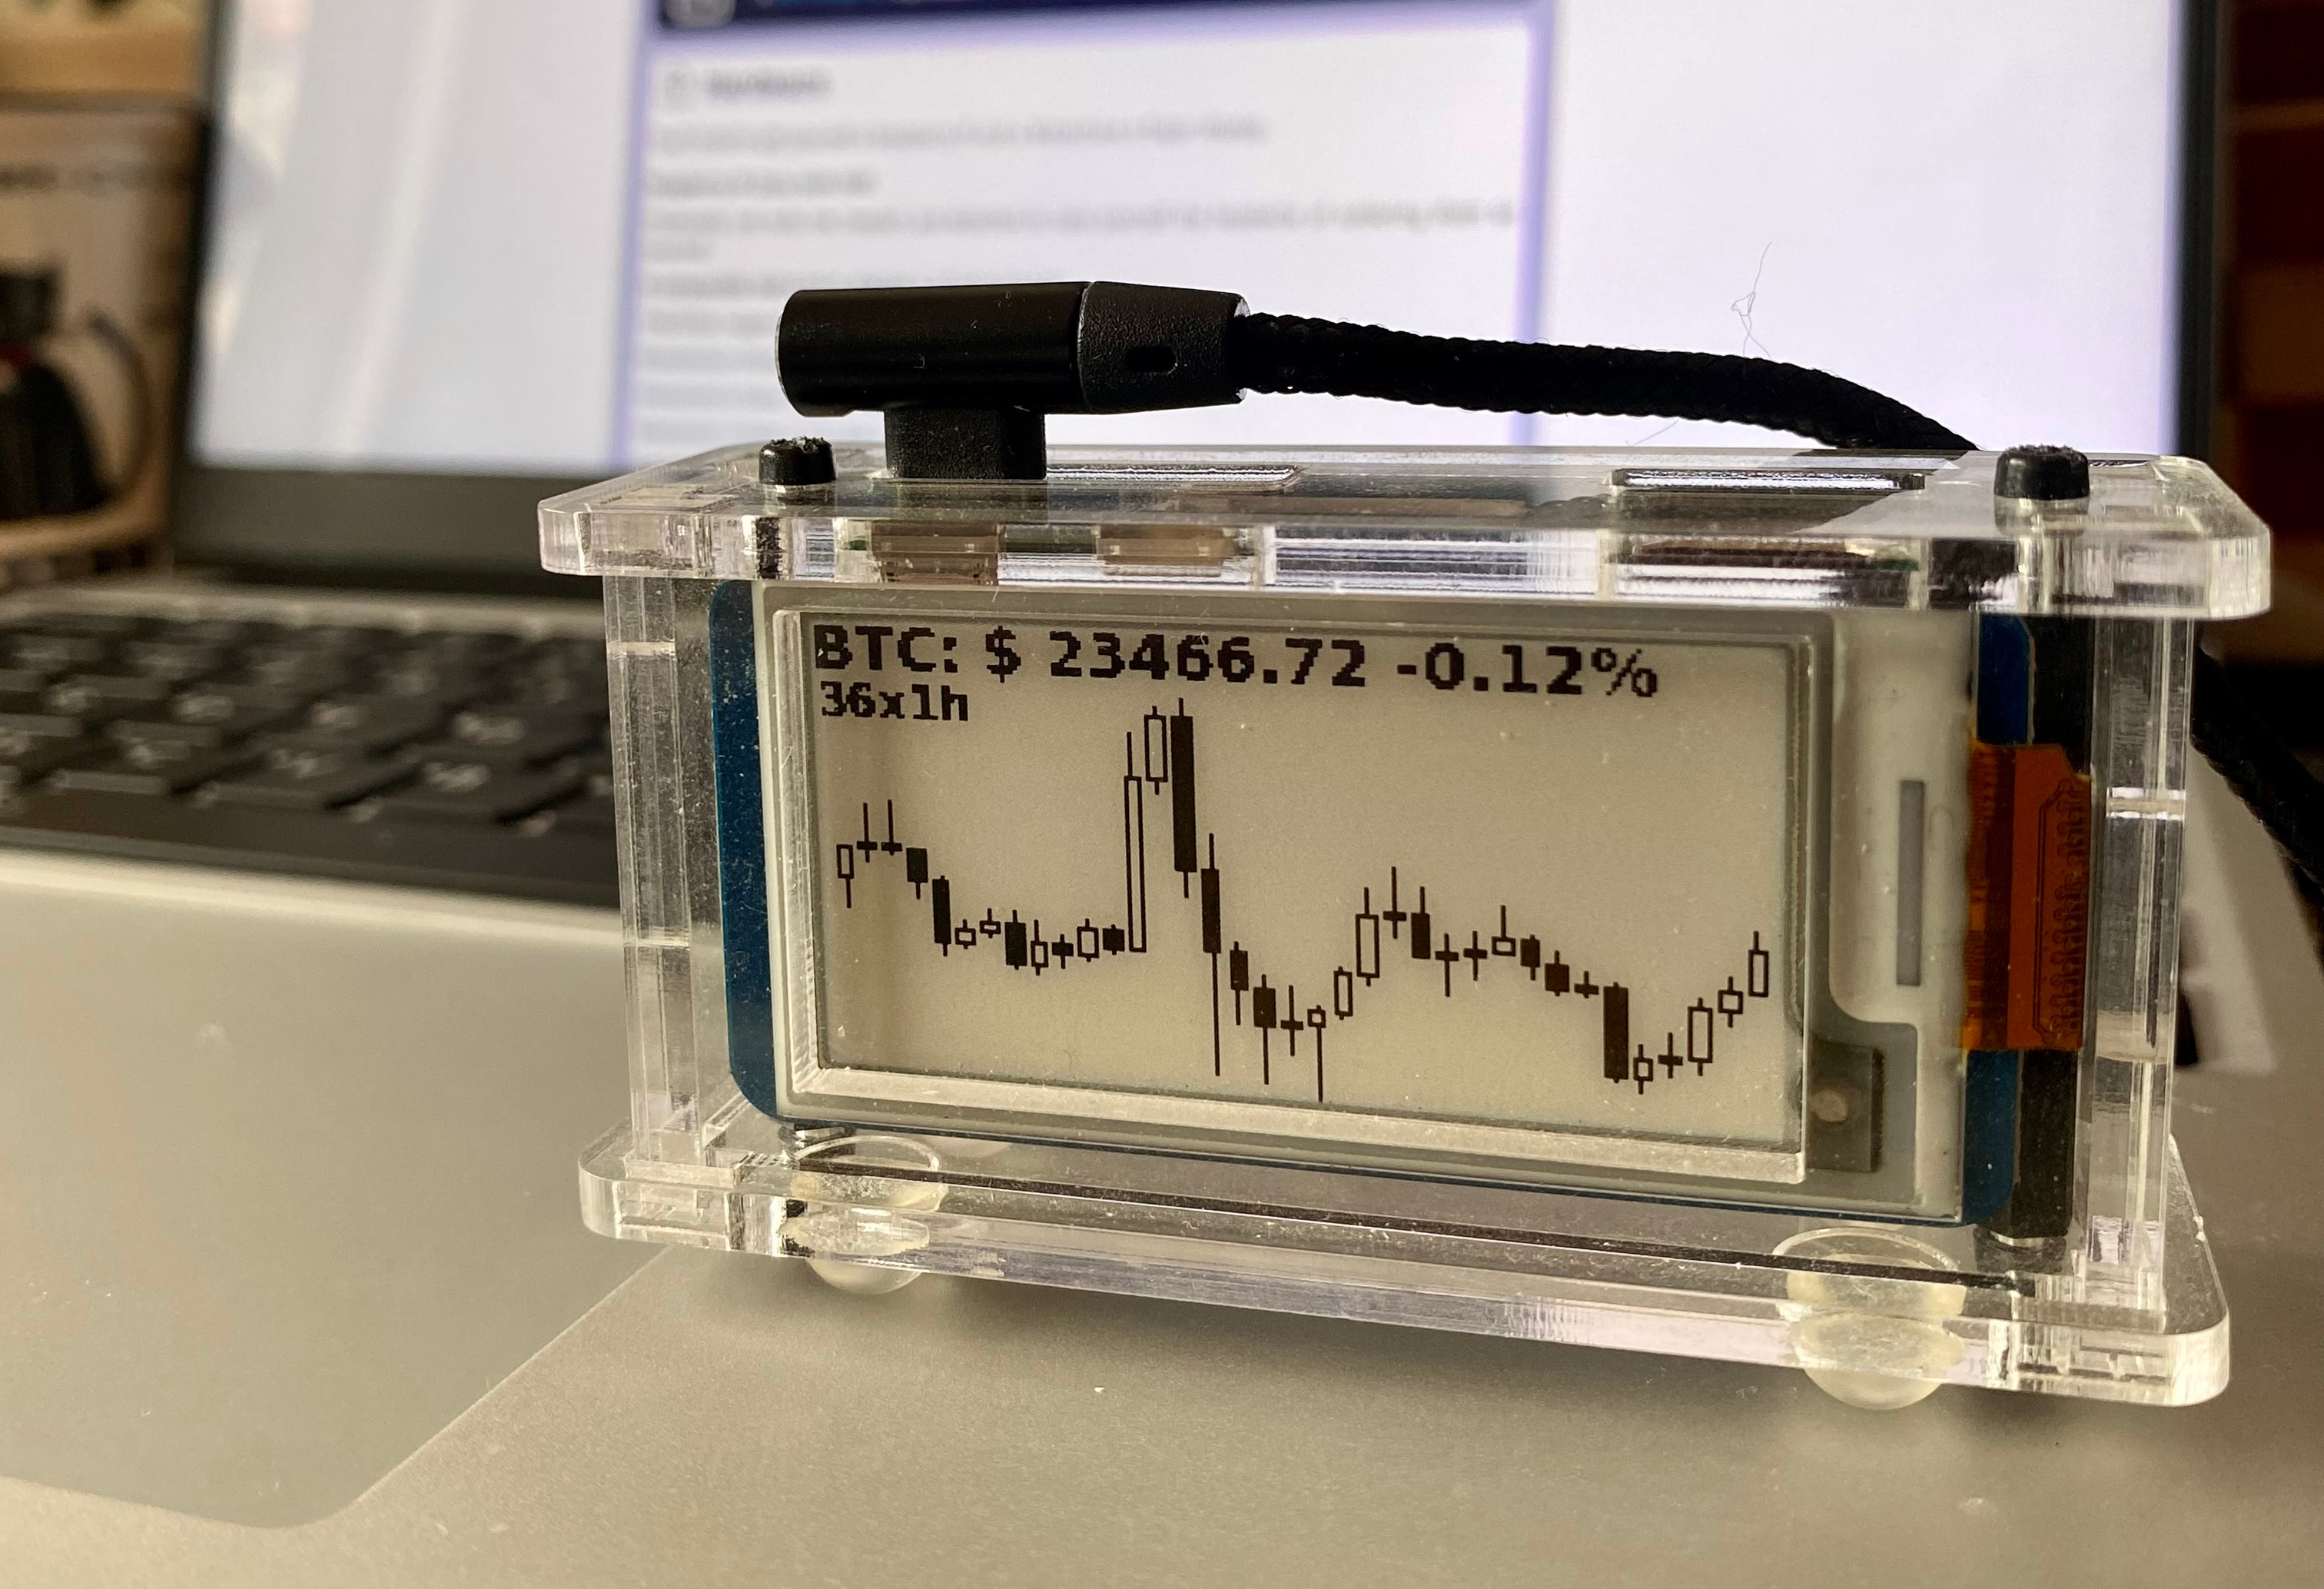


tinyticker uses a Raspberry Pi zero W and a small ePaper display to periodically display a stock or crypto chart.
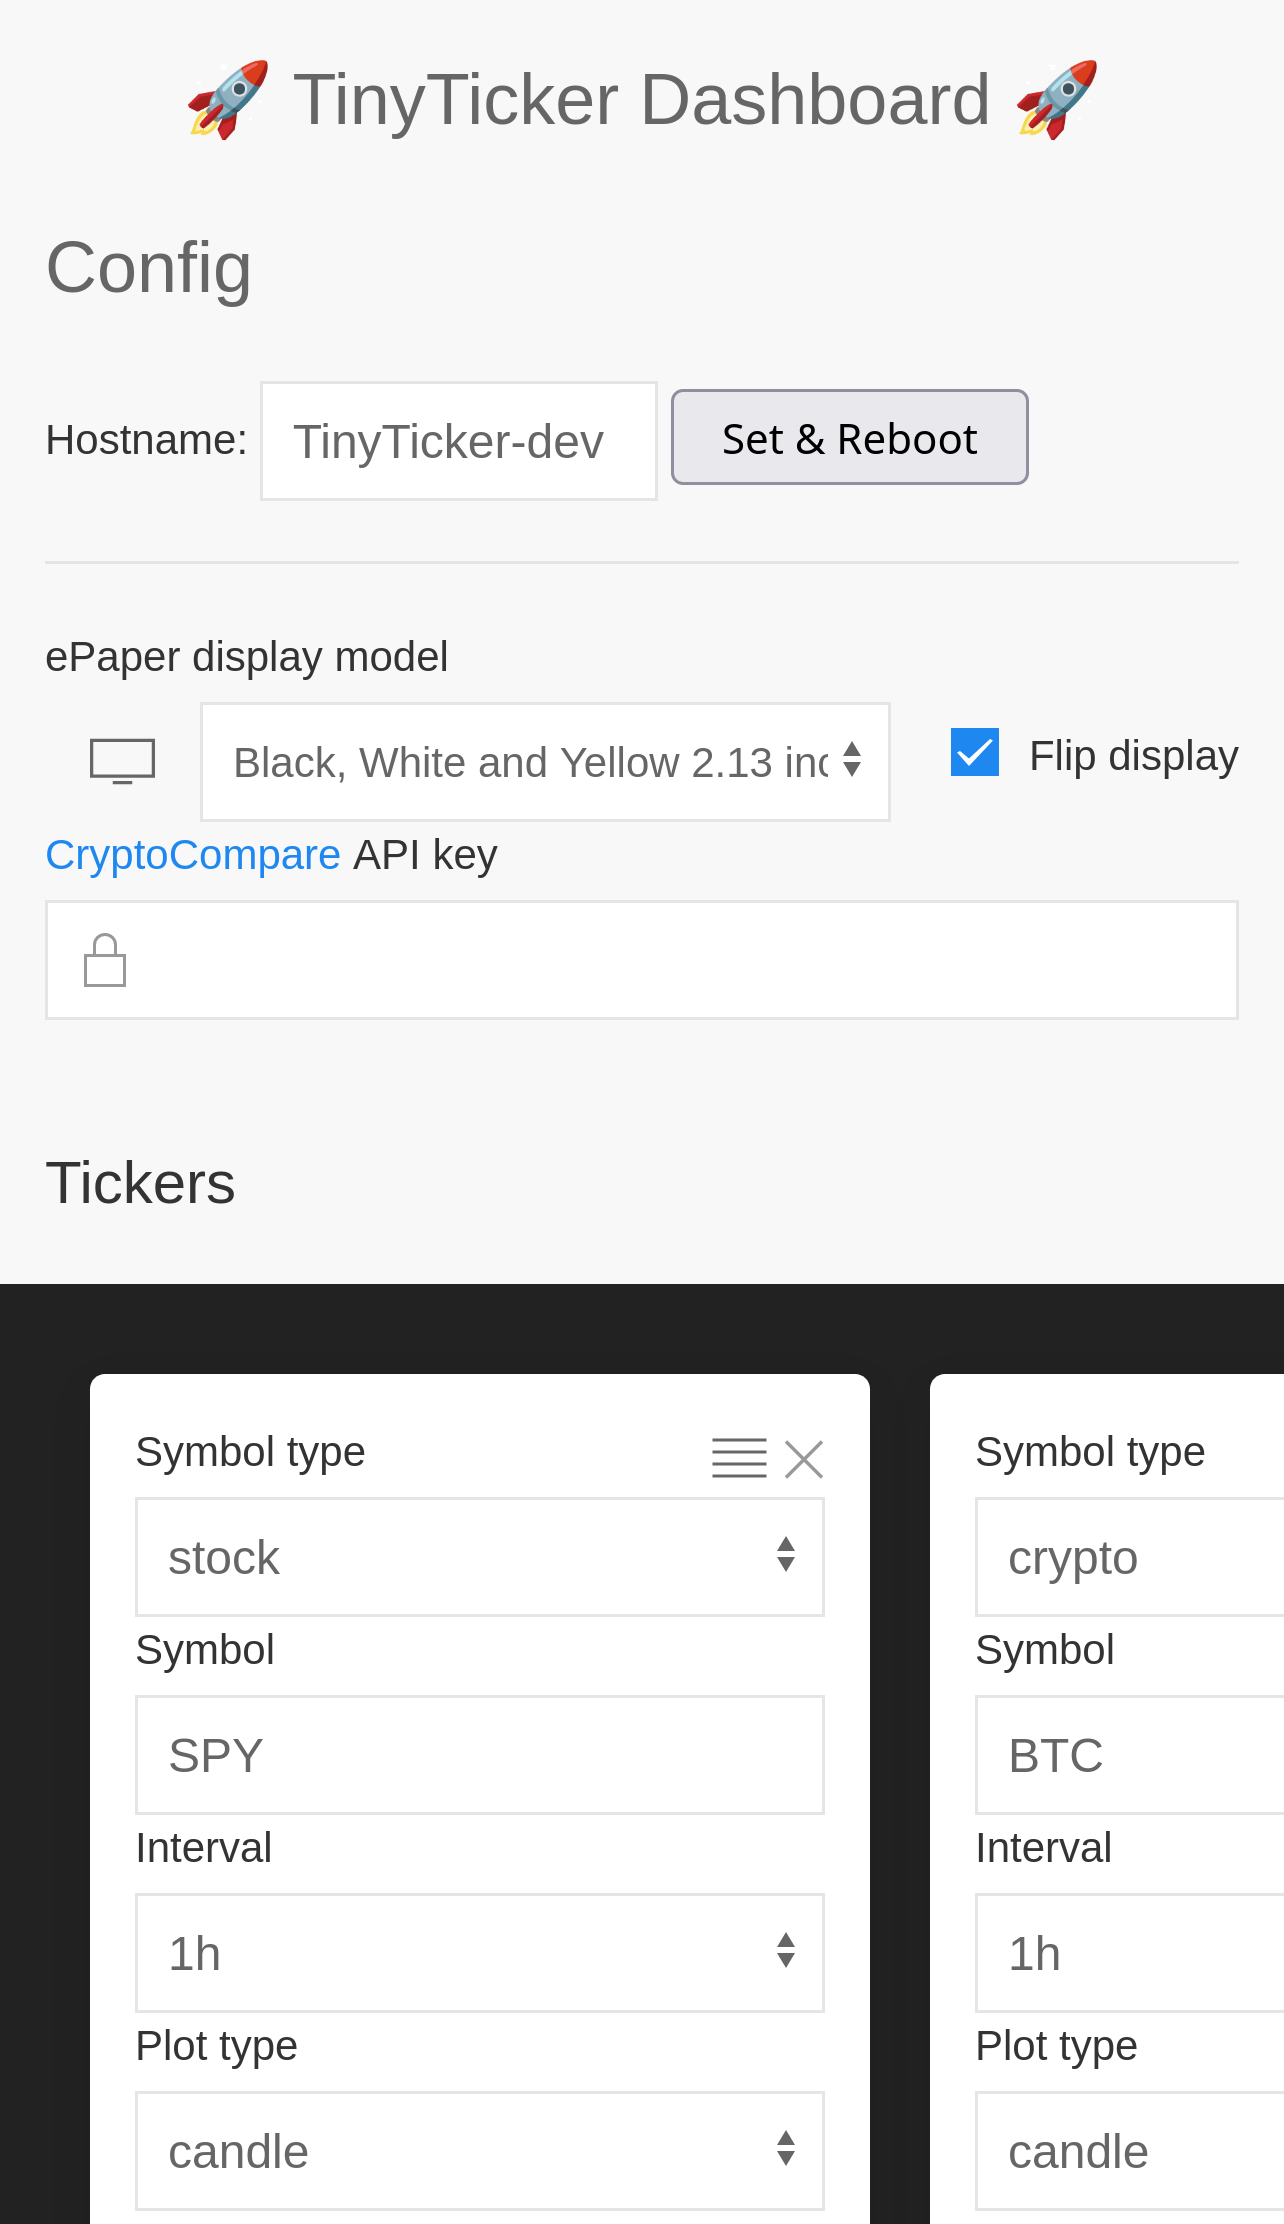
A flask web interface is created to set the ticker options and control the Raspberry Pi.
tinyticker uses the cryptocompare API to query the crypto price information, you'll need to get yourself a free API key. As well as the yfinance package to get the stock financial data.
🛒 Hardware
Shopping list:
- Raspberry Pi Zero WH
- One of these ePaper displays:
- A micro sd card
📦 Installation
[!TIP] Check out https://tinyticker.loiccoyle.com for more information.
Recommended setup
Flash the tinyticker image onto a SD card and you should be good to go.
[!NOTE] To build your own image, see the
pi-genrepo.
Manual setup
[!NOTE] This is much more involved than the recommended setup and will most likely require some debugging.
Expand
I highly recommend using comitup to setup the networking on your RPi.
-
Write the
comitupimage to your sd card -
Boot up the RPi and setup the networking
-
ssh into your RPi, you'll probably want to change the password while you're at it
-
Enable the SPI interface
-
(Optional) rename the hostname of your RPi by editing the
/etc/hostnameand/etc/hostsfile -
(Optional) rename the Wifi AP name by editing the
/etc/comitup.conffile -
Install the
BCM2835driver:curl http://www.airspayce.com/mikem/bcm2835/bcm2835-1.60.tar.gz | tar xzv cd bcm2835-1.60/ ./configure make make install
- Install
pip:
sudo apt install python3-pip
- Install dependency requirements:
sudo apt install libxml2-dev libxslt1-dev libatlas-base-dev ninja-build patchelf libopenjp2-7 libtiff-dev libjpeg-dev
- Install
tinyticker:
pip install tinyticker
- To setup
tinytickerto start on boot, copy over thesystemdunit files and enable them.
- Install
👢 First boot
On first boot, you will need to connect your RPi to your wifi network.
- Connect to the
tinytickerwifi AP - Select the wifi network you want your RPi to connect to
- Enter the wifi password
Your RPi will now connect to your wifi and the tinyticker services will start.
Once the web app is running, head over to http://tinyticker.local to configure it.
Release history Release notifications | RSS feed


Download files
Download the file for your platform. If you're not sure which to choose, learn more about installing packages.
Source Distribution
Built Distribution
Filter files by name, interpreter, ABI, and platform.
If you're not sure about the file name format, learn more about wheel file names.
Copy a direct link to the current filters
File details
Details for the file tinyticker-1.1.8.tar.gz.
File metadata
- Download URL: tinyticker-1.1.8.tar.gz
- Upload date:
- Size: 149.6 kB
- Tags: Source
- Uploaded using Trusted Publishing? No
- Uploaded via: poetry/1.8.2 CPython/3.10.16 Linux/6.8.0-1021-azure
File hashes
| Algorithm | Hash digest | |
|---|---|---|
| SHA256 |
08785f5914b419f94ccd6dceb254de403c7aecf181fb7905cf050af5c90fd2eb
|
|
| MD5 |
7d507529f9ea6d93fd30d95edc666b0b
|
|
| BLAKE2b-256 |
67b817df5de36a1f3d2bbbec46bbcd0f5aaadc706282fe6720e1dc8ac0c97732
|
File details
Details for the file tinyticker-1.1.8-py3-none-any.whl.
File metadata
- Download URL: tinyticker-1.1.8-py3-none-any.whl
- Upload date:
- Size: 164.9 kB
- Tags: Python 3
- Uploaded using Trusted Publishing? No
- Uploaded via: poetry/1.8.2 CPython/3.10.16 Linux/6.8.0-1021-azure
File hashes
| Algorithm | Hash digest | |
|---|---|---|
| SHA256 |
49dcbbe0c18760b5e6dce6efe433347e25ec594994759565c7aca4a8954e2bd9
|
|
| MD5 |
e6b3b62976ccf1fd5a73ae7ed525d6d4
|
|
| BLAKE2b-256 |
18f12337ad33e52e7b7fbb61fb8e6faa240546f5219fffcaef8cb9a5c327505d
|


