markdown file uploader for tistory

Project description
Markdown Tistory Uploader
Markdown 타입의 파일을 Github CSS를 적용한 HTML파일로 변환해서 Tistory로 업로드하는 모듈입니다.
Prerequisites
- VS Code
- Python >= 3
- Tistory github markdown style 설정
- css 파일은 여기에서 다운로드
- tistory 설정은 구글링 부탁드립니다.
Installation
pip install은 지원되지 않습니다.
$ git clone https://github.com/momentjin/tistory-uploader.git
$ cd tistory-uploader
Usage
Client Id, Secret Key 발급
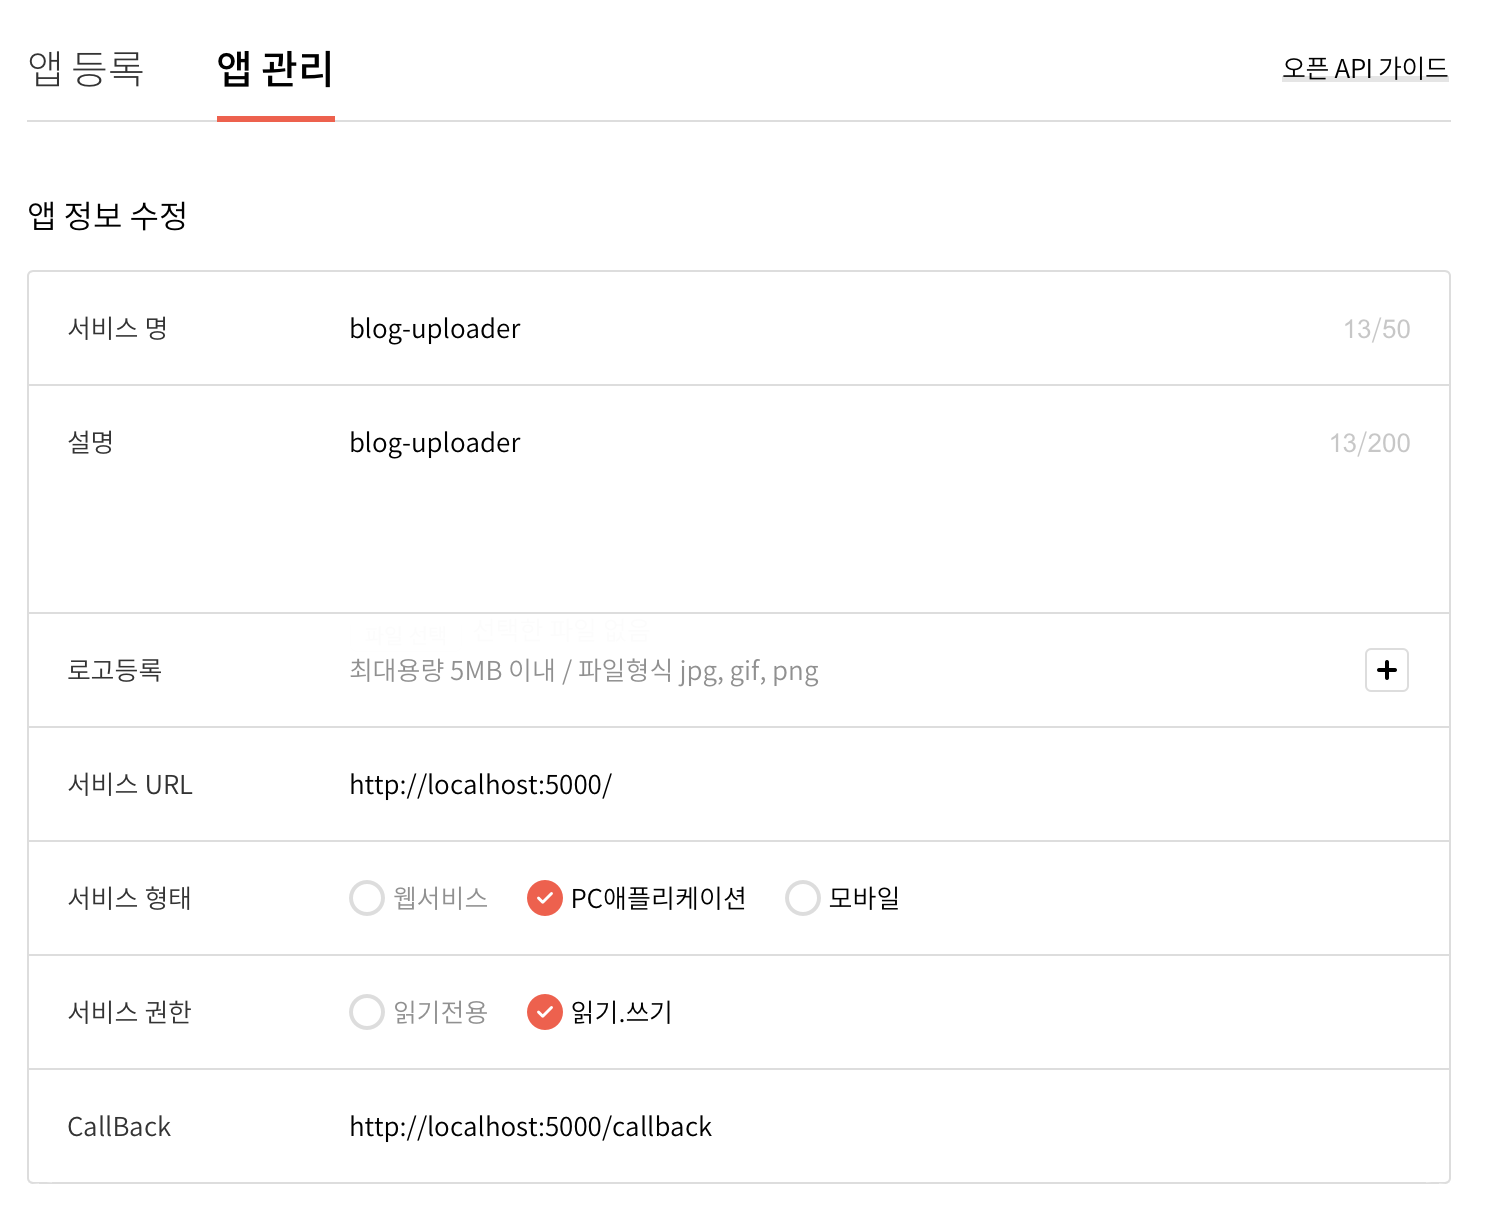
티스토리 App 등록 페이지에서 아래와 같이 서비스URL과 CallBack 값을 설정해주세요.
User Info 설정
- 아래와 같이 프로젝트 디렉토리에서 다음 명령어를 입력합니다.
$ ~/tistory-uploader python CommandConfig init
- user.json 파일이 열리면 아래 설명을 보고 내용을 입력합니다.
{
    "blog_name": "",
    "client_id": "",
    "client_secret": "",
    "access_token": "",
    "categories": []
}
- blog_name : 블로그 이름 입력. tistory 주소의 앞부분 (예를 들어 momentjin.tistory.com이면 'momentjin' 을 입력)
- client_id : Tistory 앱 등록 페이지의 App ID 입력
- client_secret : Tistory 앱 등록 페이지의 Secret Key 입력
- access_token과 categories는 명령어에 의해 입력됩니다.
Access Token 발급
- 아래 커맨드를 입력합니다.
$ ~/tistory-uploader python CommandConfig code
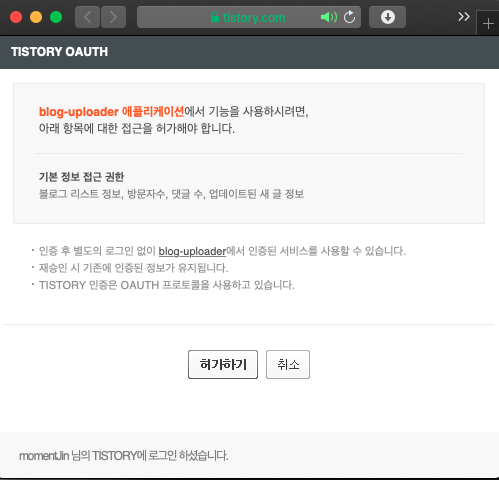
- 다음 화면에서 블로그 업로드 권한을 얻기 위해
허가하기버튼을 눌러주시면 됩니다.
user.json에 access_token이 입력된 것을 확인합니다. (현재 문제가 있어 오류 메세지가 보일 수 있습니다. 무시하면 됩니다)
Category 정보 획득
게시글 쓰기 및 수정 작업시에 카테고리 정보를 포함시키려면, 카테고리 ID를 알아야 합니다. 카테고리 정보 없이 게시글 업로드 작업을 한다면 생략하시면 됩니다.
- 아래 커맨드를 입력합니다.
$ ~/tistory-uploader python CommandConfig category
user.json에 categories 데이터가 입력된 것을 확인합니다.
게시글 업로드시 카테고리는 카테고리 이름을 입력합니다. 카테고리 이름을 통해 user.json의 카테고리 정보에서 id를 획득한 뒤 이를 API로 전달하는 방식입니다.
글 쓰기
1-1. (카테고리 정보가 필요 없는 경우) 아래 커맨드를 입력합니다.
$ ~/tistory-uploader python CommandConfig write [file_path]
1-2. (카테고리 정보가 필요한 경우) 아래 커맨드를 입력합니다. category_name는 영문의 경우 대소문자를 명확히 구분해주세요.
$ ~/tistory-uploader python CommandConfig write [file_path] -cg [category_name]
- 출력 값에 포함된 url에 접속해서 게시글이 제대로 게시되었는지 확인합니다.
글 수정
1-1. (카테고리 정보가 필요 없는 경우) 아래 커맨드를 입력합니다.
$ ~/tistory-uploader python CommandConfig modify [category_name] [file_path]
1-2. (카테고리 정보가 필요한 경우) 아래 커맨드를 입력합니다. category_name는 영문의 경우 대소문자를 명확히 구분해주세요.
$ ~/tistory-uploader python CommandConfig modify [category_name] [file_path] -cg [category_name]
- 출력 값에 포함된 url에 접속해서 게시글이 제대로 수정되었는지 확인합니다.
Release History
v0.1
- 2020.03.08
- Work in progress
License
Distributed under the MIT License. See LICENSE for more information.
Release history Release notifications | RSS feed


Download files
Download the file for your platform. If you're not sure which to choose, learn more about installing packages.
Source Distributions
Built Distribution
Filter files by name, interpreter, ABI, and platform.
If you're not sure about the file name format, learn more about wheel file names.
Copy a direct link to the current filters
File details
Details for the file tistory_uploader-0.11-py2-none-any.whl.
File metadata
- Download URL: tistory_uploader-0.11-py2-none-any.whl
- Upload date:
- Size: 7.4 kB
- Tags: Python 2
- Uploaded using Trusted Publishing? No
- Uploaded via: twine/3.1.1 pkginfo/1.5.0.1 requests/2.20.1 setuptools/42.0.2 requests-toolbelt/0.9.1 tqdm/4.43.0 CPython/3.7.6
File hashes
| Algorithm | Hash digest | |
|---|---|---|
| SHA256 |
dc449ff2e92e30d41413352333109078fd875a4dabd244fbc7d672646d3c0330
|
|
| MD5 |
ca158cfc1b43f2e35d48b9f5e4ce1e6f
|
|
| BLAKE2b-256 |
4ae3adab9080e9e20a7db913fe77e4de650b4be72a51732ae8468e9f5046d817
|


