Create virtual BMCs for controlling virtual instances via IPMI for vSphere environment

Project description
VirtualBMC for vSphere (vbmc4vsphere)

⚠️ IMPORTANT UPDATES ⚠️
Since 0.1.0, the commands have been renamed to vsbmc and vsbmcd to allow coexistence with the original VirtualBMC. Also, the path to the configuration files has been changed.
To migrate your old configuration files, please refer to the migration guide on the GitHub Wiki page.
Table of Contents
Overview
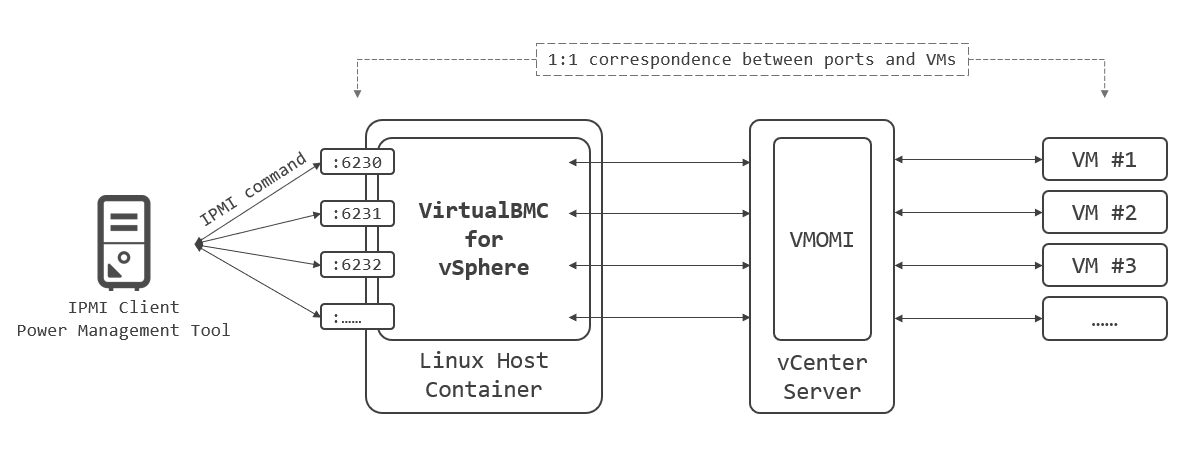
A virtual BMC for controlling virtual machines using IPMI commands for the VMware vSphere environment.
In other words, this is the VMware vSphere version of VirtualBMC part of the OpenStack project.
This can be used as a BMC of Nested-ESXi, therefore you can make the vSphere DPM work in your nested environment for testing purpose.
See:
- 📖The guide to use with Nested-ESXi and vCenter Server.
- 📖The guide to use with Nested-KVM and oVirt.
- 📖The guide to use with OpenShift Bare Metal IPI.
Disclaimer
- For testing purposes only. Not for production use.
- The vCenter Server credentials including password are stored in plain text.
- The vSphere DPM can be enabled with VirtualBMC for vSphere, but be careful with the recommendations presented in the vSphere DPM in nested environments may not be accurate or meet expectations. See the wiki page for detail.
Installation
python -m pip install vbmc4vsphere
If you want to run VirtualBMC for vSphere in Docker container, see the guide on wiki page.
vSphere Permissions
The following are the minimum permissions needed on vSphere for VirtualBMC for vSphere (queried using govc).
VirtualMachine.Config.Settings
VirtualMachine.Interact.PowerOff
VirtualMachine.Interact.PowerOn
VirtualMachine.Interact.Reset
Global.Diagnostics
Supported IPMI commands
# Power the virtual machine on, off, graceful off, reset, and NMI.
# Note that NMI is currently experimental.
ipmitool -I lanplus -U admin -P password -H 192.168.0.1 -p 6230 power on|off|soft|reset|diag

# Check the power status.
ipmitool -I lanplus -U admin -P password -H 192.168.0.1 -p 6230 power status

# Set the boot device to network, disk or cdrom.
ipmitool -I lanplus -U admin -P password -H 192.168.0.1 -p 6230 chassis bootdev pxe|disk|cdrom

# Get the current boot device.
ipmitool -I lanplus -U admin -P password -H 192.168.0.1 -p 6230 chassis bootparam get 5

# Get the channel info. Note that its output is always a dummy, not actual information.
ipmitool -I lanplus -U admin -P password -H 192.168.0.1 -p 6230 channel info

# Get the network info. Note that its output is always a dummy, not actual information.
ipmitool -I lanplus -U admin -P password -H 192.168.0.1 -p 6230 lan print 1
- Experimental support:
power diag- The command returns a response immediately, but the virtual machine receives NMI 60 seconds later. This depends on the behavior of
debug-hung-vmon the ESXi.
- The command returns a response immediately, but the virtual machine receives NMI 60 seconds later. This depends on the behavior of
Architecture
Quick Start
Install VirtualBMC for vSphere on some linux host, start vsbmcd daemon, and then configure through vsbmc command.
Installation
python -m pip install vbmc4vsphere
Start Daemon
-
Start daemon:
vsbmcd
By default, daemon starts in background. You can start it in foreground by
--foregroundoption to get logs.vsbmcd --foreground
Configure VirtualBMC
-
In order to see all command options supported by the
vsbmctool do:vsbmc --helpIt’s also possible to list the options from a specific command. For example, in order to know what can be provided as part of the
addcommand do:vsbmc add --help
-
Adding a new virtual BMC to control VM called lab-vesxi01:
vsbmc add lab-vesxi01 --port 6230 --viserver 192.168.0.1 --viserver-username vsbmc@vsphere.local --viserver-password my-secure-password
- Binding a network port number below 1025 is restricted and only users with privilege will be able to start a virtual BMC on those ports.
- Passing the credential for your vCenter Server is required.
- By default, IPMI credential is configured as
adminandpassword. You can specify your own username and password by--usernameand--passwordat this time.
-
Adding a additional virtual BMC to control VM called lab-vesxi02:
vsbmc add lab-vesxi02 --port 6231 --viserver 192.168.0.1 --viserver-username vsbmc@vsphere.local --viserver-password my-secure-password
- Specify a different port for each virtual machine.
-
Starting the virtual BMC to control VMs:
vsbmc start lab-vesxi01
vsbmc start lab-vesxi02
-
Getting the list of virtual BMCs including their VM name and IPMI network endpoints they are reachable at:
$ vsbmc list
+-------------+---------+---------+------+
| VM name     | Status  | Address | Port |
+-------------+---------+---------+------+
| lab-vesxi01 | running | ::      | 6230 |
| lab-vesxi02 | running | ::      | 6231 |
+-------------+---------+---------+------+
-
To view configuration information for a specific virtual BMC:
$ vsbmc show lab-vesxi01
+-------------------+---------------------+
| Property          | Value               |
+-------------------+---------------------+
| active            | False               |
| address           | ::                  |
| password          | ***                 |
| port              | 6230                |
| status            | running             |
| username          | admin               |
| viserver          | 192.168.0.1         |
| viserver_password | ***                 |
| viserver_username | vsbmc@vsphere.local |
| vm_name           | lab-vesxi01         |
| vm_uuid           | None                |
+-------------------+---------------------+
-
Stopping the virtual BMC:
vsbmc stop lab-vesxi01
vsbmc stop lab-vesxi02
Server Simulation
Once the virtual BMC for a specific VM has been created and started you can then issue IPMI commands against the address and port of that virtual BMC to control the VM.
In this example, if your VirtualBMC host has 192.168.0.100, you can control:
lab-vesxi01through192.168.0.100:6230lab-vesxi02through192.168.0.100:6231
by using IPMI. For example:
-
To power on the virtual machine
lab-vesxi01:$ ipmitool -I lanplus -H 192.168.0.100 -p 6230 -U admin -P password chassis power on Chassis Power Control: Up/On
-
To check its power status:
$ ipmitool -I lanplus -H 192.168.0.100 -p 6230 -U admin -P password chassis power status
Chassis Power is on
-
To shutdown
lab-vesxi01:$ ipmitool -I lanplus -H 192.168.0.100 -p 6230 -U admin -P password chassis power soft Chassis Power Control: Soft
-
To reset the
lab-vesxi02:$ ipmitool -I lanplus -H 192.168.0.100 -p 6231 -U admin -P password chassis power reset Chassis Power Control: Reset
Tips
Optional configuration file
Both vsbmcd and vsbmc can make use of an optional configuration file, which is looked for in the following locations (in this order):
VBMC4VSPHERE_CONFIGenvironment variable pointing to a file$HOME/.vsbmc/vbmc4vsphere.conffile/etc/vbmc4vsphere/vbmc4vsphere.conffile
If no configuration file has been found, the internal defaults apply.
The configuration files are not created automatically unless you create them manually. And even if you don't create a configuration file, it won't matter in most cases.
Below is a sample of vbmc4vsphere.conf.
[default]
#show_passwords = false
config_dir = /home/vsbmc/.vsbmc
#pid_file = /home/vsbmc/.vsbmc/master.pid
#server_port = 50891
#server_response_timeout = 5000
#server_spawn_wait = 3000

[log]
# logfile = /home/vsbmc/.vsbmc/log/vbmc4vsphere.log
debug = true

[ipmi]
session_timeout = 10
Manage stored data manually
Once you invoke vsbmc add command, everything that you specified will be stored as config file per virtual machine under $HOME/.vsbmc/ by default. There files can be used backup/restoration, migration, and of course can be managed by any kind of configuration management tools. Please note everything including password stored in plain text in these config file.
The path for these files can be changed by config_dir in your vbmc4vsphere.conf described above.
$ cat ~/.vsbmc/lab-vesxi01/config
[VirtualBMC]
username = admin
password = password
address = ::
port = 6230
vm_name = lab-vesxi01
vm_uuid = 903a0dfb-68d1-4d2e-9674-10e353a733ca
viserver = 192.168.0.1
viserver_username = vsbmc@vsphere.local
viserver_password = my-secure-password
active = True
Use in large-scale vSphere deployments
You can use UUID instead of name to identify virtual machine by specifying --vm-uuid option in vsbmc add command. This makes response time for IPMI command faster in large-scale vSphere deployments with a large number of virtual machines.
vsbmc add lab-vesxi01 \
  --vm-uuid 903a0dfb-68d1-4d2e-9674-10e353a733ca \
  --port 6230 \
  --viserver 192.168.0.1 \
  --viserver-username vsbmc@vsphere.local \
  --viserver-password my-secure-password
The UUID for virtual machines can be gathered in various ways like govc and PowerCLI.
# Get UUID by govc
$ govc vm.info lab-vesxi01
Name:           lab-vesxi01
  ...
  UUID:         903a0dfb-68d1-4d2e-9674-10e353a733ca
  ...
# Get UUID by PowerCLI
> (Get-VM lab-vesxi01).ExtensionData.Config.Uuid
903a0dfb-68d1-4d2e-9674-10e353a733ca
Use with Nested-ESXi and vCenter Server
In the vCenter Server, by using VirtualBMC for vSphere (0.0.3 or later), you can enable the vSphere DPM: Distributed Power Management feature for Nested-ESXi host that is running in your VMware vSphere environment.
So you can achieve:
- Power-On the virtual ESXi in the same way as for physical ESXi.
- Automated power on/off control of ESXi hosts based on the load of the host cluster by vCenter Server.
See 📖the guide on GitHub Wiki page to use with Nested-ESXi and vCenter Server.
Use with Nested-KVM and oVirt
In the oVirt, by using VirtualBMC for vSphere, you can enable the Power Management feature for Nested-KVM that is running in your vSphere environment.
See 📖the guide on GitHub Wiki page to use with Nested-KVM and oVirt.
Use with OpenShift Bare Metal IPI
With VirtualBMC for vSphere, you can control your virtual machines in the same way as a physical server. This means that tasks that require a physical BMC can be done in a virtual environment.
One such example is the provisioning of a physical server.
Here's how to automatically provision OpenShift to a physical server, called Bare Metal IPI, using a virtual machine in vSphere environment with VirtualBMC for vSphere.
See 📖the guide to GitHub Wiki page to use with OpenShift Bare Metal IPI.
Reference resources
This project is started based on the copy of VirtualBMC 2.1.0.dev and customized to support the VMware vSphere environment instead of the OpenStack.
- Original VirtualBMC documentation (for OpenStack): https://docs.openstack.org/virtualbmc/latest
- Its source: https://opendev.org/openstack/virtualbmc
Release history Release notifications | RSS feed


Download files
Download the file for your platform. If you're not sure which to choose, learn more about installing packages.
Source Distribution
Built Distribution
Filter files by name, interpreter, ABI, and platform.
If you're not sure about the file name format, learn more about wheel file names.
Copy a direct link to the current filters
File details
Details for the file vbmc4vsphere-0.3.0.tar.gz.
File metadata
- Download URL: vbmc4vsphere-0.3.0.tar.gz
- Upload date:
- Size: 32.6 kB
- Tags: Source
- Uploaded using Trusted Publishing? No
- Uploaded via: twine/4.0.1 CPython/3.9.14
File hashes
| Algorithm | Hash digest | |
|---|---|---|
| SHA256 |
f4af0bdffbef77c3218d7f3b026d5eedd0b26be6b8d200be77638cbb1f481df3
|
|
| MD5 |
7909293d5f5a551d0a60f2dd578e5fb2
|
|
| BLAKE2b-256 |
7ca759cc002fd2056cf336af71b69bbd88b393efc49bad6a37b5bdec5f139246
|
File details
Details for the file vbmc4vsphere-0.3.0-py3-none-any.whl.
File metadata
- Download URL: vbmc4vsphere-0.3.0-py3-none-any.whl
- Upload date:
- Size: 32.1 kB
- Tags: Python 3
- Uploaded using Trusted Publishing? No
- Uploaded via: twine/4.0.1 CPython/3.9.14
File hashes
| Algorithm | Hash digest | |
|---|---|---|
| SHA256 |
661dff1f9175a2c84355f8d8ba02cbf5149396a2bef2395a3f1712ed68ce8aaa
|
|
| MD5 |
4ff7c49f5e79f0452ec13d7ebe40f9e8
|
|
| BLAKE2b-256 |
f814174f64655d2b1c7c3dd268ea4c485061133f6a7c0c73dbe0f88dcbaecbf3
|


