Create virtual BMCs for controlling virtual instances via IPMI for vSphere environment

Project description
VirtualBMC for vSphere (vbmc4vsphere)
Overview
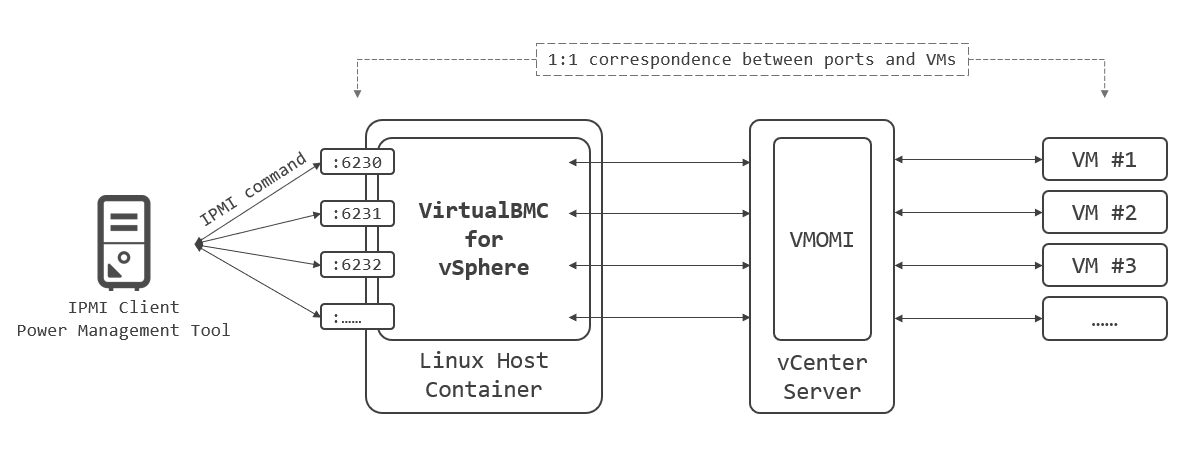
A virtual BMC for controlling virtual machines using IPMI commands for the vSphere environment.
In other words, the vSphere version of VirtualBMC part of the OpenStack project.
Installation
pip install vbmc4vsphere
Supported IPMI commands
# Power the virtual machine on, off, graceful off and reset
ipmitool -I lanplus -U admin -P password -H 192.168.0.1 -p 6230 power on|off|soft|reset

# Check the power status
ipmitool -I lanplus -U admin -P password -H 192.168.0.1 -p 6230 power status
Not Implemented yet:
- Inject NMI:
power diag - Set the boot device to network, hd or cdrom:
chassis bootdev pxe|disk|cdrom - Get the current boot device:
chassis bootparam get 5
Architecture
Quick Start
Install VirtualBMC for vSphere on some linux host, start vbmcd daemon, and then configure through vbmc command.
Installation
pip install vbmc4vsphere
Start Daemon
- Start daemon:
$ vbmcdBy default, daemon starts in background. You can start it in foreground by--foregroundoption to get logs.$ vbmcd --foreground
Configure VirtualBMC
- In order to see all command options supported by the
vbmctool do:$ vbmc --help
It’s also possible to list the options from a specific command. For example, in order to know what can be provided as part of theaddcommand do:$ vbmc add --help
- Adding a new virtual BMC to control VM called lab-vesxi01:
$ vbmc add lab-vesxi01 --port 6230 --viserver 192.168.0.1 --viserver-username vbmc@vsphere.local --viserver-password my-secure-password
- Binding a network port number below 1025 is restricted and only users with privilege will be able to start a virtual BMC on those ports.
- Passing the credential for your vCenter Server is required.
- By default, IPMI credential is confugired as
adminandpassword. You can specify your own username and password by--usernameand--passwordat this time.
- Adding a additional virtual BMC to control VM called lab-vesxi02:
$ vbmc add lab-vesxi02 --port 6231 --viserver 192.168.0.1 --viserver-username vbmc@vsphere.local --viserver-password my-secure-password
- Specify a different port for each virtual machine.
- Starting the virtual BMC to control VMs:
$ vbmc start lab-vesxi01
$ vbmc start lab-vesxi02
- Getting the list of virtual BMCs including their VM name and IPMI network endpoints they are reachable at:
$ vbmc list
+-------------+---------+---------+------+
| VM name     | Status  | Address | Port |
+-------------+---------+---------+------+
| lab-vesxi01 | running | ::      | 6230 |
| lab-vesxi02 | running | ::      | 6231 |
+-------------+---------+---------+------+
- To view configuration information for a specific virtual BMC:
$ vbmc show lab-vesxi01
+-------------------+--------------------+
| Property          | Value              |
+-------------------+--------------------+
| active            | False              |
| address           | ::                 |
| password          | ***                |
| port              | 6230               |
| status            | running            |
| username          | admin              |
| viserver          | 192.168.0.1        |
| viserver_password | ***                |
| viserver_username | vbmc@vsphere.local |
| vm_name           | lab-vesxi01        |
+-------------------+--------------------+
- Stopping the virtual BMC to control VMs:
$ vbmc stop lab-vesxi01
$ vbmc stop lab-vesxi02
Server Simulation
Once the virtual BMC for a specific VM has been created and started you can then issue IPMI commands against the address and port of that virtual BMC to control the VM.
In this example, if your VirtualBMC host has 192.168.0.100, you can controll:
lab-vesxi01througth192.168.0.100:2360lab-vesxi02througth192.168.0.100:2361
by using IPMI. For example:
- To power on the virtual machine:
$ ipmitool -I lanplus -H 192.168.0.100 -p 6230 -U admin -P password chassis power on
Chassis Power Control: Up/On
- To check its power status:
$ ipmitool -I lanplus -H 192.168.0.100 -p 6230 -U admin -P password chassis power status
Chassis Power is on
- To shutdown the virtual machine:
$ ipmitool -I lanplus -H 192.168.0.100 -p 6230 -U admin -P password chassis power soft
Chassis Power Control: Soft
Reference resources
This project is started based on the copy of VirtualBMC 2.1.0.dev and customized to support the vSphere environment instead of the OpenStack.
- Original VirtualBMC documentation (for OpenStack): https://docs.openstack.org/virtualbmc/latest
- Its source: https://opendev.org/openstack/virtualbmc
Release history Release notifications | RSS feed


Download files
Download the file for your platform. If you're not sure which to choose, learn more about installing packages.
Source Distribution
Built Distribution
Filter files by name, interpreter, ABI, and platform.
If you're not sure about the file name format, learn more about wheel file names.
Copy a direct link to the current filters
File details
Details for the file vbmc4vsphere-0.0.1.tar.gz.
File metadata
- Download URL: vbmc4vsphere-0.0.1.tar.gz
- Upload date:
- Size: 20.6 kB
- Tags: Source
- Uploaded using Trusted Publishing? No
- Uploaded via: twine/3.2.0 pkginfo/1.5.0.1 requests/2.23.0 setuptools/41.1.0 requests-toolbelt/0.9.1 tqdm/4.48.2 CPython/3.7.5
File hashes
| Algorithm | Hash digest | |
|---|---|---|
| SHA256 |
e6e825beea95ef04b283f348b261341fc53982f97a08632283bdf1d4e7b4b64e
|
|
| MD5 |
1c583edd1ef82a89a1efadf06f4f2372
|
|
| BLAKE2b-256 |
948cbfa88be458254e2fbcb99c656ef343962433aa6da3ddfdd463829b6ff8bd
|
File details
Details for the file vbmc4vsphere-0.0.1-py3-none-any.whl.
File metadata
- Download URL: vbmc4vsphere-0.0.1-py3-none-any.whl
- Upload date:
- Size: 25.5 kB
- Tags: Python 3
- Uploaded using Trusted Publishing? No
- Uploaded via: twine/3.2.0 pkginfo/1.5.0.1 requests/2.23.0 setuptools/41.1.0 requests-toolbelt/0.9.1 tqdm/4.48.2 CPython/3.7.5
File hashes
| Algorithm | Hash digest | |
|---|---|---|
| SHA256 |
88e73be1ba0e9729ab9e2983114f7389ab9be33eec049a14d2395cd6793e6dcc
|
|
| MD5 |
ef9ca0e5badd50cc51234ffe7a726c76
|
|
| BLAKE2b-256 |
1771eee3bb24fe9afecfe302f37258ceedc3a54e7e02c9b15aebf019f4abfbfa
|


