Winter Field Day logger GUI

Project description
K6GTE Winter Field Day logger (PyQt5)


Winter Field Day is a once a year 24hr emergency preparidness event for radio amateurs (Hams). During the event, we try and make as many radio contacts with other Hams in a 24 hour period. Bonus points are awarded for operating outside or using alternate power sources, such as battery/solar/wind. You can find out more about Winter Field Day by visiting the WFDA. You can find out more about amateur radio by visiting the ARRL.
The logger is written in Python 3, and uses the PyQT5 lib. Qt5 is cross platform so it might work on everything. I have tested it on Linux, Rasperry Pi OS and Windows 10. This code is based off of a logger I had done earlier using Python and the curses library wich can be found here and one written for ARRL Field Day here.
The log is stored in an sqlite3 database file 'WFD.db'. If you need to wipe everything and start clean, just delete this file and re-run wfdlogger
The logger client will generate a cabrillo for submission, An ADIF file so you can merge contacts into your normal Log, and a Statistics file with a band mode breakdown.
The server if used, will generate a group cabrillo file to submit.
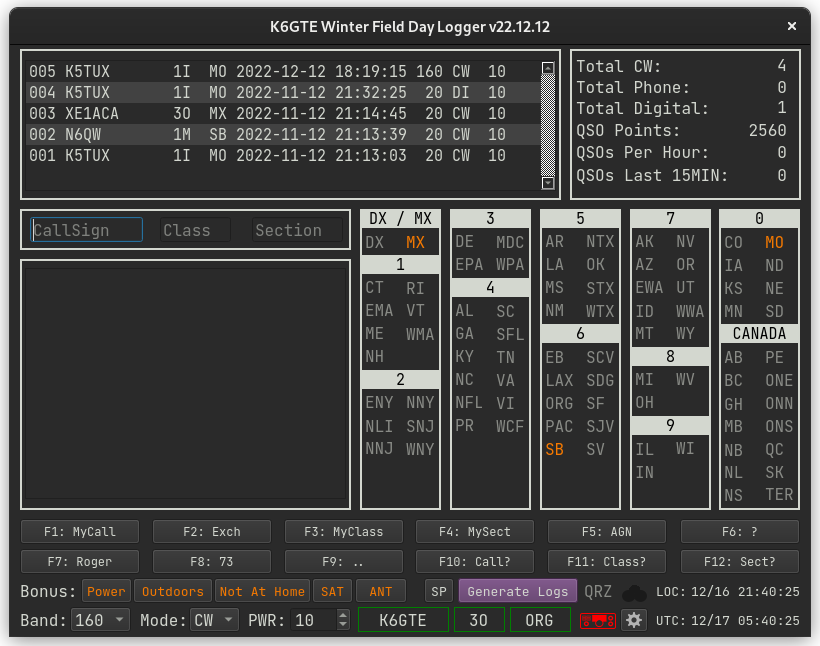
Table Of Contents
- K6GTE Winter Field Day logger (PyQt5)
- Table Of Contents
- Caveats
- Recent Changes
- WB8ERJ's blog writeup
- Installing, Updating, Removing Client
- Running Client
- The Server
- What to do first
- Logging
- Features
- CW
- When the event is over
- Group / Club logging
- Server configuration
- Client configuration for groups
- Chat Window
- How to know the server is there
- Logging reliability
- Generating the cabrillo file
- I'm sure there are short cummings
Caveats
WFD only has a generic digital mode designator 'DI', which gets exported to the cabrillo file. But ADIF and CloudLog needed something else, So I Chose RTTY. Feel free to change it to what ever you will use. Just search for the two places in the code 'RTTY' is used and Bob's your dads brother.
Recent Changes
- [24.2.19] Fixed the fix for the datetime.utc deprecation. Older Python versions work again.
- [24.1.27] Change band/mode when dropdowns are changed. removed some deprecations.
- [23.2.3] Added visual cue as to validity of logged class and section.
- [23.1.30] Changed Cabrillo tag 'CONTEST' to WFD.
- [23.1.28] xplanet markers not generating.
- [23.1.27] Fixed order of CW macro buttons.
- [23.1.23] Visual tweaks
- [23.1.20] UI now resizable.
- [23.1.14] Safer access to dict keys.
- [23.1.14] Added app icons.
- [22.12.28] Repackaged for pypi pip installation.
- [22.12.28] Removed use of BeautifulSoup and lxml. Migrated to xmltodict.
- [22.12.27] WFDA preferres
DGas the mode indicator for digital. - [22.12.16] Changed the RAC sections for 2023. Thanks for the heads up WB8ERJ!
- [22.11.12] 2023 scoring and antenna bonus.
- [22.10.13] Added N1MM XML status packets. So you can use Kyle AA0Z's Node-Red dashboard.
- [22.10.9] Added a group contact aggregation server. So multiple clients can participate in WFD together.
WB8ERJ's blog writeup
Installing, Updating, Removing Client
#install
pip install wfdlogger

#update
pip install -U wfdlogger

#remove
pip uninstall wfdlogger
Running Client
In a terminal type:
wfdlogger
The Server
Server install
pip install wfdserver
Server Documentation
What to do first
On first run, there will be a dialog box asking you for your call class and section. if you need to change this later, the entry fields can be found at the bottom of the screen.
If you're participating as a member of a group, do not put your groups/club call as your call. Enter your own call. The group call will be polled from the server.

Logging
Okay you've made a contact. Enter the call in the call field. As you type it in, it will do a super check partial (see below). Press TAB or SPACE to advance to the next field. Once the call is complete it will do a DUP check (see below). It will try and Autofill the next fields (see below). When entering the section, it will do a section partial check (see below). Press the ENTER key to submit the Q to the log. If it's a busted call or a dup, press the ESC key to clear all inputs and start again.
Features
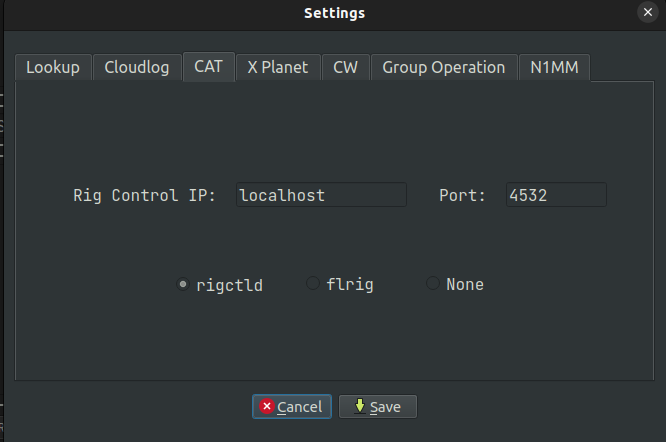
Radio Polling via flrig or rigctld
If you run flrig or rigctld on a computer connected to the radio, it can be polled for band/mode updates automatically. Click the gear icon at the bottom of the screen to set the IP and port. There is a radio icon at the bottom of the logging window to indicate polling status.
Cloudlog, QRZ, HamDB, HamQTH useage
If you use either Cloudlog logging or QRZ/HamDB/HamQTH lookup you can click the gear icon to enter your credentials.
Q's are pushed to CloudLog as soon as they are logged.
The QRZ/HamDB/HamQTH lookup is only used to get the Op name and gridsquare for the call. Mainly because when a Q is pushed to CloudLog it will not show as a pin on the map unless it has a gridsquare. So this is a scratch my own itch feature. HAMDB.org is used by default since it's free. If both are checked it will it will use QRZ then fallback to HAMDB.
N1MM packets for Node-Red Dashboard
If you wish to use Kyle AA0Z's Node-Red contest dashboard, edit these settings.

XPlanet marker file
If you use QRZ/HamdDB/HamQTH lookups you can also generate an XPlanet markerfile which will show little pips on the map as contacts are logged.
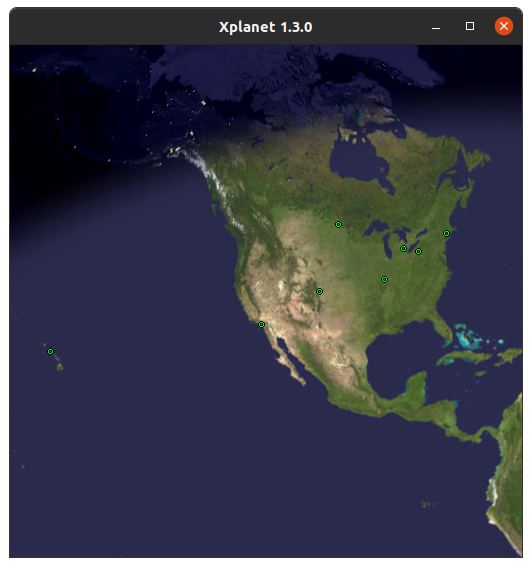
The above launched with an example command:
xplanet -body earth -window -longitude -117 -latitude 38 -config Default -projection azmithal -radius 200 -wait 5
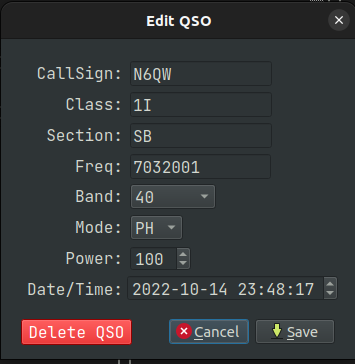
Editing an existing contact
Double click a contact in the upper left of the screen to edit or delete it.
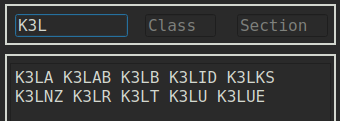
Super Check Partial
If you type more than two characters in the callsign field the program will filter the input through a "Super Check Partial" routine and show you possible matches to known contesting call signs. Is this useful? Doubt it.
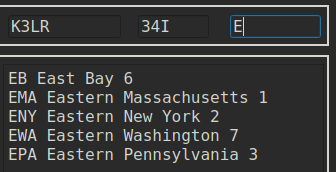
Section partial check
As you type the section abbreviation you are presented with a list of all possible sections that start with what you have typed.
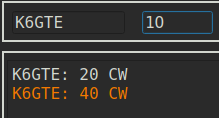
DUP checking
Once you type a complete callsign and press TAB or SPACE to advance to the next field. The callsign is checked against previous callsigns in your log. It will list any prior contact made showing the band and mode of the contact. If the band and mode are the same as the one you are currently using, the listing will be highlighted, the screen will flash, a bell will sound to alert you that this is a DUP. At this point you and the other OP can argue back and forth about who's wrong. In the end you'll put your big boy pants on and make a decision if you'll enter the call or not.
Autofill
If you have worked this person before on another band/mode the program will load the class and section used previously for this call so you will not have to enter this info again.
CW
CW Settings
Support is provided for both cwdaemon and PyWinkeyer.
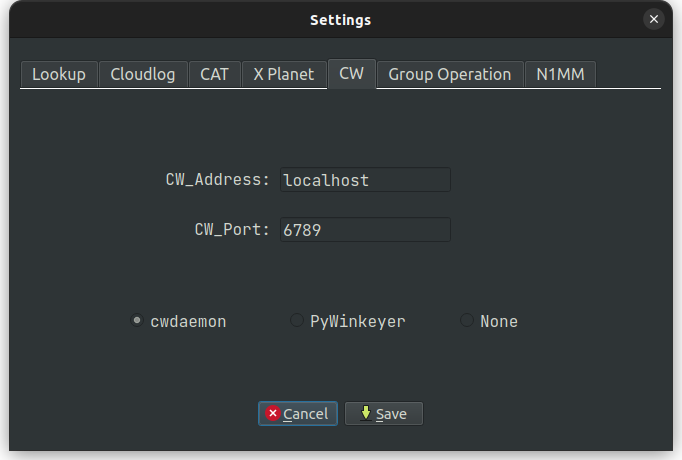
Defalt port for cwdaemon is 6789 and for PyWinkeyer is 8000.
CW Macros
The program will check in the current working directory for a file called
cwmacros.txt It will parse the file
and configure the row of 12 buttons along the bottom half of the window.
The macros can be activated by either pressing the corresponding function key,
or by directly clicking on the button. You can check the file to glean it's
structure, but it's pretty straight forward. Each line has 4 sections separated
by the pipe | character.
Here's an example line.
R|F2|Run Exch|{HISCALL} {MYCLASS} {MYSECT}
The first field is an R if the macro is to be shown while in Run mode.
Otherwise an S for Search and Pounce. The second field is the function key
to program. The third is the text label to put in the button. Lastly the
fourth is the text you would like to send.
A limited set of substitution macros are offered.
{MYCALL}
{HISCALL}
{MYCLASS}
{MYSECT}
These are pulled straight from the onscreen input fields. Combined with normal text this should have you covered for most of your exchange needs.
CW Macros (Run vs S&P)
You can toggle the macros in use between Run and Search and Pounce by clicking the button to the left of the Generate Logs button at the botton right portion of the screen.
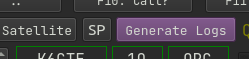
This can also be used to reload the macros if you edit them while the program is running.
cwdaemon speed changes and stop sending
If you are using cwedaemon for sending, you can use:
CTRL+Esc to abort sending.
PgUp Increase sending speed.
PgDown Decrease sending speed.
When the event is over
After the big weekend, once you've swept up all the broken beer bottles and wiped the BBQ sauce off your chin, go ahead and click the Generate Logs button.
This will generate the following:
An ADIF log 'WFD.adi'.
A Cabrillo log 'Yourcall.log'. Which you edit to fill in your address etc. If your not using Windows, you must ensure whatever editor you use uses CR/LF line endings. Cause whatever they use at the Winter Field Day society will choke with out them. To be safe you might want to run it through 'unix2dos' before submitting it.
A 'Statistics.txt' file which breaks down your band mode usage. Each unique band/mode combo is a multiplier.
Group / Club logging
I have added a group contact aggrigating server. This can be run on the same computer as the client program, or on a separate dedicated PC or Raspberry Pi on the same network.
Server configuration
The configuration file for the server is a JSON file 'server_preferences.json'.
It's generated automatically on the first run of the server wfdserver.
So start the server then press CTRL-C to quit it, then edit the josn file.
{
    "ourcall": "W1AW",
    "ourclass": "3O",
    "oursection": "ORG",
    "name": "Hiram Maxim",
    "address": "225 Main Street",
    "city": "Newington",
    "state": "CT",
    "postalcode": "06111",
    "country": "USA",
    "email": "Hiram.Maxim@arrl.net",
    "bonus": {
        "altpower": false,
        "outdoors": false,
        "notathome": false,
        "antenna": false,
        "satellite": false
    },
    "mullticast_group": "224.1.1.1",
    "multicast_port": 2239,
    "interface_ip": "0.0.0.0",
    "node_red_server_ip": "127.0.0.1",
    "node_red_server_port": 12062
}
Feel free to leave the last 3 items as they are unless you have good reason not too. The rest should be straight forward.
Under the bonuses section, if your group qualifies for a bonus, put true next
to the type of bonus.
Client configuration for groups
In the settings dialog there is now a tab labeled 'Group Operation'.
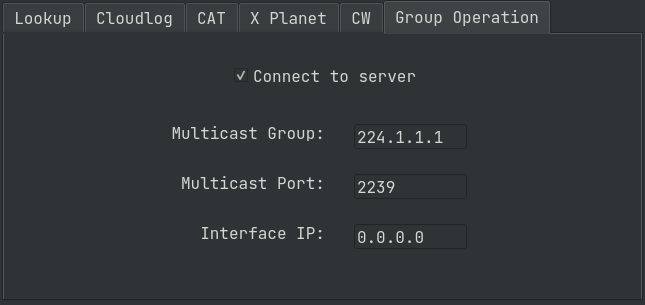
Go ahead and place a check next to 'Connect to server'. Rejoyce and let merriment be had by all. Be sure and have your callsign already set before checking this. If you forgot, Uncheck it, set your callsign and then check it.
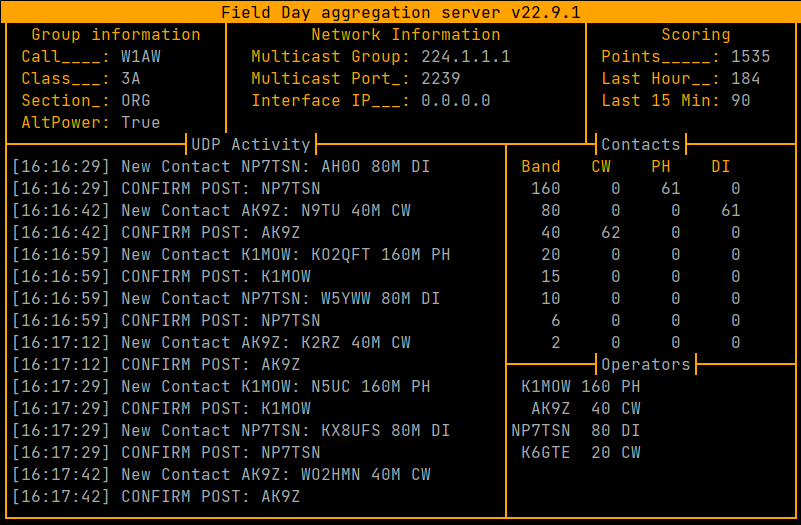
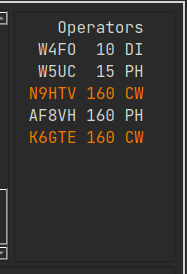
A couple of things will change on the client when this is done. You will see that your callsign will disappear and be replaced with your clubs call that the server reports. The portion of the screen where all the different ARRL sections are displayed will be replaced by a group chat window and a column showing the station call, band and mode of other participants.
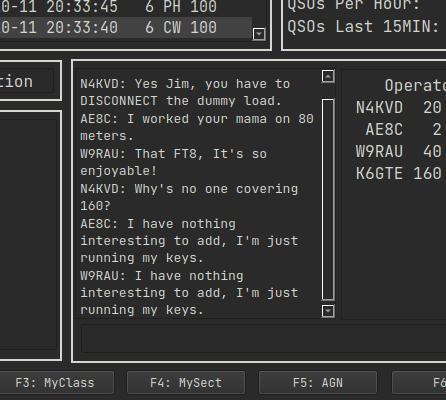
If more than one operator is on the same band/mode, their names will be highlighted in the operators list. Feel free to yell at eachother in the chat.
Chat Window
The chat window is pretty straight forward. If someone mentions you in the chat that line will be highlighted with an accent color. If you find the font size does not work for you, can adjust the size by: Placing your mouse cursor in the chat window, then rotate your mouse wheel while holding down the Control key.
There is one command you can type into the chat window that may be of use. if you type @stats into the window the server will dump out the groups stats into the chat.
Server:
Band   CW    PH    DG
 160     0     0     0
  80     0     0    25
  40     0   159     0
  20     1   162   126
  15     0     0     0
  10     0     0     0
   6     0    17     0
   2     0     0     0

Score: 1284
Last Hour: 271
Last 15: 81
Since most people will not be able to see the screen of the server, if it has one at all. You may find this useful.
How to know the server is there
Most likely, the server will be in some other tent/building/area of the room. Every 10 seconds or so the server will send out a UDP network packet saying it's there. As long as your client keeps seeing these packets the group call indicator at the bottom of the screen will look like:

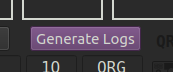
But if about 30 seconds go by with no update from the server, the indicator will change to:

Go check on it.
Logging reliability
As mentioned before, We're using UDP traffic to pass data back and forth to the server. UDP traffic is a 'Fire and forget' method. Akin to a bunch of people in the same room yelling at eachother. Everyone can hear you, but you don't know if anyone heard what you said. This has both advantages and disadvantages. One advantage is that your program is not stuck waiting for a reply or timeout, locking up your user interface. The disadvantage is you have no idea if anyone took note of what you had said.
This works fine in a local network since the traffic doesn't have to survive the trip through the big bad tubes of the internet. That being said, someone may trip on a cord, unplugging the router/switch/wireless gateway. Or someone may be trying to use WIFI and they are Soooooo far away you can barely see their tent. Or worse you have EVERYONE on WIFI, and there are packet collisions galore degrading your network.
To account for this, the client logging program keeps track of recent packets sent, noting the time they were sent at. The server after getting a packet, generates a response to the sender with it's unique identifyer. Once the client gets the response from the server, it will remove the request on the local side and print a little message giving you a visual confirmation that the command was acted upon by the server. If the server does not respond either because the response was lost or the request never made it to reply too. The client will resend the packet every 30 seconds until it gets a reply.
But all this may still result in the server not having a copy of your contact. To account for this, when the "Generate Logs" button is pressed on the client, the client will resend all the logged contacts that have not gotten responses from the server. You can keep doing this, if need be, until it gets them all.
There is a visual indicator giving you an idea of how many if any contacts have
not been verified. The Generate Logs button will change serving this purpose.
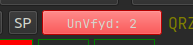
The client will resend all the unverified contacts to the server as part of the log generation process.
Chat traffic is best effort. Either everyone sees your plea for more beer or they don't. No retry is made for chat traffic. Just get your butt up and make the trip to the cooler.
Generating the cabrillo file
If any of the networked clients presses the 'Generate Logs' button on their screen, the server will be told to generate it's cabrillo file, it will be named 'WhatEverYourClubCallIs.log'.
Later you can also launch the server with '-l' flag on the command line and the server will generate the log and then exit.
I'm sure there are short cummings
It's early days, and I've mainly tested the operations with the client logging
program and several simulated operators, see file in testing/simulant.py.
Real world use for Winter Field Day outside of January is hard to come by. So I'm sure
there are a couple of things I forgot, or didn't account for.
If you are part of a group of linux using Hams, please take this for a spin and tell me what I missed or could do better. Like a dry run, to make sure I'm not an idiot.
Release history Release notifications | RSS feed


Download files
Download the file for your platform. If you're not sure which to choose, learn more about installing packages.
Source Distribution
Built Distribution
Filter files by name, interpreter, ABI, and platform.
If you're not sure about the file name format, learn more about wheel file names.
Copy a direct link to the current filters
File details
Details for the file wfdlogger-24.2.19.tar.gz.
File metadata
- Download URL: wfdlogger-24.2.19.tar.gz
- Upload date:
- Size: 658.6 kB
- Tags: Source
- Uploaded using Trusted Publishing? No
- Uploaded via: twine/4.0.2 CPython/3.12.1
File hashes
| Algorithm | Hash digest | |
|---|---|---|
| SHA256 |
15254139aa305213a85a89dcf4984d77b723c5837db71971b2188763290bfec1
|
|
| MD5 |
f6c37e495fb1823c1728a1cc50622aaf
|
|
| BLAKE2b-256 |
ff11fcf6d11569469a121439a4b1c5dc15f143a880028088570c2248bb890901
|
File details
Details for the file wfdlogger-24.2.19-py3-none-any.whl.
File metadata
- Download URL: wfdlogger-24.2.19-py3-none-any.whl
- Upload date:
- Size: 655.6 kB
- Tags: Python 3
- Uploaded using Trusted Publishing? No
- Uploaded via: twine/4.0.2 CPython/3.12.1
File hashes
| Algorithm | Hash digest | |
|---|---|---|
| SHA256 |
9c7bdc0672d2580c24aafbf883a16e4c68caeb27b800dc680445f6b6869a52b7
|
|
| MD5 |
bbcc296ebe4964c78458c10785fa99a2
|
|
| BLAKE2b-256 |
0f507a7efcc1a819d74984ababe1b18a4a165422211db718ca1401f5789d4bbd
|


