Render tree structure diagram using border on Excel.
Project description
xltree
エクセルのワークシートの境界線を使って、ツリー構造図を描画します
例1:ディレクトリー・パス
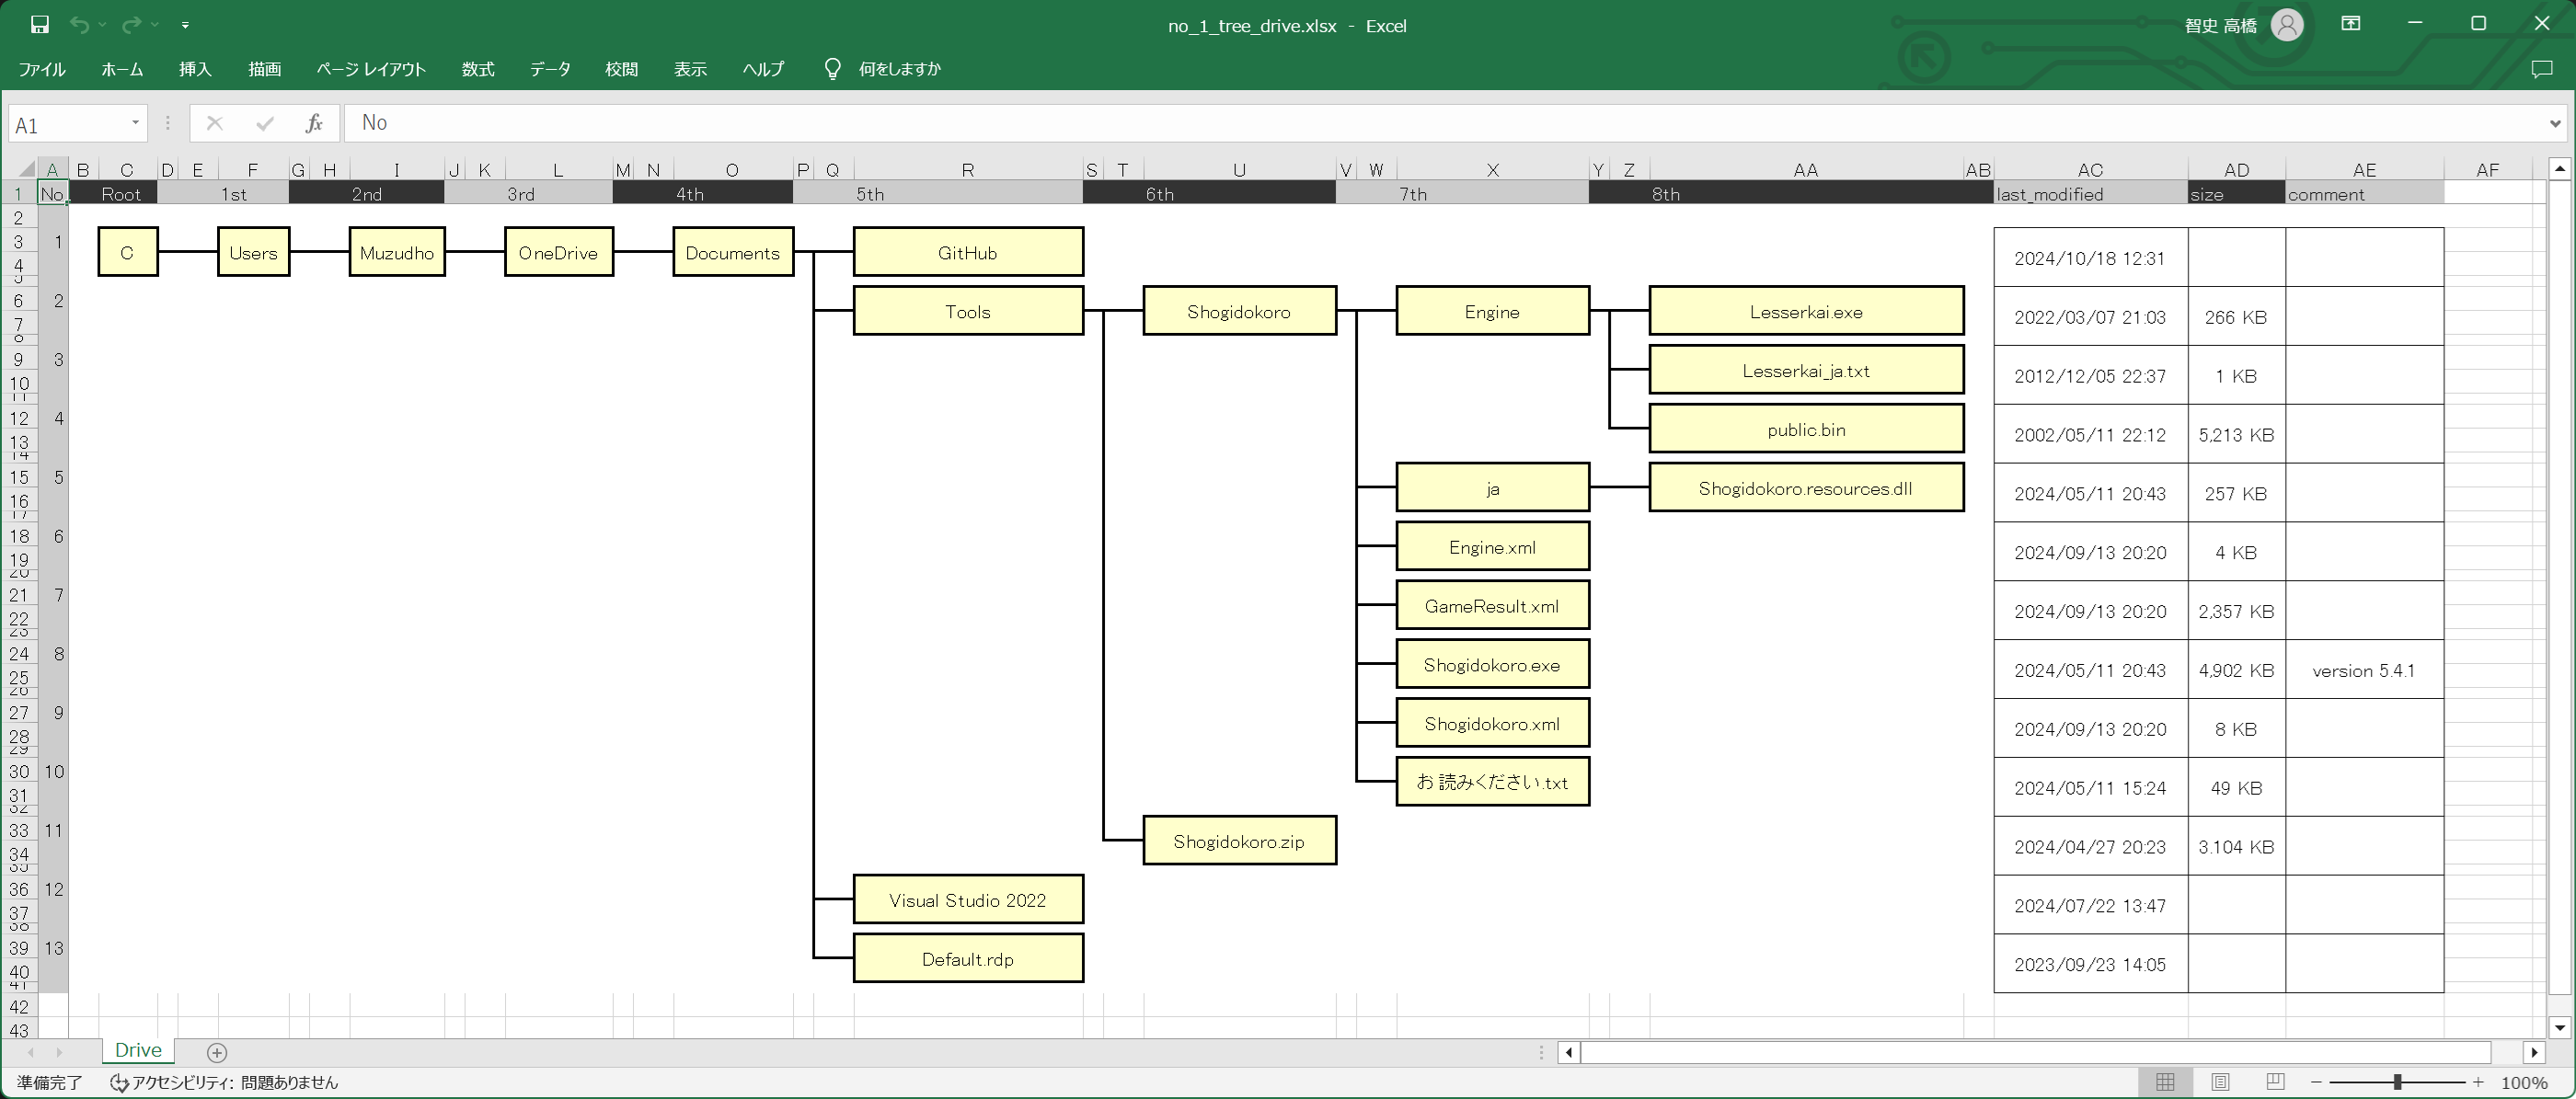
Output:
👆 わたしのWindows PCのCドライブの例です
(xltree>=0.0.10 から) ツリー部分より右側の列、つまり上図でいうと last_modified 列以降も出力します
(xltree>=0.3.1 から) セル結合するかしないか選べます
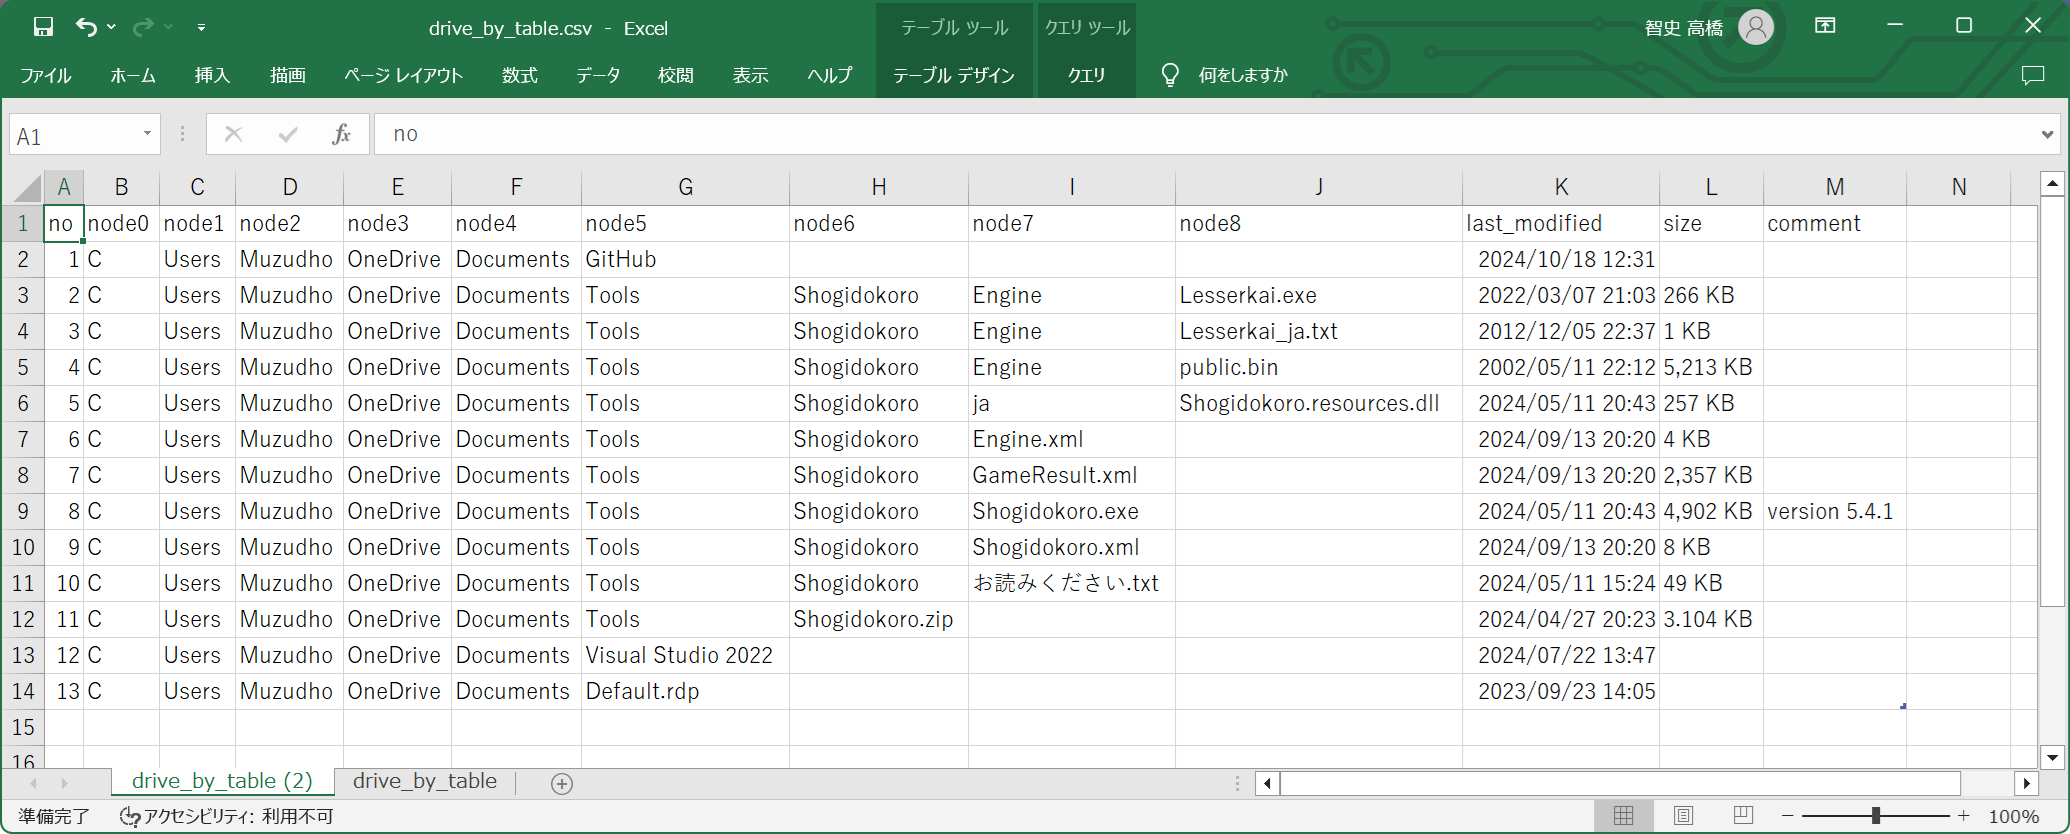
Input case like a table:
no,node0,node1,node2,node3,node4,node5,node6,node7,node8,last_modified,size,comment
1,C,Users,Muzudho,OneDrive,Documents,GitHub,,,,2024/10/18 12:31,,
2,C,Users,Muzudho,OneDrive,Documents,Tools,Shogidokoro,Engine,Lesserkai.exe,2022/03/07 21:03,266 KB,
3,C,Users,Muzudho,OneDrive,Documents,Tools,Shogidokoro,Engine,Lesserkai_ja.txt,2012/12/05 22:37,1 KB,
4,C,Users,Muzudho,OneDrive,Documents,Tools,Shogidokoro,Engine,public.bin,2002/05/11 22:12,"5,213 KB",
5,C,Users,Muzudho,OneDrive,Documents,Tools,Shogidokoro,ja,Shogidokoro.resources.dll,2024/05/11 20:43,257 KB,
6,C,Users,Muzudho,OneDrive,Documents,Tools,Shogidokoro,Engine.xml,,2024/09/13 20:20,4 KB,
7,C,Users,Muzudho,OneDrive,Documents,Tools,Shogidokoro,GameResult.xml,,2024/09/13 20:20,"2,357 KB",
8,C,Users,Muzudho,OneDrive,Documents,Tools,Shogidokoro,Shogidokoro.exe,,2024/05/11 20:43,"4,902 KB",version 5.4.1
9,C,Users,Muzudho,OneDrive,Documents,Tools,Shogidokoro,Shogidokoro.xml,,2024/09/13 20:20,8 KB,
10,C,Users,Muzudho,OneDrive,Documents,Tools,Shogidokoro,お読みください.txt,,2024/05/11 15:24,49 KB,
11,C,Users,Muzudho,OneDrive,Documents,Tools,Shogidokoro.zip,,,2024/04/27 20:23,3.104 KB,
12,C,Users,Muzudho,OneDrive,Documents,Visual Studio 2022,,,,2024/07/22 13:47,,
13,C,Users,Muzudho,OneDrive,Documents,Default.rdp,,,,2023/09/23 14:05,,
👆 さきほどの Output の図は、上図の CSV ファイルを読込ませると描いてくれます。
node 列は 0 から始まる連番で増やすことができます。常識的な長さにしてください
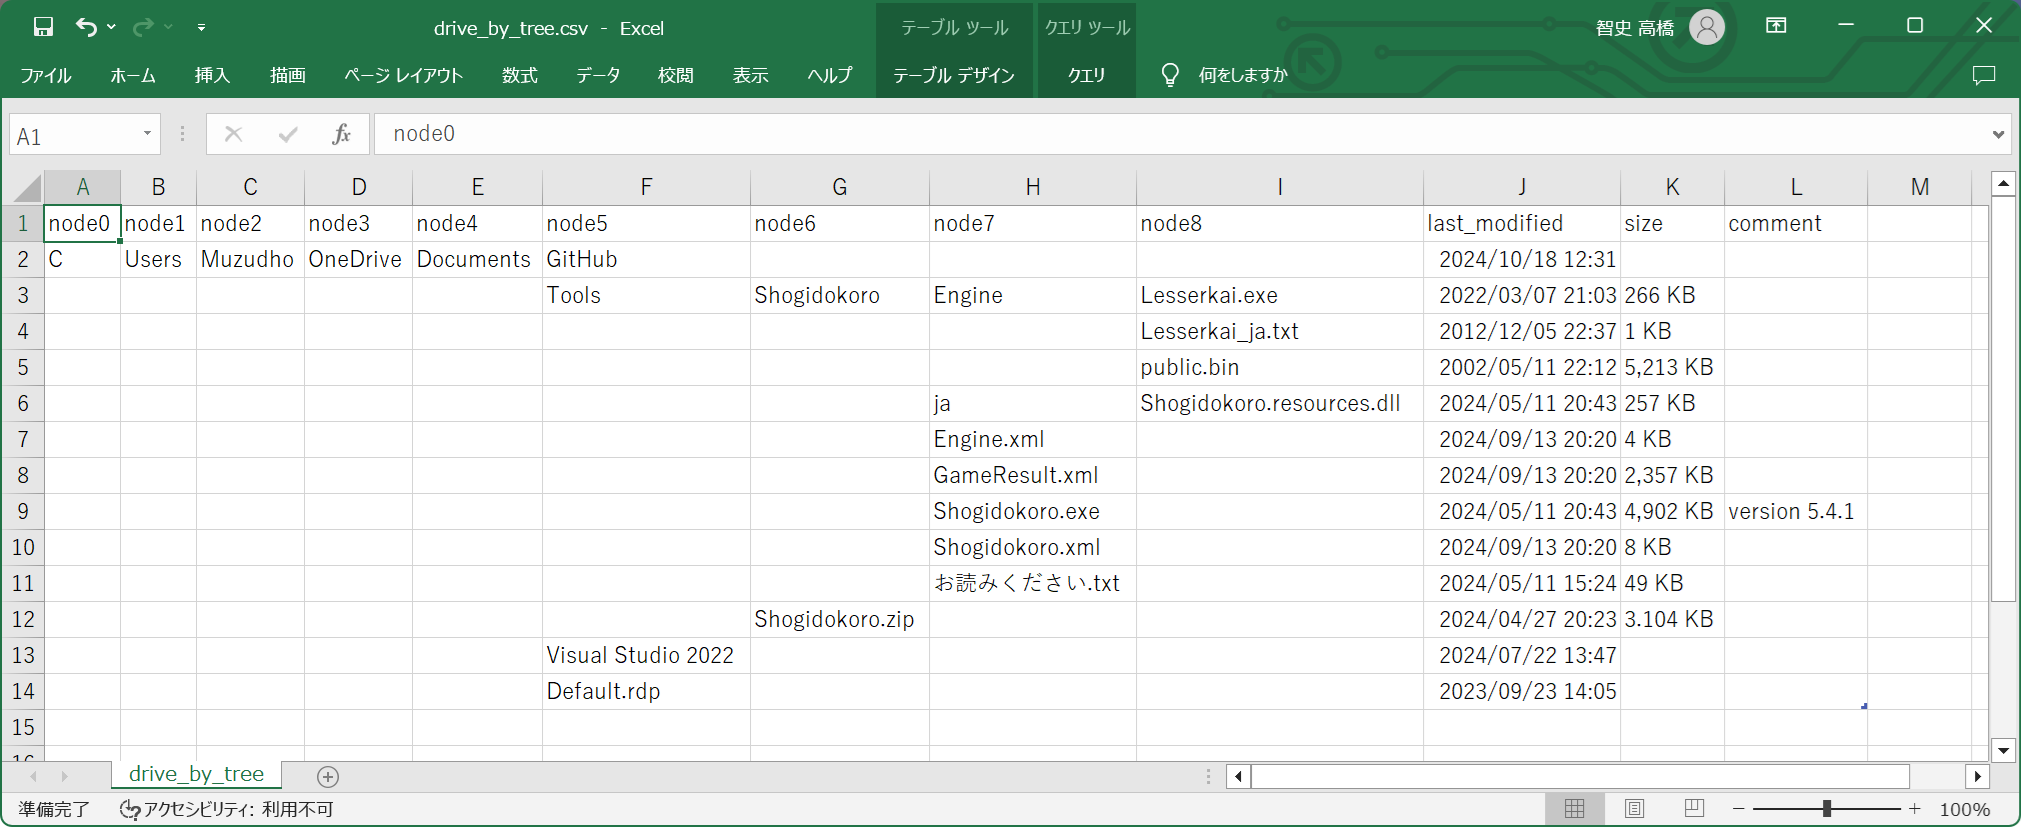
Input case like a tree:
node0,node1,node2,node3,node4,node5,node6,node7,node8,last_modified,size,comment
C,Users,Muzudho,OneDrive,Documents,GitHub,,,,2024/10/18 12:31,,
,,,,,Tools,Shogidokoro,Engine,Lesserkai.exe,2022/03/07 21:03,266 KB,
,,,,,,,,Lesserkai_ja.txt,2012/12/05 22:37,1 KB,
,,,,,,,,public.bin,2002/05/11 22:12,"5,213 KB",
,,,,,,,ja,Shogidokoro.resources.dll,2024/05/11 20:43,257 KB,
,,,,,,,Engine.xml,,2024/09/13 20:20,4 KB,
,,,,,,,GameResult.xml,,2024/09/13 20:20,"2,357 KB",
,,,,,,,Shogidokoro.exe,,2024/05/11 20:43,"4,902 KB",version 5.4.1
,,,,,,,Shogidokoro.xml,,2024/09/13 20:20,8 KB,
,,,,,,,お読みください.txt,,2024/05/11 15:24,49 KB,
,,,,,,Shogidokoro.zip,,,2024/04/27 20:23,3.104 KB,
,,,,,Visual Studio 2022,,,,2024/07/22 13:47,,
,,,,,Default.rdp,,,,2023/09/23 14:05,,
👆 さきほどの CSV と同じワークブック(.xlsx)を出力できる CSV です。
(xltree>=0.0.10 から) no 列は省くことができます。また、中間ノードが空欄になっている箇所は、前行と同じとみなします
Script:
import xltree as tr


# 出力先ワークブックを指定し、ワークブックハンドル取得
with tr.prepare_workbook(target='./examples/temp/example_o1o0_tree_drive.xlsx', mode='w') as b:

    # 読取元CSVを指定し、ワークシートハンドル取得
    with b.prepare_worksheet(target='Drive', based_on='./examples/data/drive_by_table.csv') as s:

        # ワークシートへ木構造図を描画
        s.render_tree()

    # 何かワークシートを1つ作成したあとで、最初から入っている 'Sheet' を削除
    b.remove_worksheet(target='Sheet')

    # 保存
    b.save_workbook()
👆 上記はスクリプトの記述例です
(xltree==0.4.0 から) WorkbookControl は廃止し、prepare_workbook, prepare_worksheet を使うように変更しました
👇 (xltree==0.5.0 から)前述の Input case like a table で示した CSV ファイルを出力するためのオブジェクト・モデルもあります
import datetime
import pandas as pd
from xltree as tr


# 森作成
# ------
#
#   複数の根を持つことができます
#
forest = tr.planting()
# 根を追加するなら tree_root()、辺と中間節を追加するなら grow()、 葉を明示するなら leaf() を使ってください
documents = forest.tree_root(edge_text=None, node_text='C').grow(edge_text=None, node_text='Users').grow(None, 'Muzudho').grow(None, 'OneDrive').grow(None, 'Documents')
if True: # インデントしたいだけ
    documents.leaf(edge_text=None, node_text='GitHub', remainder_columns={'last_modified':'2024/10/18 12:31'})
    tools = documents.grow(None, 'Tools')
    if True:
        shogidokoro = tools.grow(None, 'Shogidokoro')
        if True:
            engine = shogidokoro.grow(None, 'Engine')
            if True:
                engine.leaf(None, 'Lesserkai.exe', {'last_modified':'2022/03/07 21:03', 'size':'266 KB'})
                engine.leaf(None, 'Lesserkai_ja.txt', {'last_modified':'2012/12/05 22:37', 'size':'1 KB'})
                engine.leaf(None, 'public.bin', {'last_modified':'2002/05/11 22:12', 'size':'5,213 KB'})
            shogidokoro.grow(None, 'ja').leaf(None, 'Shogidokoro.resources.dll', {'last_modified':'2024/05/11 20:43', 'size':'257 KB'})
            shogidokoro.leaf(None, 'Engine.xml', {'last_modified':'2024/09/13 20:20', 'size':'4 KB'})
            shogidokoro.leaf(None, 'GameResult.xml', {'last_modified':'2024/09/13 20:20', 'size':'2,357 KB'})
            shogidokoro.leaf(None, 'Shogidokoro.exe', {'last_modified':'2024/05/11 20:43', 'size':'4,902 KB', 'comment':'version 5.4.1'})
            shogidokoro.leaf(None, 'Shogidokoro.xml', {'last_modified':'2024/09/13 20:20', 'size':'8 KB'})
            shogidokoro.leaf(None, 'お読みください.txt', {'last_modified':'2024/05/11 15:24', 'size':'49 KB'})
        tools.leaf(None, 'Shogidokoro.zip', {'last_modified':'2024/04/27 20:23', 'size':'3.104 KB'})
    documents.leaf(None, 'Visual Studio 2022', {'last_modified':'2024/07/22 13:47'})
    documents.leaf(None, 'Default.rdp', {'last_modified':'2023/09/23 14:05'})

# 任意。余り列の出力順を指定する
forest.order_of_remainder_columns = ['last_modified', 'size', 'comment']

# 任意。葉要素に番号を振っていく。葉に連番を振る機能があって、 TreeEntry#leaf_th プロパティで取り出せます
#forest.renumbering()


# 森をCSV形式でファイルへ保存
# ---------------------------
forest.to_csv(csv_file_path='./tests/diff_dump/actual/example_o1o1o0_tree_model_table.txt')
👆 (xltree==0.6.0 から) forest.remainder_column_name_list プロパティは forest.order_of_remainder_columns に名称変更
例2:しりとり
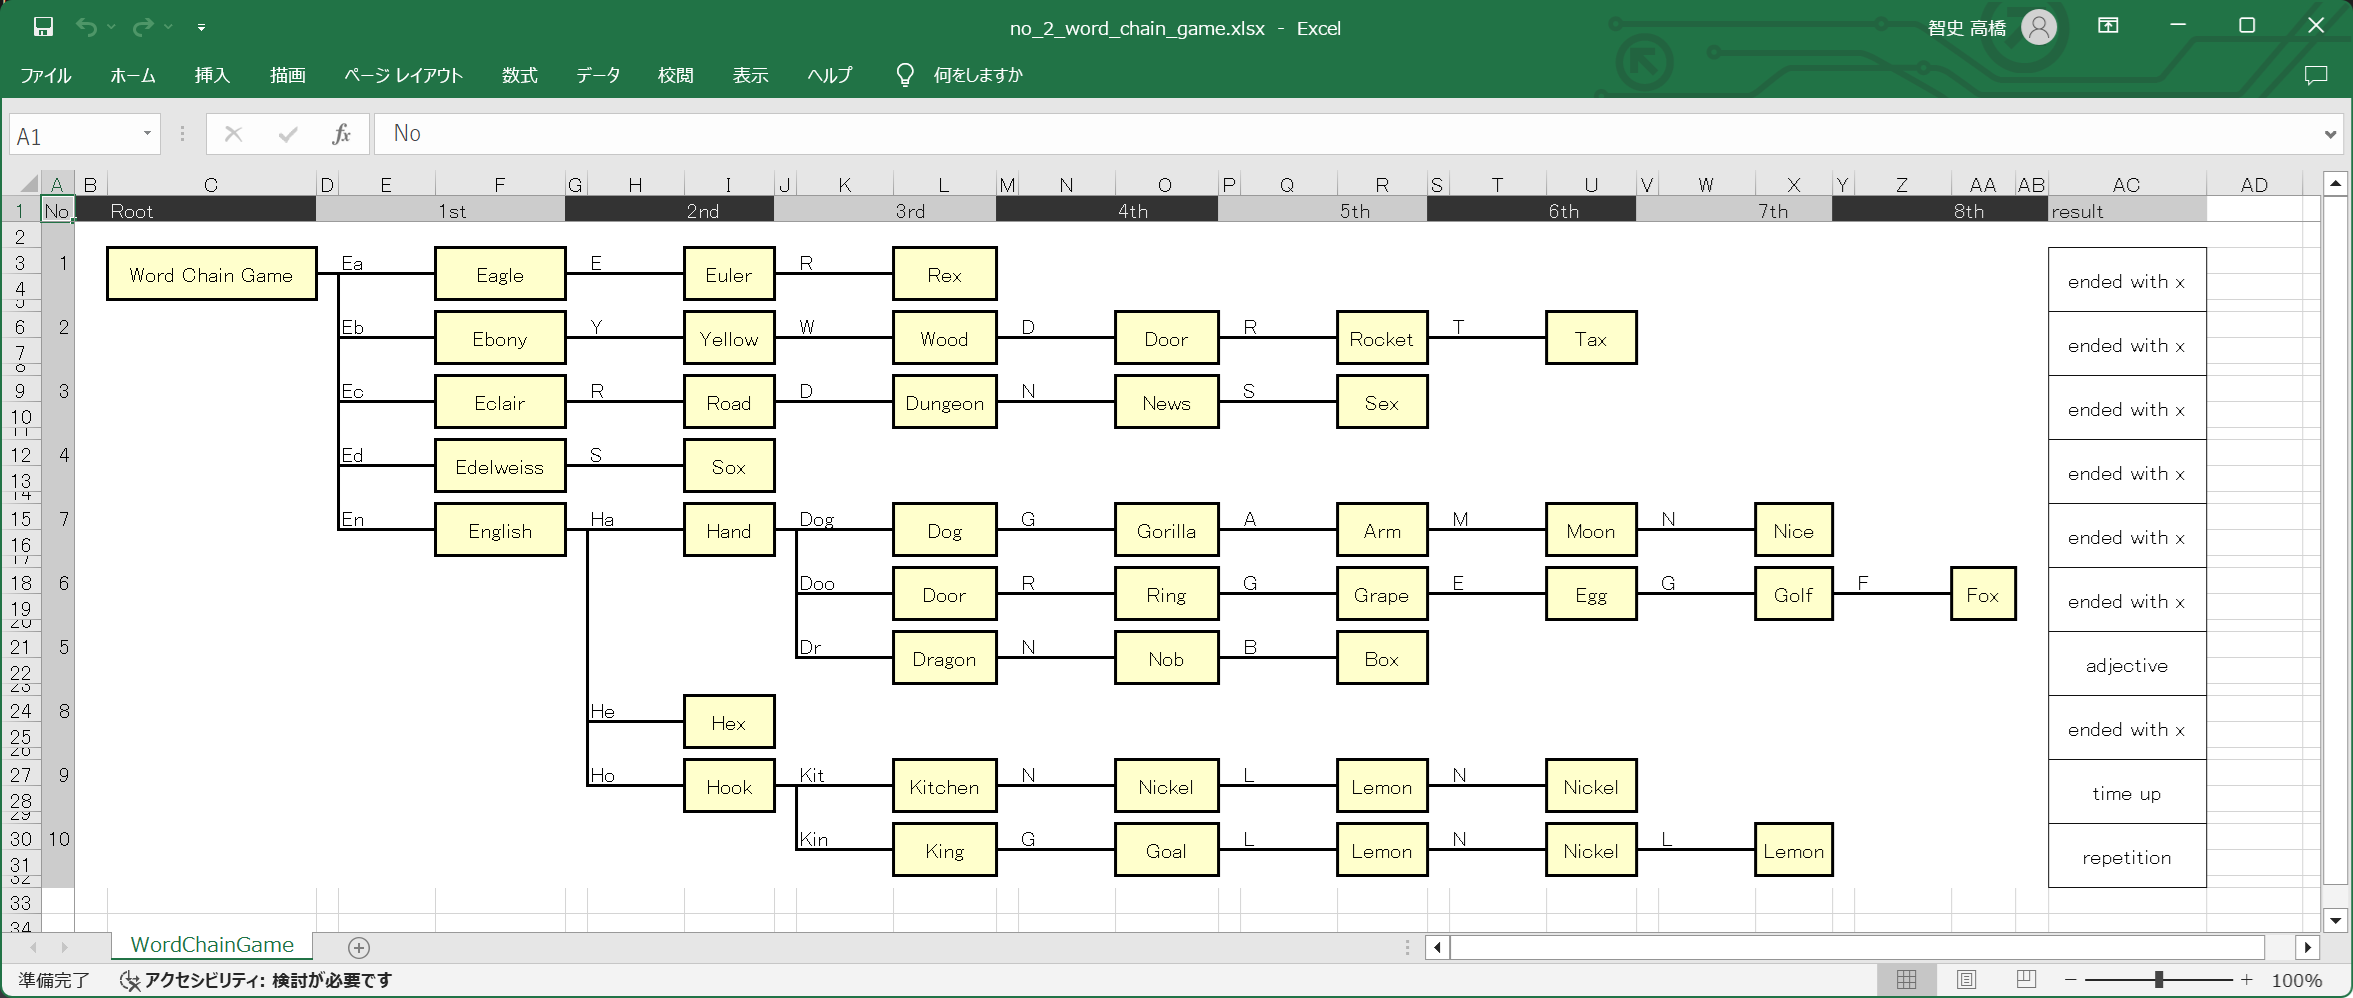
Output:
👆 しりとりというゲームの記録です。図(Diagram)の辺(Edge)にテキストを書くのはオプションです
Input:
no,node0,edge1,node1,edge2,node2,edge3,node3,edge4,node4,edge5,node5,edge6,node6,edge7,node7,edge8,node8,result
1,Word Chain Game,Ea,Eagle,E,Euler,R,Rex,,,,,,,,,,,ended with x
2,Word Chain Game,Eb,Ebony,Y,Yellow,W,Wood,D,Door,R,Rocket,T,Tax,,,,,ended with x
3,Word Chain Game,Ec,Eclair,R,Road,D,Dungeon,N,News,S,Sex,,,,,,,ended with x
4,Word Chain Game,Ed,Edelweiss,S,Sox,,,,,,,,,,,,,ended with x
7,Word Chain Game,En,English,Ha,Hand,Dog,Dog,G,Gorilla,A,Arm,M,Moon,N,Nice,,,adjective
6,Word Chain Game,En,English,Ha,Hand,Doo,Door,R,Ring,G,Grape,E,Egg,G,Golf,F,Fox,ended with x
5,Word Chain Game,En,English,Ha,Hand,Dr,Dragon,N,Nob,B,Box,,,,,,,ended with x
8,Word Chain Game,En,English,He,Hex,,,,,,,,,,,,,ended with x
9,Word Chain Game,En,English,Ho,Hook,Kit,Kitchen,N,Nickel,L,Lemon,N,Nickel,,,,,time up
10,Word Chain Game,En,English,Ho,Hook,Kin,King,G,Goal,L,Lemon,N,Nickel,L,Lemon,,,repetition
👆 edge 列は 1 から始まる連番で増やすことができます。 node 列より深い番号を付けても無視されます
Script:
import xltree as tr


# 出力先ワークブックを指定し、ワークブックハンドル取得
with tr.prepare_workbook(target='./examples/temp/example_o2o0_word_chain_game.xlsx', mode='w') as b:

    # 読取元CSVを指定し、ワークシートハンドル取得
    with b.prepare_worksheet(target='WordChainGame', based_on='./examples/data/word_chain_game.csv') as s:

        # ワークシートへ木構造図を描画
        s.render_tree()

    # 何かワークシートを1つ作成したあとで、最初から入っている 'Sheet' を削除
    b.remove_worksheet(target='Sheet')

    # 保存
    b.save_workbook()
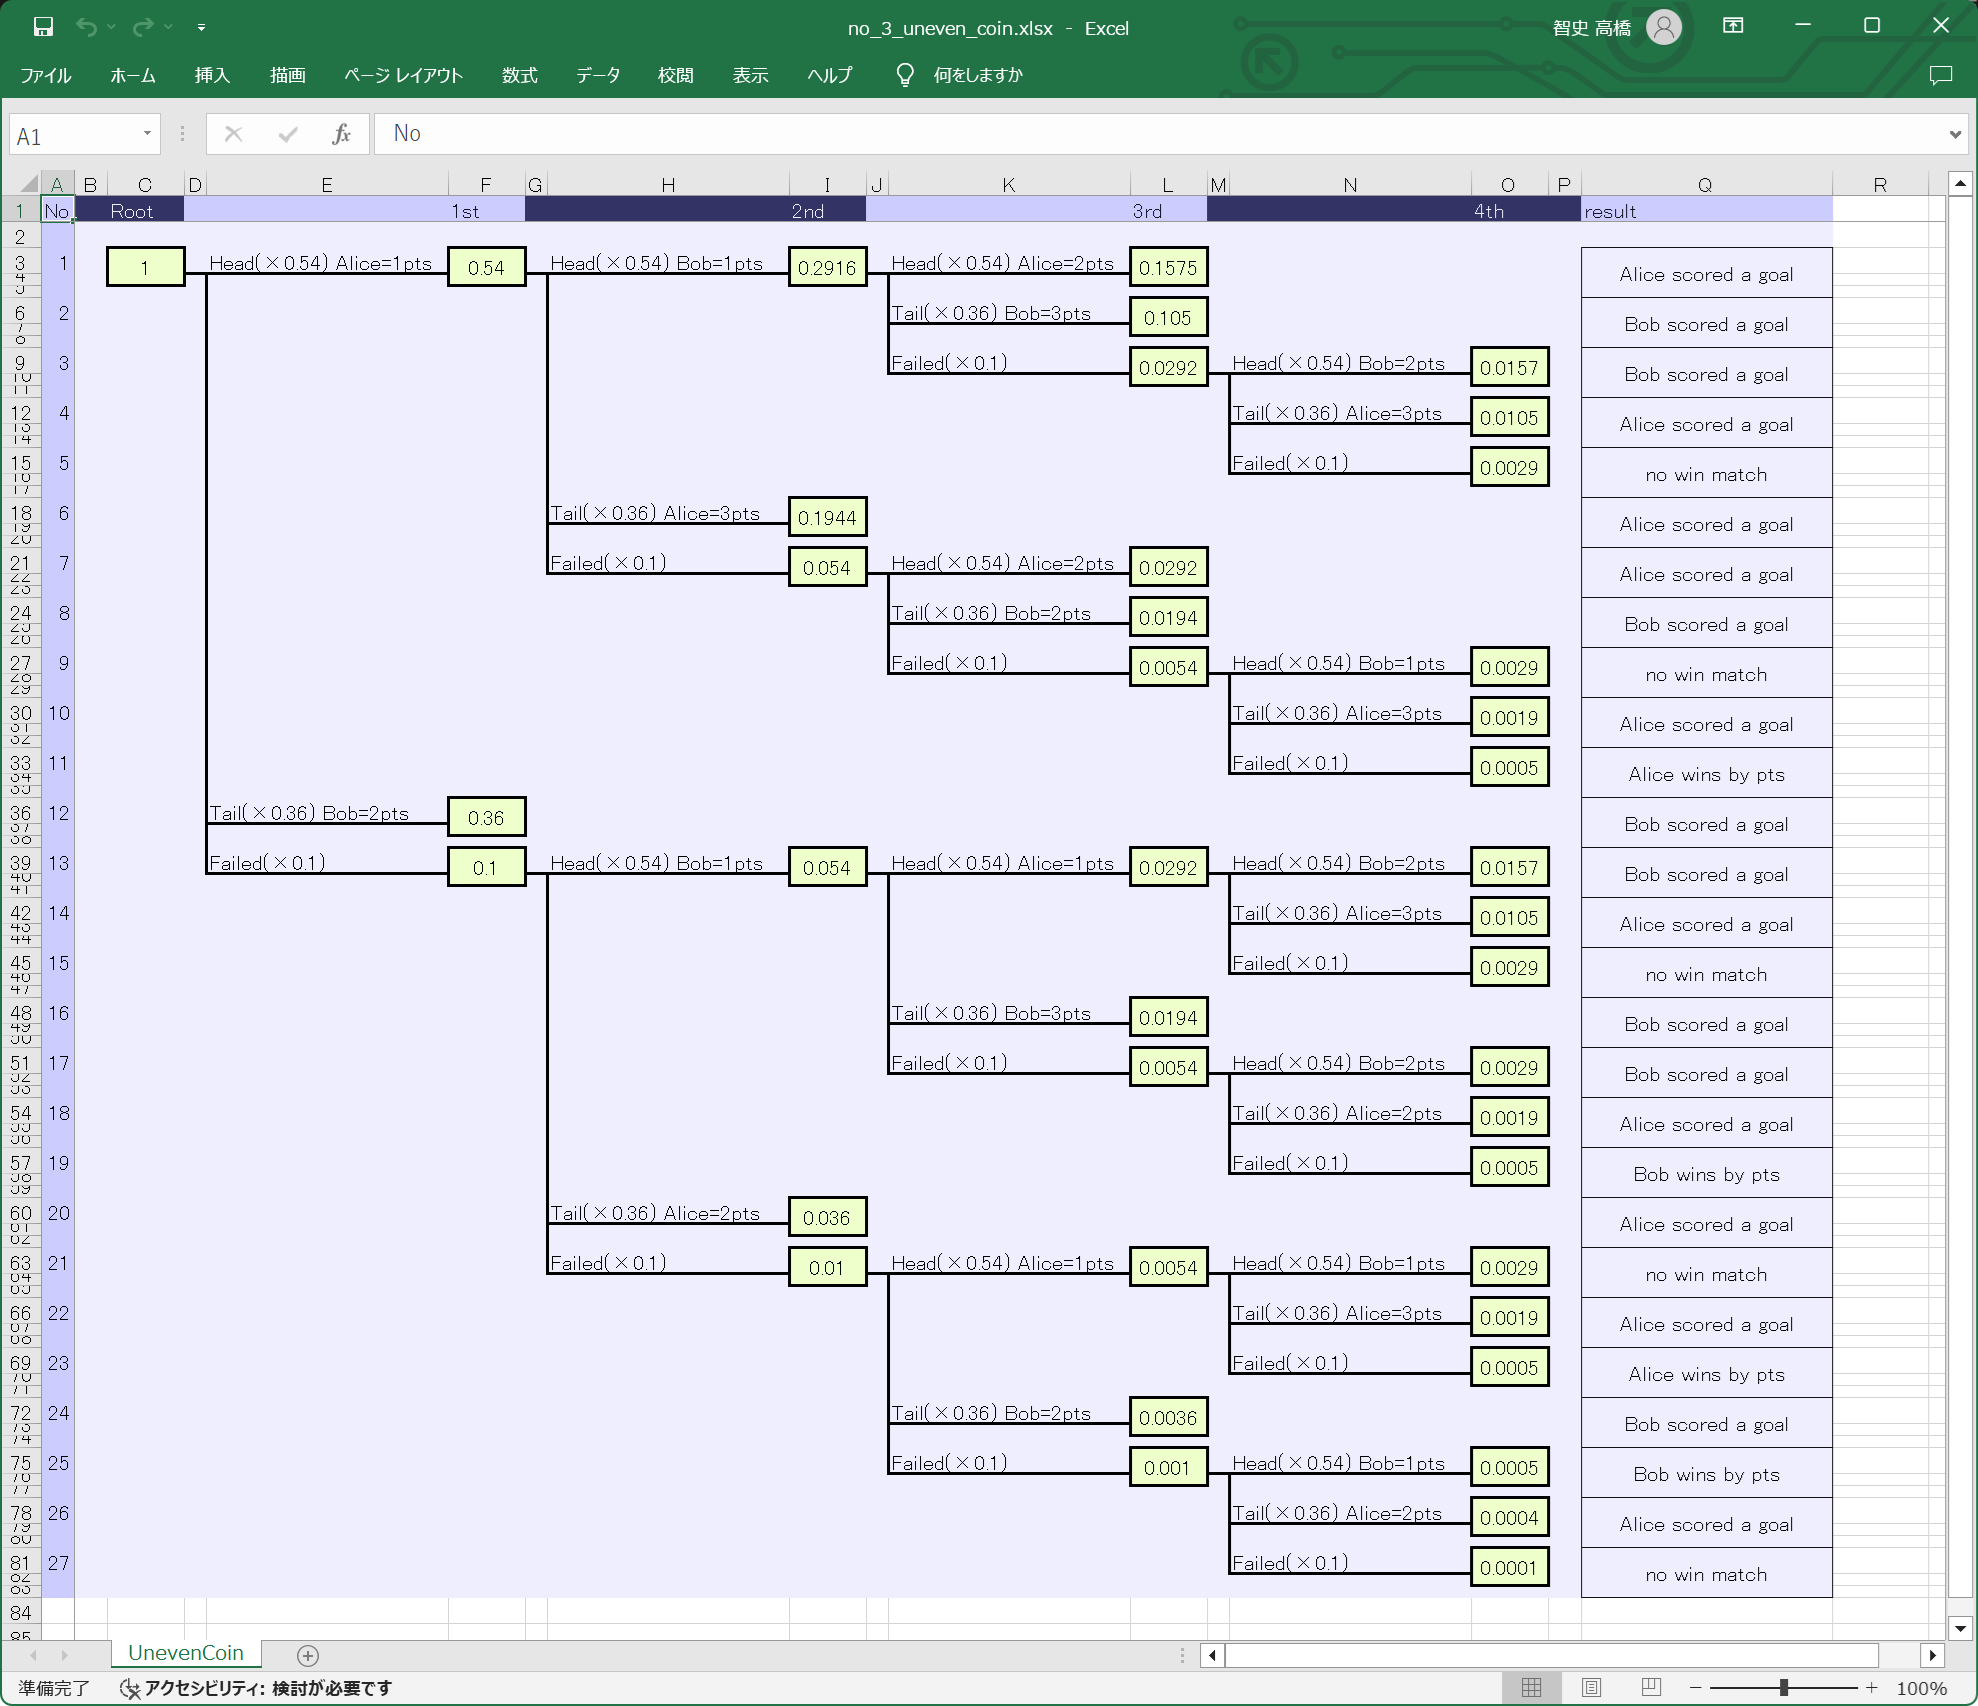
例3:偏ったコインを投げて表と裏が出る確率
Output:
👆 スタイルも少しだけ設定できます
Input:
省略します
Script:
import xltree as tr


# 各種設定
settings = {
    # 列の幅
    #'column_width_of_no':                       4,      # A列の幅。no列
    #'column_width_of_root_side_padding':        3,      # B列の幅。ツリー構造図の根側パディング
    #'column_width_of_leaf_side_padding':        3,      # ツリー構造図の葉側パディング
    'column_width_of_node':                     7,      # 例:C, F, I ...列の幅。ノードの箱の幅
    #'column_width_of_parent_side_edge':         2,      # 例:D, G, J ...列の幅。エッジの水平線のうち、親ノードの方
    'column_width_of_child_side_edge':         22,      # 例:E, H, K ...列の幅。エッジの水平線のうち、子ノードの方

    # 行の高さ
    'row_height_of_header':                    13,      # 第1行。ヘッダー
    'row_height_of_lower_side_padding':        13,      # 第2行。ツリー構造図の軸の番号が小さい側パティング
    'row_height_of_upper_side_of_node':        13,      # ノードの上側のセルの高さ
    'row_height_of_lower_side_of_node':         6,      # ノードの下側のセルの高さ
    'row_height_of_node_spacing':               6,      # ノード間の高さ

    # 背景色関連
    'bgcolor_of_tree':                   'EEEEFF',      # ツリー構造図の背景
    'bgcolor_of_header_1':               'CCCCFF',      # ヘッダーの背景色その1
    'bgcolor_of_header_2':               '333366',      # ヘッダーの背景色その2
    'bgcolor_of_node':                   'EEFFCC',      # 背景色

    # 文字色関連
    'fgcolor_of_header_1':               '111122',      # ヘッダーの文字色その1
    'fgcolor_of_header_2':               'EEEEFF',      # ヘッダーの文字色その2

    # 文字寄せ関連
    'horizontal_alignment_of_node':        'left',      # 文字の水平方向の寄せ。規定値 None。'left', 'fill', 'centerContinuous', 'center', 'right', 'general', 'justify', 'distributed' のいずれか。指定しないなら None
    'vertical_alignment_of_node':            None,      # 文字の垂直方向の寄せ。規定値 None。'bottom', 'center', 'top', 'justify', 'distributed' のいずれか。指定しないなら None

    # その他の操作
    'do_not_merge_cells':                   False,      # セル結合しないなら真
}

# 出力先ワークブックを指定し、ワークブックハンドル取得
with tr.prepare_workbook(target='./examples/temp/example_o3o0_uneven_coin.xlsx', mode='w', settings=settings) as b:

    # 読取元CSVを指定し、ワークシートハンドル取得
    with b.prepare_worksheet(target='UnevenCoin', based_on='./examples/data/uneven_coin.csv') as s:

        # ワークシートへ木構造図を描画
        s.render_tree()

    # 何かワークシートを1つ作成したあとで、最初から入っている 'Sheet' を削除
    b.remove_worksheet(target='Sheet')

    # 保存
    b.save_workbook()
👆 Settings オブジェクトを使ってください。
(xltree>=0.1.0 から) settings は Dictionary 型になりました
(xltree>=0.2.0 から) column_width_of_row_header_separator は column_width_of_root_side_padding に名称変更しました
(xltree>=0.3.0 から) row_height_of_column_header_separator は row_height_of_lower_side_padding に名称変更しました
例4:ツリー構造モデルの作成
(tree==0.4.2 から) ツリー構造のモデルを取得できます
👇 以下はターミナル表示
Output:
📁 C
└── 📁 Users
    └── 📁 Muzudho
        └── 📁 OneDrive
            └── 📁 Documents
                └── 📄 (1) GitHub
                └── 📁 Tools
                    └── 📁 Shogidokoro
                        └── 📁 Engine
                            └── 📄 (2) Lesserkai.exe
                            └── 📄 (3) Lesserkai_ja.txt
                            └── 📄 (4) public.bin
                        └── 📁 ja
                            └── 📄 (5) Shogidokoro.resources.dll
                        └── 📄 (6) Engine.xml
                        └── 📄 (7) GameResult.xml
                        └── 📄 (8) Shogidokoro.exe
                        └── 📄 (9) Shogidokoro.xml
                        └── 📄 (10) お読みください.txt
                    └── 📄 (11) Shogidokoro.zip
                └── 📄 (12) Visual Studio 2022
                └── 📄 (13) Default.rdp
Script:
import xltree as tr


# 出力先ワークブックを指定し、ワークブックハンドル取得
with tr.prepare_workbook(target='./examples/temp/example_o1o0_tree_drive.xlsx', mode='w') as b:

    # 読取元CSVを指定し、ワークシートハンドル取得
    with b.prepare_worksheet(target='Drive', based_on='./examples/data/drive_by_table.csv') as s:

        def print_child(indent, node):
            """再帰的に子ノードを表示"""
            succ_indent = indent + '    '
            for child_entry in node.child_entries.values():
                # エッジテキスト
                if child_entry.edge_text is not None:
                    et = f"─{child_entry.edge_text}─"
                else:
                    et = '──'

                # 葉ノード
                if not child_entry.has_children():
                    print(f"{indent}└{et} 📄 ({child_entry.leaf_th}) {child_entry.node_text}")

                # 中間ノード
                else:
                    print(f"{indent}└{et} 📁 {child_entry.node_text}")
                    print_child(indent=succ_indent, node=child_entry) # 再帰

        # 木構造のターミナル表示
        for root_entry in s.forest.multiple_root_entry.values():
            print(f"📁 {root_entry.node_text}")
            print_child(indent='', node=root_entry)
👆 以上がこのライブラリに付属しているツリー構造の操作のインターフェースです。他に便利なツリー構造のライブラリーがあれば、そちらへ内容を移し替えてください
(xltree==0.5.0 から) child_nodes を child_entries へ名称変更。 node.text は entry.node_text へ名称変更。 s.multiple_root_entry は s.forest.multiple_root_entry へ変更
Project details
Release history Release notifications | RSS feed
Download files
Download the file for your platform. If you're not sure which to choose, learn more about installing packages.
Source Distribution
Built Distribution
File details
Details for the file xltree-0.6.1.tar.gz.
File metadata
- Download URL: xltree-0.6.1.tar.gz
- Upload date:
- Size: 32.3 kB
- Tags: Source
- Uploaded using Trusted Publishing? No
- Uploaded via: twine/5.1.1 CPython/3.12.3
File hashes
| Algorithm | Hash digest | |
|---|---|---|
| SHA256 | 49d871016b2c633c16c33c7d531f8a62bacaeb24ea725504ffa4d037898bb047 |
|
| MD5 | 8db788f31a7c7d5a34c5687c33d89e13 |
|
| BLAKE2b-256 | 563088f95dd6a916e1a3735a1c7eb491ab30cb05337c29e43906a80b862ca022 |
File details
Details for the file xltree-0.6.1-py2.py3-none-any.whl.
File metadata
- Download URL: xltree-0.6.1-py2.py3-none-any.whl
- Upload date:
- Size: 37.1 kB
- Tags: Python 2, Python 3
- Uploaded using Trusted Publishing? No
- Uploaded via: twine/5.1.1 CPython/3.12.3
File hashes
| Algorithm | Hash digest | |
|---|---|---|
| SHA256 | 8e7caf483d7f5ef68b56022e7c8051c5f6de680dd3dac8570f6d8fc636508b88 |
|
| MD5 | d6302845643575b437d0e6da9c50b411 |
|
| BLAKE2b-256 | 4587d029c15e357c8f2f4a6ae7de52b8a9000266929350e30a15ddaddb946606 |


