NIMH Data Archive Python Client


Project description
nda-tools
nda-tools is a Python-based command-line client designed for submitting data into and downloading data from the
National Institute of Mental Health Data Archive (NDA). It enables users to programmatically validate, package,
submit, and download data while ensuring compliance with NDA’s required formats, leveraging
the Validation, Submission Package,
and Data Submission web services.
To use nda-tools, you must first have an NDA account with the necessary permissions for data submission or access.
Getting Started
- Create an NDA account, if you haven't already.
- Set up and install
nda-tools. - Run commands to submit or download data.
How to set up nda-tools
To start, open your machine's Command Prompt, Windows Terminal, or command line tool of your choice.
Step 1: Install Python 3
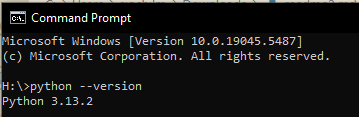
nda-tools requires Python 3. Check if Python 3 is already installed:
python --version
-
If this returns Python 3.x.x, you're good to go.
-
Python offers 2 kinds of distributions: version 2.x.x and version 3.x.x. If you have multiple versions of Python installed,
python --versionmight return Python 2.x.x. You can runpython3 --versionto verify Python 3 exists on your machine.
Notes:
-
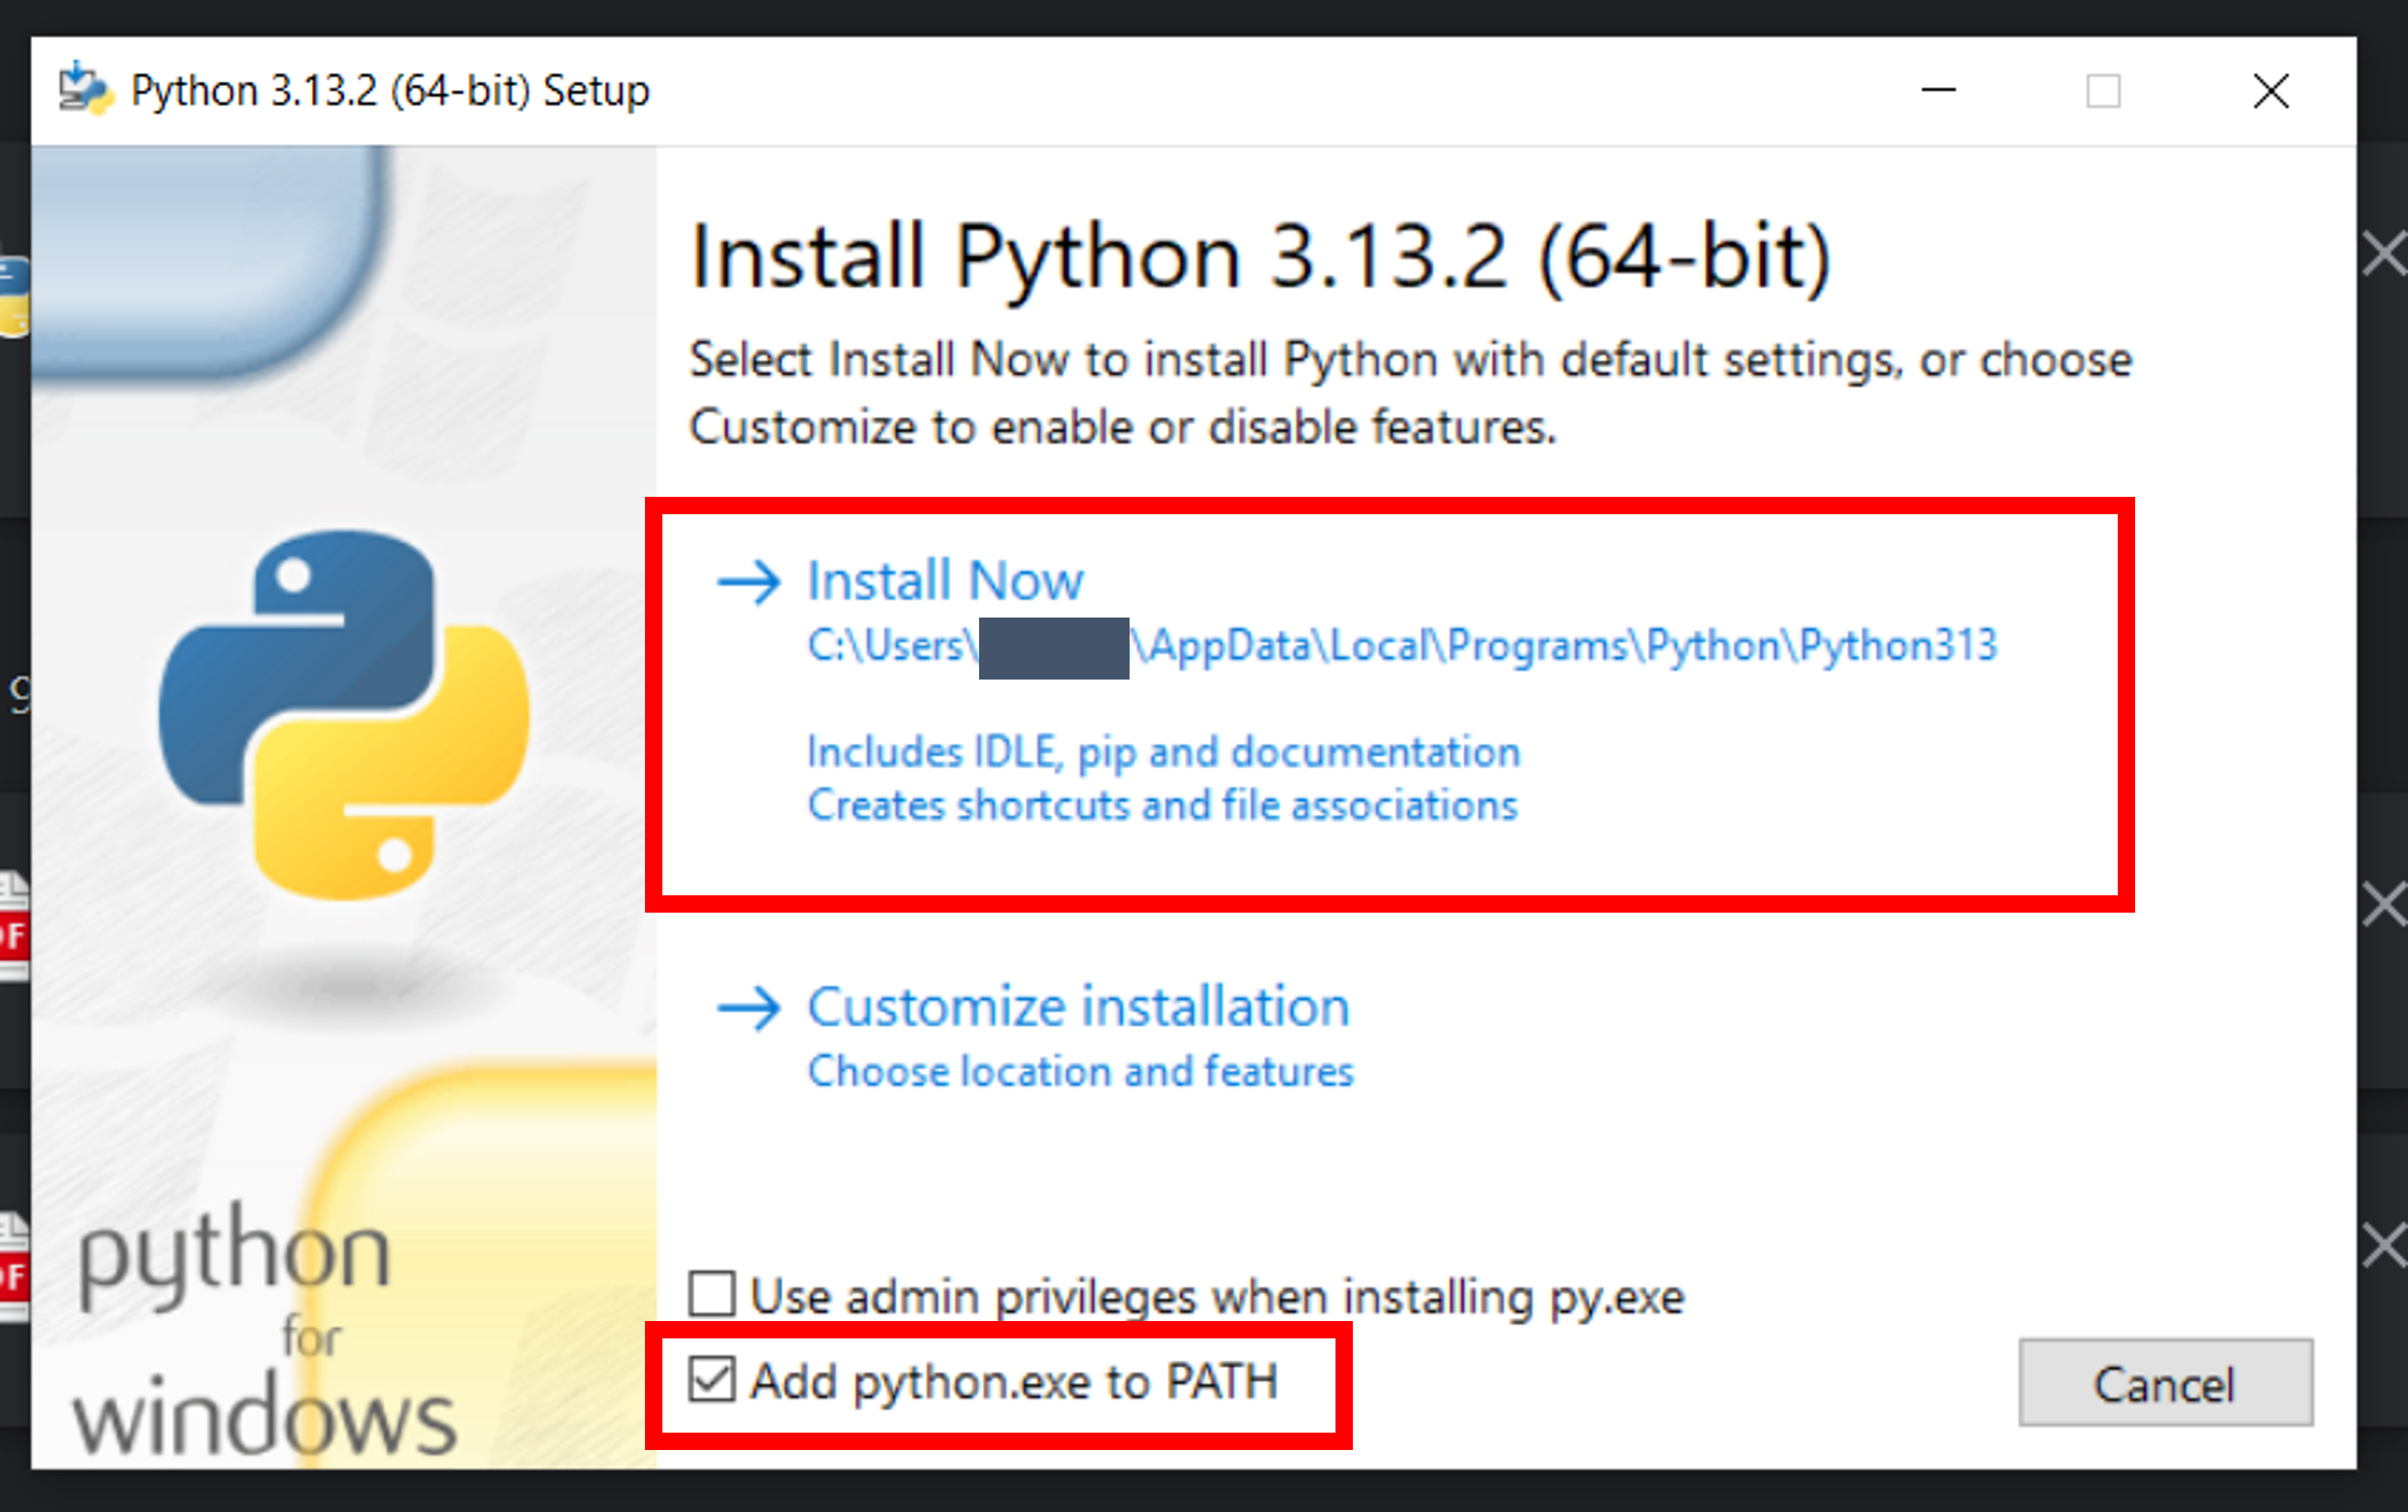
If Python cannot be found, download Python 3 from Python.org and follow the installation prompts. Tip: Select "Add python.exe to PATH" if the option is available during installation.
-
If you don't own your machine, please contact your IT department to request administrative rights, root, or sudo privileges to install python.
-
Windows Users: If
python --versiondoesn't work after installation, you may need to add Python to PATH.
Step 2: Install pip
pip (Python’s package manager) is required to install nda-tools. Check if it's installed:
pip --version
- If you have both Python 2.x.x and 3.x.x on your machine,
pip --versionreturns pip installed in Python 2, runpip3 --versionto verify pip exists in Python 3.
Notes:
-
If installed, it should return the version information.
-
If not, follow the pip installation guide.
-
If pip is not recognized, run
python get-pip.py –userto troubleshoot the error and check the version of pip installed on your machine.

Step 3: Install nda-tools
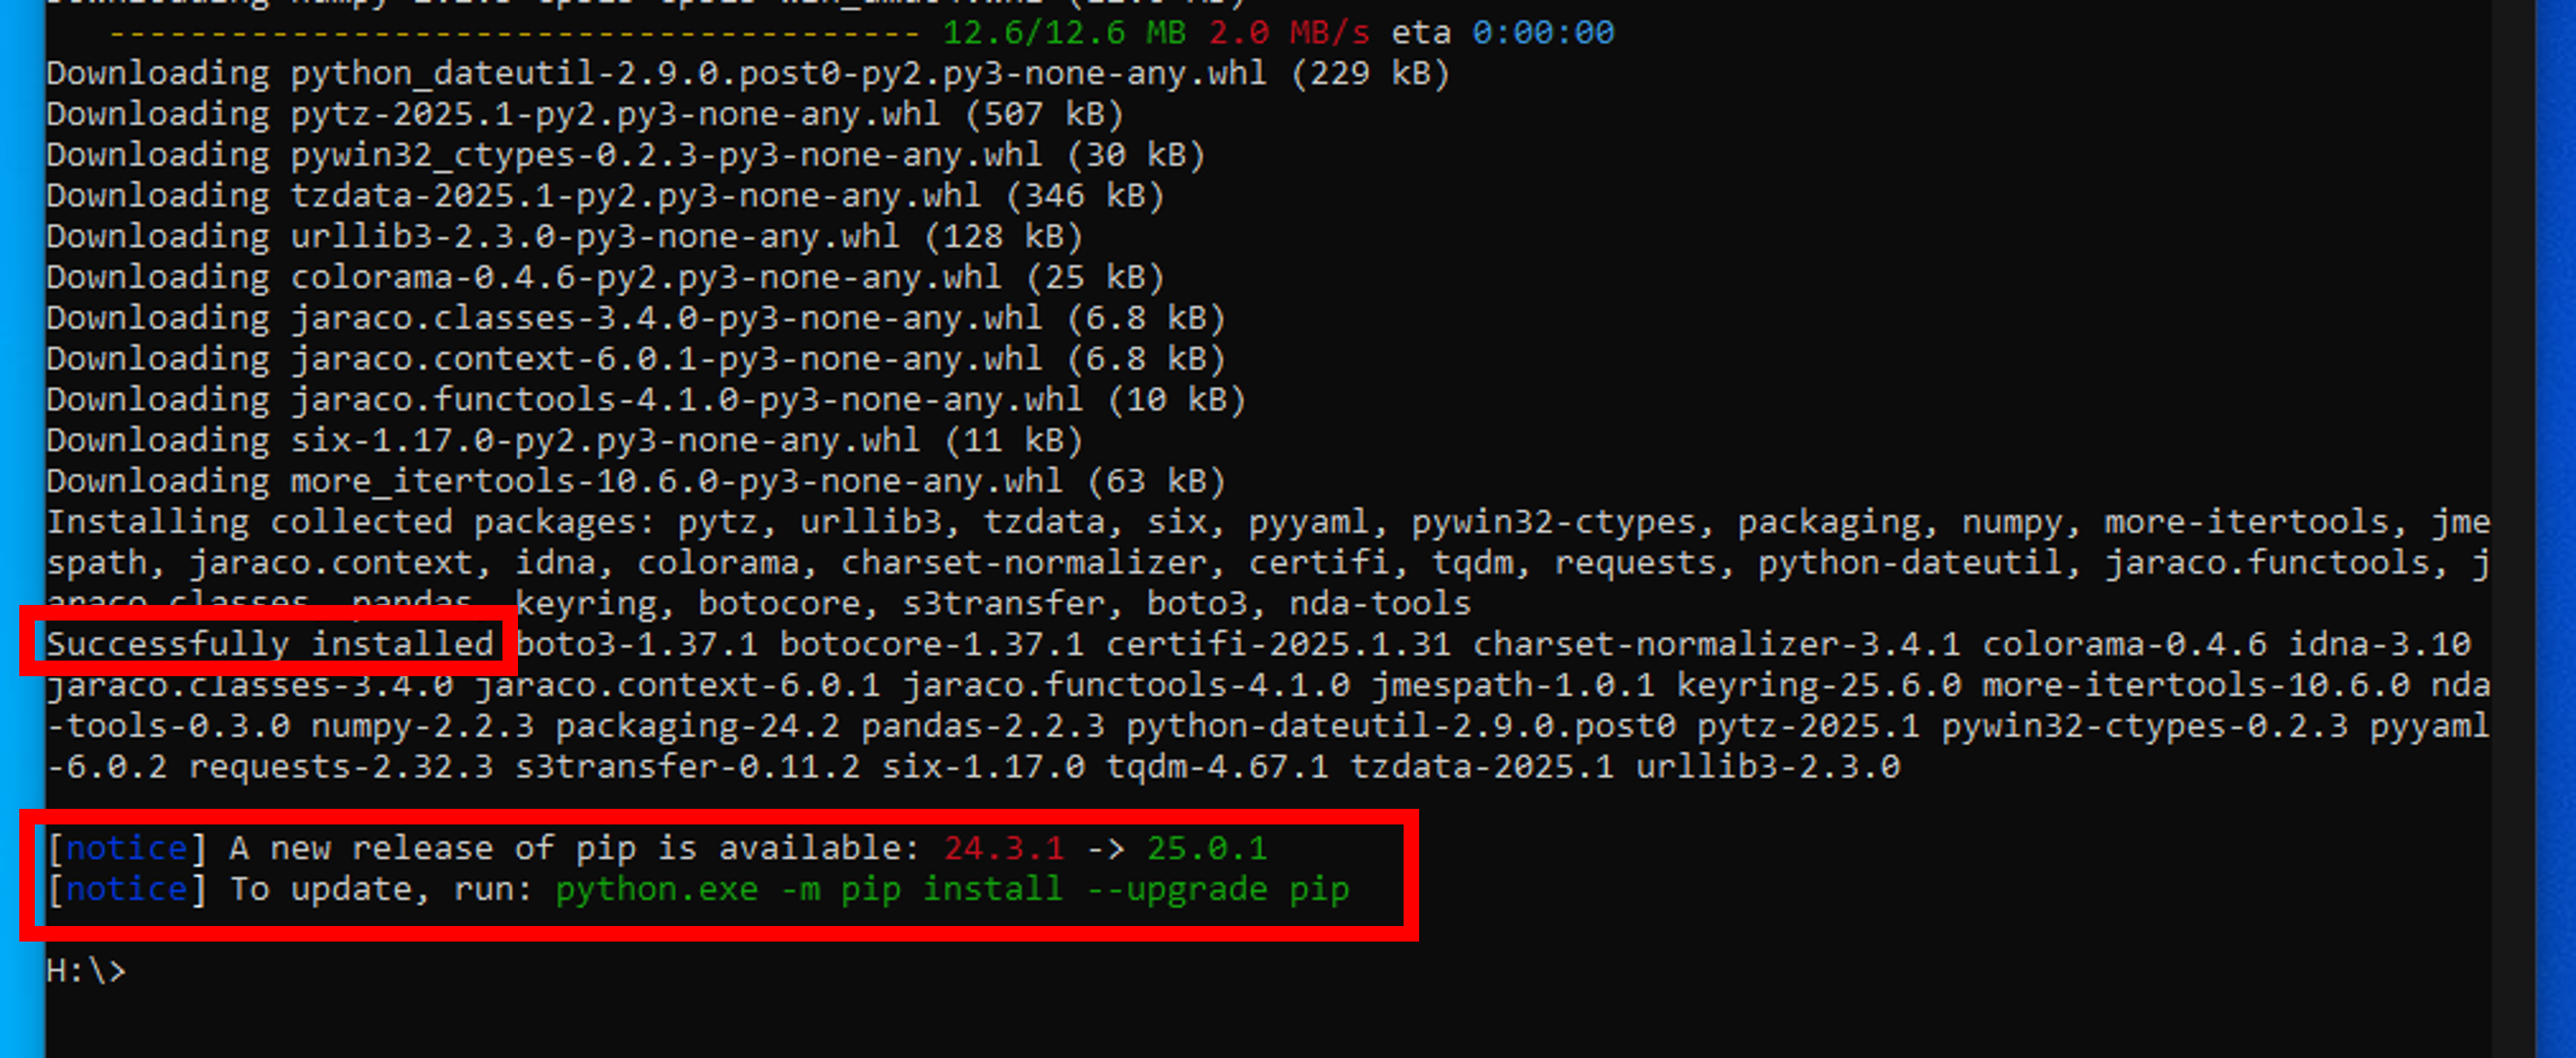
Ensure you have Python and pip installed. Run this command to install nda-tools:
pip install nda-tools
-
Run
pip3 install nda-toolsif you have Python 2.x.x and 3.x.x on your machine. -
Installation is complete when you see "Successfully installed" and can enter a new command. If updates are needed, follow the provided command.
Verify Installation by running:
vtcmd -h
- A successful installation will return the nda-tools version.
Notes:
- If the nda-tools needs special permission, try the following command:
pip install nda-tools --user
- If multiple Python or pip versions exists on your your machine, try the following command instead:
python -m NDATools.clientscripts.[NDAtoolcommand]
Step 4: Authenticate with nda-tools
1) Set up keyring (Credential Storage)
Keyring is a Python package that leverages the operating system's credential manager to securely store and retrieve your NDA login credentials. More details on Keyring Documentation.
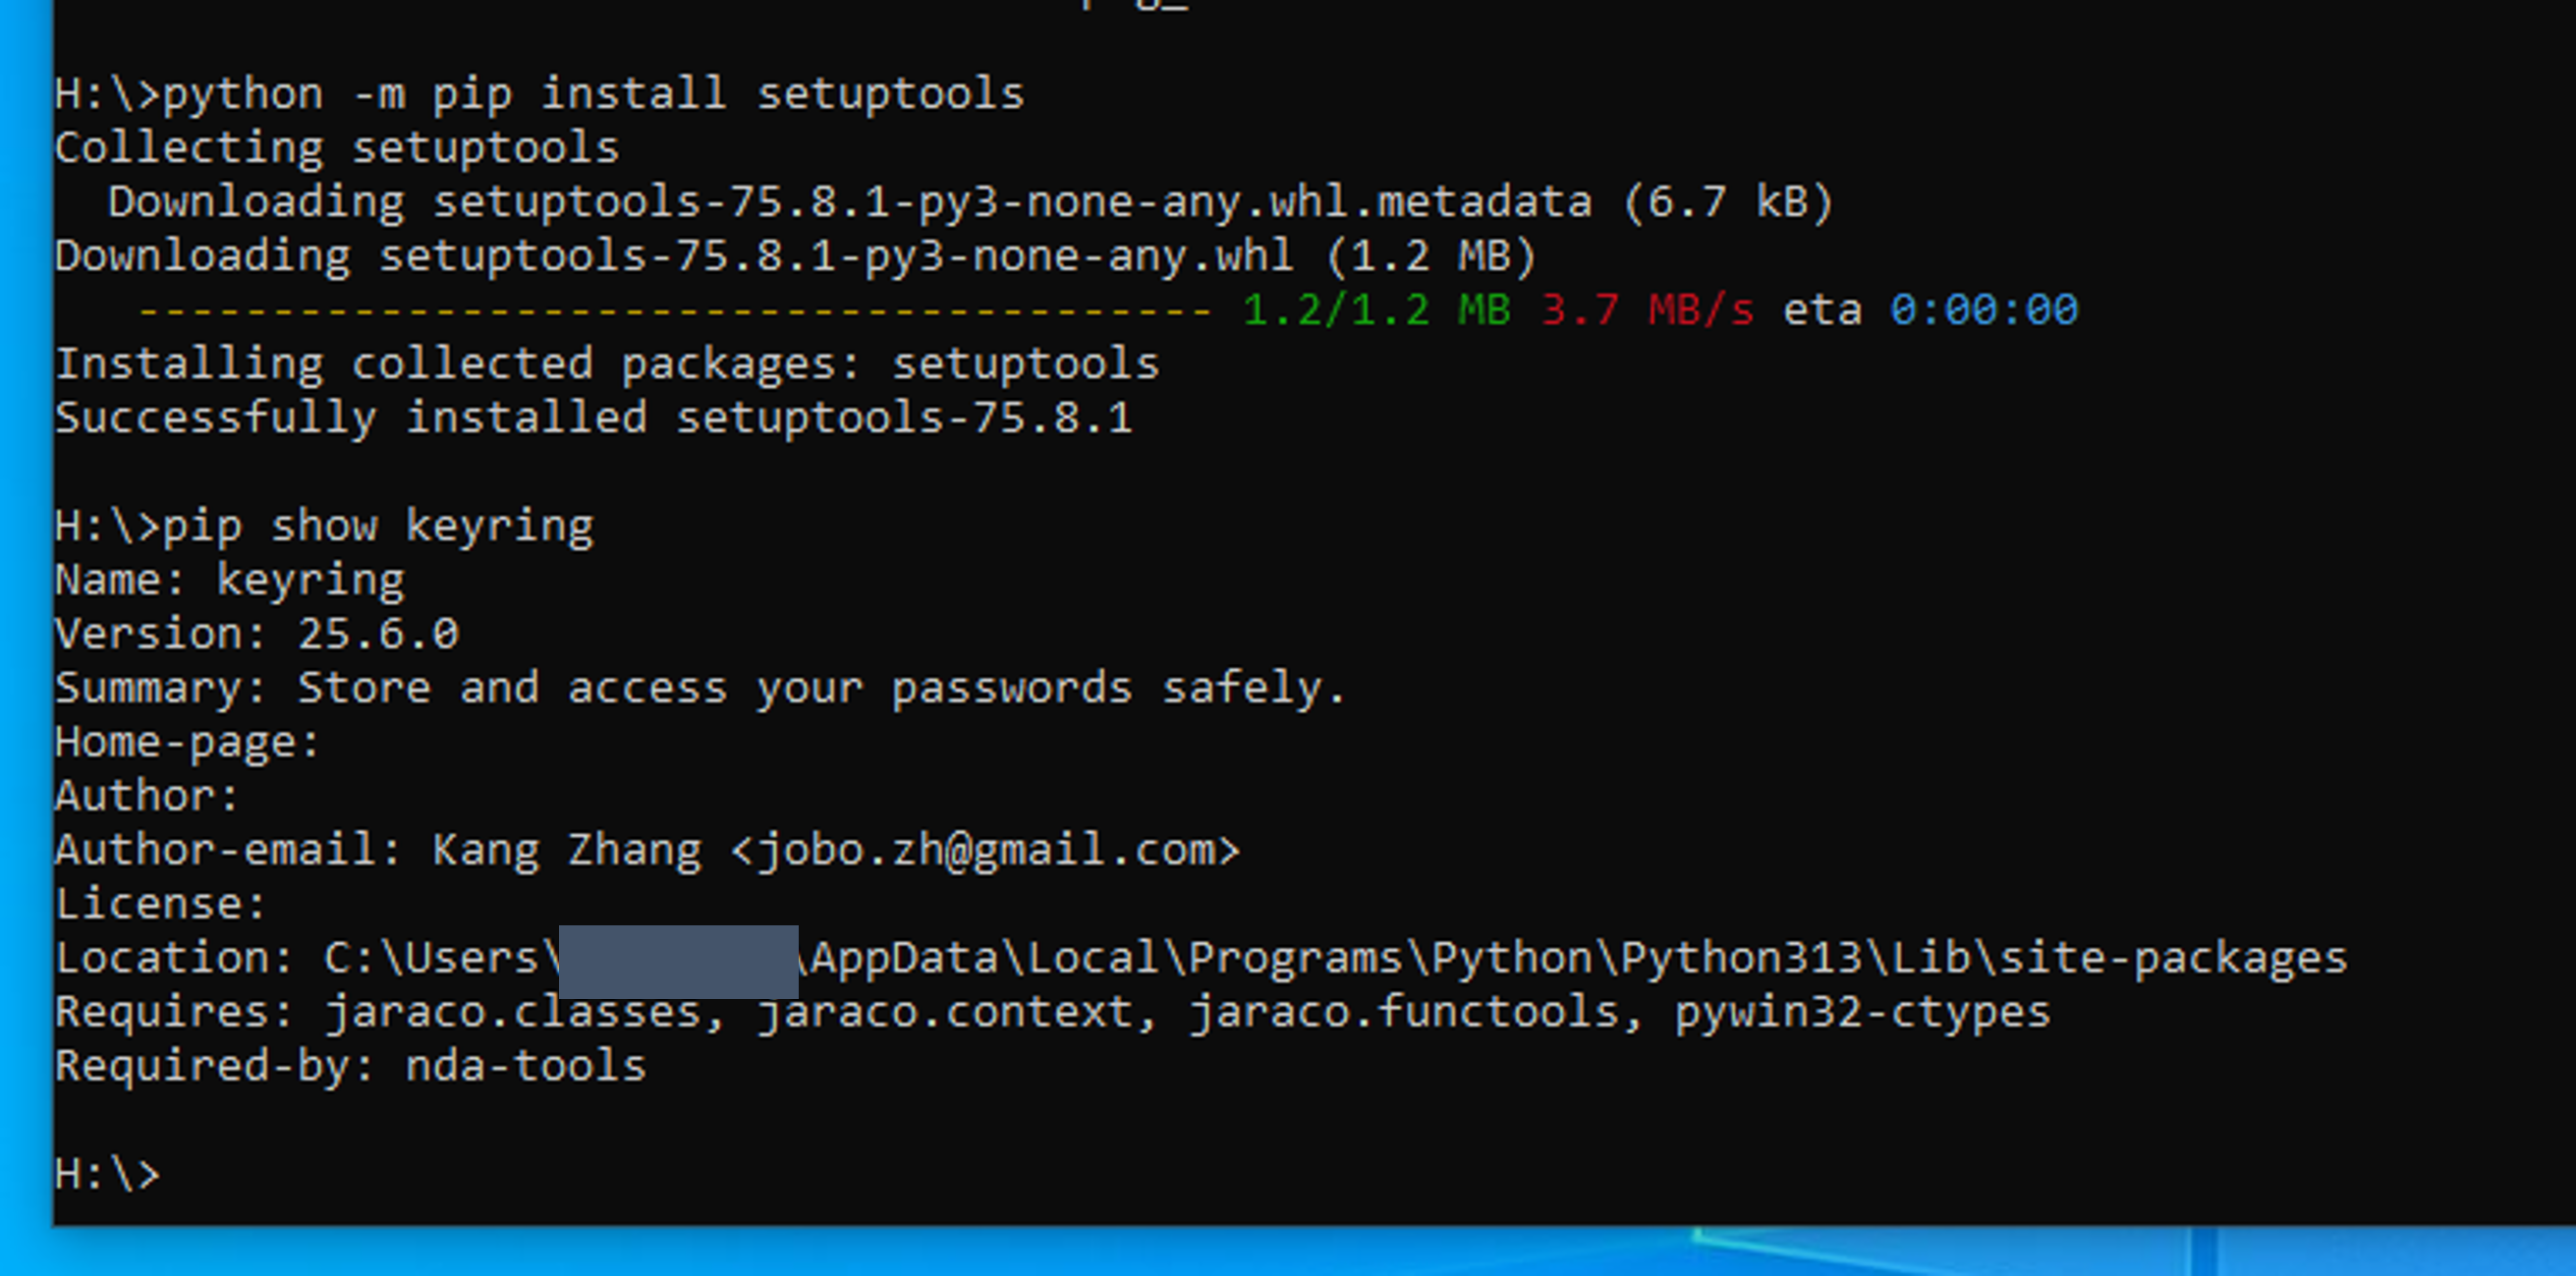
First, check if it's installed:
pip show keyring
If keyring version information is returned, then it already exists.
If not, install it:
pip install keyring
For Linux Users
-
You may need to install a backend implementation of keyring.
-
If there is no backend set up for keyring, try:
pip install secretstorage --upgrade keyrings.alt -
For Ubuntu users, try:
apt-get install -y gnome-keyring
2) Enter your NDA Credentials
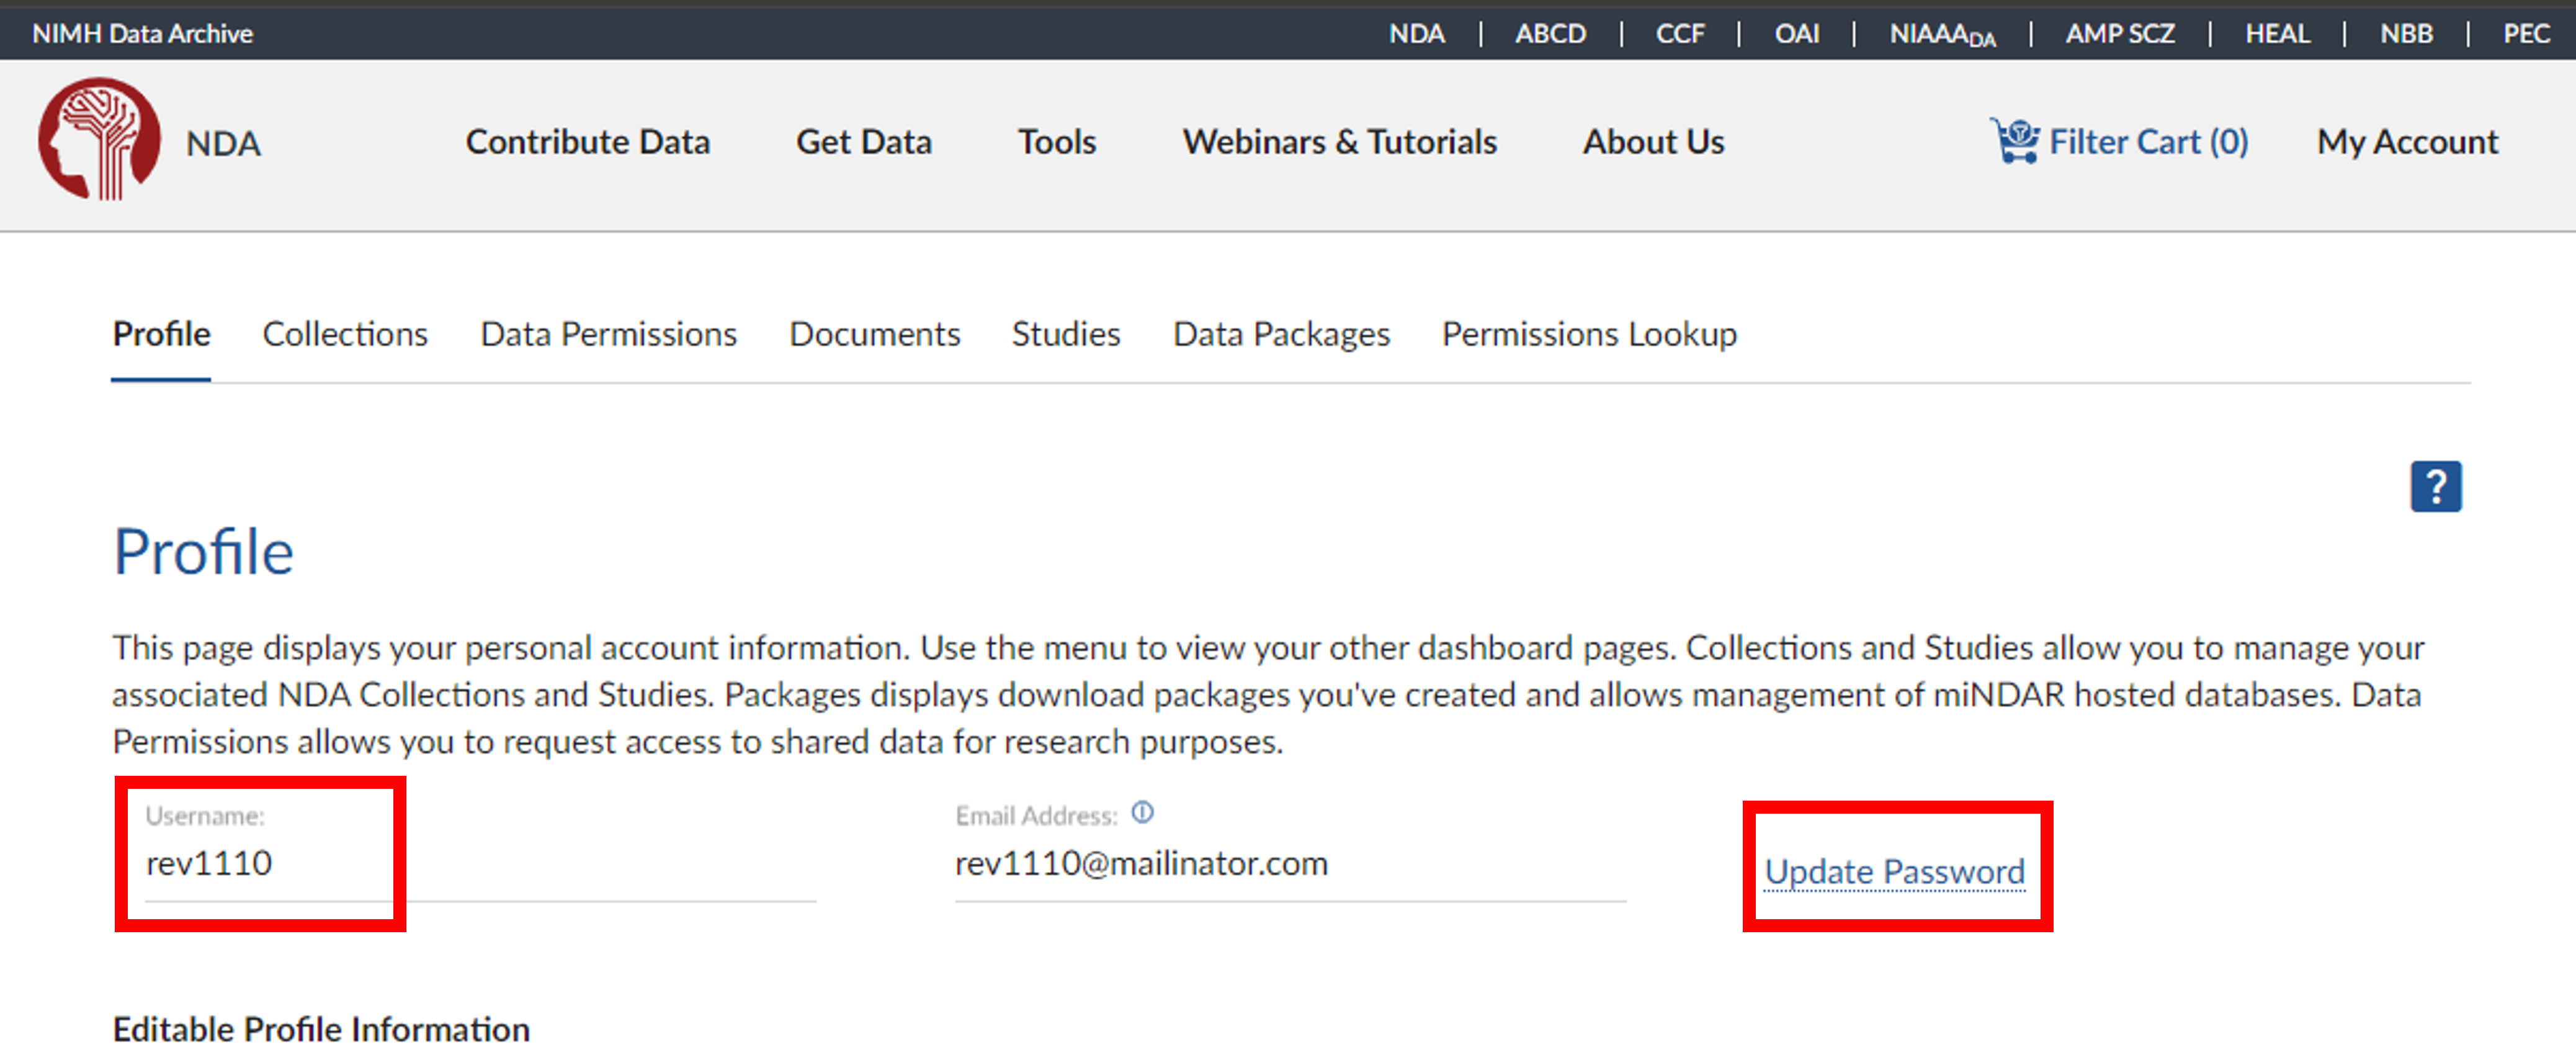
On first use, you'll be prompted for your NDA account username and password (not your eRA Commons or Login.gov credentials).
- Find your NDA username by logging into NDA Profile.
- To reset your password, click UPDATE PASSWORD on your NDA Profile.
If you're not prompted, manually store your credentials by running:
keyring.set_password('nda-tools', 'your-username', 'your-password')
After the first login, your credentials will be saved in keyring and automatically used for future nda-tools sessions.
Updating Stored Passwords with keyring (If needed)
If your NDA account password has changed since your last usage of nda-tools, you can update the password in keyring by running the following command:
python -c "import keyring; keyring.set_password('nda-tools', 'your_username_here', 'your_password_here')"
You're ready!
Once you have python, pip, and nda-tools installed, and have entered your NDA credentials, you're ready to use the tool.
-
View upload / data submission options:
vtcmd -h -
View download options:
downloadcmd -h
Notes:
- If you encounter SSL errors when running the client, re-run pip installation of requests by running
pip install requests[secure]which installs additional packages with more support for SSL connections.
Configuring the Client
- If your command-line inputs have special characters (i.e., passwords) or spaces (i.e., in directory/filenames),
you may need to enclose them in quotations.
- If you are using windows, use double-quotes: " "
- If you are using Mac OSX or Linux, use single-quotes: ' '
- Upon your first run, the client will prompt you to enter your username and password, which it will store in your operating system's credential manager. You may go back and edit your credentials at any time.
The ~.NDATools\settings.cfg file provided with the client contains configurable options for Endpoints, Files, and User information.
Typically, you won't need to change entries in the 'Endpoints' section; however, you might wish to modify the 'Files' and 'User' sections with preferred locations for validation results, user login, and AWS credentials information.
-
While arguments are not positional, the first argument should be the list of files to validate.
- The list of files has no command-line switch so it can get interpreted as part of a preceding argument.
- For example, there is no way to differentiate whether the csv file is part of the -l argument or a second argument:
 vtcmd -l "Users/[youruser]/Documents/MultipleDataTypes" \
 "Users/[youruser]/Documents/MultipleDataTypes/Stage_Testing_BigFiles_genomics_sample03.csv"
Files for Validation
It is required that you know the full path to the csv files that are going to be validated. Furthermore, if your data includes manifests and/or associated files (i.e., genomics files, imaging files, etc.), you must also know the full path to these files, which should be entered as an optional command-line argument. Otherwise, the client will prompt you to enter a list of directories where any additional files are stored. You can also list a bucket, optional prefix, and your AWS credentials if the associated files are in AWS.
Please Note: When listing the directory for associated files, include the folder up to but not including the file name listed in the csv file.
Example:
If the associated file name is in Users/[youruser]/Documents/MultipleDataTypes/data/1G_file.fastq and is listed in your csv file as:
data/1G_file.fastq
then the directory you will enter is:
Users/[youruser]/Documents/MultipleDataTypes
You should not include the 'data/' folder as part of the directory name.
- Check all files properties and make sure the user has all Permissions allowed.
To start validation, you must enter a list of files (or a file path if not in the current directory), separated by a space:
vtcmd MultipleDataTypes/genomics_sample03.csv testdata/with_associated_files/genomics_sample03.csv
If your data includes manifest files, you must enter the directories where the manifest files are located, separated by a space:
vtcmd submission_data/sample_imagingcollection01.csv -m submission_data/Manifests
If there are associated files, enter the directories where they are found, separated by a space:
vtcmd MultipleDataTypes/genomics_sample03.csv testdata/with_associated_files/genomics_sample03.csv -l MultipleDataTypes testdata/with_associated_files
If the files are located somewhere other than the current working directory, then you must enter the full path to the files:
vtcmd MultipleDataTypes/genomics_sample03.csv testdata/with_associated_files/genomics_sample03.csv -l Users/[youruser]/Downloads/SubmissionData testdata/with_associated_files
If your associated files are in S3, then you must include the bucket name, access key, and secret key.
- The access and secret key can be stored in the settings.cfg file as well.
vtcmd MultipleDataTypes/genomics_sample03.csv testdata/with_associated_files/genomics_sample03.csv -s3 my_bucket -ak XXXXXXXXXXXXXX -sk XXXXXXXXXXXXXX
Note: You can also upload associated files saved locally and in s3. Just make sure to include the directory where the local files are saved (-l path/to/local/associated/files)
To create a package, enter "-b" at the end of your command line argument. You can also enter your username, AWS credentials, Collection ID, and the title and description of your submission, or you can enter this information later when prompted by the client. The client will not begin building the submission package until:
- All your files are validated
- All associated files have been located on your local drive or in S3
Once package submission and upload are complete, you will receive an email in your inbox from NDA confirming your submission was successful. A local version of the package will be saved automatically to ~\nda-tools\vtcmd\submission_package\ folder and can be found on the collection submission tab on the NDA site.
Fixing QA Errors
A QA check is performed on all data after it has been submitted to NDA for inconsistencies in data-points including sex, subjeckey, interview age and interview date. If any problems are found with the data, an email will be sent to the users who created the submission along with a report of the errors that were found by NDA.
To fix the data in NDA for your submission, you need to replace all of the csv files which contained errors in your original submission. To do this you must:
- Retrieve the csv files with that were used to create the original submission and which contain data that needs to be corrected. This includes all csv files where data needs to be added, removed or updated.
- Correct the files by adding, removing or updating information as needed.
- Run the vtcmd with the -rs command line argument. Specify the value of the submission which you need to correct data for. Then list all of the csv files that you made corrections to. If there was a csv file from the original submission that did not contain any changes, it is not necessary to supply the file as an argument at this time.
For example, if the original submission with id 123456 consisted of file1.csv, file2.csv and file3.csv, and corrections
needed to be made to
file1.csv and file2.csv, the command to fix qa errors will look like:
vtcmd -b -rs 123456 corrected-file1.csv corrected-file2.csv
Notice that file3.csv is excluded from the command because no changes needed to be made to that particular file.
Please note this command should be run once for a submission and should include all of the files that contain corrections to data. i.e do not run the vtcmd once for corrected-file1.csv and another time for corrected-file2.csv. If you accidentally omit files containing necessary changes when running the command, please contact the HelpDesk at NDAHelp@mail.nih.gov.
Also note that the csv files should contain all of the data that was submitted originally. i.e. if a csv originally had 800 rows and only 3 rows needed to be changed, all 800 rows should be present in the csv when running the vtcmd, not just the 3 rows that contain changes. Any data that is left out of the csv will be reflected in data-expected numbers for the collection.
The script will not upload any associated files that were uploaded during the original submission. It will only be necessary to upload associated files if they appear in corrected csv files but not in any of the csv files from the original submission. This saves time during genomic and imaging submissions where associated files can take days to upload.
Downloading Data
To download data, you should use the downloadcmd command. This provides several options to download your NDA packaged data or a subset of the data. All files are downloaded automatically to the ~\nda-tools\downloadcmd\packages\ folder, but you can change this by indicating a new directory in the command line to save files. Please note: the maximum transfer limit of data is 20TB per month.
- Users can contact the NDA Help Desk at NDAHelp@mail.nih.gov and ask for their download threshold to [temporarily] be extended.
All Package Data
All packaged data can be downloaded by passing the package ID:
downloadcmd -dp <packageID>
Note: it will NOT download associated files unless you created your NDA package with associated files. Steps to download associated files are below.
Downloading .txt Files
The downloadcmd command has two options for downloading data inside .txt files. If you downloaded your NDA package, you will find meta-data .txt files, many of which represent data measures. Genomics, imaging, and other associated data will be listed in these .txt files as s3 links. If you would like to download all the s3 links in your .txt file, you can indicate so by passing the -ds flag.
downloadcmd -dp <packageID> -ds path/to/data/structure/file/image03.txt
If you want to download your NDA package and all genomics, imaging, and other associated data as a list of s3 links stored in a custom .txt file, you can do so by using the -t flag.
downloadcmd -dp <packageID> -t path/to/all/s3/txt/file/alls3.txt
Downloading Files to S3 Bucket
The downloadcmd command can download your NDA package into your S3 bucket directly.
downloadcmd -dp <packageID> -s3 <s3 bucket>
This is the preferred way to download data from NDA for two reasons:
-
Downloading to another S3 bucket is considerably faster because the data doesn't leave AWS.
-
It allows us to download an unlimited amount of data from NDA to your bucket directly.
For S3-to-S3 copy operations to be successful, the S3 bucket supplied as the program argument must be configured to
allow PUT object
operations for arn:aws:sts::618523879050:federated-user/<username>, where <username> is your NDA username.
For non-public buckets, this will require an update to the bucket policy. The following statement should be added to
allow the necessary permissions after replacing <your-s3-bucket> with the bucket name:
{
    "Sid": "AllowNDAUpload",
    "Effect": "Allow",
    "Principal": {
        "AWS": "arn:aws:iam::618523879050:federated-user/<username>"
    },
    "Action": "s3:PutObject*",
    "Resource": "arn:aws:s3:::<your-s3-bucket>/*"
}
You may need to email your company/institution IT department to have this added for you.
Note: If your S3 bucket is encrypted with a customer-managed KMS key, then you will also need to update the policy of the key that is used to encrypt the bucket.
The following statement should be added to your key's policy:
{
    "Sid": "EnableUseForFederatedNDA",
    "Effect": "Allow",
    "Principal": {
        "AWS":  "arn:aws:iam::618523879050:user/DownloadManager"
    },
    "Action": ["kms:GenerateDataKey","kms:Decrypt"],
    "Resource": "*"
}
Further Assistance
If you have any problems with this Validation Tool Python client or would like to provide feedback/comments, please email us at NDAHelp@mail.nih.gov.
Release history Release notifications | RSS feed


Download files
Download the file for your platform. If you're not sure which to choose, learn more about installing packages.
Source Distribution
Built Distribution
Filter files by name, interpreter, ABI, and platform.
If you're not sure about the file name format, learn more about wheel file names.
Copy a direct link to the current filters
File details
Details for the file nda_tools-0.6.0.tar.gz.
File metadata
- Download URL: nda_tools-0.6.0.tar.gz
- Upload date:
- Size: 82.8 kB
- Tags: Source
- Uploaded using Trusted Publishing? No
- Uploaded via: twine/6.2.0 CPython/3.10.19
File hashes
| Algorithm | Hash digest | |
|---|---|---|
| SHA256 |
0f67f07452e27e51bfc19f1bf2df210d3c7591430dfbfec9a619b51a4f800532
|
|
| MD5 |
860551de3b74967fb716742709a0ec9b
|
|
| BLAKE2b-256 |
01eb5e6a265cade34c33c8205f054102471b7d04d5c1d9dcf48abcfe46b13a54
|
File details
Details for the file nda_tools-0.6.0-py3-none-any.whl.
File metadata
- Download URL: nda_tools-0.6.0-py3-none-any.whl
- Upload date:
- Size: 100.0 kB
- Tags: Python 3
- Uploaded using Trusted Publishing? No
- Uploaded via: twine/6.2.0 CPython/3.10.19
File hashes
| Algorithm | Hash digest | |
|---|---|---|
| SHA256 |
91728e8cbbd27f9cb4c2cbe9417acfa6366c46508ac02cbb2c6523aa47c861eb
|
|
| MD5 |
6b81f6f6fc4b7ae3cef143b36add9e65
|
|
| BLAKE2b-256 |
b5e8f158a02bcde0c36b0bcbab412176364fe976a1b1d174a6c831746cec7965
|


