





PyEMD
Links
- Online documentation: https://pyemd.readthedocs.org
- Issue tracker: https://github.com/laszukdawid/pyemd/issues
- Source code repository: https://github.com/laszukdawid/pyemd
Introduction
Python implementation of the Empirical Mode Decomposition (EMD). The package contains multiple EMD variations and intends to deliver more in time.
Recent changes
- [2025-11 v1.9] Migrate to
uvandnoxfor builds and tests - [2025-11 v1.8] Performance boost of 18% to the core EMD
EMD variations
- Ensemble EMD (EEMD),
- "Complete Ensemble EMD" (CEEMDAN)
- different settings and configurations of vanilla EMD.
- Image decomposition (EMD2D & BEMD) (experimental, no support)
- Just-in-time compiled EMD (JitEMD)
PyEMD allows you to use different splines for envelopes, stopping criteria and extrema interpolations.
Available splines
- Natural cubic (default)
- Pointwise cubic
- Hermite cubic
- Akima
- PChip
- Linear
Available stopping criteria
- Cauchy convergence (default)
- Fixed number of iterations
- Number of consecutive proto-imfs
Extrema detection
- Discrete extrema (default)
- Parabolic interpolation
Installation
Note: Downloadable package is called emd-signal.
PyPi (recommended)
The quickest way to install package is through pip.
pip install EMD-signal
or with uv you can do
uv add emd-signal
#or
# uv pip install EMD-signal
In this way you install the latest stable release of PyEMD hosted on PyPi.
Conda
PyEMD (as emd-signal) is available for Conda via conda-forge channel
conda install -c conda-forge emd-signal
Source: https://anaconda.org/conda-forge/emd-signal
From source
In case, if you only want to use EMD and its variations, the best way to install PyEMD is through pip.
However, if you want the latest version of PyEMD, anyhow you might want to download the code and build package yourself.
The source is publicaly available and hosted on GitHub.
To download the code you can either go to the source code page and click Code -> Download ZIP, or use git command line
git clone https://github.com/laszukdawid/PyEMD
Installing package from source is done using command line:
python3 -m pip install .
after entering the PyEM directory created by git.
A quicker way to install PyEMD from source is done using pip and git in the same command:
python3 -m pip install git+https://github.com/laszukdawid/PyEMD.git
Note, however, that this will install it in your current environment. If you are working on many projects, or sharing reources with others, we suggest using virtual environments.
If you want to make your installation editable use the -e flag for pip
Example
More detailed examples are included in the documentation or in the PyEMD/examples.
EMD
In most cases default settings are enough. Simply import EMD and pass
your signal to instance or to emd() method.
from PyEMD import EMD
import numpy as np

s = np.random.random(100)
emd = EMD()
IMFs = emd(s)
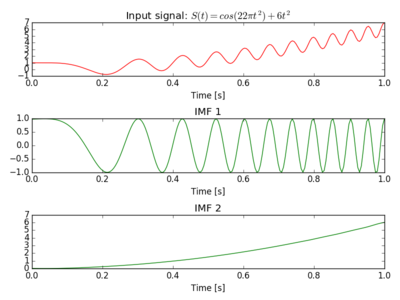
The Figure below was produced with input: $S(t) = cos(22 \pi t^2) + 6t^2$
EEMD
Simplest case of using Ensemble EMD (EEMD) is by importing EEMD and
passing your signal to the instance or eemd() method.
Windows: Please don't skip the if __name__ == "__main__" section.
from PyEMD import EEMD
import numpy as np

if __name__ == "__main__":
    s = np.random.random(100)
    eemd = EEMD()
    eIMFs = eemd(s)
CEEMDAN
As with previous methods, also there is a simple way to use CEEMDAN.
Windows: Please don't skip the if __name__ == "__main__" section.
from PyEMD import CEEMDAN
import numpy as np

if __name__ == "__main__":
    s = np.random.random(100)
    ceemdan = CEEMDAN()
    cIMFs = ceemdan(s)
Visualisation
The package contains a simple visualisation helper that can help, e.g., with time series and instantaneous frequencies.
import numpy as np
from PyEMD import EMD, Visualisation

t = np.arange(0, 3, 0.01)
S = np.sin(13*t + 0.2*t**1.4) - np.cos(3*t)

# Extract imfs and residue
# In case of EMD
emd = EMD()
emd.emd(S)
imfs, res = emd.get_imfs_and_residue()

# In general:
#components = EEMD()(S)
#imfs, res = components[:-1], components[-1]

vis = Visualisation()
vis.plot_imfs(imfs=imfs, residue=res, t=t, include_residue=True)
vis.plot_instant_freq(t, imfs=imfs)
vis.show()
Experimental
JitEMD
Just-in-time (JIT) compiled EMD is a version of EMD which exceed on very large signals or reusing the same instance multiple times. It's strongly sugested to be used in Jupyter notebooks when experimenting by modifyig input rather than the method itself.
The problem with JIT is that the compilation happens on the first execution and it can be quite costly. With small signals, or performing decomposition just once, the extra time for compilation will be significantly larger than the decomposition, making it less performant.
Please see documentation for more information or examples for how to use the code. This is experimental as it's value is still questionable, and the author (me) isn't proficient in JIT optimization so mistakes could've been made.
Any feedback is welcomed. Happy to improve if there's intrest. Please open tickets with questions and suggestions.
To enable JIT in your PyEMD, please install with jit option, i.e.
pip install EMD-signal[jit]
EMD2D/BEMD
Unfortunately, this is Experimental and we can't guarantee that the output is meaningful.
The simplest use is to pass image as monochromatic numpy 2D array. Sample as
with the other modules one can use the default setting of an instance or, more explicitly,
use the emd2d() method.
from PyEMD.EMD2d import EMD2D  #, BEMD
import numpy as np

x, y = np.arange(128), np.arange(128).reshape((-1,1))
img = np.sin(0.1*x)*np.cos(0.2*y)
emd2d = EMD2D()  # BEMD() also works
IMFs_2D = emd2d(img)
F.A.Q
Why is EEMD/CEEMDAN so slow?
Unfortunately, that's their nature. They execute EMD multiple times every time with slightly modified version. Added noise can cause a creation of many extrema which will decrease performance of the natural cubic spline. For some tweaks on how to deal with that please see Speedup tricks in the documentation.
Contact
Feel free to contact me with any questions, requests or simply to say hi. It's always nice to know that I've helped someone or made their work easier. Contributing to the project is also acceptable and warmly welcomed.
Citation
If you found this package useful and would like to cite it in your work please use the following structure:
@misc{pyemd,
  author = {Laszuk, Dawid},
  title = {Python implementation of Empirical Mode Decomposition algorithm},
  year = {2017},
  publisher = {GitHub},
  journal = {GitHub Repository},
  howpublished = {\url{https://github.com/laszukdawid/PyEMD}},
  doi = {10.5281/zenodo.5459184}
}
1 maintainer

Metadata
1 maintainer
Release files for EMD-signal 1.10.0
For a detailed explanation of source distributions (sdists) and built distributions (wheels), please see the package formats documentation.
Source distribution (sdist)
| File | Size | Uploaded | Provenance | |
|---|---|---|---|---|
| emd_signal-1.10.0.tar.gz | 74.7 kB | Without provenance | Details |
Built distribution (wheel)
| File | Interpreter | ABI | Platform | Reset |
|---|---|---|---|---|
| emd_signal-1.10.0-py3-none-any.whl | Python 3 | none | any | Details |
Total release size: 151.5 kB
Release files / emd_signal-1.10.0.tar.gz
| Download URL | emd_signal-1.10.0.tar.gz |
|---|---|
| Size | 74.7 kB |
| Tags | Source |
|
SHA-256 checksum How to use checksums |
41a4a08afb2715844bc1fbf55e2ffdcfe508ce9848a28748ec641a3671289580
|
|
BLAKE2b-256 checksum How to use checksums |
2e2e763b21298843e22098f90513ce2f819d978a51dbd813f4d4e4907ad8af18
|
| Upload date | |
|
Uploaded using Trusted Publishing? What is trusted publishing? |
No |
| Uploaded via |
twine/6.2.0 CPython/3.9.25
|
Release files / emd_signal-1.10.0-py3-none-any.whl
| Download URL | emd_signal-1.10.0-py3-none-any.whl |
|---|---|
| Size | 76.8 kB |
| Tags | Python 3 |
|
SHA-256 checksum How to use checksums |
a3adac17c0950afb74094f1aac7864d858abd2dd7eb7257931fc90ff68e18c2d
|
|
BLAKE2b-256 checksum How to use checksums |
d784beaa92798d9a498990db8b4aaffd9598c30d8e3d0d2e6dc8886d1d0363bc
|
| Upload date | |
|
Uploaded using Trusted Publishing? What is trusted publishing? |
No |
| Uploaded via |
twine/6.2.0 CPython/3.9.25
|
Security for EMD-signal 1.10.0
Provenance
Provenance describes where a file came from. On PyPI, provenance is shared via attestations, which provide a verifiable record of the build or publishing details. View details, limitations and caveats.
No provenance found
None of the files in this release were uploaded with provenance metadata.
A note on package security
PyPI is a repository for distributing packages, not a service for auditing them. While third-party security researchers and our staff do their best to detect and remove malicious packages, PyPI cannot guarantee the quality, security or suitability of any given package.














