
AppDog






Compose and generate effortlessly async API clients and MCP servers from any OpenAPI specifications.
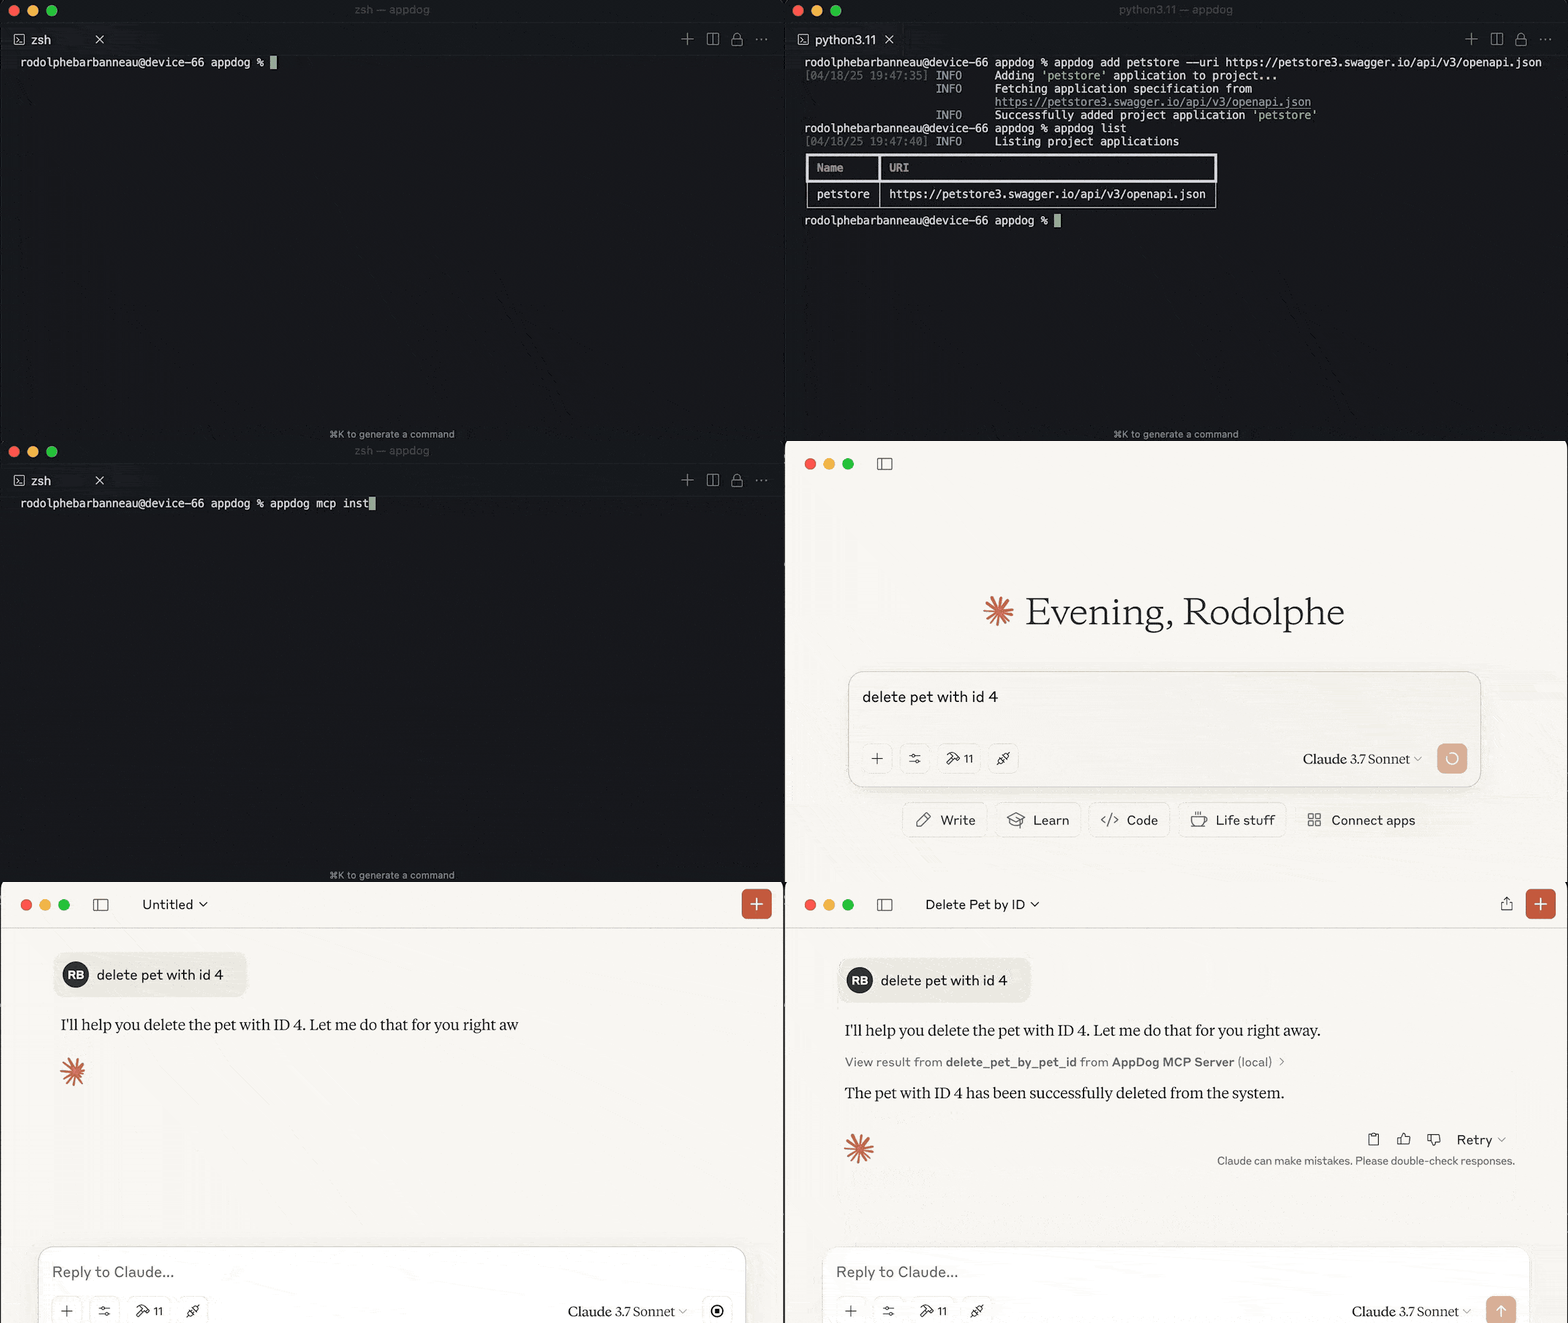
For Windows users, MCP Install command needs a manual edit of the generated Claude configuration. See this issue for more details.
Overview
AppDog is a Python package that simplifies working with OpenAPI-based APIs by:
- Automatically generating fully typed Python clients from OpenAPI specifications
- Creating ready-to-use MCP (Model Context Protocol) servers for API integrations
- Managing multiple API clients in a single project with version locking
- Providing a simple CLI for adding, removing, managing API clients, and installing MCP servers
Installation
uv add appdog
Quick Start
Initialize a project
# Create a new project in the current directory
appdog init

# Or specify a project directory
appdog init --project /path/to/project
Add an API client
# Add a new API client from an OpenAPI spec URL or file
appdog add petstore --uri https://petstore3.swagger.io/api/v3/openapi.json
List and show available APIs
# List all API clients in the project
appdog list

# Show details for a specific API client
appdog show petstore
Upgrade API clients
# Sync API clients with the project registry
appdog sync --upgrade

# Lock API clients
appdog lock --upgrade
Generate an MCP server
# Generate and install an MCP server with all registered APIs
appdog mcp install -n "My API Server"

# Or run the server directly
appdog mcp run -n "My API Server"

# Or run in development mode with inspector
appdog mcp dev -n "My API Server"
Project Structure
After initializing a project and adding APIs, your project will have:
project/
├── apps.yaml     # Installed API appdog settings (auto-generated)
├── apps.lock     # Lock file with app specs and hashes (auto-generated)
└── ...           # Project files
Using Generated Clients
After adding an API client, you can import and use it in your code:
# Import generated client
import appdog.petstore

# Use the client
async def main() -> None:
    async with appdog.petstore.client as client:
        pets = await client.get_pet_find_by_status(status='available')
        print(pets)
And compose your own MCP server:
import appdog.petstore
from fastmcp import FastMCP

mcp = FastMCP()

@mcp.tool()
async def hello_petstore() -> str:
    async with appdog.petstore.client as client:
        pets = await client.get_pet_find_by_status(status='available')
        return pets
Environment Variables
API credentials can be configured using environment variables:
APPDOG_<CLIENT_NAME>_TOKEN=your_token
APPDOG_<CLIENT_NAME>_API_KEY=your_api_key
MCP Integration
The package includes full support for MCP server generation:
-
Generate an MCP server file:
appdog mcp install -n "My API Server"
-
Use with FastMCP or other MCP clients:
from appdog import Project
from fastmcp import FastMCP

mcp = FastMCP()

project = Project.load(project_dir=PROJECT_DIR)
project.mount(mcp)
CLI Usage
Global Options
--verbose,-v: Enable verbose output--debug,-d: Enable all debug logs, including dependencies--project,-p: Specify project directory (defaults to current directory)
Commands
Show CLI version
appdog version
Initialize Project
appdog init [--force] [--project PATH]
--force: Force initialization even if config already exists
Add API Client
appdog add NAME --uri URI [--base-url URL] [OPTIONS]
NAME: Application name--uri: OpenAPI specification URL or file path--base-url: Base URL for API calls--include-methods: Methods to include--exclude-methods: Methods to exclude--include-tags: Tags to include--exclude-tags: Tags to exclude--force: Overwrite application if it already exists with a different URI--frozen: Skip adding application specification in project lock file--upgrade: Force upgrading application specification--sync: Sync application specification with project registry
Remove API Client
appdog remove NAME [OPTIONS]
NAME: Application name--frozen: Skip removing application specification from project lock file--sync: Sync application removal with project registry
List API Clients
appdog list [--project PATH]
Show API Client Details
appdog show NAME [--project PATH]
NAME: Application name
Lock API Specifications
appdog lock [OPTIONS]
--force: Overwrite application if it exists with a different URI--upgrade: Overwrite application specification with a different URI
Sync API Clients
appdog sync [OPTIONS]
--force: Overwrite application if it exists with a different URI--frozen: Skip updating application specification in project lock file--upgrade: Force upgrading application specification
Generate MCP Server
appdog mcp [COMMAND] [OPTIONS]
Commands:
install: Install applications in MCP clientrun: Run MCP applications in production modedev: Run MCP applications in development mode with inspector
Each command supports specific options:
Common Options (all commands)
--name,-n: Name of the MCP server (default: "AppDog MCP Server")--force: Overwrite server file if it exists--project,-p: Project directory (defaults to current)--output,-o: Output path for MCP server file
Install Command
appdog mcp install [OPTIONS]
--env-var,-v: Environment variables in KEY=VALUE format--env-file,-f: Environment file with KEY=VALUE pairs--with: Additional packages to install in dev mode--with-editable,-e: Local packages to install in editable mode
Run Command
appdog mcp run [OPTIONS]
--transport,-t: Transport to use for MCP run (stdio or sse)
Dev Command
appdog mcp dev [OPTIONS]
--with: Additional packages to install in dev mode--with-editable,-e: Local packages to install in editable mode
Advanced Usage
Client Configuration
Create a custom apps.yaml to configure your API clients:
petstore:
  uri: https://petstore3.swagger.io/api/v3/openapi.json
  base_url: https://petstore3.swagger.io/api/v3
  include_tags:
    - pet
    - store
Custom Authentication
For MCP usage, see environment variables section
Create a client with custom authentication:
from appdog.petstore import PetstoreClient

# Custom API key
client = PetstoreClient(api_key="YOUR_API_KEY")

# Custom headers
client = PetstoreClient(
    headers={"Authorization": "Bearer YOUR_TOKEN"}
)
Contributing
See CONTRIBUTING.md for information on contributing to the project.
License
This project is licensed under the MIT License - see the LICENSE file for details.
1 maintainer

Metadata
1 maintainer
Release files for appdog 0.1.0
For a detailed explanation of source distributions (sdists) and built distributions (wheels), please see the package formats documentation.
Source distribution (sdist)
| File | Size | Uploaded | |
|---|---|---|---|
| appdog-0.1.0.tar.gz | 104.3 kB | Details |
Built distribution (wheel)
| File | Interpreter | ABI | Platform | Reset |
|---|---|---|---|---|
| appdog-0.1.0-py3-none-any.whl | Python 3 | none | any | Details |
Total release size: 139.4 kB
Release files / appdog-0.1.0.tar.gz
| Download URL | appdog-0.1.0.tar.gz |
|---|---|
| Size | 104.3 kB |
| Tags | Source |
|
SHA-256 checksum How to use checksums |
ad0d08120ac4a1d45cb6966e8bc2ce9af59d6b5ff86fa66a46fe03cb09eaa0cd
|
|
BLAKE2b-256 checksum How to use checksums |
577d2a80c69def4b00597caa0979ba0ef69301a8fff020fc6aee02897d389c36
|
| Upload date | |
|
Uploaded using Trusted Publishing? What is trusted publishing? |
No |
| Uploaded via |
python-httpx/0.27.0
|
Release files / appdog-0.1.0-py3-none-any.whl
| Download URL | appdog-0.1.0-py3-none-any.whl |
|---|---|
| Size | 35.0 kB |
| Tags | Python 3 |
|
SHA-256 checksum How to use checksums |
1ad9051a7681a08c44f030c72f9ff61ead0ef7469d27a4f7f2b0a47d754336b2
|
|
BLAKE2b-256 checksum How to use checksums |
088f89213828478739642cea6bb3e31ecb1227ea1bd79406cd918df4cae7cb78
|
| Upload date | |
|
Uploaded using Trusted Publishing? What is trusted publishing? |
No |
| Uploaded via |
python-httpx/0.27.0
|














