
BioNick
BioNick includes a series of modular functions for the manipulation of Newick strings in python, e.g., extracting leaves, swapping roots, removing node labels, flipping the order of nodes, removing leaves, extracting subtrees, visualizing cladograms with matplotlib visuals, etc. BioNick is also equipped with the ability to represent trees as a collection of node objects and create Neighbor-Joining trees from distance matrices.
If you want new functions, feel free to open an issue.
Install
pip install BioNick
Requirements
Python (tested with 3.9.19)
│
│─── numpy (tested with 2.0.2)
│─── pandas (tested with 2.2.3)
└─── matplotlib (tested with 3.9.4)
Documentation and example use-cases
The current version is designed to work with unrooted trees without node labels. For example, tips A, B, C, D and E will be recognized in the following string:
(A:0.1,B:0.2,(C:0.3,D:0.4)E:0.5)F
But only tips B, C, D and E will be recognized in this one, which is the same tree, but explicitly rooted on A.:
((B:0.2,(C:0.3,D:0.4)E:0.5)F:0.1)A
I ran all my tests without the trailing semi-colon that is conventional in Newick files.
Run import BioNick as bn to load the package.
Load a tree string as wiki_tree = (A:0.1,B:0.2,(C:0.3,D:0.4)E:0.5)F
-
Remove node labels
tree = bn.remove_node_labels(wiki_tree)
All following examples call functions from bn and assume that node labels have been removed.
-
Extract leaves of trees
bn.leaves(tree) -
Extract leaves with branches
bn.leaves_wb(tree) -
Convert to a list of [node, child, branch-length]s
bn.nw_pd(tree) -
Root at taxon (taxon 'C' here for example)
taxon = 'C' bn.root_at(tree, taxon) -
Root at node. Nodes are supposed to be encoded sequentially from 0 starting from the leaves.
node = 5 bn.root_at_node(tree, node) -
Flip all edges
bn.flip_all_edges(tree) -
Flip leaves at an internal node
node = 4 bn.flip_leaves_at_node(tree,node) -
Export all possible rooted trees
bn.all_trees(tree) -
Export nodes with all descendants. Internal nodes begin with a "__" prefix and descendants are stored as a set.
bn.nodes_w_all_descendants(tree) -
Extract subtree. Remove all leaves except those listed. In this example, ['A','B','D'] are kept.
bn.extract_subtree(tree, ['A','B','D']) -
Remove leaf
bn.remmove_leaf(tree, 'A') -
Create Neighbor-Joining tree from distance matrix. Assumes a symmetrical distance matrix. Written over Pandas.
# A test tree from wikipedia test = pd.DataFrame([[0,5,9,9,8],[5,0,10,10,9],[9,10,0,8,7],[9,10,8,0,3],[8,9,7,3,0]]) # Indices and columns must be str objects. A prefix 't' is also added for clarity. test.index = 't'+test.index.astype(str) test.columns = 't'+test.columns.astype(str) # The neighbor-joining function is called. A second function converts the output dataframe to a BioNick tree object. tt = bn.njtr(pd.DataFrame(bn.nj(test.copy(),[]))) # A root must be specified to allow the nodes to being expanding recursively. Tree objects can be rooted using the root_at_node or root_at_tip methods. tt.root_at_node(0) tt.export_nw('','') -
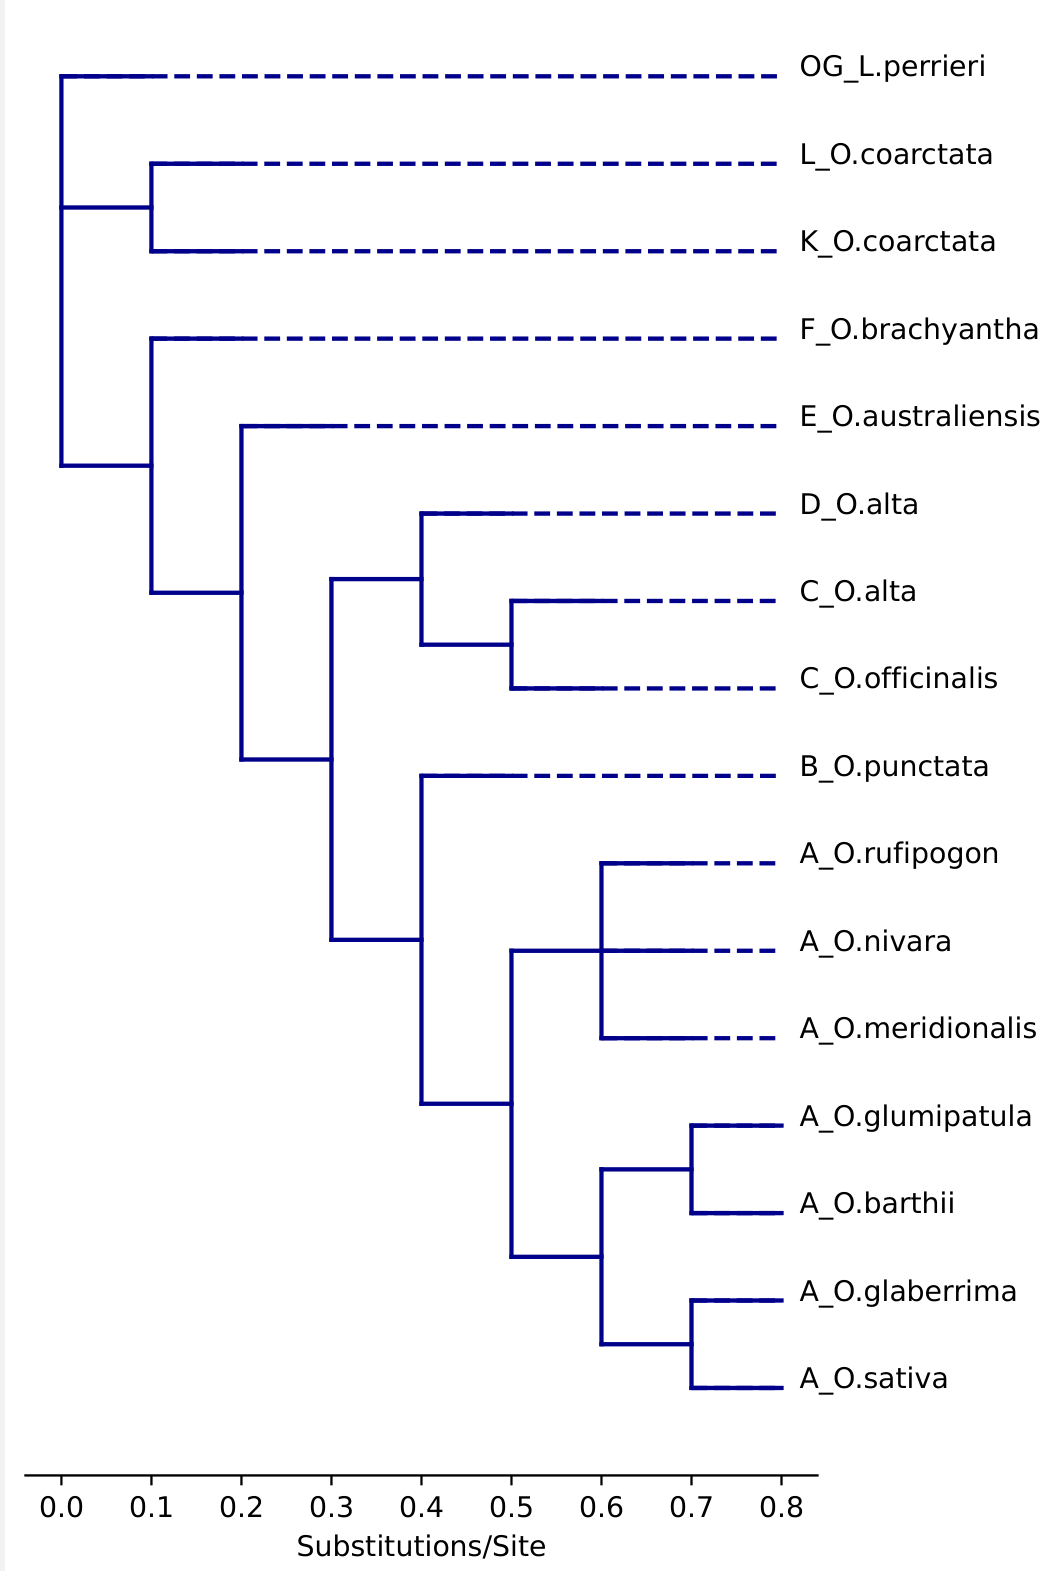
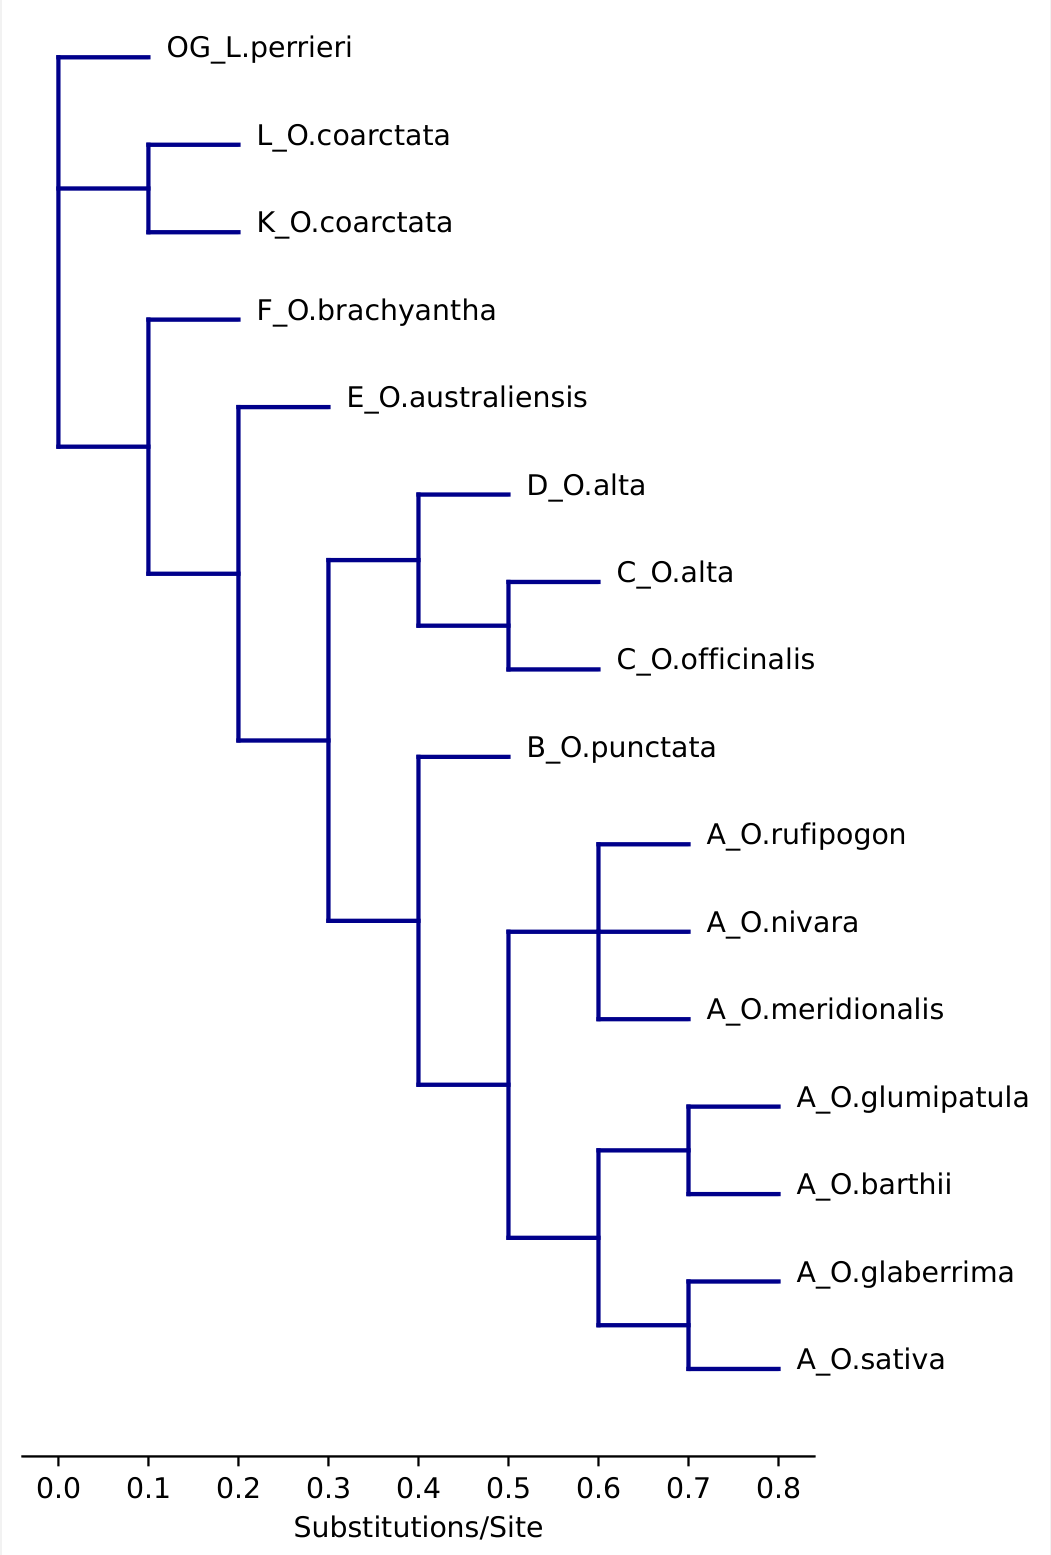
Draw a cladogram. Negative branch lengths are currently not supported and will create messy lines. Dashes and node labels can be specified if needed.
# A phylogeny of the genus Oryza

twn = '((((((((A_O.sativa:0.1,A_O.glaberrima:0.1):0.1,(A_O.barthii:0.1,A_O.glumipatula:0.1):0.1):0.1,(A_O.meridionalis:0.1,A_O.nivara:0.1,A_O.rufipogon:0.1):0.1):0.1,B_O.punctata:0.1):0.1,((C_O.officinalis:0.1,C_O.alta:0.1):0.1,D_O.alta:0.1):0.1):0.1,E_O.australiensis:0.1):0.1,F_O.brachyantha:0.1):0.1,(K_O.coarctata:0.1,L_O.coarctata:0.1):0.1,OG_L.perrieri:0.1)'

# import figure and specify dimensions.
from matplotlib.pyplot import figure
import matplotlib.pyplot as plt
figure(figsize=(max(5,len(bn.leaves(twn))/12), max(10,len(bn.leaves(twn))/5)), dpi=100)

#draw cladogram with dashes and labels
bn.draw_clad(bn.remove_node_labels(twn), dash = True, labels = True)
plt.ylim(-1,len(bn.leaves(twn))+1)
plt.gca().spines[['left','right', 'top']].set_visible(False)
plt.gca().get_yaxis().set_visible(False)
plt.xlabel('Substitutions/Site')
plt.show()

#draw cladogram without dashes.
bn.draw_clad(bn.remove_node_labels(twn), dash = False, labels = True)
plt.ylim(-1,len(bn.leaves(twn))+1)
plt.gca().spines[['left','right', 'top']].set_visible(False)
plt.gca().get_yaxis().set_visible(False)
plt.xlabel('Substitutions/Site')
plt.show()


# Export with the bbox_inches = 'tight' argument to make sure the figure doesn't cut off.
plt.savefig('BioNick_Example_Oryza_with_dashes.pdf', format = 'pdf', bbox_inches='tight')
Example output:
Dashed Not dashed
1 maintainer

Metadata
1 maintainer
Release files for BioNick 0.0.8
For a detailed explanation of source distributions (sdists) and built distributions (wheels), please see the package formats documentation.
Source distribution (sdist)
| File | Size | Uploaded | Provenance | Actions |
|---|---|---|---|---|
| bionick-0.0.8.tar.gz | 13.1 kB | Without provenance | Details for bionick-0.0.8.tar.gz |
Built distribution (wheel)
| File | Interpreter | ABI | Platform | Actions Reset |
|---|---|---|---|---|
| BioNick-0.0.8-py3-none-any.whl | Python 3 | none | any | Details for BioNick-0.0.8-py3-none-any.whl |
Total release size: 27.4 kB
Release files / bionick-0.0.8.tar.gz
| Download URL | bionick-0.0.8.tar.gz |
|---|---|
| Size | 13.1 kB |
| Tags | Source |
|
SHA-256 checksum How to use checksums |
464722d40821e2f89d332fbcaab3f9cd440b8f9375c17a5ff01aa0e4199bee56
|
|
BLAKE2b-256 checksum How to use checksums |
ef4cf103f5d5c9c3dbecd56da73ec040de9598e11417596b854995f156281e98
|
| Upload date | |
|
Uploaded using Trusted Publishing? What is trusted publishing? |
No |
| Uploaded via |
twine/5.1.1 CPython/3.12.3
|
Release files / BioNick-0.0.8-py3-none-any.whl
| Download URL | BioNick-0.0.8-py3-none-any.whl |
|---|---|
| Size | 14.3 kB |
| Tags | Python 3 |
|
SHA-256 checksum How to use checksums |
8c9bb00823af2786ae55b214cf39211d772a54bf58d3b71d5f6735ad3ded2a00
|
|
BLAKE2b-256 checksum How to use checksums |
fd6a0ea7dc9f1144ae717d5fe746dfa49650014352810d1b644d4acbd06fa487
|
| Upload date | |
|
Uploaded using Trusted Publishing? What is trusted publishing? |
No |
| Uploaded via |
twine/5.1.1 CPython/3.12.3
|
Security for BioNick 0.0.8
Provenance
Provenance describes where a file came from. On PyPI, provenance is shared via attestations, which provide a verifiable record of the build or publishing details. View details, limitations and caveats.
No provenance found
None of the files in this release were uploaded with provenance metadata.
A note on package security
PyPI is a repository for distributing packages, not a service for auditing them. While third-party security researchers and our staff do their best to detect and remove malicious packages, PyPI cannot guarantee the quality, security or suitability of any given package.
To learn more about protecting yourself from malicious actors, visit our package security documentation.














