
Bioinformatics Retrieval Augmented Digital (BRAD) Assistant
BRAD is a digital assistant designed to streamline bioinformatics workflows by leveraging the power of Large Language Models (LLMs). Built as a Python package, BRAD integrates computational tools, databases, and scientific literature into a unified system, enabling information retrieval and workflow automation. BRAD supports retrieval-augmented generation (RAG), database integration, executing external codes, and provides flexibility to integrate new tools. BRAD is a Python package and Graphical User Interface, and not dependent on a specific LLM.
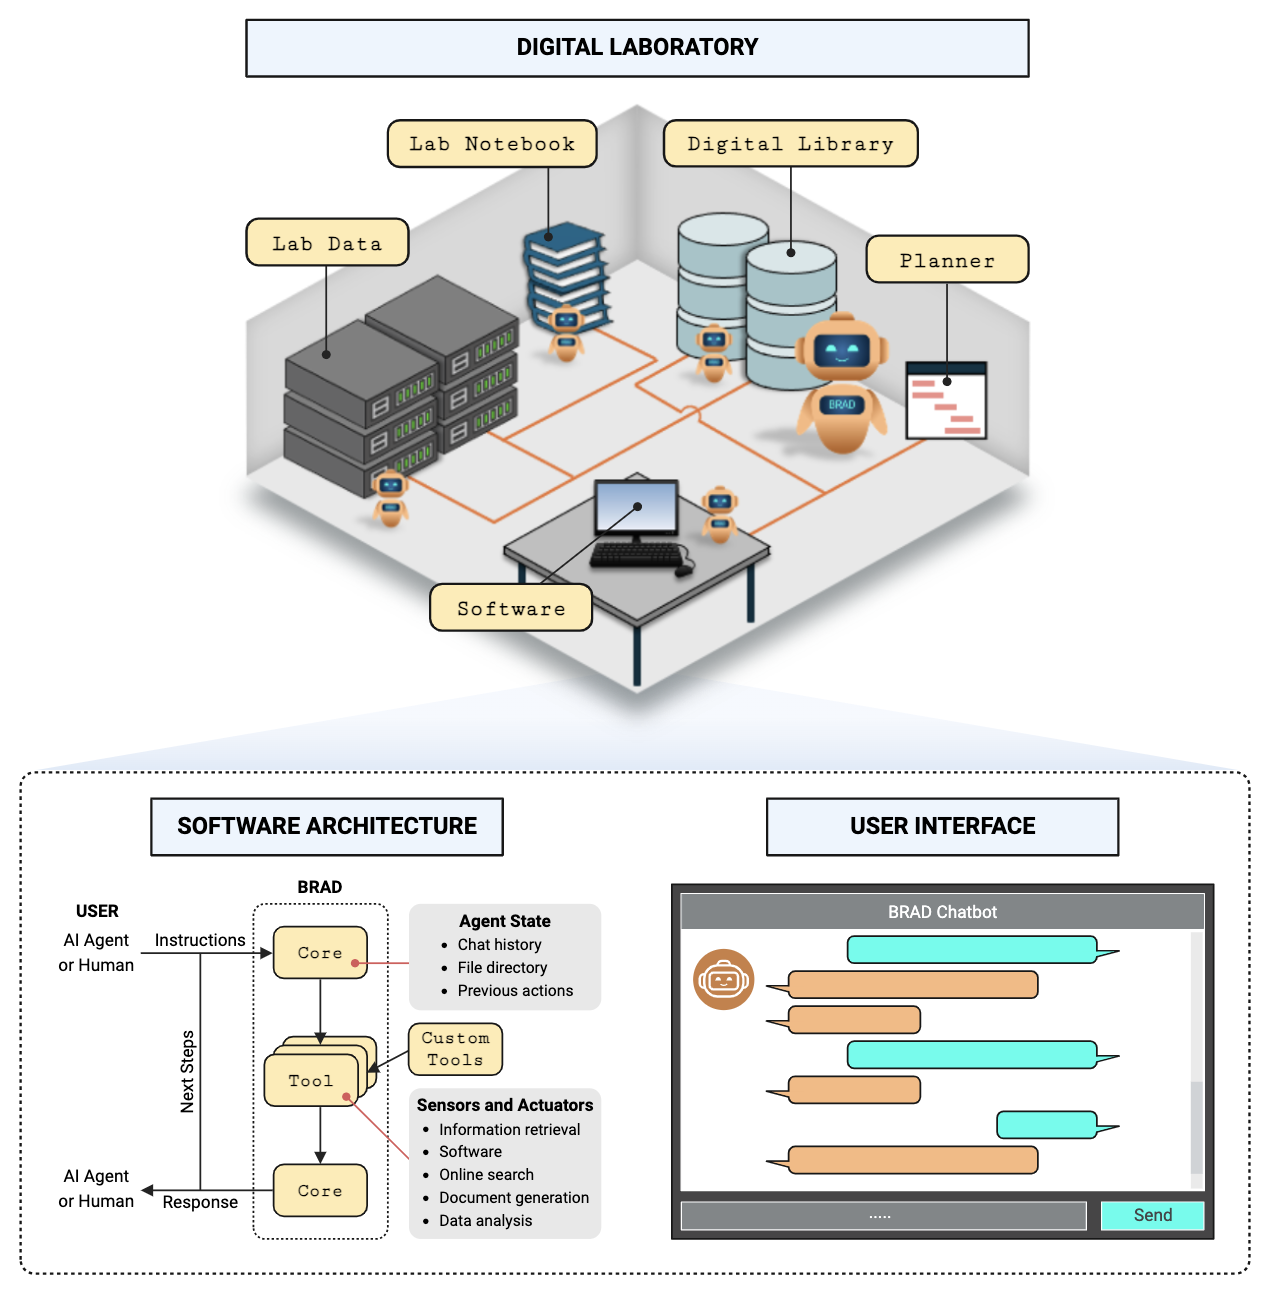
Scope of this README
This README is intended as a quick reference for installing, setting up, and a few examples of the BRAD software. For additional information about this project, see the main page available here and for implementation and configuration details regarding how the software works, consult the software manual here.
System Requirements:
Any machine capable of running Docker should be able to run BRAD. This includes Windows, MAC, and Linux machines. BRAD was tested on the following operating systems:
- Windows 11 Enterprise, 22H2
- Ubuntu 22.04.4 LTS
- and several others
The GUI does not have significant compute requirements, and has been tested on systems with 16 GB of RAM. If a user installs the Python version or the development version of BRAD, the software dependencies can be installed from the below instructions. If a user wishes to run BRAD while running LLM inference locally, the user will require sufficient hardware and compute resources to run the LLM, separate from the dependencies of BRAD. The full list of softare dependencies used throughout this repository can be found here.
Quickstart
BRAD can be installed either as a Python package or through Docker. Follow the instructions below to get started.
Python Instillation
Brad can be installed directly from pip:
pip install -U BRAD-Chat
Python Quickstart
Once installed, you can verify the instillation worked with the following import:
from BRAD import agent
See the examples below for how to being using the package or the software manual for documentation of the installed package.
Docker Instillation
Download and install docker desktop and follow the instructions. Click on download docker and double click the .exe file on windows or .dmg file on mac to start the installation. You will have to restart the system to get docker desktop running.
Once installed, pull the latest BRAD docker image with the command:
docker pull thedoodler/brad:main
This will download the BRAD container image and prepare it for deployment. This instillation should take several minutes.
Docker Turn on
Start the BRAD container using the following command:
docker run -e OPENAI_API_KEY=<YOUR_OPENAI_API_KEY> \
           -e PYDANTIC_SKIP_VALIDATING_CORE_SCHEMAS='True' \
           -p 5002:5000 -p 3000:3000 \
           thedoodler/brad:main
Note: You may need to adjust how environment variables are specified to match your terminal's expectations.
Replace <YOUR_OPENAI_API_KEY> with your OpenAI API key. If using LLMs hosted by NVIDIA, you can include the NVIDIA API key as well:
docker run -e OPENAI_API_KEY=<YOUR_OPENAI_API_KEY> \
           -e NVIDIA_API_KEY=<YOUR_NVIDIA_API_KEY> \
           -e PYDANTIC_SKIP_VALIDATING_CORE_SCHEMAS='True' \
           -p 5002:5000 -p 3000:3000 \
           thedoodler/brad:main
Once the container is running, open your browser and navigate to http://localhost:3000 to access the BRAD GUI.
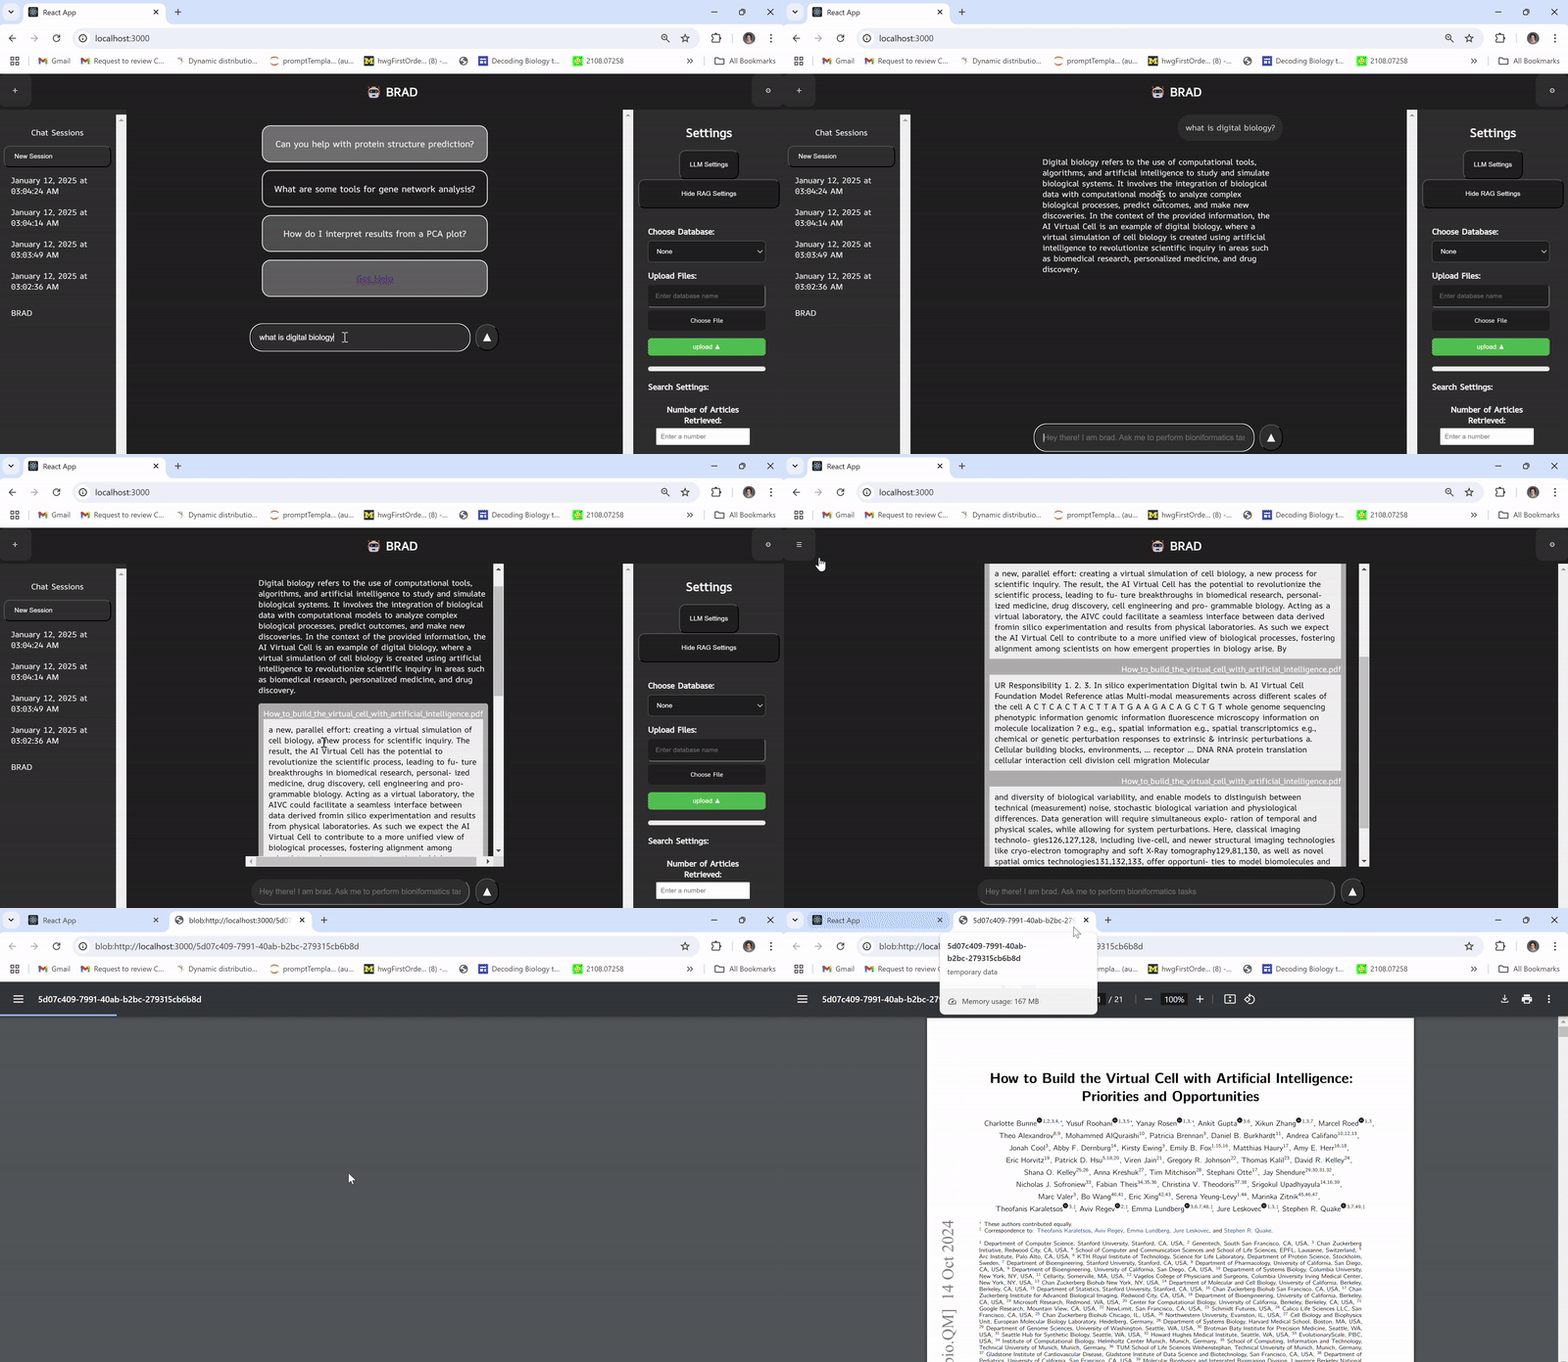
BRAD-Examples
-
GUI Tutorial
A simple tutorial for how to set up and use BRAD's Graphical User Interface. -
Hello World
A simple "Hello, World!" example to help you understand the basics of using the BRAD chatbot. -
Search and Retrieval-Augmented Generation (RAG)
Demonstrates how to use BRAD to scrape online data and integrate it into a Retrieval-Augmented Generation pipeline. -
Using the Scanpy Package with BRAD
Explores how BRAD can streamline workflows involving Scanpy, including preprocessing and visualization of single-cell data. -
Biomarker Selection Pipeline
Illustrates how BRAD can assist in selecting biomarkers from datasets using machine learning and bioinformatics tools. -
Video RAG BRAD operates as a RAG with a video database to interact with the past decade of Michigan Bioinformatics seminars
https://github.com/user-attachments/assets/293d7bf0-5e6b-4bcb-b62b-e4b8fd17e65f
Development Environment and Software Requirements
To contribute or modify BRAD, you need to set up a development environment. Follow the detailed instructions below for both Python and GUI development.
Python Development Environment
- Clone the Repository
Download the BRAD repository from GitHub:
git clone https://github.com/Jpickard1/BRAD.git
cd BRAD
- Configure Settings
Update the configuration file located at./BRAD/config/config.jsonto match your preferences. Specifically, update thelog_pathkey to point to a directory on your local system for storing logs.
"log_path": "/usr/src/brad/logs", // Replace this line
- Set up Python Environment (optional)
Ensure Python 3.8 or higher is installed. For better isolation and to avoid dependency conflicts, use Conda to create a separate environment:
conda create -n brad-dev
conda activate brad-dev
Our recommendation is to use a self managed conda environment.
environment.ymlprovides a template to build the environment, but package management may depend on different software requirements for new tools being integrated to BRAD.
- Install Python Requirements
Install all dependencies using the provided requirements file:
pip install -r requirements_frozen.txt
If additional dependencies are needed during development, remember to update this file after installation.
Note: This will install the requirements associated only with the Python package. It will not install the full set of software dependencies, which can be found here.
GUI Development
Follow these instructions to install the development version of BRAD's GUI:
- Install NPM and Node.js
BRAD's GUI requires Node.js version 20.18.0 and npm version 10.8.2. You can install these either:- Directly from the Node.js website
- Or using nvm (recommended for managing multiple Node.js versions):
curl -o- https://raw.githubusercontent.com/creationix/nvm/master/install.sh | bash
source ~/.nvm/nvm.sh
nvm install 20.18.0
nvm use 20.18.0
Our recommendation is to use nvm:
https://raw.githubusercontent.com/creationix/nvm/master/install.sh | bash
source ~/.nvm/nvm.sh \
nvm install 20.18.0 \
nvm use 20.18.0
- Install GUI Dependencies
Navigate to the frontend directory and install required packages:
npm install --prefix ./brad-chat
- Start the Backend
Start BRAD backend with:
PYDANTIC_SKIP_VALIDATING_CORE_SCHEMAS=True \
OPENAI_API_KEY=<your_openai_api_key> \
NVIDIA_API_KEY=<your_nvidia_api_key> \            (optional)
flask --app app run --host=0.0.0.0 --port=5000
- Start the Frontend
Start BRAD frontend with
cd brad-chat
npm start
- Access BRAD
The above process will start BRAD with:
- Flask server at
http://localhost:3000 - GUI at
http://localhost:5000
Open a browser and navigate to http://localhost:5000 to view the GUI.
Docker
The Docker build can be used to deploy brad without having to install packages manually. After installing either docker desktop or docker engine docker intsallation, you can follow one of the following commands to install and run BRAD
- Use with docker compose:
cd deployment
docker compose up -d
- OR with just docker
docker run -e OPENAI_API_KEY=your_open_ai_key -e PYDANTIC_SKIP_VALIDATING_CORE_SCHEMAS='True' -p 5001:5000 -p 3000:3000 brad:full_frontend
- To build the dockerfile yourself:
docker build -t brad:local .
Then proceed to http://localhost:3000 to view the frontend
Documentation
To build the projects documentation in the ReadTheDocs html formatting, in the docs/ directory, run the command make html. This will populate the docs/build/html directory with the webpages. The docs/build/ directory is excluded from git but will automatically be built when pushing to main.
To remove the documentation from docs/build/ run make clean from the same directory where you built it.
Cite Us
@article{pickard2024language,
  title={Language Model Powered Digital Biology with BRAD},
  author={Pickard, Joshua and Prakash, Ram and Choi, Marc Andrew and Oliven, Natalie and
          Stansbury, Cooper and Cwycyshyn, Jillian
          and Gorodetsky, Alex and Velasquez, Alvaro and Rajapakse, Indika},
  journal={arXiv preprint arXiv:2409.02864},
  url={https://arxiv.org/abs/2409.02864},
  year={2024}
}
1 maintainer

Metadata
1 maintainer
Release files for BRAD-Agent 0.1.34
For a detailed explanation of source distributions (sdists) and built distributions (wheels), please see the package formats documentation.
Source distribution (sdist)
| File | Size | Uploaded | |
|---|---|---|---|
| brad_agent-0.1.34.tar.gz | 249.4 kB | Details |
Built distribution (wheel)
| File | Interpreter | ABI | Platform | Reset |
|---|---|---|---|---|
| brad_agent-0.1.34-py3-none-any.whl | Python 3 | none | any | Details |
Total release size: 510.9 kB
Release files / brad_agent-0.1.34.tar.gz
| Download URL | brad_agent-0.1.34.tar.gz |
|---|---|
| Size | 249.4 kB |
| Tags | Source |
|
SHA-256 checksum How to use checksums |
4f7fb1b1419051cfe334441e581cfa59aa6a886c3e30cab60470f998daccc729
|
|
BLAKE2b-256 checksum How to use checksums |
4e4fa860ffd4787158374d17866677d0d890ff6c0f64fbdea7d5bb147e434bf2
|
| Upload date | |
|
Uploaded using Trusted Publishing? What is trusted publishing? |
Yes |
| Uploaded via |
twine/6.0.1 CPython/3.12.8
|
Provenance
Provenance describes where a file came from. On PyPI, provenance is shared via attestations, which provide a verifiable record of the build or publishing details. View details, limitations and caveats.


PyPI Publish Attestation
PyPI verified that this artifact, at this checksum, originated from the publisher listed below.
Signed by GitHub Actions, verified by PyPI on Feb 4, 2025.
Transparency logRelease files / brad_agent-0.1.34-py3-none-any.whl
| Download URL | brad_agent-0.1.34-py3-none-any.whl |
|---|---|
| Size | 261.5 kB |
| Tags | Python 3 |
|
SHA-256 checksum How to use checksums |
d63826063c99a400b55624e55029f51865d4b72d2cd8dde9059a4e9e99b65645
|
|
BLAKE2b-256 checksum How to use checksums |
643b4427436cb3cbad67c3db9e7361880027ef659d17cbf87beea6e0254c1995
|
| Upload date | |
|
Uploaded using Trusted Publishing? What is trusted publishing? |
Yes |
| Uploaded via |
twine/6.0.1 CPython/3.12.8
|
Provenance
Provenance describes where a file came from. On PyPI, provenance is shared via attestations, which provide a verifiable record of the build or publishing details. View details, limitations and caveats.
PyPI Publish Attestation
PyPI verified that this artifact, at this checksum, originated from the publisher listed below.
Signed by GitHub Actions, verified by PyPI on Feb 4, 2025.
Transparency log













