An automated call attendant and call blocker using a Raspberry Pi and USR-5637 modem
Project description
Call Attendant


pip install callattendant
The Call Attendant (callattendant) is an auto attendant with call blocking and voice messaging features running on a Raspberry Pi. It stops annoying robocalls and spammers from interrupting your life. Let the Call Attendant intercept and block robocallers and telemarketers before the first ring on your landline.
If you're at all interested in this project, please provide some feedback by giving it a star, or even better, get involved by filing issues and/or pull requests. Thanks!
Table of Contents
Overview
The Call Attendant (callattendant) is a python-based, automated call attendant that runs on a lightweight Raspberry Pi, or other Linux-based system, coupled with a US Robotics 5637 USB modem.
How it works
The Raspberry Pi and modem are connected to your home phone system in parallel with your phone handset(s). When an incoming call is received, the call goes to both your phone and the callattendant. During the period of the first ring the callattendant analyzes the caller ID, and based on your configuration, determines if the call should be blocked or allowed. Blocked calls can be simply hung up on, or routed to the voice message system. Calls that are allowed will simply ring your home phone like normal. All calls can be sent to a voice mail system if you choose. The callattendant's filtering mechanisms include an online lookup service, a permitted number list, a blocked number list and pattern matching on the caller's number and/or name.
Features include:
- A call blocker that intercepts robocallers and blocked numbers at or before the first ring
- Permitted numbers pass straight through to the local phone system for normal call ringing and answering
- Visual indicators to show whether the incoming call is from a permitted, blocked, or unknown number
- Call details, permitted numbers, and blocked numbers are available in a web-based user interface
- Calls can be handled by a voice messaging system that optioanlly requires human interaction, e.g, "Press 1 to leave a message"
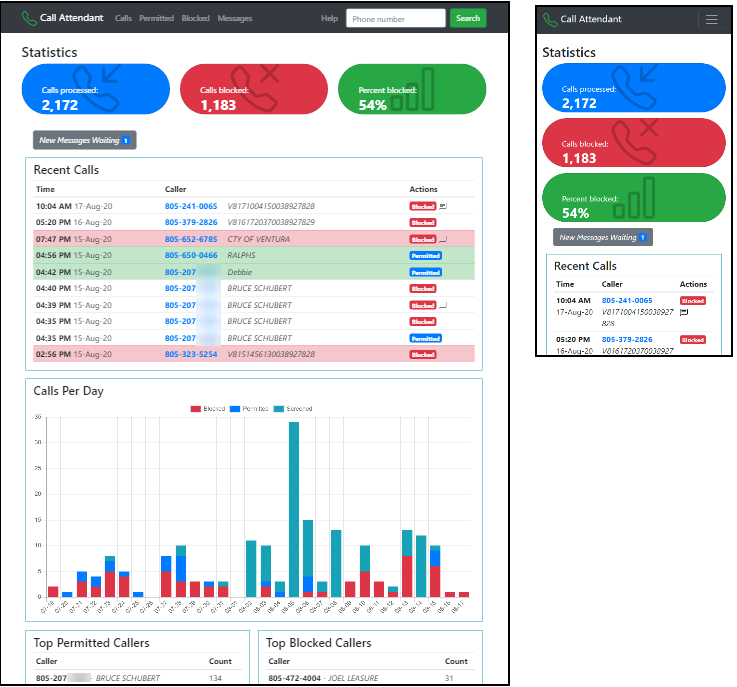
You can review call history, voice messages, permitted and blocked numbers, and performing caller management through the Call Attendant's web interface. Here is an example of the home page with metrics and a convienient list of recent calls. For a complete description see the User Guide.
Screenshots of the home page as seen on an IPad Pro and a Pixel 2 phone
Documentation
The project wiki on GitHub contains the documentation for the Call Attendant:
- See the Wiki Home for complete installation, configuration, and operation instructions.
- See the User Guide section for the web interface instructions.
- The Developer Guide section describes the software architecture and software development plan, and shows you how to setup your software development environment.
- The Advanced section addresses more complex setups and situations. For instance, Running as a Service.
Hardware Requirements
The callattendant uses the following hardware:
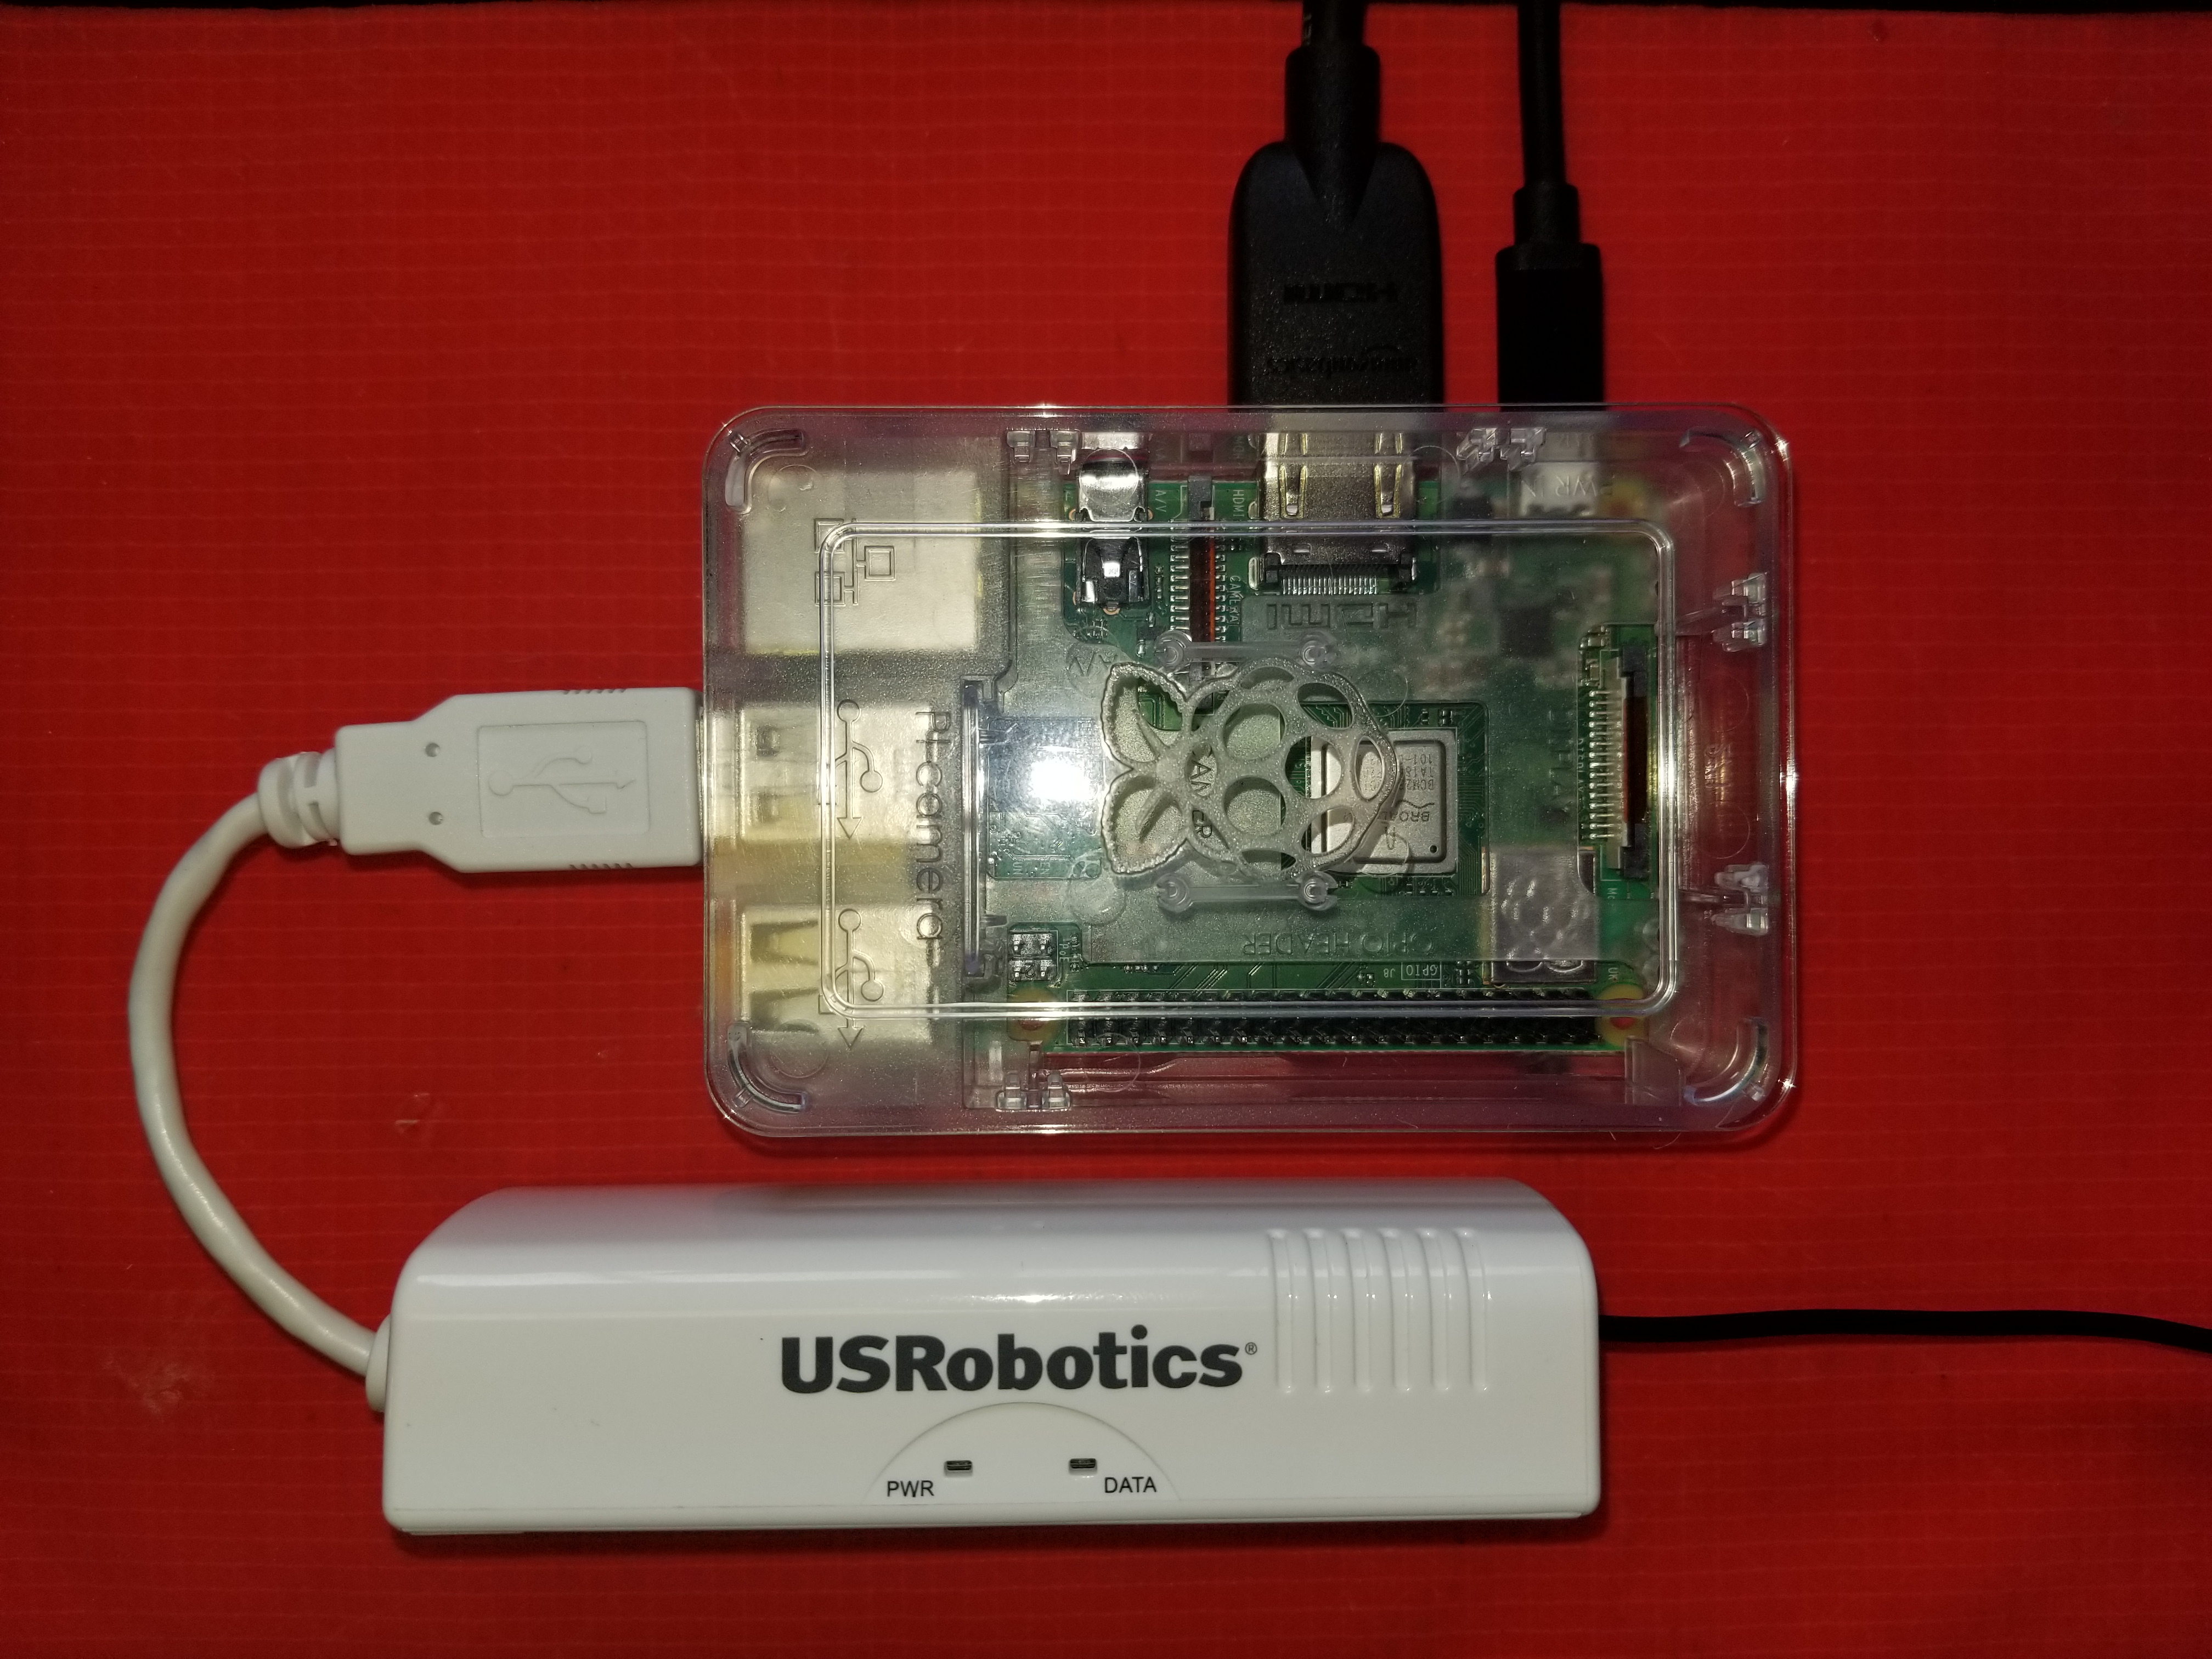
- Raspberry Pi 3B+ or better
- US Robotics 5637 Modem
Photo of the required hardware: a Raspberry Pi 3B+ and USR5637 modem
Quick Start
Hardware
You will need a Raspberry Pi running Raspbian or better with access to the Internet for the software installation, and ultimately for the the online robocaller lookups. For the project, you will need a modem of some sort to do the telephony communications. The U.S. Robotics USR5637 56K USB Modem has been proven effective. For some installs, it just works, no config needed. It showed up as /dev/ttyACM0.
Software
The installation calls for Python3.X.
Setup a Virtual Environment
Optional
The following instructions create and activate a virtual environment named venv within the current folder:
# Install virtualenv - if not installed
sudo apt install virtualenv

# Create the virtual environment
virtualenv venv --python=python3

# Activate it
source venv/bin/activate
Now you're operating with a virtual Python. To check, issue the which command and ensure the
output points to your virtual environment; and also check the Python version:
$ which python
/home/pi/venv/bin/python

$ python --version
Python 3.7.3
Later, when you install the callattendant software, it will be placed within the virtual environment
folder (under lib/python3.x/site-packages to be exact). The virtual environment, when activated, alters
your PATH so that the system looks for python and its packages within this folder hierarchy.
Install the Software
The software is available on PyPI. Install and update using pip:
# Using the virtual environment you use "pip" to install the software
pip install callattendant

# You must use "pip3" on the Pi if your not using a virtual environment
pip3 install callattendant
If your not using the virtual environment, you may need to reboot or logoff/login to update the
$PATH for your profile in order to find and use the callattendant command.
Operation
The callattendant package includes a callattendant command to start the system. Run this command
the first time with the --create-folder option to create the initial data and files in the default
data folder: ~/.callattendant. This is a hidden folder off the root of your home directory. You
can override this location with the --data-path option.
Usage: callattendant --config [FILE] --data-path [FOLDER]
Options:
-c, --config [FILE]       load a python configuration file
-d, --data-path [FOLDER]  path to data and configuration files
-f, --create-folder       create the data-path folder if it does not exist
-h, --help                displays this help text
# Creating the default data folder with the default configuration
callattendant --create-folder

# Using the default configuration
callattendant

# Using a customized config file in an alternate, existing location
callattendant --config myapp.cfg --data-path /var/lib/callattendant
You should see output of the form:
[Configuration]
  BLOCKED_ACTIONS = ('greeting',)
  BLOCKED_GREETING_FILE = resources/blocked_greeting.wav
  BLOCKED_RINGS_BEFORE_ANSWER = 0
  BLOCK_ENABLED = True
  BLOCK_NAME_PATTERNS = {'V[0-9]{15}': 'Telemarketer Caller ID'}
  BLOCK_NUMBER_PATTERNS = {}
  DATABASE = data/callattendant.db
  DEBUG = False
  ENV = production
  PERMITTED_ACTIONS = ()
  PERMITTED_GREETING_FILE = resources/general_greeting.wav
  PERMITTED_RINGS_BEFORE_ANSWER = 4
  ROOT_PATH = /home/pi/src/callattendant/callattendant
  SCREENED_ACTIONS = ('greeting', 'record_message')
  SCREENED_GREETING_FILE = resources/general_greeting.wav
  SCREENED_RINGS_BEFORE_ANSWER = 0
  SCREENING_MODE = ('whitelist', 'blacklist')
  TESTING = False
  VOICE_MAIL_GOODBYE_FILE = resources/goodbye.wav
  VOICE_MAIL_GREETING_FILE = resources/general_greeting.wav
  VOICE_MAIL_INVALID_RESPONSE_FILE = resources/invalid_response.wav
  VOICE_MAIL_LEAVE_MESSAGE_FILE = resources/please_leave_message.wav
  VOICE_MAIL_MENU_FILE = resources/voice_mail_menu.wav
  VOICE_MAIL_MESSAGE_FOLDER = data/messages
{MSG LED OFF}
Staring the Flask webapp
Running Flask webapp
 * Serving Flask app "userinterface.webapp" (lazy loading)
 * Environment: production
   WARNING: This is a development server. Do not use it in a production deployment.
   Use a production WSGI server instead.
 * Debug mode: off
Modem COM Port is: /dev/ttyACM0
Make a few calls to yourself to test the service. The standard output will show the
progress of the calls. Then navigate to http://<pi-address>|<pi-hostname>:5000 in a
web browser to checkout the web interface.
Press ctrl-c a couple of times to exit the system
Web Interface
URL: http://<pi-address>|<pi-hostname>:5000
To view the web interface, simply point your web browser to port 5000 on your Raspberry Pi.
For example, in your Raspberry Pi's browser, you can use:
http://localhost:5000/
See the User Guide for more information.
Configuration
The Call Attendant's behavior can be controlled by a configuration file. To override the default
configuration, open the the ~/.callattenant/app.cfg and edit its contents.
nano ~/.callattendant/app.cfg
Then specify the configuration file and path on the command line, e.g.:
callattendant --config app.cfg
See the Configuration section in the project's wiki for more information.
Project details
Release history Release notifications | RSS feed
Download files
Download the file for your platform. If you're not sure which to choose, learn more about installing packages.
Source Distribution
Built Distribution
Hashes for callattendant-1.0.0-py3-none-any.whl
| Algorithm | Hash digest | |
|---|---|---|
| SHA256 | e7f8a8e2c0eb39997e2d5968a4f6ba138e6bcc508bb8228ca35e6c2b39ec8846 |
|
| MD5 | d879a6132c8b20cd8b49ed2c4e8f8c73 |
|
| BLAKE2b-256 | e4076a7c376a61eb8014c980d10f20b00635938943850ddc42d261ce622ff5d3 |


