
Datacube Open Web Services






Datacube-OWS provides a way to serve data indexed in an Open Data Cube as visualisations, through open web services (OGC WMS, WMTS and WCS).
Free software: Apache Software License 2.0
Documentation: https://datacube-ows.readthedocs.io.
Features
Leverages the power of the Open Data Cube, including support for COGs on S3.
Fully supports WMS v1.3.0. Partial support (GetMap requests only) for v1.1.1.
Supports WMTS 1.0.0
Supports WCS versions 1.0.0, 2.0.0 and 2.1.0.
Richly featured styling engine for serving data visualisations via WMS and WMTS.
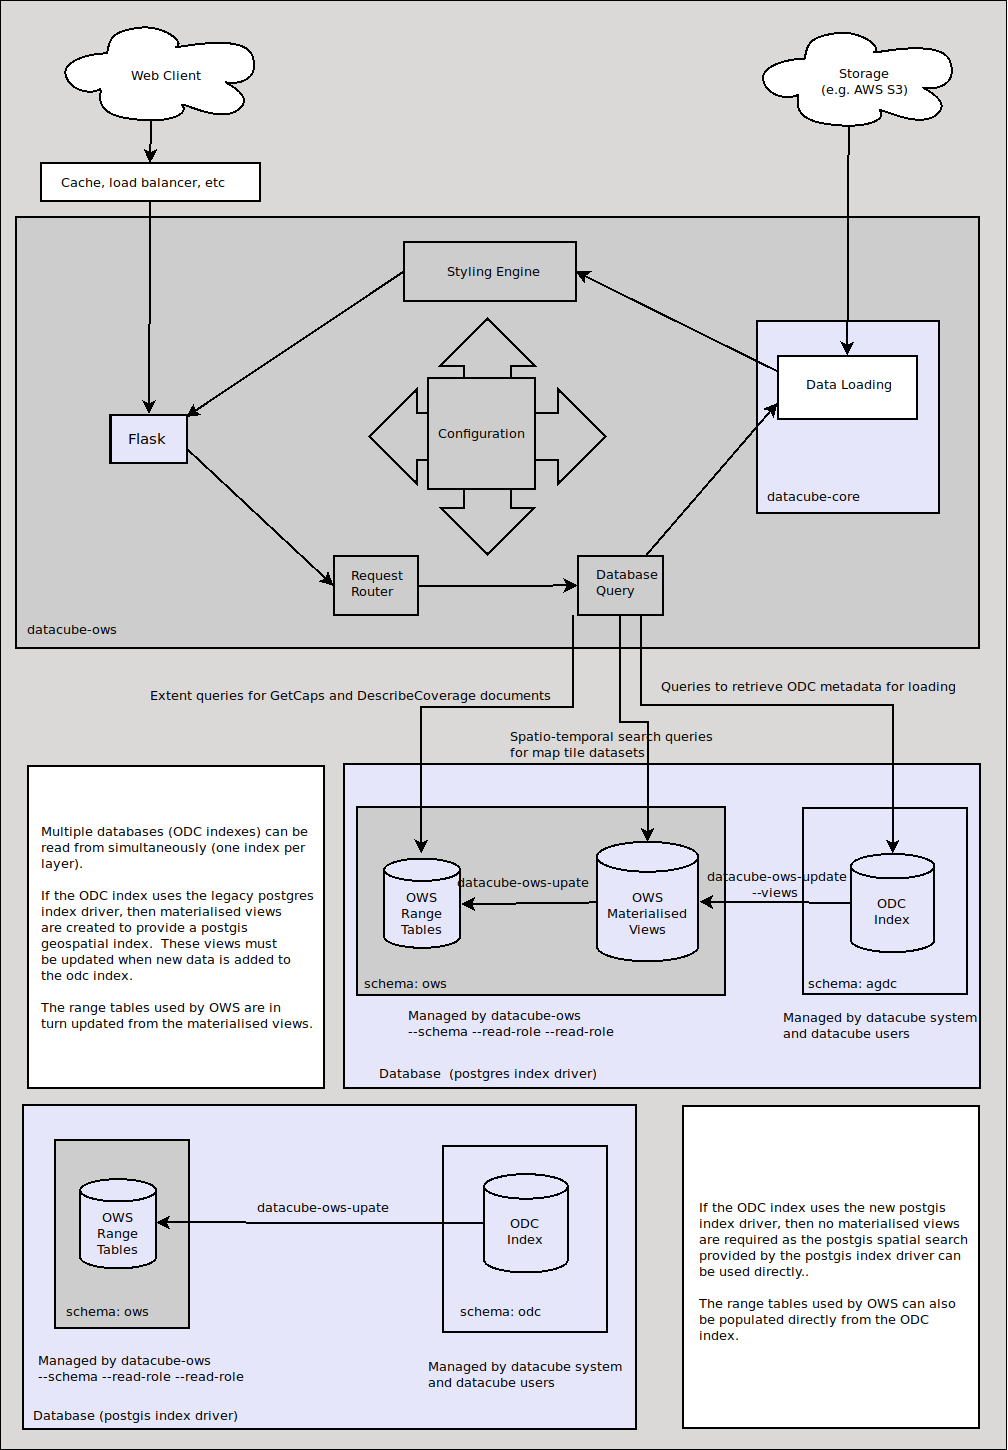
System Architecture
Known CRS Limitations
ODC datasets with WKT-format CRSs will not work with OWS - data from such datasets will never be displayed. OWS currently only works with EPSG format CRSs.
Datasets that straddle the anti-meridian or the north or south polar region will cause issues with the legacy postgres driver.
These are fundamental limitation of the way OWS works with the postgres ODC index driver. These limitations are addressed in v1.9.0, but only for the new ODC postgis index driver.
Note for Developers
This repository is currently running the TypeChangeBot as part of an academic research project. Developers making changes to type hints will be prompted to fill out a short survey about the reasons for the annotation changes. Participation is voluntary. More information about the project can be found here
Community
This project welcomes community participation.
Join the ODC Discord if you need help setting up or using this project, or the Open Data Cube more generally.
Please help us to keep the Open Data Cube community open and inclusive by reading and following our Code of Conduct.
Setup
Datacube_ows (and datacube_core itself) has many complex dependencies on particular versions of geospatial libraries. Dependency conflicts are almost unavoidable in environments that also contain other large complex geospatial software packages. We therefore strongly recommend some kind of containerised solution and we supply scripts for building appropriate Docker containers.
Linting
ruff check
isort --check --diff **/*.py
Configuration and Environment
The configuration file format for OWS is fully documented here.
And example configuration file datacube_ows/ows_cfg_example.py is also provided, but may not be as up-to-date as the formal documentation.
Environment variables that directly or indirectly affect the running of OWS are documented here.
Docker-Compose
setup env by export
We use docker compose to make development and testing of the containerised ows images easier.
Set up your environment by creating a .env file (see below).
To start OWS with flask connected to a pre-existing database on your local machine:
docker compose up
The first time you run docker-compose, you will need to add the –build option:
docker compose up --build
To start ows with a pre-indexed database:
docker compose -f docker-compose.yaml -f docker-compose.db.yaml up
To start ows with db and flask (development):
docker compose -f docker-compose.yaml -f docker-compose.override.yaml -f docker-compose.db.yaml up
To start ows with db and gunicorn instead of flask (production):
docker compose -f docker-compose.yaml -f docker-compose.db.yaml up
The default environment variables (in .env file) can be overriden by setting local environment variables:
# Enable pydev for pycharm (needs rebuild to install python libs)
# hot reload is not supported, so we need to set FLASK_DEV to production
export PYDEV_DEBUG=yes
export FLASK_DEV=production
docker compose -f docker-compose.yaml -f docker-compose.db.yaml up --build
setup env with .env file
cp .env_simple .env # for a single ows config file setup
cp .env_ows_root .env # for multi-file ows config with ows_root_cfg.py
docker compose up
Docker
To run the standard Docker image, create a docker volume containing your ows config files and use something like:
docker build --tag=name_of_built_container .

docker run --rm \
      -e DATACUBE_OWS_CFG=datacube_ows.config.test_cfg.ows_cfg   # Location of config object
      -e AWS_NO_SIGN_REQUEST=yes                                 # Allowing access to AWS S3 buckets
      -e AWS_DEFAULT_REGION=ap-southeast-2 \                     # AWS Default Region (supply even if NOT accessing files on S3! See Issue #151)
      -e SENTRY_DSN=https://key@sentry.local/projid \            # Key for Sentry logging (optional)
      \ # Database connection URL: postgresql://<username>:<password>@<hostname>:<port>/<database>
      -e ODC_DEFAULT_DB_URL=postgresql://myuser:mypassword@172.17.0.1:35434/mydb \
      -e PYTHONPATH=/code                                        # The default PATH is under env, change this to target /code
      -p 8080:8000 \                                             # Publish the gunicorn port (8000) on the Docker
      \                                                          # container at port 8008 on the host machine.
      --mount source=test_cfg,target=/code/datacube_ows/config \ # Mount the docker volume where the config lives
      name_of_built_container
The image is based on the standard ODC container and an external database
Installation with Conda
The following instructions are for installing on a clean Linux system.
Create and activate a Python 3.10 Conda environment:
conda create -n ows -c conda-forge python=3.10 datacube pre_commit postgis
conda activate ows
Install the latest release using pip install:
pip install datacube-ows[all]
Initialise and run PostgreSQL:
pgdata=$(pwd)/.dbdata
initdb -D ${pgdata} --auth-host=md5 --encoding=UTF8 --username=ubuntu
pg_ctl -D ${pgdata} -l "${pgdata}/pg.log" start # if this step fails, check log in ${pgdata}/pg.log

createdb ows -U ubuntu
Enable the PostGIS extension:
psql -d ows
create extension postgis;
\q
Initialise the Datacube and OWS schemas:
export ODC_DEFAULT_DB_URL=postgresql:///ows
datacube system init

# to create schema, tables and materialised views used by datacube-ows.

export DATACUBE_OWS_CFG=datacube_ows.ows_cfg_example.ows_cfg
datacube-ows-update ubuntu --schema

# If you are not using the `default` ODC environment, you can specify the environment to create the schema in:

datacube-ows-update -E myenv --write-role ubuntu --schema
Create a configuration file for your service, and all data products you wish to publish in it. Detailed documentation of the configuration format can be found here.
Set environment variables as required. Environment variables that directly or indirectly affect the running of OWS are documented here.
Run datacube-ows-update (in the Datacube virtual environment).
When additional datasets are added to the datacube, the following steps will need to be run:
# Update the materialised views (postgis index driver only - can be skipped for the postgis index driver):
datacube-ows-update --views
# Update the range tables (both index drivers)
datacube-ows-update
If you are accessing data on AWS S3 and running datacube_ows on Ubuntu you may encounter errors with GetMap similar to: Unexpected server error: '/vsis3/bucket/path/image.tif' not recognized as a supported file format.. If this occurs run the following commands:
mkdir -p /etc/pki/tls/certs
ln -s /etc/ssl/certs/ca-certificates.crt /etc/pki/tls/certs/ca-bundle.crt
Launch the flask app using your favorite WSGI server. We recommend using Gunicorn with either Nginx or a load balancer.
The following approaches have also been tested:
Flask Dev Server
Good for initial dev work and testing. Not (remotely) suitable for production deployments.
cd to the directory containing this README file.
Set the FLASK_APP environment variable:
export FLASK_APP=datacube_ows/ogc.py
Run the Flask dev server:
flask run
If you want the dev server to listen to external requests (i.e. requests from other computers), use the –host option:
flask run --host=0.0.0.0
Local Postgres database
create an empty database and db_user
run datacube system init after creating a datacube config file
A product added to your datacube datacube product add url some examples are here: https://github.com/GeoscienceAustralia/dea-config/tree/master/products
Index datasets into your product for example refer to https://datacube-ows.readthedocs.io/en/latest/usage.html
aws s3 ls s3://deafrica-data/jaxa/alos_palsar_mosaic/2017/ --recursive \
| grep yaml | awk '{print $4}' \
| xargs -n1 -I {} datacube dataset add s3://deafrica-data/{}
Write an ows config file to identify the products you want available in ows, see example here: https://github.com/opendatacube/datacube-ows/blob/master/datacube_ows/ows_cfg_example.py
Run datacube-ows-update --schema --read-role <db_read_role> --write-role <db_write_role> as a database superuser role to create ows specific tables and views
Run datacube-ows-update as db_write_role to populate ows extent tables.
Apache2 mod_wsgi
Getting things working with Apache2 mod_wsgi is not trivial and probably not the best approach in most circumstances, but it may make sense for you.
If you use the pip install approach described above, your OS’s pre-packaged python3 apache2-mod-wsgi package should suffice.
Activate the wsgi module:
cd /etc/apache2/mods-enabled
ln -s ../mods-available/wsgi.load .
ln -s ../mods-available/wsgi.conf .
Add the following to your Apache config (inside the appropriate VirtualHost section):
WSGIDaemonProcess datacube_ows processes=20 threads=1 user=uuu group=ggg maximum-requests=10000
WSGIScriptAlias /datacube_ows /path/to/source_code/datacube-ows/datacube_ows/wsgi.py
<Location /datacube_ows>
        WSGIProcessGroup datacube_ows
</Location>
<Directory /path/to/source_code/datacube-ows/datacube_ows>
        <Files wsgi.py>
                AllowOverride None
                Require all granted
        </Files>
</Directory>
Note that uuu and ggg above are the user and group of the owner of the Conda virtual environment.
Copy datacube_ows/wsgi.py to datacube_odc/local_wsgi.py and edit to suit your system.
Update the url in the configuration
Credits
This package was created with Cookiecutter and the audreyr/cookiecutter-pypackage project template.
2 maintainers


Metadata
2 maintainers
Release files for datacube-ows 1.9.19
For a detailed explanation of source distributions (sdists) and built distributions (wheels), please see the package formats documentation.
Source distribution (sdist)
| File | Size | Uploaded | Provenance | |
|---|---|---|---|---|
| datacube_ows-1.9.19.tar.gz | 762.4 kB | With provenance | Details |
Built distribution (wheel)
| File | Interpreter | ABI | Platform | Reset |
|---|---|---|---|---|
| datacube_ows-1.9.19-py3-none-any.whl | Python 3 | none | any | Details |
Total release size: 979.7 kB
Release files / datacube_ows-1.9.19.tar.gz
| Download URL | datacube_ows-1.9.19.tar.gz |
|---|---|
| Size | 762.4 kB |
| Tags | Source |
|
SHA-256 checksum How to use checksums |
8ee8fe85f4ca4cce292543aa7c434014afaf54efc29e6679f461b0a969a6c452
|
|
BLAKE2b-256 checksum How to use checksums |
4008b5c54f0631e5069b2fc674cc014daa5fdb82d1a34f9cf9bf63bac584e835
|
| Upload date | |
|
Uploaded using Trusted Publishing? What is trusted publishing? |
Yes |
| Uploaded via |
twine/7.0.0 CPython/3.13.14
|
Provenance
Provenance describes where a file came from. On PyPI, provenance is shared via attestations, which provide a verifiable record of the build or publishing details. View details, limitations and caveats.


PyPI Publish Attestation
PyPI verified that this artifact, at this checksum, originated from the publisher listed below.
Signed by GitHub Actions, verified by PyPI on Oct 23, 2026.
Transparency logRelease files / datacube_ows-1.9.19-py3-none-any.whl
| Download URL | datacube_ows-1.9.19-py3-none-any.whl |
|---|---|
| Size | 217.3 kB |
| Tags | Python 3 |
|
SHA-256 checksum How to use checksums |
1f05fed43e80c7d4bd89beff0feeed5d4ba498fe7bf708243fb9859de1315d59
|
|
BLAKE2b-256 checksum How to use checksums |
cb47be8c99f44490283ae71d8488610f0c7790b4d704e4e7728a8db202249f63
|
| Upload date | |
|
Uploaded using Trusted Publishing? What is trusted publishing? |
Yes |
| Uploaded via |
twine/7.0.0 CPython/3.13.14
|
Provenance
Provenance describes where a file came from. On PyPI, provenance is shared via attestations, which provide a verifiable record of the build or publishing details. View details, limitations and caveats.
PyPI Publish Attestation
PyPI verified that this artifact, at this checksum, originated from the publisher listed below.
Signed by GitHub Actions, verified by PyPI on Oct 23, 2026.
Transparency logSecurity for datacube-ows 1.9.19
Provenance
Provenance describes where a file came from. On PyPI, provenance is shared via attestations, which provide a verifiable record of the build or publishing details. View details, limitations and caveats.
Full provenance
All 2 files in this release have been uploaded with provenance metadata.
Attestation for datacube_ows-1.9.19.tar.gz
PyPI Publish Attestation
PyPI verified that this artifact, at this checksum, originated from the publisher listed below.
Signed by GitHub Actions, verified by PyPI on Oct 23, 2026.
Transparency logA note on package security
PyPI is a repository for distributing packages, not a service for auditing them. While third-party security researchers and our staff do their best to detect and remove malicious packages, PyPI cannot guarantee the quality, security or suitability of any given package.
To learn more about protecting yourself from malicious actors, visit our package security documentation.














